Building a web service with Node.js in Visual Studio Part 1: foundations

Introduction

I’ll be honest with you right from the start: I don’t like JavaScript too much. I don’t like its loose types, the lack of OOP features – although you can mimic them to some extent -, that everything seems to be a function which can be passed around, etc., I could go on and on. Keep in mind that this is only my personal opinion, you are free to like JS and its derivatives, like Angular.js, jQuery, Prototype, Knockout and about a million more. Admittedly, the web would be very different without these client-side technologies so I don’t wish them dead.

Node.js, however, can be more appealing to someone who’s more into back-end development, like me. It still has a funny syntax and loose types and all that but it is used to build server-side code. It is a server-side platform to build fast, low level, asynchronous and highly scalable web-based applications. I won’t regurgitate its basic characteristics, you can read about it on Wikipedia. One thing to note is that we write JS code to build applications for the Node.js platform but Node itself was not written in JavaScript.

As a .NET developer you may think you’ll never need another platform if you can go with .NET. That’s until the project leader tells you that the new API will need to run on Linux instead of Windows. Even in that case you’ll have several options, such as Java, Python or Ruby, but JavaScript is something that most web programmers come across at some point so it doesn’t take a long time to get started with it even if you haven’t worked with Node.js before.

Also, it’s always fun to learn something new and broaden your knowledge. Having at least a basic knowledge of Node.js will definitely boost your skill set. I think it’s always beneficial for a developer to look around and see what’s available out there. It helps you get out of your comfort zone and you’ll be able to propose 2-3 different solutions as new questions arise with their pros and cons.

Goals of this course

In this course I’ll assume that you have no prior knowledge of Node.js.

We’ll look at the document-based MongoDb for data access. Node.js can access traditional relational databases as well but Node is often backed up by NoSql databases like MongoDb or RavenDb. Note that I have a MongoDb tutorial on this blog starting here. If you’re not familiar with MongoDb at all then I recommend that you skim through the first two parts of that series. We won’t completely leave all our .NET tools behind as we’ll build our demo application with Visual Studio.

Note: you can build web sites hosted on Node. There are templating engines available to set up your views like you do in an ASP.NET MVC application with Razor. In this course, as the title suggests, I’ll first and foremost concentrate on building an API, not a website. In other words we’ll be looking into pure back-end web service coding, i.e. the equivalent of the Web API in .NET. The web framework behind HTTP APIs hosted on Node is called Express.

Note 2: I’ll build the demo with Visual Studio 2013 Professional. The Node.js development tools are at the time of writing this post not available for the Express edition.

Installation on Windows

Navigate to the Node.js homepage and click the green Install button in the middle of the screen. At the time of writing this demo the current version of the platform is v0.10.32. Node is a mature product but is still under heavy development so by the time you read this post there will almost certainly be an updated version.

You’ll get an msi package from the website. Step through the installer and accept the default values. You might want to change the installation folder as you wish but I’ll go with the proposed c:\program files\nodejs folder. Let the installation run complete.

Node.js command line interface

You can enter the Node command line interface (CLI) in several ways:

  • Open the Nodejs installation folder and double-click the application file called “node”
  • Open a command prompt, navigate to the installation folder and type “node”
  • If you just want to be able to type “node” in the command prompt then you’ll need to add the path to the node application file to the environment variable Path. The Node.js installation process will actually add it to the Path System variable, see screenshot below.

Environmental variable NodeJs home

If you open a command prompt and type “node” and press enter then the command may not be recognised. There are two ways to solve that:

  • Run the command prompt as an Administrator – it will then be able to access the System level variables
  • Open the Environment variables window again and add the path to node to the user-level PATH variable, see screenshot below

Add environment variable to user level settings

The Node.js CLI is not very dramatic, you should only see a “greater-than” sign:

Nodejs CLI start

You can write JavaScript commands in this CLI to interact with Node. We won’t do that, however. The point of this exercise was to make sure that the command “node” is available everywhere.

Setting up Node.js in Visual Studio

There are Node.js tools available for Visual Studio that can be downloaded on the project homepage here but they won’t work with the Express edition of Visual Studio. Currently the project is in Beta. Click the purple “download” button which will get you an msi installer. Run through the installer accepting all the defaults. Open Visual Studio when the installer has run complete. Under “Other languages, JavaScript” you should see some new template specific to Node.js:

Node.js templates in Visual Studio

These are “normal” templates, like ASP.NET MVC4 or C# Console App, that will create a VS project for you with the expected files, like .sln.

Select the blank console app template. This will give you an app.js file with one row:

console.log('Hello world');

As you may have guessed this is the JS equivalent of Console.Write in this context. Console.out will print a message to the available output window. You are free to write JS code in app.js and press Start. As this is a normal VS project you’ll get intellisense, breakpoints, step-by-step execution with F11 etc. Let’s test the following code:

console.log('Hello world');
var intOne = 4;
var intTwo = 10;
var result = intOne + intTwo;
console.log("...and the result is: " + result);
console.log("Bye!");

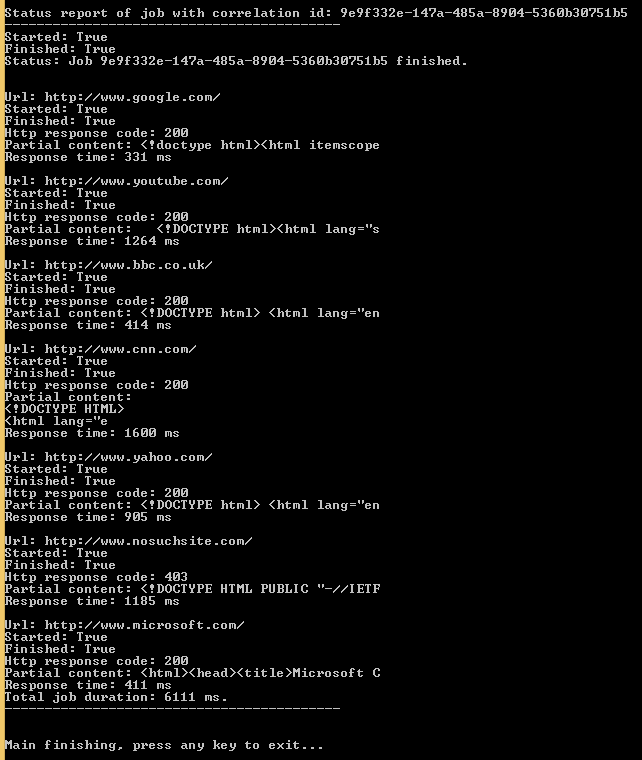
If you set a breakpoint at the last line and start the project with F5 then you should see an output similar to the following:

Hello world node js

You’ll see that it was in fact node.exe that hosted the console app.

There are two other files created by the template:

  • package.json: a metadata file holding some characteristics, like version and description, about the assembly in JSON format. We will look at this file in more detail in this series.
  • readme.md: a standard read-me file that you see in GitHub projects

You’ll also see a tool called “npm” which is short for Node Package Manager. Don’t worry about it yet, we’ll be using it during the course. For the time being it’s enough to say that it is very similar to the NuGet dependency manager in .NET projects and Maven in Java projects.

In the next part we’ll start looking into MongoDb.

View all posts related to Node here.

Lambda expressions in Java 8 part 2: extended syntax and the function package

Introduction

In the previous post in this short series we introduced the syntax of lambda expressions in Java 8. In this post we’ll look at a couple more facets of lambda expressions in Java: the ‘::’ operator and the new java.util.function package.

Syntactic sugar with ‘::’

There’s a new operator in Java 8: ‘::’, i.e. a double-colon. It’s used as a shortcut to write lambda expressions. Recall our Comparator implementation from the previous post:

Comparator<Employee> employeeAgeComparator = 
                (employeeOne, employeeTwo) -> Integer.compare(employeeOne.getAge(), employeeTwo.getAge());

That was an Employee comparison where the input parameters were of type Employee but we compared their ages which are of type Integer. Say that we first collect the age values into a separate integer list. We can then write a pure integer comparator in a very similar way:

Comparator<Integer> intComparator = (int1, int2) -> Integer.compare(int1, int2);

This can be rewritten as follows:

Comparator<Integer> intComparatorShort = Integer::compare;

This way of writing the lambda expression is called a method reference. We first write the object on which we want to invoke a method, i.e. “Integer”, followed by a double-colon, and finally we have the name of the method. The compiler will infer from the Comparator type that we want to compare two integers so we don’t need to write compare(int1, int2). We’ll see other examples of this later on but the difference between this syntax and the one we saw in the previous post is purely syntactic. There’s no performance gain or loss with either of them.

java.util.function

Java.util.function is a new package that provides a range of functional interfaces. If you work in an IDE which provides intellisense – such as NetBeans – then you can type “import java.util.function.” above a class declaration to see the list of interfaces within this package. You’ll see names such as…

BiConsumer<T, U>
Consumer<T>
LongSupplier

At first these interfaces probably look quite strange. They are out-of-the box functional interfaces that represent some frequently used methods so that they can be written as lambda expressions. Examples:

  • BiConsumer of T and U: represents a void method that accepts two arguments of types T and U
  • Consumer of T: same as BiConsumer but it accepts a single parameter only
  • IntSupplier: a method that returns an integer and accepts no arguments
  • BiPredicate of T and U: a function that returns a boolean and accepts two arguments
  • Function of T and R: a function that accepts an argument of type T and returns and object of type R

The input and output parameter types can be the same or different.

There are also specialised interfaces such as the UnaryOperator of T which extends Function of T and T. This means that UnaryOperator is a Function which returns an object of type T and returns an object of type T, i.e. both the input and output parameters are of the same type.

A simple example is System.out.println(String s). This is a void method that accepts a single argument of String, i.e. this fits the functional interface type of Consumer of String:

Consumer<String> systemPrint = s -> System.out.println(s);

We know from the above section that we can shorten this code to the following:

Consumer<String> systemPrint = System.out::println;

The Comparator of integers we saw above accepts two integers and returns another integer. This sounds like a BiFunction of int, int, int, i.e. a function that accepts 2 integers and returns another integer:

BiFunction<Integer, Integer, Integer> intComparatorFunctional = (t, t1) -> Integer.compare(t, t1);

…and as all types are the same we can use the shorthand notation:

BiFunction<Integer, Integer, Integer> intComparatorFunctional = Integer::compare;

We can further simplify this as there’s a specialised functional interface for the case of two integer inputs and one integer return value: IntBinaryOperator. The shortened version of the integer comparator looks like this:

IntBinaryOperator intComparatorAsBinaryOperator = Integer::compare;

So if you see that all parameters are of the same type then it’s worth checking what’s available in the java.util.function package because there might be a specialised interface. Choose the one that you think is most straightforward.

You can use these interfaces to pass around lambda expressions as input parameters. E.g. there’s a new method available for Collections, or objects that implement the Iterable interface to be exact: forEach, which accepts a Consumer of T. In other words you can iterate through the items in a collection and pass in a Consumer, i.e. a void method which accepts a single parameter to perform some action on each item in a collection in a single statement:

stringList.forEach(s -> System.out.println(s));

…or…:

stringList.forEach(System.out::println);

Other examples:

Add the items of a list to Employee objects to another list – we saw the Employee object in the previous post:

List<Employee> employees = new ArrayList<>();
        List<Employee> employeesCopy = new ArrayList<>();
        employees.add(new Employee(UUID.randomUUID(), "Elvis", 50));
        employees.add(new Employee(UUID.randomUUID(), "Marylin", 18));
        employees.add(new Employee(UUID.randomUUID(), "Freddie", 25));
        employees.add(new Employee(UUID.randomUUID(), "Mario", 43));
        employees.add(new Employee(UUID.randomUUID(), "John", 35));
        employees.add(new Employee(UUID.randomUUID(), "Julia", 55));        
        employees.add(new Employee(UUID.randomUUID(), "Lotta", 52));
        employees.add(new Employee(UUID.randomUUID(), "Eva", 42));
        employees.add(new Employee(UUID.randomUUID(), "Anna", 20));   
        
        Consumer<Employee> copyEmployees = employeesCopy::add;
        employees.forEach(copyEmployees);

employeesCopy will have the same objects as the employees list.

You can even chain Consumers with the “andThen” interface method:

Consumer<Employee> copyEmployees = employeesCopy::add;
Consumer<Employee> printEmployeeName = (Employee e) -> System.out.println(e.getName());
employees.forEach(copyEmployees.andThen(printEmployeeName));

View all posts related to Java here.

Lambda expressions in Java 8 part 1: basic syntax

Introduction

If you’re familiar with .NET then you already know what Lambda expressions are and how useful they can be. They were not available in Java before version 8. Let’s investigate how they can be applied in Java.

First example: an interface method with a single parameter

Say you have the following Employee class:

public class Employee
{
    private UUID id;
    private String name;
    private int age;

    public Employee(UUID id, String name, int age)
    {
        this.id = id;
        this.name = name;
        this.age = age;
    }
        
    public UUID getId()
    {
        return id;
    }

    public void setId(UUID id)
    {
        this.id = id;
    }

    public String getName()
    {
        return name;
    }

    public void setName(String name)
    {
        this.name = name;
    }    
    
    public int getAge()
    {
        return age;
    }

    public void setAge(int age)
    {
        this.age = age;
    }
}

You can judge whether or not an Employee is cool based on a number of factors. As the implementation of “coolness” can vary so let’s hide it behind an interface:

public interface EmployeeCoolnessJudger
{
    boolean isCool(Employee employee);
}

Here comes an anonymous implementation of the EmployeeCoolnessJudger interface based on the employee name. We simply say that everyone with the name “Elvis” is cool:

EmployeeCoolnessJudger nameBasedCoolnessJudger = new EmployeeCoolnessJudger()
{
            @Override
            public boolean isCool(Employee employee)
            {
                return employee.getName().equals("Elvis");
            }
};

In Java 8 this can be rewritten as follows:

EmployeeCoolnessJudger nameBasedCoolnessJudgerAsLambda = 
                (Employee employee) -> employee.getName().equals("Elvis");

If you know lambdas from .NET then this will look very familiar to you. We declare the input parameters within brackets to the isCool method. As the interface has only one method it’s not necessary to show its name anywhere, the compiler will “understand”. The parameter declaration is followed by a dash ‘-‘ and the greater-than sign, which is similar to ‘=>’ in .NET. Then we write what we want the function to return which will be a boolean. Note that we don’t need the return statement. Also, as the whole method implementation fits into a single line we didn’t need any curly braces.

The parameter type can in fact be omitted, which is again similar to .NET:

EmployeeCoolnessJudger nameBasedCoolnessJudgerAsLambda = 
                (employee) -> employee.getName().equals("Elvis");

…and if there’s only one parameter then the brackets can be omitted as well:

EmployeeCoolnessJudger nameBasedCoolnessJudgerAsLambda = 
                employee -> employee.getName().equals("Elvis");

How can we use this lambda implementation of EmployeeCoolnessJudger? You can pass it around like any other object. Say the Employee class has a function that accepts an EmployeeCoolnessJudger:

public boolean isCool(EmployeeCoolnessJudger coolnessJudger)
{
     return coolnessJudger.isCool(this);
}

Then you can construct an Employee object and pass the lambda expression name into the isCool method:

Employee coolEmployee = new Employee(UUID.randomUUID(), "Elvis", 50);
boolean isCool = coolEmployee.isCool(nameBasedCoolnessJudgerAsLambda);

…or you can pass the complete Lambda expression into the function…:

Employee coolEmployee = new Employee(UUID.randomUUID(), "Elvis", 50);
boolean isCool = coolEmployee.isCool(employee -> employee.getName().equals("Elvis"));

…which returns true as expected.

Second example: an interface with no parameters

The above example required a single parameter. How is the syntax affected if there are no parameters? Say that we want an employee to say something. Again, we can hide the implementation behind an interface:

public interface EmployeeSpeaker
{
    void speak();
}

We can implement an anonymous method of this to say “Hello World”:

EmployeeSpeaker helloWorldSpeaker = new EmployeeSpeaker()
{

            @Override
            public void speak()
            {
                System.out.println("I'm saying Hello World!");
            }
};

The anonymous helloWorldSpeaker implementation can be rewritten with a Lambda expression as follows:

EmployeeSpeaker helloWorldSpeaker = () ->  System.out.println("I'm saying Hello World!");

As the implementation doesn’t require any input parameters it’s enough to write empty brackets followed by dash and greater-than. If the method body spans more than one line of code we’ll need to put them within curly braces:

EmployeeSpeaker helloWorldSpeaker = () ->
        { 
            String sentence = "I'm saying Hello World!";
            System.out.println(sentence);        
        };

The usage is the same as above. The employee class can have a method that accepts an EmployeeSpeaker as input parameter:

public void saySomething(EmployeeSpeaker speaker)
    {
        speaker.speak();
    }

You can call it as follows:

coolEmployee.saySomething(helloWorldSpeaker);

…which will print “I’m saying Hello World!” to some console depending on the IDE you’re using.

Third example: an interface with 2 or more parameters

We want to compare the Employee objects based on their ages and sort them accordingly. One way to achieve this is to implement the generic Comparator interface. Say we have the following employees:

List<Employee> employees = new ArrayList<>();
        employees.add(new Employee(UUID.randomUUID(), "Elvis", 50));
        employees.add(new Employee(UUID.randomUUID(), "Marylin", 18));
        employees.add(new Employee(UUID.randomUUID(), "Freddie", 25));
        employees.add(new Employee(UUID.randomUUID(), "Mario", 43));
        employees.add(new Employee(UUID.randomUUID(), "John", 35));
        employees.add(new Employee(UUID.randomUUID(), "Julia", 55));        
        employees.add(new Employee(UUID.randomUUID(), "Lotta", 52));
        employees.add(new Employee(UUID.randomUUID(), "Eva", 42));
        employees.add(new Employee(UUID.randomUUID(), "Anna", 20));   

Here comes the anonymous class solution to implement Comparator of Employee:

Comparator<Employee> employeeAgeComparator = new Comparator<Employee>()
        {

            @Override
            public int compare(Employee employeeOne, Employee employeeTwo)
            {
                return Integer.compare(employeeOne.getAge(), employeeTwo.getAge());
            }
        };

…and here comes the lambda solution. Note that we have 2 input parameters:

Comparator<Employee> employeeAgeComparator = 
      (Employee employeeOne, Employee employeeTwo) -> Integer.compare(employeeOne.getAge(), employeeTwo.getAge());

…or without specifying the parameter types:

Comparator<Employee> employeeAgeComparator = 
                (employeeOne, employeeTwo) -> Integer.compare(employeeOne.getAge(), employeeTwo.getAge());

As we have more than one input parameters we cannot leave off the brackets.

We can use the custom comparator as follows:

Collections.sort(employees, employeeAgeComparator);
        
for (Employee employee : employees)
{
       System.out.println(employee.getName());
}

This prints out the names as follows:

Marylin
Anna
Freddie
John
Eva
Mario
Elvis
Lotta
Julia

Some things to note

Lambdas in Java also introduced a couple of new concepts::

  • The type definition of a Lambda expression is functional interface. Such an interface type can only have one abstract method.
  • You can use the @FunctionalInterface annotation to annotate functional interfaces if you prefer to be explicit about it, see example below
  • Lambda expressions can be used as variables and passed into other methods. We’ve seen examples of that above: nameBasedCoolnessJudgerAsLambda and employeeAgeComparator. As a consequence a Lambda expression can be returned by a method as well. E.g. nameBasedCoolnessJudger can be returned from a method whose return type is EmployeeCoolnessJudger
  • Creating Lambdas doesn’t involve as much overhead as creating an anonymous object with the “new” keyword so you can speed up the application by lambdas.

Here’s an example of the FunctionalInterface annotation:

@FunctionalInterface
public interface ISomeFunctionalInterface
{
    void doSomething(String param);
}

As soon as you try to add another abstract method to this interface you’ll get a compiler error:

@FunctionalInterface
public interface ISomeFunctionalInterface
{
    void doSomething(String param);
    int returnSomething();
}

…:

error: Unexpected @FunctionalInterface annotation
@FunctionalInterface
ISomeFunctionalInterface is not a functional interface
multiple non-overriding abstract methods found in interface ISomeFunctionalInterface

We’ll continue with terminal and intermediary operations in the next post.

View all posts related to Java here.

Create code at runtime with Reflection in .NET C#: Properties

In the previous post of this short series we saw how to add a field to our custom type using Reflection. In this finishing post we’ll look at properties and how to save our dynamic assembly.

Properties can be created in two ways. First we can use the PropertyBuilder class:

PropertyBuilder priceProperty = simpleType.DefineProperty("Price", PropertyAttributes.None, typeof(int), Type.EmptyTypes);

This will create a standard property called Price which returns an integer and has no input parameters. You’d write it like this in Visual Studio:

public int Price { get; set; }

For some reason the PropertyAttributes enumeration doesn’t let you refine the characteristics of the property as much as e.g. MethodAttributes or FieldAttributes do. In case you’d like to define the visibility of the property you need to turn to the MethodBuilder object and use it in a special way. The methods will perform the get/set methods separately. The following code example creates a get and set method:

MethodAttributes pricePropertyAttributes = MethodAttributes.Public | MethodAttributes.SpecialName | MethodAttributes.HideBySig;
MethodBuilder getPriceBuilder = simpleType.DefineMethod("get_Price", pricePropertyAttributes, typeof(int), Type.EmptyTypes);
MethodBuilder setPriceBuilder = simpleType.DefineMethod("set_Price", pricePropertyAttributes, null, new Type[] { typeof(int) });
priceProperty.SetGetMethod(getPriceBuilder);
priceProperty.SetSetMethod(setPriceBuilder);

The SpecialName and HideBySig values indicate that these methods are special and will not be part of the public interface. The name of the get/set methods must follow a convention: “get_XXX” and “set_XXX” where ‘XXX’ is the name of the property like get_Price.

The special methods can be associated with the property using the SetGetMethod and SetSetMethod methods of the PropertyBuilder object.

Once you’re done with your custom assembly then it can be persisted on disk using the Save method of AssemblyBuilder:

assemblyBuilder.Save(assemblyFileName);

View all posts on Reflection here.

Using a Windows service in your .NET project part 8: Windows Service body part 2

Introduction

In the previous post of this series we started adding some code to the Windows service. We also implemented a simplified logging system to be able to track what’s happening within the service. In this post we’ll start adding code to actually run the HTTP jobs inserted in MongoDb.

So open the demo application in VS and let’s start.

HttpJobRunner process

We established before that HttpJobRunner will need an IHttpJobService to retrieve the new jobs and an IHttpJobExecutionService to run them. Open HttpJobRunner.cs and add the following private fields:

private readonly IHttpJobService _httpJobService;
private readonly IHttpJobExecutionService _httpJobExecutionService;

Extend the constructor as follows:

public HttpJobRunner(ILoggingService loggingService, IHttpJobService httpJobService, IHttpJobExecutionService httpJoExecutionService)
{
	InitializeComponent();
	if (loggingService == null) throw new ArgumentNullException("LoggingService");
	if (httpJobService == null) throw new ArgumentNullException("HttpJobService");
	if (httpJobExecutionService == null) throw new ArgumentNullException("HttpJobExecutionService");
	_loggingService = loggingService;
	_httpJobService = httpJobService;
	_httpJobExecutionService = httpJobExecutionService;
	TaskScheduler.UnobservedTaskException += TaskScheduler_UnobservedTaskException;
}

Program.cs in Demo.HttpJobRunner will start complaining of course. Open that file and extend its body to the following:

static class Program
{
	static void Main()
	{
		ServiceBase[] ServicesToRun;
		IHttpJobService httpJobService = BuildHttpJobService();
		IHttpJobExecutionService httpJobExecutionService = BuildHttpJobExecutionService(httpJobService);
		ServicesToRun = new ServiceBase[] 
                { 
				
                   new HttpJobRunner(new FileBasedLoggingService(@"c:\logging\log.txt"), httpJobService, httpJobExecutionService)
                };
		ServiceBase.Run(ServicesToRun);
	}

	private static IHttpJobService BuildHttpJobService()
	{
		IConfigurationRepository configurationRepository = new ConfigFileConfigurationRepository();
		IDatabaseConnectionSettingsService dbConnectionSettingsService = new HttpJobDatabaseConnectionService(configurationRepository);
		IJobRepository jobRepository = new JobRepository(dbConnectionSettingsService);
		IHttpJobService httpJobService = new HttpJobService(jobRepository);
		return httpJobService;
	}

	private static IHttpJobExecutionService BuildHttpJobExecutionService(IHttpJobService httpJobService)
	{
		IHttpJobExecutionService httpJobExecutionService = new HttpJobExecutionService(httpJobService, new HttpJobUrlService(new HttpClientService()));
		return httpJobExecutionService;
	}
}

You’ll need to add a reference to all other projects in the solution from Demo.HttpJobRunner for this code to compile. We do nothing else but declare the concrete implementations of the abstractions in the entry point of the Windows service application.

HttpJobRunner has all the dependencies it needs now so we can continue. Well, almost. recall that we saved the connection string and the HttpJobs table name in app.config of the Console application. Check the files available for the Windows service project. There should be another app.config. When we deploy the Windows service then it will consult its own app.config, which is totally independent of the app.config of ConsoleConsumer. It won’t magically have access to the configuration file of the Console app. This means that we need to add the same settings to HttpJobRunner.app.config too. Copy the settings so that the Windows service app.config looks as follows:

<?xml version="1.0" encoding="utf-8" ?>
<configuration>
  <connectionStrings>
    <add name="HttpJobsConnectionString" connectionString="mongodb://localhost"/>
  </connectionStrings>
  <appSettings>
    <add key="HttpJobsDatabaseName" value="HttpJobsDatabase"/>
  </appSettings>
  <startup>
    <supportedRuntime version="v4.0" sku=".NETFramework,Version=v4.5" />
  </startup>
</configuration>

The plan for the job execution process in the service is the following:

  • Check the database for new jobs periodically
  • If new jobs are found then log them and start running them on a different thread
  • Log the result of the job

It’s important to start a new thread for each new job otherwise the job process will block all other code, including checking the database for new jobs. This way the service will be able to execute multiple jobs simultaneously.

We can instruct the Windows service to carry out a certain action using the Timer object in the System.Timers namespace. Add the following private field to the field list of HttpJobRunner:

private readonly Timer _jobCollectionTimer;

…and add the following code into the HttpJobRunner constructor to initialise the timer and attach an event listener to the Timer.Elapsed event:

_jobCollectionTimer = new Timer(10000);
_jobCollectionTimer.Elapsed += _jobCollectionTimer_Elapsed;

…where _jobCollectionTimer_Elapsed was generated by Visual Studio and looks like this by default:

void _jobCollectionTimer_Elapsed(object sender, ElapsedEventArgs e)
{
	throw new NotImplementedException();
}

This handler is called every 10 seconds, i.e. 10000 milliseconds we specified in the Timer’s constructor. Remove the “throw new…” bit from the handler body and add the “async” keyword in front of “void”:

async void _jobCollectionTimer_Elapsed(object sender, ElapsedEventArgs e)

We’ll have an awaitable asynchronous method call within the handler body hence the need for the async keyword.

We need to start the Timer as well. Add the following code…

_jobCollectionTimer.Start();

…to 3 overridden Windows service events:

  • OnStart
  • OnContinue
  • OnPause

Here’s the body of the _jobCollectionTimer_Elapsed handler:

async void _jobCollectionTimer_Elapsed(object sender, ElapsedEventArgs e)
{
	try
	{
		GetHttpJobsResponse getAllNewHttpJobsResponse = _httpJobService.GetNewHttpJobs();
		if (getAllNewHttpJobsResponse.OperationException != null) throw getAllNewHttpJobsResponse.OperationException;
		IEnumerable<HttpJob> newJobs = getAllNewHttpJobsResponse.HttpJobs;
		if (newJobs.Count() > 0)
		{
			LogNewJobs(newJobs);
			foreach (HttpJob httpJob in newJobs)
			{
				await Task.Factory.StartNew(async () => await RunSingleHttpJob(httpJob));
			}
		}
	}
	catch (Exception ex)
	{
		LogException(ex);
	}
}

…and here come the private helper methods:

private async Task RunSingleHttpJob(HttpJob httpJob)
{
	LogStartOfNewJob(httpJob);
	try
	{
		await _httpJobExecutionService.Execute(httpJob);
	}
	catch (Exception ex)
	{
		LogException(ex);
	}
	LogEndOfNewJob(httpJob);
}

private void LogStartOfNewJob(HttpJob newJob)
{
	StringBuilder sb = new StringBuilder();
	sb.Append("About to start job ").Append(newJob.CorrelationId);
	_loggingService.LogInfo(this, sb.ToString());
}

private void LogEndOfNewJob(HttpJob newJob)
{
	StringBuilder sb = new StringBuilder();
	sb.Append("Finished running job ").Append(newJob.CorrelationId);
	_loggingService.LogInfo(this, sb.ToString());
}

private void LogNewJobs(IEnumerable<HttpJob> newJobs)
{
	StringBuilder sb = new StringBuilder();
	sb.Append("Found the following new jobs: ");
	foreach (HttpJob httpJob in newJobs)
	{
		sb.Append(httpJob.CorrelationId).Append(", ");
	}
	_loggingService.LogInfo(this, sb.ToString());
}

private void LogException(Exception exception)
{
	StringBuilder sb = new StringBuilder();
	sb.Append("Exception caught in HttpJobRunner:")
		.Append(NL).Append("Exception message: ").Append(exception.Message)
		.Append(NL).Append("Exception stacktrace: ").Append(exception.StackTrace);
	_loggingService.LogError(this, sb.ToString(), exception);
}

As outlined in the expected work flow the HttpJobRunner will first extract the list of new jobs. If there are any new jobs then they are logged. Then each new job is started on its own thread. Within RunSingleHttpJob we first log the start of the job, instruct the execution service to execute the job and finally log the end of the process.

This should be all we need to have a simple but functioning system. Rebuild the solution, uninstall the service and install it again as we did before. Check the log file to make sure the service has “checked in”. Then run the Console app, enter a couple of URLs and wait for the status messages. In my case I got the following:

Service starting executing job

The same message appeared a couple of times, but then…

Job execution ongoing

Job execution near finish

…and finally…:

Job execution finished

So the job was successfully executed by the HttpJobRunner service. Let’s check the log:

22/09/2014 20:14:58: source: Demo.WindowsService.HttpJobRunner, level: INFO, message: Found the following new jobs: 9e9f332e-147a-485a-8904-5360b30751b5, , any exception: None
22/09/2014 20:14:58: source: Demo.WindowsService.HttpJobRunner, level: INFO, message: About to start job 9e9f332e-147a-485a-8904-5360b30751b5, any exception: None
22/09/2014 20:15:04: source: Demo.WindowsService.HttpJobRunner, level: INFO, message: Finished running job 9e9f332e-147a-485a-8904-5360b30751b5, any exception: None

…which looks fine too.

We’re done, this concludes the series on a possible use of a Windows service in a .NET project. Windows services can be used for other things such as hosting another service, such as WCF, but I wanted to concentrate on their function to execute periodic and/or long running processes.

View the list of posts on Architecture and Patterns here.

Create code at runtime with Reflection in .NET C#: Fields

In the previous post of this short series we saw how to create a method using Reflection.

We can also create fields in our custom type. Here’s how to create a standard private field:

FieldBuilder fieldBuilder = simpleType.DefineField("_price", typeof(int), FieldAttributes.Private);

You can use the FieldAttributes enumeration to modify the properties of the field. E.g. here’s how to declare the field public and readonly – which is not a very clever combination, but there you have it:

FieldBuilder fieldBuilder = simpleType.DefineField("_price", typeof(int), FieldAttributes.InitOnly | FieldAttributes.Public);

View all posts on Reflection here.

Create code at runtime with Reflection in .NET C#: Methods

The previous post in this miniseries got us as far as defining a default and an overloaded constructor for our custom type:

ConstructorBuilder defaultConstructorBuilder = simpleType.DefineDefaultConstructor(MethodAttributes.Public);
ConstructorBuilder constructorBuilder = simpleType.DefineConstructor(MethodAttributes.Public, CallingConventions.Standard, new Type[] { typeof(string) });

We can add methods to the type in the following ways. Here’s how to create a void method called Calculate which accepts two integers as parameters:

MethodBuilder calculateFunctionBuilder = simpleType.DefineMethod("Calculate", MethodAttributes.Public, null, new Type[] { typeof(int), typeof(int) });

Note the ‘null’ parameter which defines that there’s no return type. Consequently here’s how to add a return type of int:

MethodBuilder calculateFunctionBuilder = simpleType.DefineMethod("Calculate", MethodAttributes.Public, typeof(int), new Type[] { typeof(int), typeof(int) });

If there are no parameters to the method then leave the last item as null:

MethodBuilder calculateFunctionBuilder = simpleType.DefineMethod("Calculate", MethodAttributes.Public, typeof(int), null);

…and here’s how to define a static method:

MethodBuilder calculateFunctionBuilder = simpleType.DefineMethod("Calculate", MethodAttributes.Public | MethodAttributes.Static, typeof(int), null);

We’ll of course need a method body as well and just like we saw in the case of constructors this operation can be quite complex. Check the post on creating constructors programmatically for my notes and links regarding the .NET intermediate language instructions, the ILGenerator and OpCodes objects for further information.

View all posts on Reflection here.

Using a Windows service in your .NET project part 7: Windows Service body part 1

Introduction

In the previous post we saw how to install and uninstall the Windows service of our demo project. Currently the service doesn’t do anything as there’s no method implementation anywhere but it’s good that we can safely install and uninstall it.

Let’s review what this service should be able to do and what dependencies it will need:

  • It should periodically check the MongoDb database for new Http jobs. We have a service method for this in IHttpJobService
  • It should then execute those jobs using an IHttpJobExecutionService
  • Log the actions using an interface and implementation we haven’t seen yet

I need to stress the importance of logging in a Windows service. First of all it’s vital to log at least some activity in any real business application so that you can trace what your users are doing and find the source of exceptions. It’s even more important to have logging in place for an application with no user interface such as a Windows service. A Windows service cannot even send messages to a command prompt for you to see during testing. If you have no logging in place then you’ll be wondering what is going on if the service doesn’t perform its job.

We won’t build a full-blown logging system here, just a simplified file-based one. You can read more about logging in two blog posts: an introduction and a concrete example with log4net.

Logging

Let’s get this done first. We’ll reuse the logging interface from the logging intro referred to above. Open the Demo.Infrastructure project and add a new folder called Logging. Insert the following interface:

public interface ILoggingService
{
	void LogInfo(object logSource, string message, Exception exception = null);
	void LogWarning(object logSource, string message, Exception exception = null);
	void LogError(object logSource, string message, Exception exception = null);
	void LogFatal(object logSource, string message, Exception exception = null);
}

We’ll implement a home-made file-based logging service. Insert the following class to the Logging folder:

public class FileBasedLoggingService : ILoggingService
{
	private readonly string _logFileFullPath;

	public FileBasedLoggingService(string logFileFullPath)
	{
		if (string.IsNullOrEmpty(logFileFullPath)) throw new ArgumentException("Log file full path");
		FileInfo logFileInfo = new FileInfo(logFileFullPath);
		if (!logFileInfo.Exists) throw new ArgumentNullException("Log file does not exist");
		_logFileFullPath = logFileFullPath;
	}

	public void LogInfo(object logSource, string message, Exception exception = null)
	{
		AppendMessage(logSource, message, "INFO", exception);
	}

	public void LogWarning(object logSource, string message, Exception exception = null)
	{
		AppendMessage(logSource, message, "WARNING", exception);
	}

	public void LogError(object logSource, string message, Exception exception = null)
	{
		AppendMessage(logSource, message, "ERROR", exception);
	}

	public void LogFatal(object logSource, string message, Exception exception = null)
	{
		AppendMessage(logSource, message, "FATAL", exception);
	}

	private void AppendMessage(object source, string message, string level, Exception exception)
	{
		try
		{
			File.AppendAllText(_logFileFullPath, FormatMessage(source, message, level, exception));
		}
		catch { }
	}

	private string FormatMessage(object source, string message, string level, Exception exception)
	{
		return string.Concat(Environment.NewLine, DateTime.UtcNow.ToString(), ": source: ", source.ToString(), ", level: ", level, ", message: ", message, ", any exception: ", (exception == null ? "None" : exception.Message) );
	}
}

In a real application you’d use a professional tool to log to a file but that would unnecessarily sidetrack us now. Also, we could take the level of abstraction even further. Note that FileBasedLoggingService directly uses objects like File and FileInfo which make it difficult to test the methods in this class. A more complete solution would require us to separate out the concrete file-based operations to an abstraction. We’ll leave the implementation as it is for now. You can clean up this code if you’d like to as a homework. You can take a look at this post where I go through how to factor out file-related operations. It ties in well with what I’ve written in this paragraph.

Create a text file like “log.txt” somewhere on your hard drive and take note of its full path. Make sure that the file is editable by the service. For demo purposes you can give full access to Everyone so that we don’t need to trace any logging-related exceptions:

Set log file access to Everyone

Note how we simply ignore any exceptions thrown within AppendMessage. This is called fire-and-forget. This strategy can be acceptable in logging as we don’t want the application to stop just because e.g. the log file is inaccessible. In a testing phase you can catch the exception and log it somewhere else, such as the event log, in case you don’t see the logging messages in the target file, here’s an example:

private void AppendMessage(object source, string message, string level, Exception exception)
{
	try
	{
		File.AppendAllText(_logFileFullPath, FormatMessage(source, message, level, exception));
	}
	catch (Exception ex)
	{
		string s = "HttpJobRunner";
		string log = "Application";
		if (!EventLog.SourceExists(s))
		{
			EventLog.CreateEventSource(s, log);
		}
		EventLog.WriteEntry(s, "Exception in HttpJobRunner logging: " + ex.Message, EventLogEntryType.Error, 1234);
	}
}

Let’s add this as a dependency to HttpJobRunner. At present HttpJobRunner- the partial class that inherits from ServiceBase – is quite empty with a constructor that calls upon InitializeComponent and two empty overridden methods.

Change the implementation as follows:

public partial class HttpJobRunner : ServiceBase
{
	private readonly ILoggingService _loggingService;

	public HttpJobRunner(ILoggingService loggingService)
	{
		InitializeComponent();
		if (loggingService == null) throw new ArgumentNullException("LoggingService");
		_loggingService = loggingService;
	}

	protected override void OnStart(string[] args)
	{
		_loggingService.LogInfo(this, "HttpJobRunner starting up");
	}

	protected override void OnStop()
	{
		_loggingService.LogInfo(this, "HttpJobRunner stopping");
	}
}

You’ll need to add a project reference to the Infrastructure layer for this to compile. We let an ILoggingService be injected to HttpJobRunner through its constructor. Then we simply take note of the Windows service starting up and shutting down in the log file. Build the project and you should get an exception from Program.cs in the Windows service layer: HttpJobRunner doesn’t have an empty constructor. Change the implementation as follows:

static void Main()
{
	ServiceBase[] ServicesToRun;
	ServicesToRun = new ServiceBase[] 
        { 
             new HttpJobRunner(new FileBasedLoggingService(@"c:\logging\log.txt"))
       };
	ServiceBase.Run(ServicesToRun);
}

Make sure you insert the full path of the log file that you created before in the FileBasedLoggingService constructor.

Let’s see if this works. Rebuild the project and re-install the Windows service following the steps outlined in the previous part. Check the contents of the log file, there should be one entry similar to the following:

20/09/2014 20:07:25: source: Demo.WindowsService.HttpJobRunner, level: INFO, message: HttpJobRunner starting up, any exception: None

You can stop and/or restart the service in the Services window:

Stop and restart a service

The log messages should be added to the log file accordingly, e.g.:

20/09/2014 21:00:42: source: Demo.WindowsService.HttpJobRunner, level: INFO, message: HttpJobRunner starting up, any exception: None
20/09/2014 21:01:02: source: Demo.WindowsService.HttpJobRunner, level: INFO, message: HttpJobRunner shutting down, any exception: None
20/09/2014 21:01:03: source: Demo.WindowsService.HttpJobRunner, level: INFO, message: HttpJobRunner starting up, any exception: None

Great, we have some logging in place.

Restarting a Windows service can have negative consequences in your application. If the service is carrying out a job without saving its current state somewhere then restarting the service will in effect kill the job. So at a minimum we want to know any time the service status has changed. Add the following overrides to HttpJobRunner:

protected override void OnShutdown()
{
	_loggingService.LogInfo(this, "HttpJobRunner shutting down");
}

protected override void OnContinue()
{
	_loggingService.LogInfo(this, "HttpJobRunner continuing");
}

protected override void OnPause()
{
	_loggingService.LogInfo(this, "HttpJobRunner pausing");
}	

This doesn’t of course solve the problem of interrupted jobs but at least we know that something noteworthy has happened which can be the cause of a failed job. It is your responsibility to make your service “clever” enough to pick up an interrupted job when it’s restarted. In our example the service could check all jobs that have been started but not yet finished and start from there – or simply restart the job from the beginning. However, that’s beyond the scope of this series, but it’s still good to know about this issue.

Before we finish this post let’s add one more method to HttpJobRunner. The goal is that the service is never restarted due to an unhandled exception. If there’s an uncaught exception somewhere during the code execution the the service will fail and act according to the failure policy, such as “Restart the service” in our case. However, as noted above service restarts can be detrimental. It’s not always possible to catch all exceptions in a large code base even if you put try-catch clauses everywhere.

There’s a solution to catch all uncaught exceptions in a Windows service though. I mentioned it already in this short post on threading. We’ll reuse much of it here.

Within the HttpJobRunner constructore start typing…

TaskScheduler.UnobservedTaskException +=

…and press Tab twice. This will add a default handler that’s called whenever an uncaught exception bubbles up:

void TaskScheduler_UnobservedTaskException(object sender, UnobservedTaskExceptionEventArgs e)
{
	throw new NotImplementedException();
}

Insert the following implementation:

void TaskScheduler_UnobservedTaskException(object sender, UnobservedTaskExceptionEventArgs e)
{
	e.SetObserved();
	AggregateException aggregateException = (e.Exception as AggregateException).Flatten();
	aggregateException.Handle(ex =>
	{				
		return true;
	});
	List<Exception> inners = aggregateException.InnerExceptions.ToList();
	StringBuilder sb = new StringBuilder();
	sb.Append("Unhandled exception caught in HttpJobRunner by the generic catch-all handler.")
				.Append(NL);
	if (inners != null && inners.Count > 0)
	{
		foreach (Exception inner in inners)
		{
			sb.Append("Exception: ").Append(inner.Message).Append(NL).Append("Stacktrace: ").Append(NL)
				.Append(inner.StackTrace).Append(NL);
			if (inner.InnerException != null)
			{
				Exception innerInner = inner.InnerException;
				sb.Append("Inner exception has also an inner exception. Message: ")
					.Append(innerInner.Message).Append(". ").Append(NL)
					.Append("Stacktrace: ").Append(innerInner.StackTrace);
							
			}
			sb.Append(NL).Append(NL);
		}
	}
	else
	{
		sb.Append("No inner exceptions.").Append(NL);
		sb.Append("Plain message: ").Append(aggregateException.Message).Append(NL);
		sb.Append("Stacktrace: ").Append(aggregateException.StackTrace).Append(NL);
	}

	_loggingService.LogFatal(this, sb.ToString());
}

…where “NL” refers to a private variable to shorten Environment.NewLine:

private readonly string NL = Environment.NewLine;

This is enough for now. We’ll continue with the service implementation in the next post.

View the list of posts on Architecture and Patterns here.

Create code at runtime with Reflection in .NET C#: Constructor

The previous post in this miniseries got us as far as defining a type using the TypeBuilder object:

TypeBuilder simpleType = moduleBuilder.DefineType("PluginSimpleType", TypeAttributes.Class | TypeAttributes.Public);
TypeBuilder extendedType = moduleBuilder.DefineType("PluginExtendedType", TypeAttributes.Class | TypeAttributes.Public, typeof(Customer), new Type[] {typeof(IEqualityComparer), typeof(IEquatable<int>) });

The TypeBuilder object is the entry point to creating the members of the Type such as constructors and methods. Here’s how you can create a public constructor with a string parameter:

ConstructorBuilder constructorBuilder = simpleType.DefineConstructor(MethodAttributes.Public, CallingConventions.Standard, new Type[] { typeof(string) });

If there’s no constructor for the Type then a default parameterless constructor is automatically created for you. If you declare an overloaded constructor like above then there will be no default constructor – this should be familiar to you from everyday OOP in .NET and Java. If you’d like to have a default empty constructor like this…

public Customer()
{
}

…besides the overloaded constructor then you can call the DefineDefaultConstructor method:

ConstructorBuilder defaultConstructorBuilder = simpleType.DefineDefaultConstructor(MethodAttributes.Public);

Otherwise if you’d like to have a parameterless constructor which has a body, i.e. does more than call the default constructor of the base class then you need to use the DefineConstructor method again:

ConstructorBuilder constructorBuilder = simpleType.DefineConstructor(MethodAttributes.Public, CallingConventions.Standard, null);

Note the ‘null’ to denote 0 parameters.

This is not the end of the story. We need to attach a method body to the constructors(s) defined by the DefineConstructor method. We can leave the parameterless default constructor as it is, we don’t need any method body implementation for it.

This is where creating assemblies in code can become quite challenging.

Creating your method body requires intimate knowledge of the Microsoft Intermediate Language instructions that all .NET languages are translated into when compiled. I won’t even pretend that I know much about these instructions. The ILGenerator object can somewhat help you out so that you don’t need to write the actual byte code.

The OpCodes class stores more than 1000 instructions such as Ret for return, Call to call another method or Neg for negating a value.

You can get the ILGenerator object from the builder and call its Emit method to emit IL instructions. This is how you’d add a return statement:

ILGenerator msilGenerator = constructorBuilder.GetILGenerator();
msilGenerator.Emit(OpCodes.Ret);

More information about dynamic methods is available on MSDN here and here.

View all posts on Reflection here.

Using a Windows service in your .NET project part 6: Windows Service installation

Introduction

In the previous post we went through the basics of a Windows Service. We saw how to set its properties in code. In this post we’ll see how the service can be installed.

Installation

There are at least three ways to install a Windows Service:

  • Manually calling the InstallUtil tool which is usually located at C:\Windows\Microsoft.NET\Framework64\v4.0.30319 or C:\Windows\Microsoft.NET\Framework\v4.0.30319
  • Call upon InstallUtil in a .bat file
  • Use the InstallShield limited edition project type in Visual Studio and add the components of the installation package

The first option is a bit cumbersome I think. You have to type in the uninstall and install commands to InstallUtil in a command prompt and provide the necessary command parameters. The third option, as far as I can remember, is not by default suitable for installing Windows services. The InstallShield wizard is meant to install “normal” desktop applications, like games. The last time I used the InstallShield project type I had to add a plugin from WiX in order to make it work with Windows services and it wasn’t fun.

We’ll instead go with the second option. There’s a definitive advantage with option 2 compared to the other ones. In a more advanced “enterprise” scenario you’ll likely store your code in some repository like SVN or GitHub. Then the code will be exported to a Continuous Deployment or Continuous Integration tool such as Jenkins or TeamCity. These tools can run the installation script to automatically install the Windows service as part of the automated deployment process.

The installation scripts

The scripts are very simple. We’ll have one for uninstalling a service and one for installing it. Some of the process will be manual but it can be automated with batch files in an automatic deployment scenario. When we install the Windows service we have to make sure that any existing service of the same name is uninstalled otherwise we’ll get an exception hence the need for an uninstaller.

I’m not aware of a batch file item type in Visual Studio so open Notepad. Add the following content to it:

@ECHO OFF

echo Installing HttpJobRunner service…
echo ———————————————–
C:\Windows\Microsoft.NET\Framework\v4.0.30319\InstallUtil /i “C:\Program Files (x86)\WindowsServiceDemo\Demo.WindowsService.exe”
C:\Windows\System32\sc.exe failure “HttpJobRunner” reset= 0 actions= restart/1000
echo ———————————————–
echo Done.
pause

We call InstallUtil, instruct it to install a service with the ‘i’ flag. The install command refers to a folder we haven’t set up yet but will do it soon. Then, as hinted at in the previous post we’ll add an extra call to set the failure mode to restart the service. Be exact with the arguments, including the whitespaces: “reset= 0” and not “reset = 0” or “reset =0”. In my experience putting the space in the wrong position will result in a failure. We then call “pause” to leave the command prompt open so that we can read the outcome. You can later remove that command so that the window closes itself automatically.

We’ll save the file in the same directory where Demo.HttpJobRunner resides. If you’re not sure where it is then right click the Windows service project in the solution explorer and click Open Folder in File Explorer. That is the folder where we’ll save the file we wrote in Notepad. Save the file as “_installer.bat”.

The file first won’t be visible in Solution explorer. Click the “Show all files” and “Refresh” buttons, it should appear:

Installer file shown in Visual Studio

Right-click the file and select “Include in project”. Locate the properties window to set the “Copy to Output Directory” option to Copy always:

Select Copy Always option for installer files

We do this so that the _installer.bat file is also copied to the deploy folder.

Let’s create another file in Notepad with the following content:

@ECHO OFF

echo Uninstalling HttpJobRunner service…
echo ———————————————–
C:\Windows\Microsoft.NET\Framework\v4.0.30319\InstallUtil /u “C:\Program Files (x86)\WindowsServiceDemo\Demo.WindowsService.exe”
echo ———————————————–
echo Done.
pause

As expected this will uninstall the service. Save the file as “_uninstall.bat” and add it to the project the same way as we did with _installer.bat. At the end you should have both files listed in Visual Studio:

All installer files present in Visual Studio solution explorer

Next let’s set up the deployment folder. Normally all applications are installed in the Program Files or Program Files (x86) folder. Let’s follow that convention. Create a folder called WindowsServiceDemo within Program Files (x86) or Program Files. Within that new folder add another folder called Deploy. In Visual Studio set the Build path to this Deploy folder for Demo.HttpJobRunner:

Set build output to new installation folder

Note that the _installer.bat and _uninstaller.bat files refer to Program Files (x86) but if you opted for Program Files then make sure to update the installer files accordingly.

We should be good to go. Right-click the Demo.HttpJobRunner project and select Rebuild. The Deploy folder should be populated:

First build package loaded to new installation path

Copy all files except for _installer.bat and _uninstaller.bat one level up, i.e. under “WindowsServiceDemo”. Then return to Deploy and run _installer.bat as an Administrator. View the notices on the Command prompt. It might tell you that the OnCommitted event has failed but the exception message is misleading I think: you haven’t specified a process file name or something similar. I’ve seen it before, I’m not 100% sure why it happens but I’m pretty certain that it’s because the Process object has not enough rights to run the “sc” command. It’s OK, the installer script will take care of that. In case you don’t see any exceptions from the OnCommitted phase in the output then you can remove the extra call to “sc” in the _installer.bat file. Otherwise just keep it and remove the SetRecoveryOptions method from HttpJobRunnerInstaller if you wish.

OK, let’s see if the service is up and running. It should figure in the list of services and should be running:

HttpJobRunner installed as Windows service

Check its properties. They should be set according to what we provided in code. Check especially the failure mode:

Failure mode for HttoJobRunner

Let’s now test the uninstaller. Go back to the Deploy folder and run _uninstaller.bat as an administrator. After some seconds and output to the console the uninstall process should succeed. Refresh the services list and HttpJobRunner should be gone:

HttpJobRunner uninstalled as Windows service

The service doesn’t do anything yet when installed because we left HttpJobRunner.cs untouched.

The installation process at present is a bit manual but can be automated with new batch files. Assuming that the service is up and running these are the steps to install a new service:

  • Build the project in Visual Studio – this will put the HttpJobRunner deploy package to the Deploy folder including _installer and _uninstaller.bat
  • Run _uninstaller.bat
  • Copy the deploy files to the WindowsServiceDemo folder except for the installation files
  • Run _installer.bat

In the next post we’ll start adding some action to the Windows Service.

View the list of posts on Architecture and Patterns here.