Building a web service with Node.js in Visual Studio Part 11: PUT and DELETE operations
December 8, 2014 Leave a comment
Introduction
In the previous post we tested the GET operations in our demo web service through the C# console tester application. In this post we’ll look at two other HTTP verbs in action. We’ll insert and test a PUT endpoint to update a customer. In particular we’ll add new orders to an existing customer. In addition we’ll remove a customer through a DELETE endpoint. This post will also finish up the series on Node.js.
We’ll extend the CustomerOrdersApi demo application so have it ready in Visual Studio.
Updating a customer
Let’s start with the repository and work our way up to the controller. Add the following method to customerRepository.js:
module.exports.addOrders = function (customerId, newOrders, next) {
    databaseAccess.getDbHandle(function (err, db) {
        if (err) {
            next(err, null);
        }
        else {
            var collection = db.collection("customers");
            var mongoDb = require('mongodb');
            var BSON = mongoDb.BSONPure;
            var objectId = new BSON.ObjectID(customerId);
            collection.find({ '_id': objectId }).count(function (err, count) {
                if (count == 0) {
                    err = "No matching customer";
                    next(err, null);
                }
                else {
                    collection.update({ '_id': objectId }, { $addToSet: { orders: { $each: newOrders } } }, function (err, result) {
                        if (err) {
                            next(err, null);
                        }
                        else {
                            next(null, result);
                        }
                    });
                }
            });
        }
    });
};
Most of this code should look familiar from the previous posts on this topic. We check whether a customer with the incoming customer ID exists. If not then we return an exception in the “next” callback. Otherwise we update the customer. The newOrders parameter will hold the orders to be added in an array. The update statement may look strange at first but the MongoDb addToSet operator coupled with the “each” operator enables us to push all elements in an array into an existing one. If we simply use the push operator then it will add the newOrders array into the orders array of the customer, i.e. we’ll end up with an array within an array which is not what we want. The each operator will go through the elements in newOrders and add them into the orders array. If the update function goes well then MongoDb will return the number of elements updated which will be assigned to the “result” parameter. We’re expecting it to be 1 as there’s only one customer with a given ID.
Let’s extend customerService.js:
module.exports.addOrders = function (customerId, orderItems, next) {
    if (!customerId) {
        var err = "Missing customer id property";
        next(err, null);
    }
    else {
        customerRepository.addOrders(customerId, orderItems, function (err, res) {
            if (err) {
                next(err, null);
            }
            else {
                next(null, res);
            }
        });
    }
};
Here comes the new function in index.js within the services folder:
module.exports.addOrders = function (customerId, orderItems, next) {
    customerService.addOrders(customerId, orderItems, function (err, res) {
        if (err) {
            next(err, null);
        }
        else {
            next(null, res);
        }
    });
};
…and finally we can build the PUT endpoint in customersController.js:
app.put("/customers", function (req, res) {
        var orders = req.body.orders;
        var customerId = req.body.customerId;
        customerService.addOrders(customerId, orders, function (err, itemCount) {
            if (err) {
                res.status(400).send(err);
            }
            else {
                res.set('Content-Type', 'text/plain');
                res.status(200).send(itemCount.toString());
            }
        });
    });
We read the “orders” and “customerId” parameters from the request body like when we inserted a new customer. We return HTTP 200, i.e. “OK” in case the operation was successful. We also respond with the number of updated items in a plain text format.
Let’s test this from our little tester console application. Add the following method to ApiTesterService.cs:
public int TestUpdateFunction(String customerId, List<Order> newOrders)
{
	HttpRequestMessage putRequest = new HttpRequestMessage(HttpMethod.Put, new Uri("http://localhost:1337/customers/"));
	putRequest.Headers.ExpectContinue = false;
	AddOrdersToCustomerRequest req = new AddOrdersToCustomerRequest() { CustomerId = customerId, NewOrders = newOrders };
	string jsonBody = JsonConvert.SerializeObject(req);
	putRequest.Content = new StringContent(jsonBody, Encoding.UTF8, "application/json");
	HttpClient httpClient = new HttpClient();
	httpClient.Timeout = new TimeSpan(0, 10, 0);
	Task<HttpResponseMessage> httpRequest = httpClient.SendAsync(putRequest,
			HttpCompletionOption.ResponseContentRead, CancellationToken.None);
	HttpResponseMessage httpResponse = httpRequest.Result;
	HttpStatusCode statusCode = httpResponse.StatusCode;

	HttpContent responseContent = httpResponse.Content;
	if (responseContent != null)
	{
		Task<String> stringContentsTask = responseContent.ReadAsStringAsync();
		String stringContents = stringContentsTask.Result;
		if (statusCode == HttpStatusCode.OK)
		{
			return Convert.ToInt32(stringContents);
		}
		else
		{
			throw new Exception(string.Format("No customer updated: {0}", stringContents));
		}
	}
	throw new Exception("No customer updated");
}
…where AddOrdersToCustomerRequest looks as follows:
public class AddOrdersToCustomerRequest
{
	[JsonProperty(PropertyName="customerId")]
	public String CustomerId { get; set; }
	[JsonProperty(PropertyName="orders")]
	public List<Order> NewOrders { get; set; }
}
We set the JSON property names according to the expected values we set in the controller. We send the JSON payload to the PUT endpoint and convert the response into an integer. We can call this method from Program.cs as follows:
private static void TestCustomerUpdate()
{
	Console.WriteLine("Testing item update.");
	Console.WriteLine("=================================");
	try
	{
		ApiTesterService service = new ApiTesterService();
		List<Customer> allCustomers = service.GetAllCustomers();
		Customer customer = SelectRandom(allCustomers);
		List<Order> newOrders = new List<Order>()
		{
			new Order(){Item = "Food", Price = 2, Quantity = 3}
			, new Order(){Item = "Drink", Price = 3, Quantity = 4}
			, new Order(){Item = "Taxi", Price = 10, Quantity = 1}
		};
		int updatedItemsCount = service.TestUpdateFunction(customer.Id, newOrders);
		Console.WriteLine("Updated customer {0} ", customer.Name);
		Console.WriteLine("Updated items count: {0}", updatedItemsCount);
	}
	catch (Exception ex)
	{
		Console.WriteLine("Exception caught while testing PUT: {0}", ex.Message);
	}
	Console.WriteLine("=================================");
	Console.WriteLine("End of PUT operation test.");
}
We first extract all customers, then select one at random using the SelectRandom method we saw in the previous post. We then build an arbitrary orders list and call the TestUpdateFunction of the service. If all goes well then we print the name of the updated customer and the number of updated items which we expect to be 1. Otherwise we print the exception message. Call this method from Main:
static void Main(string[] args)
{
	TestCustomerUpdate();

	Console.WriteLine("Main done...");
	Console.ReadKey();
}
Start the application with F5. As the Node.js project is set as the startup project you’ll see it start in a browser as before. Do the following to start the tester console app:
- Right-click it in Solution Explorer
- Select Debug
- Select Start new instance
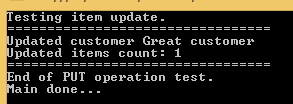
You should see output similar to the following:
If you then navigate to /customers in the appropriate browser window then you should see the new order items. In my case the JSON output looks as follows:
[{"_id":"544cb61fda8014d9145c85e6","name":"Great customer","orders":[{"item":"Food","quantity":3,"itemPrice":2},{"item":"Drink","quantity":4,"itemPrice":3},{"item":"Taxi","quantity":1,"itemPrice":10}]},{"_id":"546b56f1b8fd6abc122cc8ff","name":"hello","orders":[]}]
This was one application of PUT. You can use the same endpoint to update other parts of your domain, e.g. the customer name.
Deleting a customer
We’ll create a DELETE endpoint to remove a customer. We cannot attach a request body to a DELETE request so we’ll instead send the ID of the customer to be deleted in the URL. We saw an example of that when we retrieved a single customer based on the ID.
Here’s the remove function in customerRepository.js:
module.exports.remove = function (customerId, next) {
    databaseAccess.getDbHandle(function (err, db) {
        if (err) {
            next(err, null);
        }
        else {
            var collection = db.collection("customers");
            var mongoDb = require('mongodb');
            var BSON = mongoDb.BSONPure;
            var objectId = new BSON.ObjectID(customerId);
            collection.remove({ '_id': objectId }, function (err, result) {
                if (err) {
                    next(err, null);
                }
                else {
                    next(null, result);
                }
            });
        }
    });
};
Like in the case of UPDATE, MongoDb will return the number of deleted elements in the “result” parameter. Let’s extend customerService.js:
module.exports.deleteCustomer = function (customerId, next) {
    if (!customerId) {
        var err = "Missing customer id property";
        next(err, null);
    }
    else {
        customerRepository.remove(customerId, function (err, res) {
            if (err) {
                next(err, null);
            }
            else {
                next(null, res);
            }
        });
    }
};
…and index.js in the services folder:
module.exports.deleteCustomer = function (customerId, next) {
    customerService.deleteCustomer(customerId, function (err, res) {
        if (err) {
            next(err, null);
        }
        else {
            next(null, res);
        }
    });
};
Finally let’s add the DELETE endpoint to customersController:
app.delete("/customers/:id", function (req, res) {
        var customerId = req.params.id;
        customerService.deleteCustomer(customerId, function (err, itemCount) {
            if (err) {
                res.status(400).send(err);
            }
            else {
                res.set('Content-Type', 'text/plain');
                res.status(200).send(itemCount.toString());
            }
        });
    });
Like above, we return HTTP 200 and the number of deleted items if the operation has gone well.
Back in the tester app let’s add the following test method to ApiTesterService:
public int TestDeleteFunction(string customerId)
{
	HttpRequestMessage getRequest = new HttpRequestMessage(HttpMethod.Delete, new Uri("http://localhost:1337/customers/" + customerId));
	getRequest.Headers.ExpectContinue = false;
	HttpClient httpClient = new HttpClient();
	httpClient.Timeout = new TimeSpan(0, 10, 0);
	Task<HttpResponseMessage> httpRequest = httpClient.SendAsync(getRequest,
			HttpCompletionOption.ResponseContentRead, CancellationToken.None);
	HttpResponseMessage httpResponse = httpRequest.Result;
	HttpStatusCode statusCode = httpResponse.StatusCode;
	HttpContent responseContent = httpResponse.Content;
	if (responseContent != null)
	{
		Task<String> stringContentsTask = responseContent.ReadAsStringAsync();
		String stringContents = stringContentsTask.Result;
		if (statusCode == HttpStatusCode.OK)
		{
			return Convert.ToInt32(stringContents);
		}
		else
		{
			throw new Exception(string.Format("No customer deleted: {0}", stringContents));
		}
	}
	throw new Exception("No customer deleted");
}
This method is very similar to its update counterpart. We send our request to the DELETE endpoint and wait for the response. If all goes well then we return the number of deleted items to the caller. The caller can look like this in Program.cs:
private static void TestCustomerDeletion()
{
	Console.WriteLine("Testing item deletion.");
	Console.WriteLine("=================================");
	try
	{
		ApiTesterService service = new ApiTesterService();
		List<Customer> allCustomers = service.GetAllCustomers();
		Customer customer = SelectRandom(allCustomers);

		int deletedItemsCount = service.TestDeleteFunction(customer.Id);
		Console.WriteLine("Deleted customer {0} ", customer.Name);
		Console.WriteLine("Deleted items count: {0}", deletedItemsCount);
	}
	catch (Exception ex)
	{
		Console.WriteLine("Exception caught while testing DELETE: {0}", ex.Message);
	}

	Console.WriteLine("=================================");
	Console.WriteLine("End of DELETE operation test.");
}
Like above, we retrieve all existing customers and select one at random for deletion.
Call the above method from Main:
static void Main(string[] args)
{
	TestCustomerDeletion();

	Console.WriteLine("Main done...");
	Console.ReadKey();
}
Start both the web and the console application like we did above. You should see output similar to the following:

There you have it. We’ve built a starter Node.js application with the 4 basic web operations: GET, POST, PUT and DELETE. Hopefully this will be enough for you to start building your own Node.js project.
View all posts related to Node here.