Building a web service with Node.js in Visual Studio Part 2: MongoDb basics
November 6, 2014 Leave a comment
Introduction
In the previous post we outlined the goals of this series and discussed the basics of Node.js. In this post we’ll start from the very back of our service and set up the storage, namely the document-based MongoDb. There’s another series on this blog devoted to MongoDb in .NET. If you’ve never worked with MongoDb then I encourage you to read at least the first 2 parts in that series to get the overall idea. Make sure you understand the basic terminology of MongoDb, such as documents, BSON, collections and how objects are stored in documents.
For the sake of this demo we’ll look at JS and Json in MongoDb in some more detail. The series referred to above doesn’t look at interacting with the MongoDb database directly, only through the MongoDb C# driver which hides those details from us. E.g. it is possible to interact with an SQL Server database from a .NET application without writing a single line of SQL if you go through e.g. LINQ to Entities or LINQ to SQL. The details of opening and querying the database are abstracted away behind the database object context and LINQ statements.
This is, however, not the case with Node.js. There’s no LINQ to Node, or a Node.js driver for MongoDb or anything similar – not that I know of at least. We’ll later see a Node.js package which enables us to open the connection to MongoDb and send CRUD instructions to it but much of the syntax, especially in the case of filtering queries, will be the same as the bare-bones queries you send directly to MongoDb from the MongoDb console. So it is in fact some kind of Node.js driver for MongoDb but it doesn’t provide the same services as the C# driver in a .NET project. Therefore if you’re a staunch believer of relational databases and love using tools such as MS SQL management studio then you’ll need to take a deep breath and dive into the unknown 🙂 You’ll need to be familiar with a new query language designed for MongoDb. Don’t worry, the basics are not complex at all and there’s a lot of help on the MongoDb homepage and the language reference pages:
- Homepage
- Interactive test window: select the Try It Out link from the menu, although it is quite limited
- MongoDb query statements
- Reference manual
- Inserting documents in MongoDb
…and a whole lot more. These pages, especially the Reference manual will be good sources as you try to construct your queries.
This and the next post will be dedicated to MongoDb JavaScript and JSON syntax. This lays the foundations for the “real” stuff, i.e. when we interact with MongoDb through the web service interface. We’ll revisit many of these statements there.
Why MongoDb?
It is certainly possible to establish a connection to relational databases, like MS SQL or Oracle from Node.js but that’s not the norm. If a project already uses one of those and you need to build a Node.js module on top of it then you’ll need to work with it anyway. It’s, however, seldom the case that a brand new Node.js project will pick a relational database as its backup store. You’ll see that Node.js and document databases go hand in hand in practice. That is a more straightforward choice due to the extensive usage of JavaScript and JSON in Node.js and MongoDb. Also, it’s trivial to set up MongoDb on a database machine, you’re literally done in a couple of minutes. It is not the same hassle as setting up the more complex relational database applications like MS SQL. Also, Node.js is free and open-source, hence it’s more natural to pick a free and open-source database to accompany it.
Setup
Go through the first two pages in the MongoDb series referred to above. Make sure that you have MongoDb running as a service at the end of the process:

MongoDb CRUD operations
Connect to the MongoDb database by running mongo.exe in a command prompt. Make sure you navigate to the bin folder of the MongoDb installation folder. In my case this is c:\mongodb\bin:
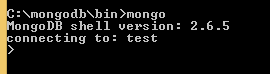
You’ll connect to the default “test” database upon the first connect. Note that connecting to a database doesn’t necessarily mean that the database exists – it won’t exist until you insert the first collection into it.
Type “show dbs” to list the databases. You’ll probably not see “test” among them. You can switch to another database with “use [database name]”, but again, the database won’t be created at first.
In the demo we’ll be working with customers and orders. In a relational database you’d probably create 2 or more tables to store customers and orders and order items and link them with secondary keys. Although you could solve it in a similar manner in a document database it’s better to think of collections as hierarchical representations of your objects. You store the customer and the orders in the same document, adhering to OOP principles.
Let’s look at an example. A customer and its orders can be represented in a JSON string as follows:
{
  "name": "Great customer",
  "orders": [{
	"item": "Book",
	"quantity": 2,
	"itemPrice": 10
  }, {
	"item": "Car",
	"quantity": 1,
	"itemPrice": 2000
  }]
}
Let’s first add “Great customer” to MongoDb. Switch to the customers context by running “use customers” in the MongoDb command prompt and then enter the following command:
db.customers.insert({name: "Great customer", orders: []})
If everything went OK then you’ll see something like “WriteResult…” and nInserted: 1 as a response.
Note that we inserted a new customer with an empty orders array. We will see this pattern later in the demo where we insert new customers through the web service. Another interesting detail is that you don’t need to put quotation marks around the property names: name vs. “name”, orders vs “orders” in the MongoDb JSON.
Let’s see if the object has really been inserted. Enter the following “find” command without parameters:
db.customers.find()
The “find” command with no parameters will select all elements from a collection. The output will be similar to the following:
{ "_id" : ObjectId("544cb61fda8014d9145c85e6"), "name" : "Great customer", "orders" : [ ] }
You’ll recognise “name” and “orders” but “_id” is new. If you haven’t specified an ID field then MongoDb will assign its own ID of type ObjectId to each new object with the property name “_id”. ObjectId is an internal type within MongoDb. You can specify an ID yourself but it’s your responsibility to make it unique, e.g.:
db.customers.insert({_id: 10, name: "Great customer", orders: []})
If there’s already an entry with id 10 then you’ll get an exception.
Let’s insert 2 more new customers:
db.customers.insert({name: "Donald Duck", orders: []})
db.customers.insert({name: "Mickey Mouse", orders: []})
Run the “find” command to make sure we have 3 customers in the customers collection.
You can search by customer name by adding a JSON-like query to the find method:
db.customers.find({name: "Donald Duck"})
Here’s the equivalent of the SQL “IN” clause to provide a range of values to the SELECT WHERE clause:
db.customers.find({name: { $in: ["Donald Duck", "Mickey Mouse"]}})
There’s a whole range of operators in MongoDb prefixed with the “$” character.
You can negate the statements using the $not operator:
db.customers.find({name: {$not: { $in: ["Donald Duck", "Mickey Mouse"]}}})
The above statement will return Great Customer, i.e. all customers whose name is not listed in the provided string array.
You can limit the returned fields by switching them on and off in a second JSON parameter. E.g. if you only wish to look at the ID of a customer then you can switch off “name” and “orders”:
db.customers.find({name: "Donald Duck"}, {name: 0, orders: 0})
We switch off “name” and “orders” by assigning 0 to them in the second JSON parameter. The _id field will be returned by default. If you’d like to view the orders only then enter the following command:
db.customers.find({name: "Donald Duck"}, {name: 0, _id: 0})
All fields that were NOT switched off by “0” in the selection parameter will be returned, in this case an empty array: “orders” : [].
The below query returns all customers who have not ordered anything yet, i.e. whose “orders” array is of size 0:
db.customers.find({orders: {$size: 0}})
If, however, you’d like to return all customers who have ordered at least 1 product, i.e. whose order array exceeds size 0 then you may test with the $gt, i.e. greater-than operator:
db.customers.find({orders: {$size: {$gt : 0}}})
…except that you’ll get an exception that $size is expecting a number. I’m not sure why this is the case and why it was implemented like this but the following statement with the $where operator will do the job:
db.customers.find({$where:"this.orders.length > 0"})
$where accepts a JavaScript command and we want to return items whose “orders.length” property is greater than 0. In fact the $size: 0 can be rewritten as follows:
db.customers.find({$where:"this.orders.length == 0"})
Note that this solution assumes that every element in the collection has an “orders” field. However, as you can store unstructured objects in a collection it’s not guaranteed that every customer will have an “orders” field. Say that in the beginning of the project you initialised each new customer like this:
db.customers.insert({name: "Donald Duck"})
In this case the above solution will throw an exception as “Donald Duck” has no “orders” field. To make sure this is not the case you can combine $where with $exists:
db.customers.find( {orders : {$exists:true}, $where:'this.orders.length>3'} )
We cannot go through all possible query examples here but this should be enough for starters. You can always consult the reference material mentioned in the introduction as you’re refining your queries. You can test your queries in the MongoDb command prompt like we did above to make sure they work as expected and to see how the result set is structured.
In the next post we’ll look at updates and deletions.
View all posts related to Node here.

