Building a Web API 2 project from scratch using OWIN/Katana .NET Part 4: async controllers and mini-DDD

Introduction

In the previous post we briefly looked at a new hosting project by Microsoft called Helios. It is meant to be the future of web application deployment where Helios removes the necessity of having the entire System.Web dependency in your web project. We saw that Helios is only in a preview state so it shouldn’t be used for real-life projects yet.

In this post we’ll diverge from OWIN/Katana and instead see how we can add asynchronous controller methods to our current CustomersApi web project. We’ll also build a miniature version of a layered application. We’ll put the layers into separate folders for simplicity.

Read more of this post

Advertisement

Web farms in .NET and IIS using Web Farm Framework 2.2 part 3: deployment and tests

In this blog post we’ll put into practice some of the things we’ve gone through in this series on web farms. In particular we’ll take a closer look into the following scenarios:

  • How to deploy a web site to a WFF web farm with ARR as the load balancer
  • How to set up the state service common to all web farm machines
  • How to set up the database state management common to all web farm machines

Deployment

The first thing we want to test is how to deploy our website to the web farm. I’ve prepared a very simple ASP.NET web forms project where the Index page prints out the machine name. I wanted to show some more-or-less unique ID on the screen which shows that we’re getting the response from different machines as the load balancer distributes the web requests. I wanted to make this ID independent of the web site settings as all such settings should be identical throughout the farm. Recall that the primary server is the “leader”, so whatever is deployed on that machine will also be replicated on the secondary servers.

I show the machine name in a label control as follows:

protected void Page_Load(object sender, EventArgs e)
{
	if (!IsPostBack)
	{
		lblUniqueId.Text = GetUniqueIdentifier();
	}
}


private string GetUniqueIdentifier()
{
        return System.Environment.MachineName;
}

The ID is shown on the index page:

Show machine name on screen

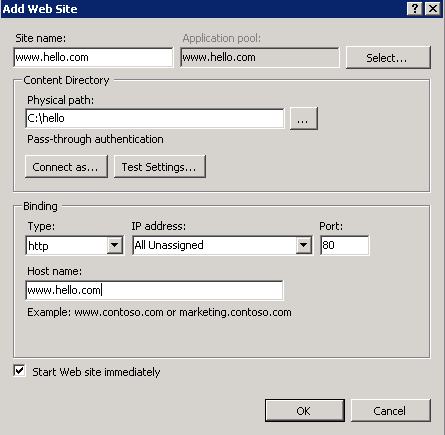
Next I’ll need to create the correct bindings in IIS. Follow these steps:

  1. Log onto the primary server of the web farm
  2. Open the IIS manager
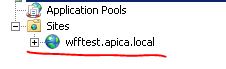
  3. Delete the existing Default Web Site in the Sites folder
  4. Create a new website: give it some name – I called mine wfftest.apica.local. Leave the host name blank to keep it simple
  5. Create a folder for the deployment package in the Physical path text box

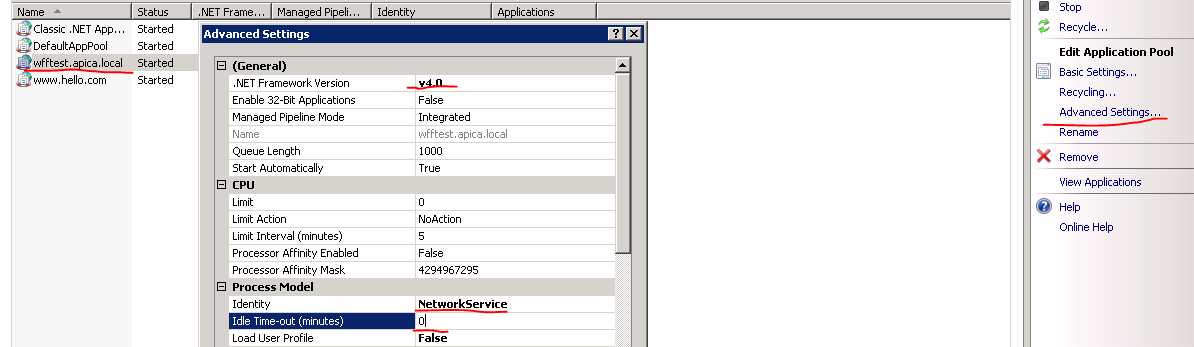
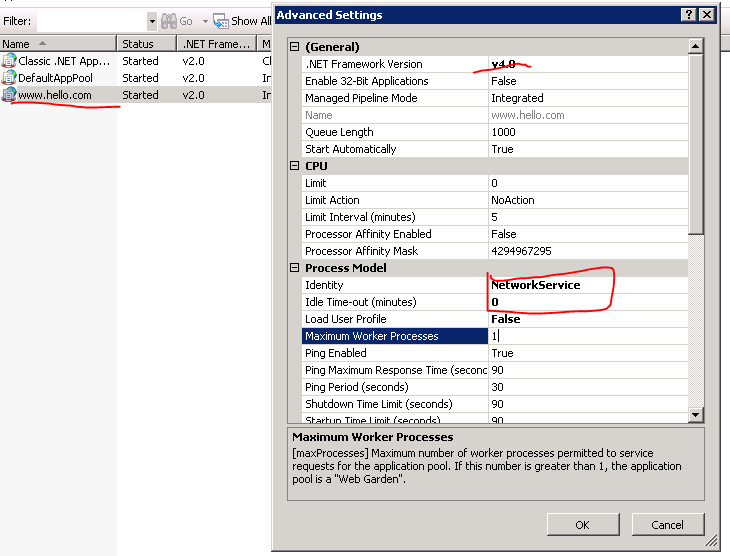
Change the application pool settings as follows:

Change app pool settings on primary server

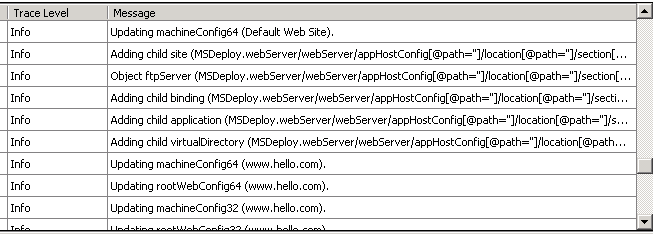
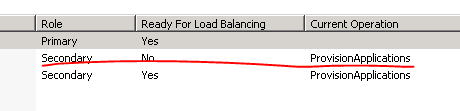
Normally you would have to go through this procedure on every machine of the web farm. However, we have WFF in place, so I’ll log on to one of the secondary servers to see if the changes have been propagated:

Web site changes propagated to secondary server

I’ll now deploy the web page to the web site folder using the Web Deploy technique we saw in this post. I don’t know about you but I got an exception at first:

Web deploy failed

Web deployment task failed: make sure web deploy is installed and the required process – Web Management Service – is started.

I’ll show here all the steps I had to take to make this work:

1.) Select the Machine in IIS on the primary server and see if the below icons are available:

Management service icons in IIS

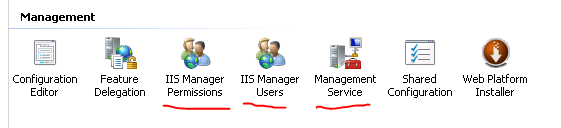
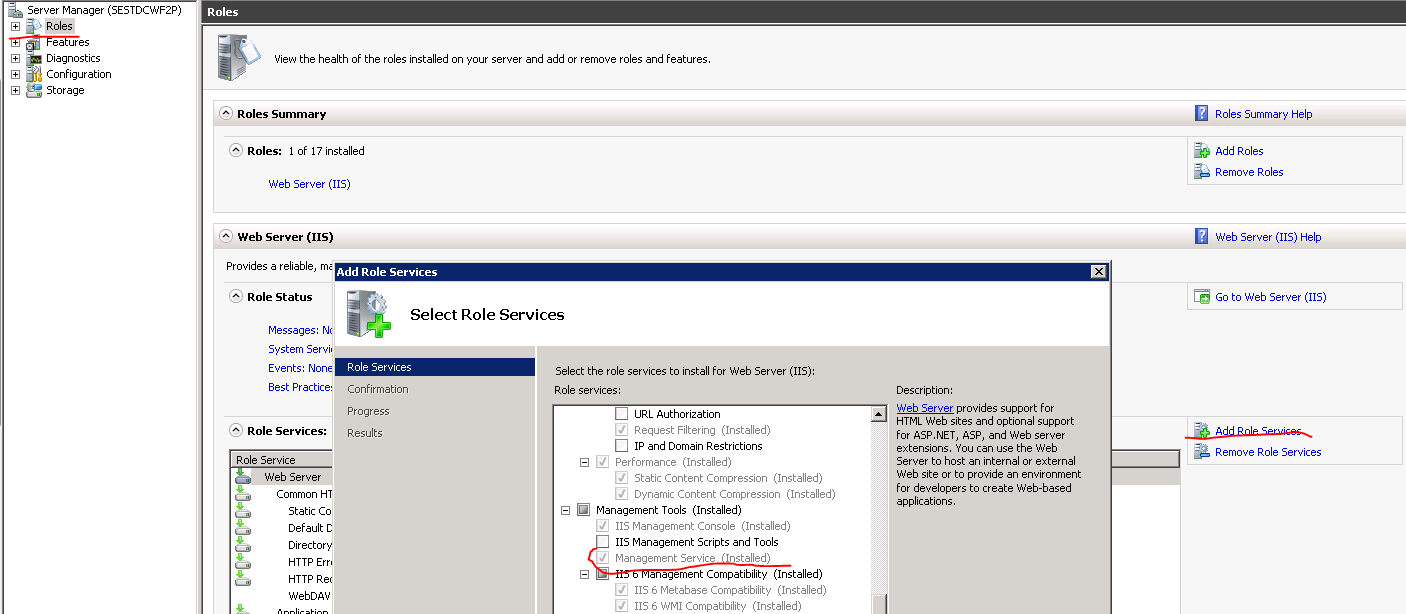
If not then you’ll need to enable them. Go to Start, Administrative Tools, Server Manager. Select Roles, Add Role Services and click the Management Service feature:

Add management service to IIS

Click Next and Install. After this refresh the IIS manager window and you should see the three icons that were missing.

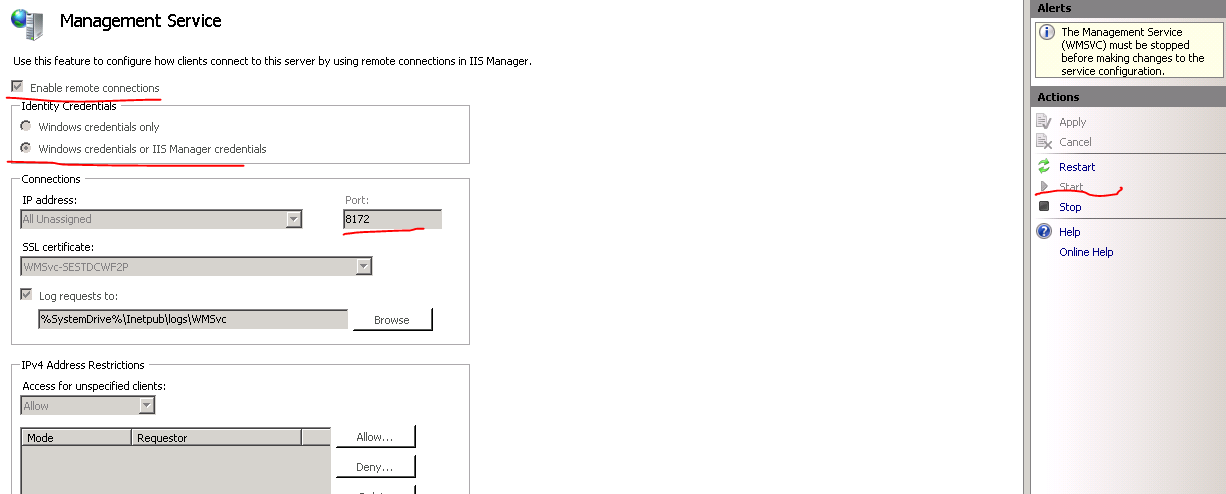
2.) Start the service:

Double click the Management Service icon in IIS. Make sure you that remote connections are enabled and you allow for a mixture of credentials. Leave the port number at 8172. Click Start after these changes:

Start management service

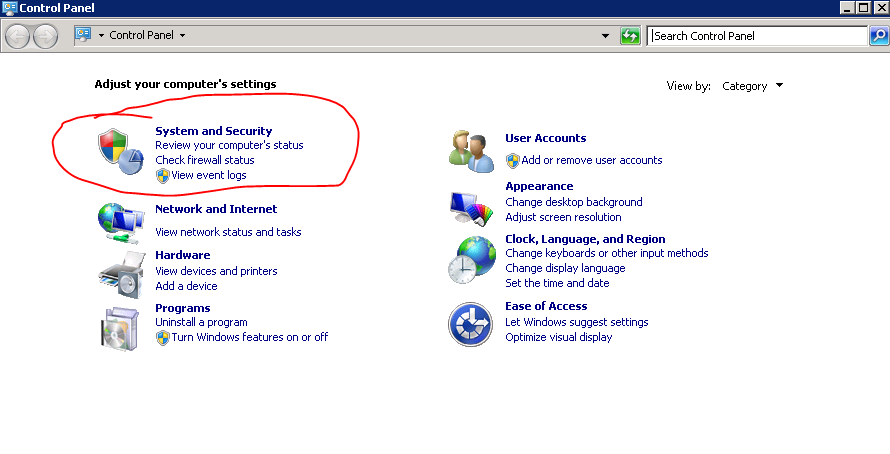
3.) Check your firewall settings:

The following inbound rule must be enabled in the Windows Firewall manager (Start, Administrative tools, Windows Firewall and Advanced Security):

Management service inbound rule enabled

4.) Install Web deploy:

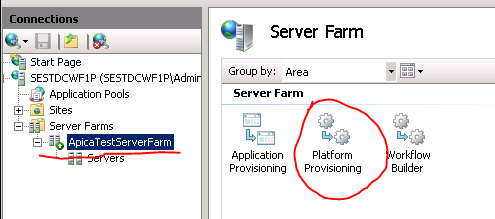
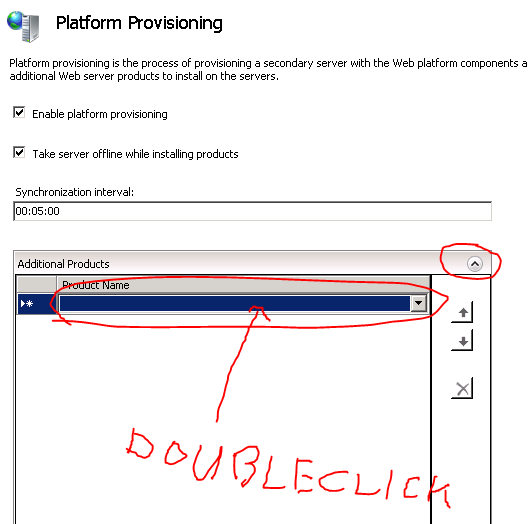
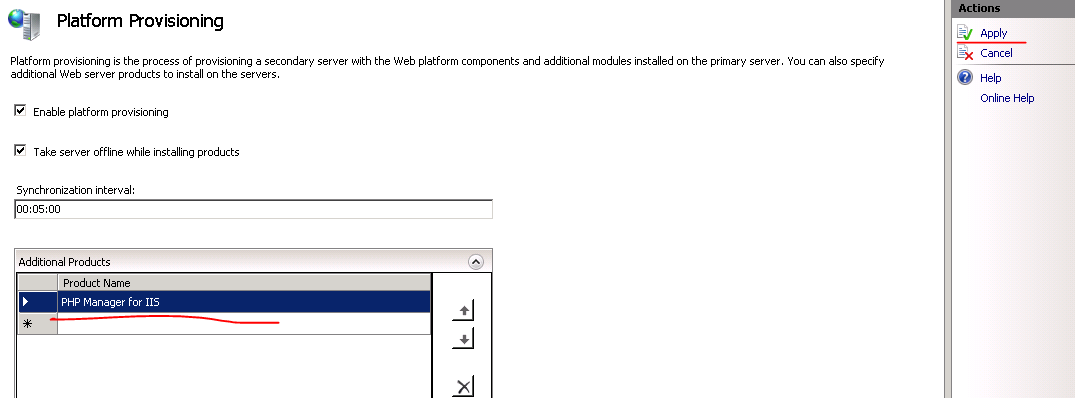
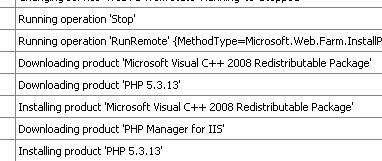
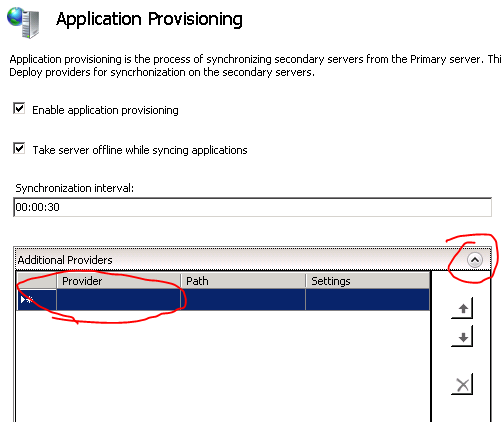
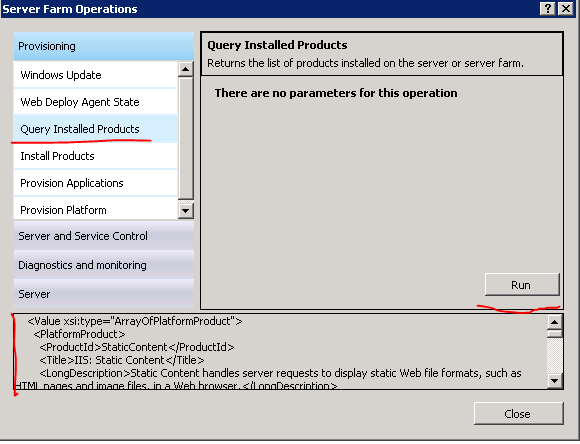
This is easy with WFF. Log onto the controller machine, select Platform provisioning and select Web Deployment Tool 2.1:

Web deployment tool with provisioning

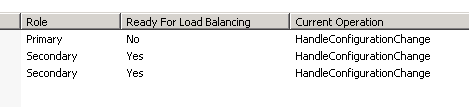
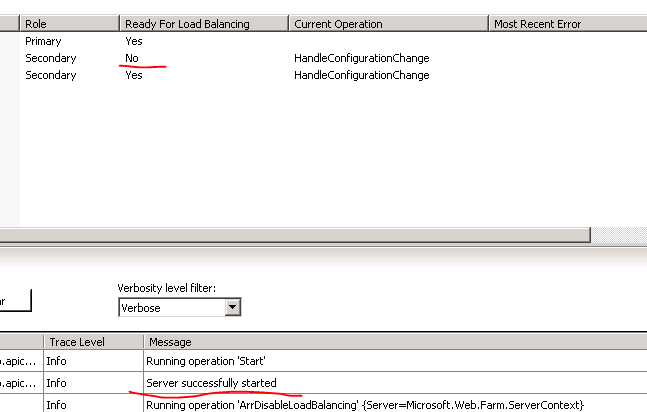
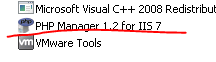
Check that the tool is deployed on the primary server:

Web deployment tool installed successfully

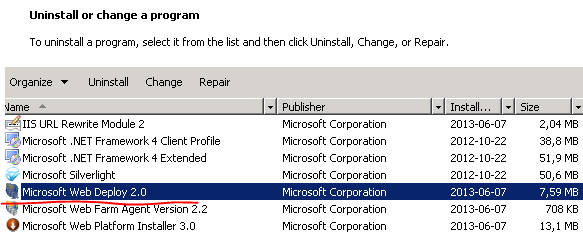
5.) Check if web deployment handler is installed:

In the Programs and Features window shown above right click Microsoft Web Deploy and select Change. Make sure that all features are enabled. You’ll see a red X if they are disabled. Select the following option:

Install web deploy handler

6.) Restart the web management service:

Restart web management service

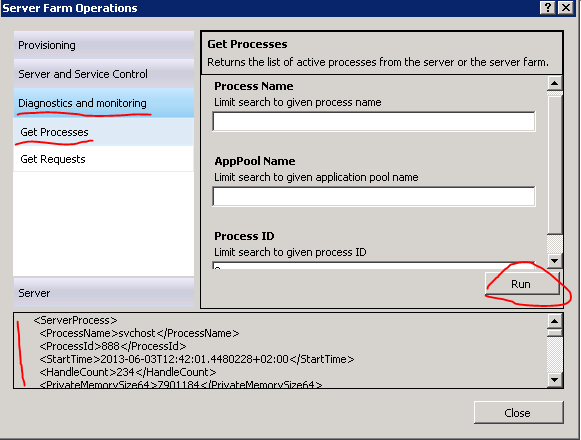
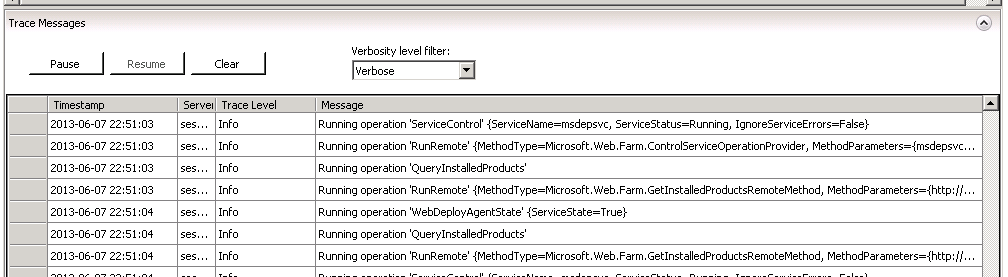
In case none of the above options help then check out the management service log file.

The relevant log file is available on the primary web farm machine under c:/inetpub/logs/WMSvc. There may be an additional folder there, such as W3SVC1. Within that folder you will find a text file, open that. You’ll see some cryptic messages such as:

2013-06-27 13:51:58 192.168.50.102 HEAD /msdeploy.axd site=wfftest.apica.local 8172 – 192.168.100.22 – 404 7 0 234

This means that msdeploy.axd was missing which in turn means that WebDeploy wasn’t installed. Check the numeric codes at the end – I know that due to the IIS response: 404.7. You can find all IIS response codes and subcodes here.

Another problem you may encounter is that IIS doesn’t allow some file extensions. Check the applicationHost.config file on the primary server under c:/windows/system32/inetsrv/config/applicationHost.config. Look for the element called fileExtensions. It has an attribute called allowUnlisted. Set it to true if it’s set to false.

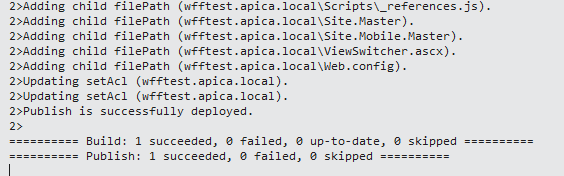
So, after all this I’ve been able to deploy according to VS:

Web deploy success in Visual Studio

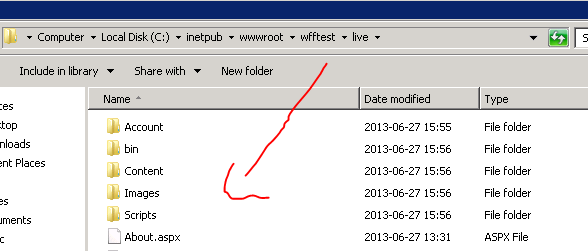
Check that the package has been deployed to the correct folder. In my case it has indeed:

Package deployed to correct folder

Check the secondary servers as well to see if the controller machine has updated them. You should see that everything is jolly well. We’re making progress! Let’s continue with the setup.

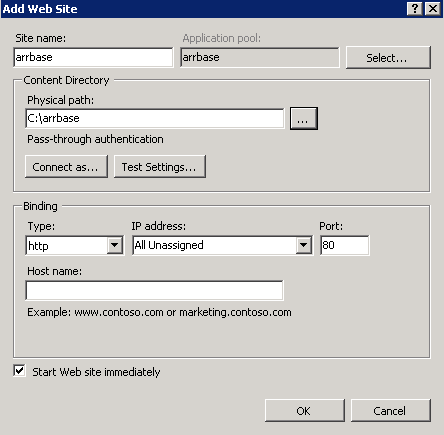
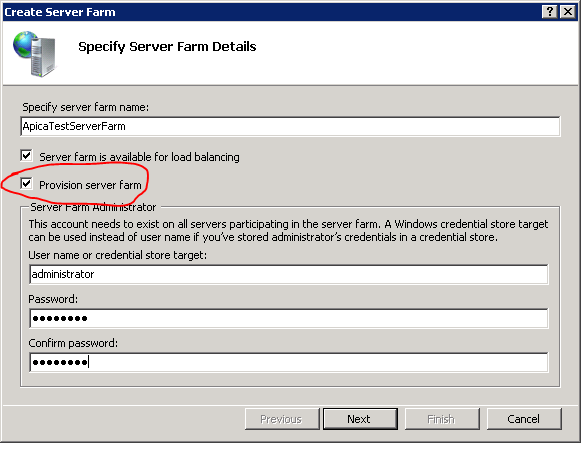
Log onto the controller machine and open the IIS manager. Delete the Default Web Site. Create a new site called arrbase pointing to a blank folder located anywhere you like on c:\. Leave the IP and port values untouched and the Host name field blank:

Create arr base on controller machine

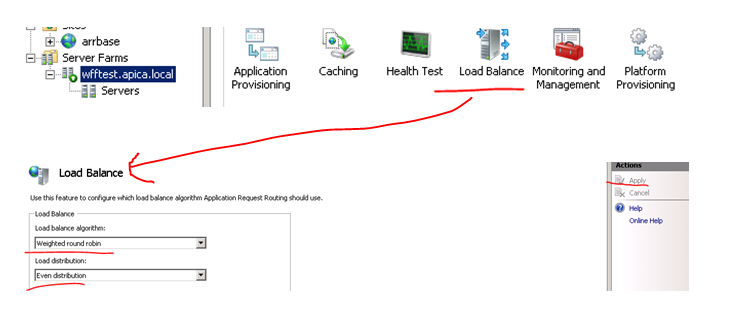
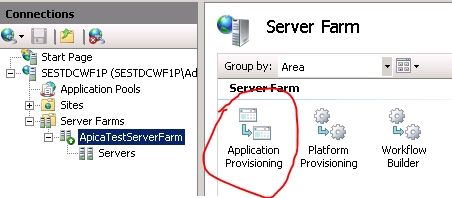
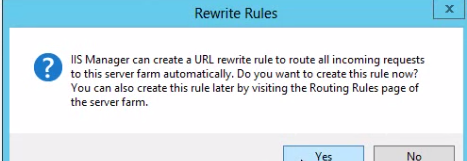
The next step is to set up URL rewrite using ARR. Select the name of the server farm and click the Routing Rules icon:

Routing rules icon in IIS

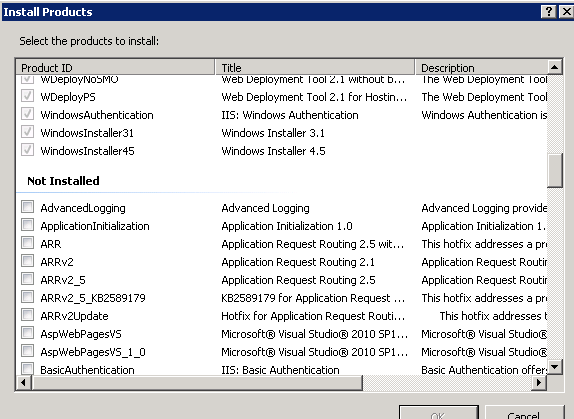
In case you don’t see it you’ll need to install ARR – I had to install it as well. I assumed that installing WFF would be enough to use the capabilities of ARR but I was wrong. On the controller machine start Web Platform Installer and search for ARR:

Arr in web platform installer

Reopen the IIS manager and now you should be able to open Routing Rules. You’ll see that the Use URL Rewrite to inspect incoming requests checkbox is unchecked. Check it and apply the changes:

Set routing rule in ARR

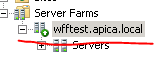
Now we should be good to go. I re-named my web farm to wfftest.apica.local which is only available from within the company’s intranet where I work:

wfftest.apica.local

I asked our technicians to link this URL to the controller machine’s IP so that I can reach it from my machine. An alternative solution is to modify your hosts file at c:\windows\system32\drivers\etc\hosts. Open that file with Notepad using admin rights. Enter the IP of the controller machine and the web farm address, e.g.
192.168.53.412 wfftest.apica.local. Make sure to put a tab in between the IP and the address.

So I enter this address in a web browser on my machine and… :

Wff test apica local responds

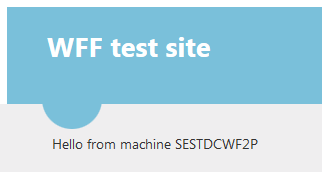
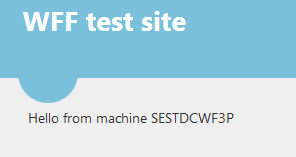
So I got a response from the primary machine in the web farm. I want to check if all 3 machines in the web farm work so I set the load balancing algorithm to round robin:

Set LB algorithm to round robin

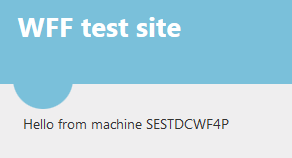
…and then press F5 a couple of times. Apparently it takes a couple of seconds for the algorithm to be implemented but I get the response from the two secondary servers as well eventually:

Response from secondary server one

Response from secondary server two

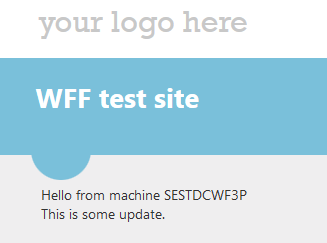
Before we move on let’s re-test the deployment process and we’ll keep an eye on the controller machine. In the web project I add a new line under the “Hello from machine” bit just to be able to check that the changes had been deployed. Watch the controller machine carefully as the deployment process is rather quick:

Controller taking turns to deploy the web project

I then refresh the web page and the updates had indeed been deployed:

Web update successful

Session management

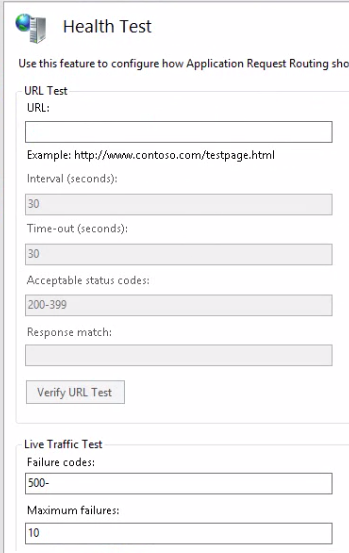
If you have a completely stateless web application, such as a REST web service, then you may as well stop here. You can add some health checks using the techniques shown here to ARR and then you are good to go. You have a functioning web farm with pretty decent provisioning and load balancing features for a relatively low price. If you use caching in your web service then you’ll need to look into some distributed cache solution. A bit more on that in the conclusion part of this post.

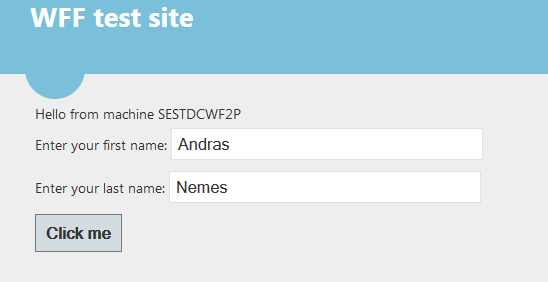
However, web sites are usually stateful. Lots of different data can be stored in session variables to carry them from one page to another. You can read about session management in a web farm in this post, here I only want to test two features outlined there: saving the session in an external state service and alternatively in a database. So make sure you read through that post as I will not repeat the details here. I need to make the model web site use the session state. So I create the following markup in Default.aspx within the MainContent placeholder:

Hello from machine <asp:Label Id="lblMachineName" runat="server" />
<div>
	<div>Enter your first name: <asp:TextBox runat="server" ID="txtFirstName"></asp:TextBox></div>
	<div>Enter your last name: <asp:TextBox runat="server" ID="txtLastName"></asp:TextBox></div>
	<asp:Button Text="Click me" ID="btnSubmit" OnClick="btnSubmit_Click" runat="server" />
</div>

The Submit button has the following click event:

protected void btnSubmit_Click(object sender, EventArgs e)
{
	Session["Firstname"] = txtFirstName.Text;
	Session["Lastname"] = txtLastName.Text;
	Response.Redirect("~/About.aspx");
}

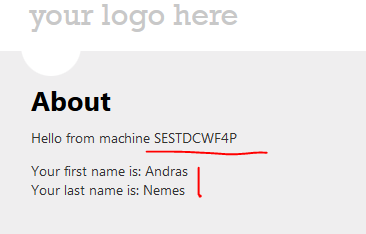
I modified the HTML on About.aspx as follows:

<article>
	Hello from machine <asp:Label Id="lblMachineName" runat="server" />
        <p>        
		<asp:Label Text="" ID="lblFirstName" runat="server" /><br />
		<asp:Label Text="" ID="lblLastName" runat="server" />
        </p>
</article>

…with the Page_Load event of About.aspx.cs looking like this:

protected void Page_Load(object sender, EventArgs e)
{
	if (!IsPostBack)
	{
		lblFirstName.Text = Session["Firstname"] != null ? string.Concat("Your first name is: ",   Convert.ToString(Session["Firstname"])) : "There's no First name in the session!";
		lblLastName.Text = Session["Lastname"] != null ? string.Concat("Your last name is: ", Convert.ToString(Session["Lastname"]))	: "There's no Last name in the session!";
		lblMachineName.Text = System.Environment.MachineName;
	}
}

I believe this is easy to follows. Let’s now deploy the project as it is without making changes to session handling and see what happens. So I fill in my first and last name and press the Click me button and… …I got an exception saying that validation of viewstate MAC has failed:

MAC validation failed

So we are required to change the session state management anyway. I took the following steps to set up a state service:

  1. Picked a development machine separate from the web farm machines but still within the same intranet
  2. Started the Windows service called ASP.NET State Service on that machine
  3. Changed the registry key HKEY_LOCAL_MACHINE\SYSTEM\CurrentControlSet\Services\aspnet_state\Parameters\AllowRemoteConnection value to 1 on that machine and restarted the state service
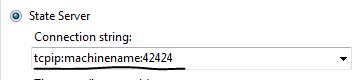
  4. Declared in web.config that session state must be handled through a state server using the address of the state server, which is the dev machine in my case I mentioned under point 1
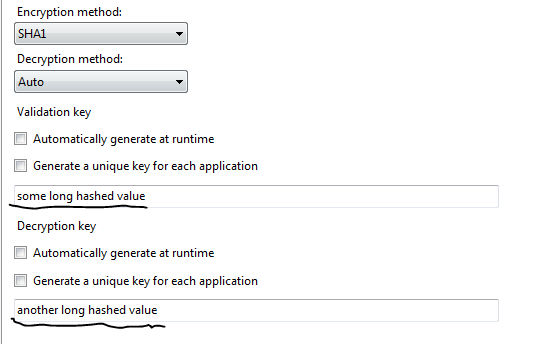
  5. I inserted a machine key in web.config which will be common to all machines in the web farm

So I redeploy the web app and land on the primary machine. I enter my first and last name and press the button:

Enter first and last name on primary machine

…and…

Session state management on state server successful

That’s looking really good. We ended up on a different machine and the state is still available. Refresh the About page to land on different machines and you’ll see that the state is available.

OK, let’s try to save the session in a database now. I performed the following steps:

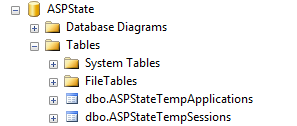
  1. Set up the ASPState table in a database available to all machines in the web farm using the aspnet_regsql.exe tool: aspnet_regsql.exe -ssadd -sstype p -S [database machine name] -U [db admin username] -P [db admin password]
  2. Check the database and I see the following table structure: ASPState table successfully created
  3. Update the sessionState tag in web.config (details below)

My sessionState element in web.config looks as follows:

<sessionState mode="SQLServer" allowCustomSqlDatabase="true" sqlConnectionString="ASPStateConnectionString">
</sessionState>

…where ASPStateConnectionString refers to a connection string in web.config which has the following format:

<add name="ASPStateConnectionString" connectionString="Data Source=[DB machine name];Initial Catalog=ASPState;User ID=xxx;Password=xxxxx"
   providerName="System.Data.SqlClient" />

I deploy the web app as usual and perform the same test as above. It went well so I check the entries in the ASPState database:

ASPNet table session values

So we have successfully tested the most basic session management features for an IIS web farm.

A short addition: you can add an extra level of security to the database type of solution by synchronising your primary SQL server with a secondary one which serves as a failover solution. You can achieve this using the technology called SQL AlwaysOn. That way if your primary server fails then the sessions will be available from your failover server. If you find that the database solution is too slow but don’t want to take the risk of your state server going down then you can check out Memcached which is a free tool that offers a highly available short-term caching solution. An alternative solution is CouchBase.

Conclusion and possible improvements

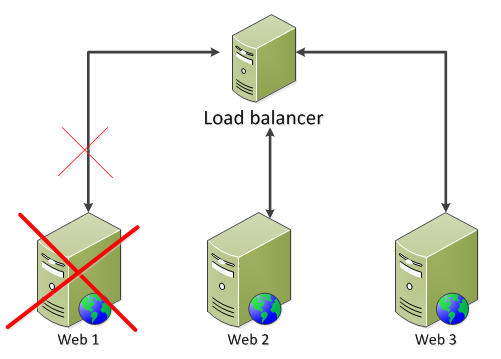
We currently have the following model:

Blog WFF model

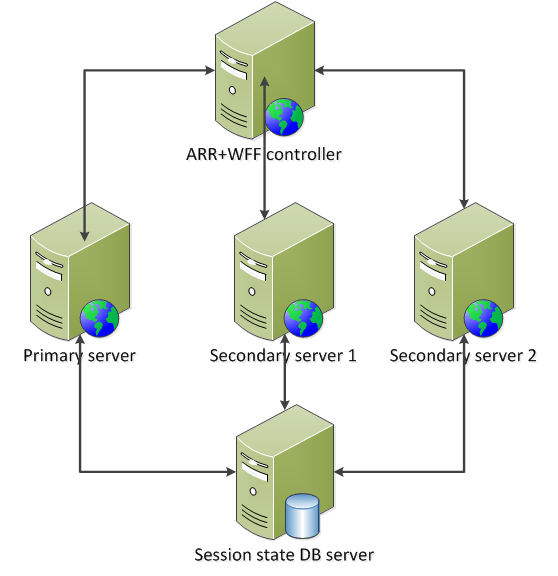
This is a good foundation but we still have a couple of vulnerability points:

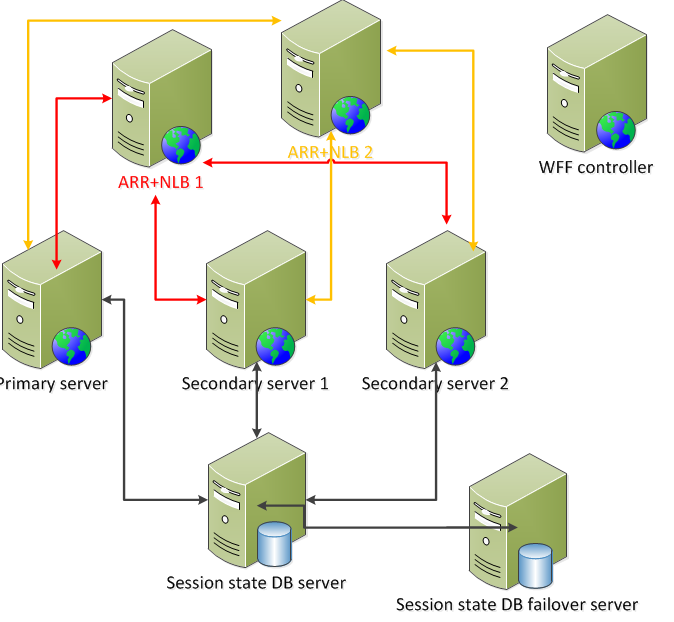
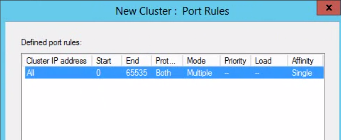
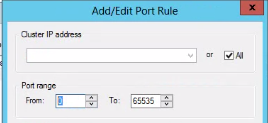
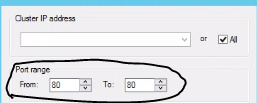
  • ARR doesn’t provide high availability and scalability in itself – the solution is to set up an identical load balancing machine with ARR and NLB and install NLB on the existing ARR machine as well. Here‘s a good guide on how to proceed. The key idea is to provide a virtual IP for the two ARR+NLB machines where NLB is responsible for high availability
  • ARR and WFF are located on the same machine, but there’s nothing stopping you from putting them on two different machines: if this machine dies then WFF can still control the web farm
  • Set up another state DB machine and put SQL AlwaysOn in place in order to synchronise it with the main state DB
  • The WFF controller can still die and then there’s no content replication from the primary server to the secondary ones: at present this cannot be helped, i.e. there’s no high availability solution for the controller machine in WFF2.2 – your best bet is to monitor this machine externally and react quickly if it goes offline and avoid deploys during this time. However, even if it goes down your web farm will still be responding to web request – provided that the load balancer is located on a different machine
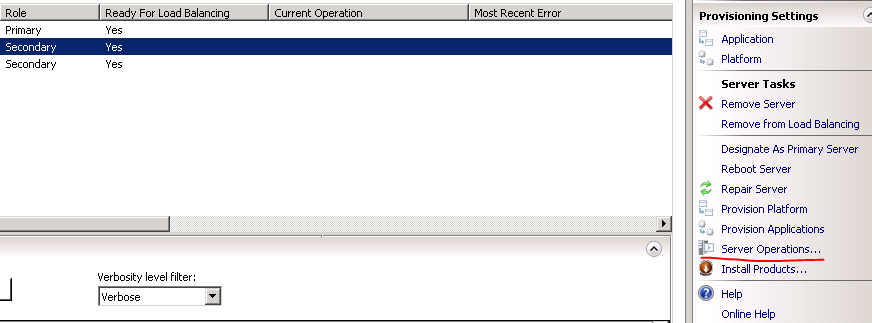
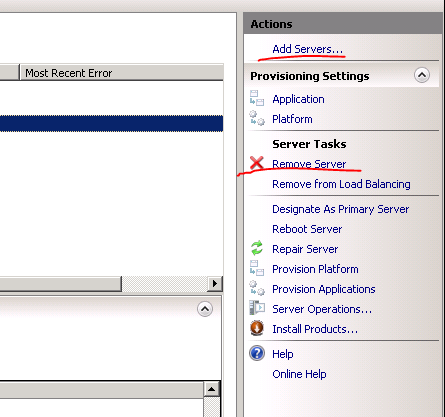
  • The primary server can of course also go down meaning you cannot deploy to it and WFF will not be able to replicate its content to the secondary servers – the solution is straightforward: just designate another primary server, check the screenshot below

To designate a secondary server as the primary one in the WFF GUI:

Designate a secondary server as the primary one

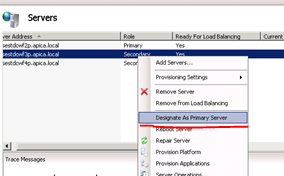
Right-click the secondary server name and select “Designate as Primary Server” from the context menu.

So if we implement the solutions suggested above to solve the weak points of our current architecture we may end up with something like this:

Wff finalised structure

This is a cost-effective high availability and high scalability system using well tested and reliable software solutions. You can add new web servers to your farm and then update the servers list on the ARR+NLB machines and on the WFF controller.

Caching

We haven’t talked much about caching yet. Say that you’d like to cache the results of the database query using one of the several built-in caching mechanisms in .NET: ObjectCache, HttpCache etc. If you cache the result on web farm machine A then that cached value will not be available on machine B automatically. Both machine A and B will have the cached value in their memory eventually if the web requests are routed to both of them, but their expiry date will be different. Maybe machine A will fetch a more recent result of the database query than machine B because machine B stores the value with a later expiry date. So essentially we’ll need a similar distributed solution for caching as for session management: the cached values should be available on separate machines that all web farm members have access to. We mentioned Memcached and CouchBase before in this post. They are both really good products with a .NET library.

CouchBase has an advantage over Memcached: in case you set up more than one external cache machine – a good idea if you need a failover solution here as well – then it’s desirable for the cache machines to synchronise their cache data as soon as there’s a change. We don’t want to the cache machines to return different objects for the same cache key, right? Memcached servers don’t talk to each other so you may actually end up with that scenario. CouchBase servers however provide synchronisation: say that web farm member A writes to the cache; this object with a certain cache key will be sent to the CouchBase server cluster. CouchBase will make sure that all cache machines in the cluster will have this updated value.

You can even use CouchBase to take care of session management for you if you don’t like the database solution outlined above. You replace the sessionState node in web.config to use an external session management solution. After all, session values are key-value pairs, much like cached objects.

Pre-compiled web package

One last improvement that I want to mentioned is pre-compiled websites. In the present solution if you deploy the web package then it must be compiled on the server when the first web request comes in after the deploy. This can cause a slight delay in the response time for the first visitor. It is possible with MSDeploy to pre-compile your web project before deploy. You can even automate that using your Continuous Integration server, such as TeamCity.

If you perform all the suggested improvements then you’ll end up with a distributed system which has the following characteristics:

  • High availability
  • High scalability
  • Distributed, highly available cache service
  • Distributed, highly available session state service
  • Automated content replication
  • Seamless deployment from the client’s point of view: the cache and the state are still available during and after a web deploy and the client doesn’t see a longer response time on the first web request

Web farms in .NET and IIS using Web Farm Framework 2.2 part 2: provisioning a server farm

By the end of the previous post we had a system with 4 machines up and running: a controller with WFF installed, a primary web farm server and two secondary web farm servers. We also saw an example of application synchronisation using WFF. In this post we’ll look at application and platform provisioning.

Content mirroring

By default all content of the primary server is mirrored to the secondary servers. The first thing I want to check is whether web sites and their folder content are copied over. Let’s log on to the primary server and create a new website. Don’t worry about the URL and the binding, I’ve created the following:

Create test website on primary server

A quick look at the trace messages on the controller shows the following:

Trace message after website creation

So far so good, our changes have been noted and apparently the sync process has started. I’ll make a couple of changes to the hello.com application pool to see if those changes are mirrored as well:

Changes to the application pool

I’ll also simulate a deploy and place an empty index.html file in the deployment folder I created on the primary server, c:\hello. I’ll now check the status on the secondary servers. I can see that all elements have been correctly mirrored:

Changes to website applied to secondsary server

Platform provisioning

With platform provisioning you can synchronise the secondary servers with the modules installed on the primary server. You can also select the interval between sync cycles. You can open the platform provisioning options by selecting the name of the server farm you created and then double-clicking the Platform Provisioning icon:

Open platform provisioning options

This opens the Platform Provisioning window:

Platform provisioning window

The purpose of the two checkboxes and the Sync interval textbox is easy to understand I believe. You can then select products to provision in the Additional Products section. At first this is confusing as the list will be empty and you may think there are no products available. You’ll need to double-click the product name row to bring up a list of products. I selected the PHP Manager for IIS package, but feel free to select whatever you want. Select Apply when you’re done:

Apply platform provisioning

Clicking Apply will bring up the list of products that the web platform installer will provision. Click I Accept and let’s see what happens. Select the Servers node in the Connections pane and you’ll see that synchronisation has started. The changes have been noted:

Handle configuration change status after applying provisioning

The servers are brought offline one by one:

Remove one server at a a time during platform provisioning

The first machine has been temporarily removed from the farm while the provisioning process takes place. You’ll see the related trace messages as well:

Trace messages during platform provisioning

Of course I want to verify that the selected product has been deployed to the secondary servers and it has indeed:

Platform provisioning successful

There’s another way to install products on the servers. You can even install the product on all machines of the web farm or just a selected one. If you want to install a product on the web farm then select the name of the web farm in the Connections pane on IIS on the controller machine and click the Install Products link:

Install products link at web farm level

If you wish to install a product on a specific machine then select one of the servers under the Servers node. You’ll find the same link as shown above under the Actions pane to the right. In either case the Install Products window will open where you can select the products to be installed:

Install products window

Application provisioning

This is similar to platform provisioning but it’s dedicated to Web Deploy. If you recall from the previous post WFF has a dependency on Web Deploy 2.0 so is is here where it is heavily used. You can open Application provisioning as follows:

Open application provisioning

The options look similar to what you saw under platform provisioning. You’ll need to double click the Provider cell to bring up all MSdeploy providers:

Application provisioning options

These are all MSDeploy providers, so you can automate MSDeploy commands. You can find the list of providers and what they do here and their settings here. The path will be the folder where the provider will be installed. You can open the settings, i.e. the MSDeploy program arguments by clicking the ellipsis:

Open provider settings MSDeploy

Server operations

You can perform operations on the server farm or individual machines in the farm. The term operation is quite wide in this case and can be grouped into 4 categories:

  • Provisioning: besides the types of provisioning mentioned above you can e.g. update Windows or get a list of installed products
  • Windows services: you can control the Windows services installed on the target machine(s), change their state and reboot them.
  • Diagnostics: get a list of processes and requests running on the machine(s)
  • Server: test your servers

Let’s look at a couple of examples. These are all available on the controller machine. If you’d like to perform operations on the web farm level then click the Server Farm Operations link:

Open server farm operations

You can find a similar link if you open the web farm node and select one of the machines:

Open operations on a single server

The link will open the Server Operations window where you’ll recognise the categories from the list above:

Server farm operations window

Click on the categories and subcategories to open the parameters you can provide to the operation. Most of them are quite self-explanatory, such as the Windows Update or Install Products option. Click the ‘Run’ button when you’re done and the results of the operation will be shown in the small panel in the bottom. The results will be presented in an XML format. The Query Installed Products produces an output similar to the following:

Query installed products operations result

It’s not easy to look at the result in that small panel. If you want to view the details then copy and paste it to a text editor.

You can get the processes and requests running on the server under the Diagnostics and monitoring section. You can leave the filtering text boxes empty if you want to retrieve a full list:

Get processes operations result

This gives you the list of processes as you can see them in the Task Manager serialised into XML.

In the next post we’ll see how to deploy a real web site in the sample web farm.

Web farms in .NET and IIS using Web Farm Framework 2.2 part 1: how to set up a web farm using WFF

So far in the series on web farms we’ve looked at two concrete solutions for load balancing: Network Load Balancing and Application Request Routing. Both are software based solutions that are relatively easy to use and get started with. However, there’s still a certain amount of manual work you need to perform: add new servers, install applications, install load balancers etc.

There are frameworks out there that can take the burden of manual installations and settings off of your shoulder. However, they can be quite complex with a steep learning curve. Also, as there is much automation involved it’s important to understand them inside out.

Microsoft provides two frameworks as mentioned in the first part of the series on web farms: the Web Farm Framework (WFF) and Windows Azure Services. As the title of this post suggests we’ll look at WFF a bit more closely. The latest version is WFF2.2 at the time of writing this post.

Note: if you are completely new to web farms in IIS and .NET then start here. Some concepts may be difficult to understand if you lack the basics.

General

WFF is a module add-on to IIS. WFF uses the Web Deploy module to update products and applications. Here you’ll find the homepage of WFF2.0 but we’ll concentrate on WFF2.2 which is the most up-to-date version at the time of writing this post. Some of the more interesting features include the following:

  • Server provisioning: often called elastic scale, WFF keeps track of all product installations on the server so that you can provision new servers any time with almost no effort. The process takes a server with only the operating system installed and WFF brings it up to the same status as the existing web servers
  • Application provisioning: WFF can perform application installations in each machine in the web farm one by one. It takes the server out of rotation, installs the components, brings the server back online, and then continues with the next server. It’s possible to roll out applications using Web Platform Installer or Web Deploy
  • Content provisioning: WFF also manages application content provisioning and updates
  • Load balancing support: WFF has built-in support for Application Request Routing (ARR) and third party load balancers so it can manage servers and sites for you
  • Log consolidation and statistics: WFF offers status and trace logs from all servers in the web farm
  • Extensibility: WFF is highly configurable and allows you to integrate your own applications and processes into WFF
  • API: WFF can be accessed programmatically using the Microsoft.Web.Farm namespace. It can also be managed through PowerShell commands.

It’s important to stress that WFF is not a load balancer in itself but works in unison with load balancers. The default load balancer that WFF works with is ARR.

The disadvantage of WFF is that it introduces an extra point of failure: it depends on a single controller node. If that fails then WFF will be unable to monitor or manage the server farm until it is back online again. If you make a change to your primary server then that change won’t be propagated to the secondary servers. Your web farm will still continue to work, i.e. your clients will still get web responses from your website but WFF will not be able to synchronise between your server farm machines to keep them up to date. This shortcoming may be corrected in a future version. Read on to find out the role of each server type in a WFF setup.

The starting point

The plan is to start the investigation from scratch. I now have 4 clean machines at my disposal to test WFF: one controller machine, one primary server and two secondary servers. Every machine has Windows Server 2008 R2 and IIS7.5 installed and they all have a 64-bit architecture. There’s no website deployed on any of them yet. All machines sit within the same network so that they can communicate with each other. Don’t make your life harder by putting one machine in the cloud and the other in the local network of your company. Make the start as easy as possible.

The roles of each machine are as follows:

  • Controller: the WFF controller server which is the controller of the web farm. This is the only machine that needs to have WFF installed. It monitors the status of the web farm machines, provides synchronisation, provisions applications, etc., it is a real workhorse
  • Primary server: this is the blueprint machine for all web farm machines. The changes made on this machine will be propagated to the secondary servers.
  • Secondary servers: the “slaves” of the primary server. They will be updated according to the changes on the primary server.

The secondary servers must be of the same architecture as the primary server, i.e. either 32 or 64 bit. You must have an administrator account to the machines.

Setting up the controller

So now I’ve logged on to the controller machine. Installing WFF is at present not as straightforward as I initially thought. I expected that the latest Web Platform Installer, which is in version 4.5 at this date, will be enough to be able to select WFF and install it with all the dependencies. However, WPI 4.5 won’t have that product listed at all.

Instead you’ll need to install v3 of the web platform installer available here. Install it and then download v2.2 of WFF from here. Select the correct package depending on the architecture on the next screen:

Select WFF architecture

When the installation starts you may be greeted with the following message:

Web deploy is a prerequisite

DON’T go to the link shown on the little popup. It will lead you to the Web Deploy v3 download page. It will also update your freshly acquired WPI v3 to v4.5, arghh! As it turns out we’ll need Web Deploy 2 instead.

You can download Web Deploy 2.0 from this link. Select the correct package according to the architecture of the machine and step through the very simple installer.

So now you should have the following platforms available among the applications on the controller machine:

Correct WPI and Web Deploy packages

Now go back to the WFF 2.2 download page and try to install WFF again. Hopefully you’ll get the same message as me:

Successful installation of WFF 2.2

Yaaay! I don’t really understand why this process is so cumbersome. It’s as if Microsoft want to hide this product. If you happen to know the reason then feel free to comment.

The controller machine will have the main instance of WFF in the network. WFF will install a WFF agent on the web farm machines.

Setting up the secondary servers

As mentioned above you should have an admin account to the servers. This account will be used when we create the web farm in a later step. We also need to make a couple of exceptions in the firewall. Open the Control Panel and select the System and Security group:

Open control panel

Then select the option marked below:

Allow program through firewall option

You’ll need to open up 3 channels. They are Core networking, File and printer sharing and Remote administration:

Select 3 options in allow programs through firewall window

Do this on all secondary servers in the web farm.

Create a server farm

These steps should be performed on the controller server where we installed WFF 2.2. Open up the IIS manager and you should see a new node called Server Farms:

Server farms node in IIS

Right-click that node and select Create Server Farm… This will open the Create Server Farm window. The first step is to give the web farm some name and provide the administrator account. Don’t worry too much about the name, you can always change it later. Make sure to select the Provision server farm option:

Specify server farm details

The Server farm is available for load balancing option will set up Application Request Routing (ARR) as the load balancer. Uncheck this textbox if you have a different load balancing option in place.

Click next to go to the Add Servers window. Here you can add all the servers participating in the server farm. I’ll first add the primary server so I enter the primary server machine name, check the “Primary Server” checkbox and click add. When you click add then the wizard will attempt to connect to the server using the admin account you’ve provided. Upon successful setup the primary server should be added to the list of servers:

Add primary server in WFF

Then add the secondary servers the same way. If there’s a communication error then you’ll see an error message: maybe the machine name is not spelled correctly, or there’s a firewall problem. At the end of the process I have 3 machines: 1 primary and 2 secondary:

Server farm machines ready

Click finish and there you are, you’ve just set up a web farm using WFF! Open the Server Farms node and you’ll see the farm you’ve just created.

There are a couple of things going on right after the setup process. WFF will install the WFF agents on the primary and secondary servers and it will also synchronise all content, applications, configurations etc. between the primary and secondary servers. Select the Servers node under the farm you’ve just created. This will open up the Servers section in the middle of the screen. At first you may see No under Ready for load balancing:

Ready for load balancing

Here it already says yes as I forgot to save the picture just after the farm creation, but it should say no at first. Look at the bottom half of the screen. You will see that WFF starts the synchornisation process right away:

Wff trace messages

After a couple of minutes the ‘no’ should go over to a ‘yes’.

Testing the primary server sync

Let’s now test if an application is copied from the primary server to the secondary ones. Log onto the primary server and download WPI v3 like we did above. Using Web PI install Url Rewrite 2.0. Go back to the controller machine and watch the status of each web farm member. You’ll see that each is temporarily removed from the network while updating the member machine:

WFF synch machine 1

The machine is brought back online and then it’s the second machine’s turn to be updated. I’ll now log onto the secondary machines to see if the update really happened, and it actually did:

Sync successful with WFF

So far so good!

Adding and removing servers are straightforward operations. Just select the following links in the Actions pane on the right:

Links to add and remove servers

You can see the WFF trace messages in the bottom half of the screen. I believe it’s quite straightforward what you can do here: pause, resume, clear and filter the messages. A maximum of 1000 messages are saved in the trace queue. When this size has been reached the message at the top of the queue is removed in favour of the most recent message. Check out the column headers of the trace messages, they are easy to understand.

Web farms in .NET and IIS part 5: Session state management

Managing session state is vital in a web farm environment. Many websites simply cannot function without maintaining state throughout the user’s visit. Session variables are maintained by the web server and a cookie is saved to the client. This cookie will inform the server who the user is and the server can then extract the session information from it. You will need to give extra consideration to state management in a web farm scenario.

Imagine that the web request is routed to farm machine A and the code invoked by the request relies on some parameters stored in the session. If the same user is then routed to machine B in the next web request which also relies on the session state then the results may unpredictable: as the value is not available in the session then a null pointer exception may be thrown, or if you put in a guard clause then that variable may be assigned some default value thereby “forgetting” what the value was in the previous web request. And then the wrong default value may be stored in the database instead of the one the user has selected.

In this post we discussed session stickiness which makes sure that the same user is directed to the same machine on subsequent requests. We also said that we should avoid this solution so that the load balancer can pick the “right” machine in the farm based on the actual load. In case you need to deploy a Classic ASP site in a web farm then this is your only option: Classic ASP doesn’t have any built-in session state solution that works with a web farm.

You can define session state handling in IIS. Let’s see what the options are.

Session state management

Every web developer must have used the session state in some form. A classic example is when a user fills in a step-by-step signup questionnaire then the values are store in a session:

Session["FirstName"] = txtFirstName.Text;
Session["LastName"] = txtLastName.Text;

The question is how and where these session states are stored.

In IIS you can open the session state manager by choosing the web site and then clicking the Session State icon:

Session state icon in IIS

This opens the following window:

Session state options in IIS

The default choice is in-process. This means that the session state data is stored inside of the worker process called w3wp.exe. You can think of this as storing the session inside the application pool. This option provides the fastest retrieval of the session state as there’s no need to connect to another computer or database to read or store the session data. However, there are several disadvantages which are also related but not limited to web farms:

  • Session management runs inside the worker process which means that it’s consuming memory in the worker process. This memory could be used by other functionality of your web site.
  • The session state is lost as soon as the application pool of your website in IIS is recycled. It is gone forever.
  • This option is particularly dangerous in a web farm environment. Take the example I mentioned above: one farm machine stores the session state but not the other. Subsequent web requests from the same user may not read the correct session state

This last point forces us to introduce sticky sessions which beats the purpose of load balancing so you should always try to avoid this path.

The points above will certainly lead to bad user experience in the form of inexplicable exceptions, unexpected values and irritating bugs. Each machine in the web farm will store its own little subset of the full session state:

In process session management

Salvation comes in the exact opposite of in-process state management: out-of-process state management. This option simply means that instead of storing the session state within the application pool we store it somewhere else, in a place which is independent of the website:

  • ASP.NET session state service: this provides a somewhat slower service than the in-process variant as we need to make calls to a remote server. All session data is stored in memory so shutting down the state machine will wipe out all session data as well
  • SQL server, where we store the state in a database: this option provides the most reliable service but is also the slowest as all data must be read to and from a database. Session data is not lost even if the state machine is shut down
  • A third party component, possibly commercial or self-built

So we move out the session state from each individual farm machine to one central place where the session can be read and stored:

Out of process state management

ASP.NET state service

Open the Services management window and you should find the following service there:

ASP.NET state service in Services window

So it’s a plain old Windows service. Every machine that has a .NET framework installed has this service. As you see by default it is turned off and is set to a manual start mode. Change this to automatic and start the service to activate it:

Set service to automatic

Normally you would do this on the designated state service machine. This will allow external machines to connect to the state service and put session data in and out of it and it’s all stored in memory. Restarting either the state server or just that Windows service will erase the session data.

Also, the service cannot be accessed remotely by default. To enable that option you need to set the value of the following registry key to 1: HKEY_LOCAL_MACHINE\SYSTEM\CurrentControlSet\Services\aspnet_state\Parameters\AllowRemoteConnection. Don’t forget to restart the asp.net state service after the registry key change.

So this Windows service is easy to use but there’s a significant disadvantage: the State Server does not provide any failover option. If the service is stopped or the machine running the state service is shut down then your session variables will not be available and cannot be saved. If you are willing to take that risk then you’ll be good to go in a couple of minutes.

SQL server

As mentioned above this provides the most reliable session service but it also the slowest. If you rely on the session state a lot in your code then there will be a lot of read and write operations to and from your SQL server affecting its performance. However, the added redundancy may well compensate for the slight increase in the performance overhead.

You can have a cluster of SQL Servers configured with SQL AlwaysOn so that even if one state machine goes down then the other machine can take over. As state is persisted in database tables it is only lost if the table data is wiped out. Otherwise it is available even if the machine is restarted.

You must prepare your database to fit the session state schema. This can be done using the aspnet_regsql.exe tool which is located in the following folder:

ASP net reg sql tool location

You can only perform the necessary schema change from the command line. If you double-click the executable file then a GUI will open but that GUI is used for setting up ASP.NET membership, profiles and role management tables in the database. It is not meant for state management purposes.

Make sure that the user you provide in the command line arguments has admin rights to the database otherwise the command will fail. The command will need access to msdb system-stored procedures.

The command line arguments include a paramenter called -sstype which stands for the SQL Server session type. It has 3 options: ‘t’ for temporary, ‘p’ for permanent and ‘c’ for custom. T and p create a database called ASPState. T saves the session in the tempdb database so this data is only temporary: session state is lost if SQL Server is restarted. P on the other hand causes the session data to be saved in the ASPState database and allows the session state management to use the same SQL server.

Make sure to open port 1433 on the machine where you’re intending to save the session data. Note that the parameters are case-sensitive. Examples:

aspnet_regsql.exe -ssadd -sstype c -S sql.mycompany.local -d SQLState -U adminUserName -P adminPassword

-ssadd simply means to add SQL Server session state. The server is specified though -S, -d specifies the database, -U the username and -P the password.

aspnet_regsql.exe -ssadd -sstype c -S sql.mycompany.local -d SQLState -E

This is the same as above except that it uses Windows authentication.

aspnet_regsql.exe -ssadd -sstype p -S sql.mycompany.local -E

Here we ask the tool to create the ASPState database, which is the default name of the session state database, hence we don’t need the -d parameter.

You can view all parameters by typing aspnet_regsql.exe /?

Third party tools

The following tools are all reliable session managers that are built for highly available, highly scalable web farms. They either maintain session data in-process and replicate all changes immediately or store the session data out-of-process through a custom worker process that resides on each server.

Preparing your web site

You need to declare in web.config in case you want to use an out of process state management option. Create a new MVC internet application or simply open the one we used in the previous blog post. Open web.config. You need to declare the session management options within the system.web node. Example:

<sessionState mode="StateServer"								stateConnectionString="tcpip=machinename:42424">
</sessionState>

If you want to use the StateServer service on the local machine then you can ignore the stateConnectionString attribute.

Use intellisense to check the attribute options for the session state node. You will find the SQL variant there as well. You’ll probably recognise the purpose of the mode attribute and its value. The state connection string will be the address of the state machine and the port of the ASP.NET session service. By default it is listening on port 42424.

In case you’re opting for the SQL Server type of solution then this section may look like the following:

<sessionState mode="SQLServer" allowCustomSqlDatabase="true"
	sqlConnectionString="the connection string name to the server">
</sessionState>

Where sqlConnectionString refers to the name of the connection string in the connectionStrings section of web.config which holds the details of the state table. The connection string itself may take up the following format:

<add name="ASPStateConnectionString" connectionString="Data Source=[DB machine name where state DB is stored];Initial Catalog=ASPState;User ID=[db admin user name];Password=[db admin password]"
   providerName="System.Data.SqlClient" />

We’re not done yet, we also need to add a machine and a validation key within the system.web node, that may look something like this:

<machineKey
	validationKey="some long hashed value"
	decryptionKey="another long hashed value"
	validation="SHA1"/>

The validation key is used to validate encrypted data such as the ViewState to ensure it has not been tampered with. The decryption key is used to encrypt and decrypt forms authentication data and viewstate when validation is set to TripleDES.

The default setting for the validation key is AutoGenerate which does exactly what the name applies: the key will be generated automatically by IIS. The default generation mode for the decryption key is IsolateApps. It generates a unique key for each application by using the application ID.

We need this common machine key as we want to run this on several machines so we don’t want the machine key to be automatically generated. The default IsolateApps mode for the decryption key is OK to use in a web farm scenario but the validation key must be common across all servers so we want to produce it ourselves. There are ASP.NET machine key generators out there on the net, you can search yourself, but here are some:

Easiest way to generate MachineKey
Generate ASP.NET Machine Keys
ASP.NET resources

It’s important to emphasise that we want to have static machine key values. The opposite scenario would be that each web farm machine has its own machine key, which will have different values of course and then they access different versions of the session state service.

If you prepare web.config and then deploy your web site using the deployment profile we built in the previous post then the values in the Session State window in IIS will be populated with the values defined in web.config:

State server options filled out in IIS after deploy

Check the machine key in IIS as well:

Machine key icon in IIS

You’ll see that even the validation and decryption keys have also been filled out:

Machine key filled out in IIS

Now that we have set up the out of process state management we can recycle the application pool as much as we like the session state variables will be preserved. If for whatever reason you want to destroy the session state you have the restart the ASP.NET State Service in the Services window or restart the state machine itself.

If you recall from the previous post we set up a batch file that deploys the entire IIS configuration from the staging server to the web farm servers. That will ensure that even the machine keys will be “exported” so that we have one common machine key for the entire farm.

In the next post we’ll start looking at Web Farm Framework.

Web farms in .NET and IIS part 4: Code deployment

So now we have our web farm in place where the servers in the cluster are identical machines: they have the same CPU, same RAM, same OS etc. This is an important point as you certainly want to provide the same user experience regardless of which web farm server receives the web request.

A good way to ensure this is through using templates in a virtualisation environment, such as VMWare. You define a template for a model machine with all the necessary physical traits such as the CPU, disk size, RAM etc. You then use this template to create new virtual machines. This process is a lot smoother and cheaper then buying new physical machines.

The next step is code deployment. You typically want to deploy your website on all machines in the farm, right? You can of course manually copy over your deployment package to each and every server one by one but that’s inefficient and tedious. A staging server can help you out.

Staging server

A staging server is not part of the web farm therefore it won’t get any web requests. However, it will also have IIS installed just like the machines in the web farm. We can first deploy our code to that IIS and we can use that IIS to deploy the website to the web farm servers. The staging server can act as an environment where we check if our code is working properly, if the configuration is working fine etc. It is the last stage before actual employment so ideally the staging server has the same physical properties – CPU, RAM, etc. – as the servers in the web farm:

Staging server

There’s a free tool from Microsoft that you can use to deploy your code: MSDeploy, or Web Deploy. MSDeploy is a command line tool that Visual Studio uses behind the scenes if you choose that deployment method when publishing your code. It can be used to migrate IIS configuration, web content, Windows components. It is a powerful tool which is well suited for web farms because it allows to synchronise some more difficult items such as the registry or the GAC.

Demo

Open Visual Studio 2010 or 2012 and create a new MVC internet application. I will go through the steps using VS 2012 but web deployment is available in VS 2010 as well. You can leave the default website content as it is, we’re only interested in the deployment options. You can open the publish options from the Build menu:

Publish web menu point

This opens the Public Web window:

Publish Web window

In the Select or import a publish profile drop down list select New… Give some meaningful name to the deployment profile:

Give name to deployment profile

You can then select the deployment method:

Deployment method option selector

The Web Deploy publish method represents the MSDeploy tool mentioned above. Like in parts 2 and 3 of this series I don’t have access to any private web farm so I’ll just deploy this web site to the IIS instance of my own computer.

UPDATE: in this post I show how to set up Web Deploy with a real external web server.

Open the IIS manager and add a new web site:

Add application IIS

Give it some name and select the physical location of the deployment package. You can create a new folder using the Make New Folder button.

Back in VS we can now specify the server as localhost and define the application name which we’ve just set up:

Web deploy options

You can validate the connection using the Validate Connection button which requires that you start VS as an administrator.

The Service URL can be the location of your staging server or that of a hosted environment that you’re deploying your site to: http://staging.mysite.com, http://finaltest.mysite.com or whatever URL you gave that IIS website. Press Publish and you may be greeted with the following error message in VS:

Web deployment failed due to wrong runtime version

Back in IIS we need to modify the default application pool that IIS created automatically for the new web site:

Default application pool in IIS

Right-click that application pool and select Advanced settings from the context menu. Change two things in the Advanced Settings window:

Modify application pool in IIS

Run the deployment from VS again and it should proceed without errors:

Web deploy success

You can even check the contents of the deployment folder you specified in IIS to verify that the web site was in fact deployed:

Deployment package in folder

You can even see the same structure in IIS under the website:

Web site contents in IIS

In a real life environment we would check this code into source control, such as GIT or SVN. The staging server would pull out of source control the latest check-in code but for now we’ll just pretend that this localhost environment represents our source control server. So we’ll push this code to our staging server thereby doing what a source control would do for us automatically.

The msdeploy tool is normally located at C:/Program Files/IIS/Microsoft Web Deploy V3. At the time of writing this post V3 was the latest available version. By the time you read this there may be a newer version of course. Open a command prompt, navigate to that directory and run msdeploy.exe without any arguments. You should get a long list of options that msdeploy can be used with:

MSDeploy options in command window

We can write a short batch file to carry out the necessary msdeploy commands for our deployment purposes. In the batch file, which we can call deploy.bat we first specify the directory:

cd “\Program Files\IIS\Microsoft Web Deploy V3”

Then we can fill up the file with msdeploy commands. To deploy from the current location, i.e. localhost, to our staging environment, we can write like this:

msdeploy -verb:sync -source:iisApp=mysite.com -dest:iisApp=mysite.com,computerName=[name of staging server machine]

We’re instructing msdeploy to pull the code out of mysite.com on the local machine and deploy it to mysite.com on the staging server. This command will simply take the contents of the mysite.com website and push it over to the given destination.

Then from there it’s equally straightforward to deploy to our web farm machines:

msdeploy -verb:sync -source:webServer,computerName=[name of staging server machine] -dest:webServer,computerName=[name of first machine in web farm]
msdeploy -verb:sync -source:webServer,computerName=[name of staging server machine] -dest:webServer,computerName=[name of second machine in web farm]

So here we don’t just copy the application itself but the entire IIS config and its contents from the staging server and push it over to the web servers one by one. We’re taking the staging server and push it out to farm machine 1 and 2.

We do this because we want to make sure that the web farm machines have the exact same IIS configuration as the staging one. Remember that we can run tests on the staging server where we fine-tune some IIS settings, like response headers or whatever, and we want those settings to be copied over to all live web servers. We want this to ensure that every member in the farm behaves the same, i.e. the end users get the same behaviour. If we only copy the application contents from the staging machine to the web farm machines then it’s not guaranteed that the IIS settings across the web farm will be the same as on the staging machine.

In other words the staging server is a central place in the system. It is a blueprint for all live web servers in the web farm: the code, the configurations, the IIS settings etc. available on the staging server are the ones that take precedence. It represents the most recent stage of the deployment environment. You shouldn’t go out and change the settings on the web farm servers and hope for the best. Instead, you “play” with the staging server settings and when you’re satisfied with the results you can push out the entire IIS config and its contents to the web farm.

If you want to get really advanced then you can employ a PowerShell which pulls out the web server from the farm just before deploying the code to it to make sure that this machine doesn’t get any traffic during the deployment process. The script would do this to every machine in the farm one by one.

Other content replication tools

MSDeploy is by no means the only tool to replicate content. You can check out the following alternatives:

  • Distributed File System (DFS)
  • Robocopy
  • Offline folders
  • Web Farm Framework

DFS is a solution to keep servers in sync. It consists of two parts: DFS Namespaces (DFSN) and DFS Replication (DFSR). They make up a powerful tool to achieve high availability and redundancy. DFSN ensures that if one server fails then another takes over without any configuration changes necessary. DFSR on the other hand gives you the ability to replicate content over either a LAN or a WAN.

Robocopy – Robust File Copy for Windows – is a command line tool by Microsoft that will replicate content between servers, either one-way or two-way. Its main advantage is the easy-to-configure replication between folders. However, it doesn’t offer a method to redirect to the backup server is the primary server fails. With DFS this is possible to achieve.

The next option, i.e. offline folders, is rather a tool to enable the usage of offline folders which offers faster performance when the network is slow and offline files when the network is completely down. The result is that configuration files will always be available even in the case of network problems. This technique is known as Client Side Caching (CSC): in case of a network failure IIS will use the cached version until the network connection is restored.

We mentioned the Web Farm Framework in the first part of this series: it’s an advanced plug-in to IIS made by Microsoft which can fully automate the content replication tasks. We’ll take a closer look at WFF in an upcoming post.

Web farms in .NET and IIS part 3: Application Request Routing ARR

Introduction

In this post we’ll look at the basics of Application Request Routing. The target audience is beginners who have not worked with ARR before and want to get going with it.

As mentioned in the first post of this series ARR is an extension that can be added to IIS 7.0 and above.

ARR has a lot more available functions than Network Load Balancing (NLB) making it the better load balancing option. However, ARR doesn’t have its own solution for high availability so it cannot handle failures to the server hosting ARR – the result is that the ARR server becomes a single point of failure. This is where NLB enters the scene as it provides high availability – ARR and NLB together make up a very good team.

ARR comes with the following advantages compared to full-blown hardware based load balancers:

  • Cost: if you have IIS7.0 or above you can install ARR free of charge
  • Ease of use: this is of course relative, but if you have some basic knowledge of IIS then the learning curve will be minimal
  • Performance: ARR can handle very large sites with ease – the first resource limit that ARR runs into is network. Most networks support 1 Gbps or more, so this is usually not an issue
  • Flexibility: ARR offers load balancing based on any server variable, URL, cookie etc.

ARR has some disadvantages:

  • As mentioned above ARR doesn’t have its own built-in solution for high availability
  • It does not offer the same range of features as more complete hardware based products. E.g. it lacks SEO treatment and DDoS handling. Some of these shortcomings can be solved with other products, such as NLB or Request Filtering

You can get pretty far with NLB and ARR unless you have some very specialised needs that only expensive commercial products can provide.

ARR is a software based reverse proxy solution – for an explanation of these terms check out the first post in this series. It supports all common load-balancing algorithms, such as server weighting, round-robin etc. The following general list shows the features available in ARR:

  • Health checking
  • Caching
  • Can work as a Content Delivery Network (CDN)
  • SSL offloading
  • HTTP compression
  • URL rewrite
  • Usage reporting
  • Sticky sessions
  • Programming and automation support

ARR only handles HTTP traffic, so it cannot work in conjunction with FTP, RDP etc.

Routing

ARR routing goes through three touchpoints:

  1. IIS site binding: your website will of course need to have a valid URL which we can call the ARR base. It is a site that appears below the Sites node in the IIS manager
  2. URL rewrite rule: this happens at the IIS level
  3. The server farm

When a web request hits the ARR server it is first caught by the IIS binding. A standard binding needs to exist on a website. This is the same process as setting up a new website in IIS under the Sites node. It can be a generic website with no real content – it is only used for the HTTP and HTTPS bindings. Also, it is here where SSL offloading occurs.

The request is then caught by URL Rewrite as long as an appropriate rule exists. This happens at the PreBeginRequest step in the IIS pipeline so it is performed before any other site functionality. URL Rewrite rules can edit server variables as well.

In the last step the server farm gets the request from URL Rewrite. It determines which server to send the request to based on the load balancing algorithm and client affinity settings.

How-to

You can download ARR on your designated routing server using the web platform installer available here. Search for Application Request Routing in the search window of the installer and select the below version:

ARR in web platform installer

By the time you read this post there may of course be a new version of the extension.

Click Add and Install in the installer window. The installer will fetch all the dependencies as well.

As in the case of Network Load Balancer I don’t have a private network of Windows servers. Therefore I can show you the steps you need to take in order to create a web farm but will not actually create one in the process.

As soon as you install ARR you will see a new node called Server Farms in the IIS manager:

Server farms node in IIS

Right click on that node and select Create Server Farm. The Create Server Farm window will appear where you can add the Server farm name:

Create server farm window

You can provide any name here, like in the case of the, but give it some URL-type of name, such as arr.mysite.com. It’s a good idea to provide the same name as the URL for the ARR version of your website. Example: if your website is http://www.fantasticsite.com then the ARR version may well be arr.fantasticsite.com. Click Next to go to the Add Server window:

Add Server window in ARR setup

Here you can add the servers that are the members of the farm. Add the server address one by one in the Server Address textbox and click Add after each entry. The servers you will appear in the list box. Click Finish when you’re done with this step. ARR will then ask you if you want to create any URL rewrite rules:

Ask if URL rewrite rules should be added

Click yes. You’ll see that the server farm will appear in the Server Farms list of the IIS manager. Open the Server Farms node, select the name of the farm you’ve just created and you will see some additional setup options:

Server farm setup options in IIS

The default options are sufficient to test the network. Open a web browser and navigate to the ARR name of your website such as arr.mysite.com. The request should be routed to one of the web farm members you specified during the setup.

Let’s look at some of the options in the IIS manager. Clicking on Caching will open the following window:

Caching options window ARR

The default setting is that anything that goes through ARR will be cached for 60 seconds and disk cache is enabled. So if 2 web requests ask for the same resource within a minute ARR will hand back the cached version to the second request without consulting the web tier. You can even set whether the caching mechanism should cache the results by the query string or not. Example: arr.mysite.com?arg=1 and arr.mysite.com?arg=2 will probably return different results from your backend database so it’s a good idea to cache by the query string.

So what is cached? ARR follows the caching rules set out in RFC2616. By default all static content such as css, js etc. is cached.

If your site streams media then checking the Enable request consolidation checkbox can be a good idea. It will consolidate all the streaming requests to reduce the number of requests.

Also, it is recommended to turn off the idle time setting of the application pool:

Idle time out in IIS

By default this value is set to 20 minutes. This means that the application pool will enter “sleep” mode if it sits idle, i.e. receives no web request for 20 minutes. Set that value to 0 to turn off this feature, which is recommended anyway, so not only in web farm scenarios. This keeps your site actively running while maintaining the health checking even during quiet times.

ARR can even function as a Content Delivery Network to front entire web farms. Check out the resources on this page for a video user guide.

The Health Test window looks as follows:

Health test window ARR

Here you can schedule explicit health checks and/or rely on live traffic tests. Live traffic testing watches for errors with the live traffic. If it sees what you define as a failure it marks that server as unhealthy. The main advantage of this method is that is watches for errors with any type of page request not just a single testing URL. The main disadvantage is that if the developers release a bad, untested version of the website then eventually all web farm machines may be turned off as all of them may eventually produce the same error if the same page is requested by the clients. This makes a DoS attack a breeze and even completely innocent clients can break down your site if they hit F5 often enough. Also, if a live traffic test shuts off a web server then that server is not brought back online automatically. Therefore it’s very important that you set up explicit URL testing as well and don’t rely on live tests exclusively.

You can configure live traffic tests as follows:

  • A comma separated list of failure codes that will cause the web server to be marked as unhealthy. You can even define a range with a hyphen, e.g. 400-500, or mix the styles such as 500, 510-599
  • The number of maximum failures that must occur during the failover period before the server is marked unhealthy
  • The failover period in seconds is used along with the maximum failures to determine if there are too many failures during the failover period. If this value is set to 0 then live traffic testing is disabled.

With explicit URL testing you ask ARR to send a request to the web farm members with specific time intervals and inspect the response. You can provide the URL in the URL text box. The test request will be sent to each machine in the farm. It’s highly recommended that you set up explicit URL checks so that unhealthy servers are not allocated any web requests. You can enable explicit URL tests by providing a URL in the appropriate text box. We’ll come back to this type of test a little later, but here are the parameters you can set:

  • The test URL whose response is inspected by ARR
  • The time between tests in seconds – if the test fails ARR will continue to send the same request and bring the server back online if the test passes
  • The timeout in seconds before the health test gives up on a page that takes too long. If ARR receives no response before the timeout then the server is marked as unhealthy.
  • The Acceptable status codes field works the same way as failure codes in the case of live traffic tests
  • You can also perform a content match to ensure that a certain word or phrase can be found on the page.

Bear in mind that ARR will mark the server as unhealthy after the very first bad response. Therefore make sure that the testing interval is not too long as even fully functioning and healthy servers may produce bad responses from time to time.

In the bottom of the same window you’ll see another text box where you can define the number of minimum servers. The idea here is that if you know that you need a certain number of healthy servers to reasonably handle the load then the health test shouldn’t allow the server farm to drop below that level. Example: your web farm has 10 machines and you need a minimum of 6 to handle the load on an average day. If the number of healthy servers drops to 5 then it may be a better idea to bring all machines back online again: 5 out of 10 users will receive good experience, so not all visitors will be impacted. The quality level is difficult to predict: your users may see intermittent errors that only occur if their request is directed to one of the bad servers. This is a tradeoff: the web farm will not be rendered completely useless due to overloading but the user experience may not be top class either. If this limit is reached then ARR will ignore all scheduled tests and bring back all servers online again.

The test URL should be a very simple self-contained page: it should not access the database or your application logic. If your database or application layer fails then all the web farm machines will be taken out of action. The ideal test page contains only some static HTML. Make sure that the test page only fails if there’s a problem with the specific server the page is employed on. Otherwise, if the test page fails on every server then the entire web farm will be useless as all servers are brought offline.

You can pick the load balance algorithm in the Load Balance window, meaning how would like to set the rules for web request routing:

Load balance algorithm options ARR

The default option is Least current request which is probably the most logical choice. This option means that the web request will be routed to the web farm member that has the least amount of request. Weighted round robin tells ARR to route the requests to each web farm member in turn: first to server 1, then 2 then 3, back to 1, then 2, then 3 etc. regardless of the current load each machine. You can find the explanation of each algorithm in the first post of this series.

If you change the default options you’ll need to select Apply to the right:

Apply changes to ARR in IIS

The Monitoring and Management window will show you the web request statistics and current health state of each member of the web farm:

Monitoring and management ARR in IIS

You can even get some real time disk cache statistics in the bottom of this window:

Real time disk cache stats ARR

Proxy allows us to configure how the packets are forwarded:

Proxy settings ARR

Preserving the X-Forwarded-For header can be useful if you want to see which IP the client’s request originated from.

In the Routing Rules window we can set various advanced features.

Set routing rules ARR

You can e.g. let the ARR server take care of SSL encryption and decryption by selecting the Enable SSL offloading option which is set by default. Keep in mind that ARR is a reverse proxy load balancer meaning that the web farm servers will see the http request coming from ARR and not from the client. If ARR is responsible to encrypt and decrypt SSL then the web farm will get HTTP requests from ARR even if the original request was sent through HTTPS. If it is critical in your environment that the web farm receives HTTPS requests then a tool called ARR Helper can be something to consider: it digs out the details of the original HTTPS message from the ARR server and writes them back to the original locations thereby fooling the web servers into thinking that the request came from the client in the form of HTTPS. The tool can be downloaded from this link. It comes in two versions: 32bit and 64bit. The tool must be installed on the web servers, not on the ARR machine.

In the Server Affinity window you can set whether you want sticky sessions or not.

Server affinity window in ARR

The default setting is that there are no sticky sessions. Selecting Client affinity means that the same user will be directed to the same machine during the web session. Session stickiness will be cookie based, you can even set the name of the cookie in the Cookie name text box.

With the web farm and the load balancer in place you can test how ARR behaves if one of the web farm servers is taken out of action. Go to the IIS manager of a server and stop the application pool of the website deployed there:

Stop application pool ARR web farm

If you selected the round robin routing algorithm then you will see the following: a normal 200 response from the web server still up and running followed by a 503 from the one you’ve just shut down, then back to healthy server, then again to the inactive one etc. We can set up a status check to avoid this behaviour so that ARR can determine if a web server is healthy before routing any web requests to it.

Go back to ARR and select the Health checks option. Enter a URL which ARR can send requests to. It can be a page dedicated to the health checks, a very simple page with no value to a “real” visitor. Its only reason to exist is to check the state of the web server. How you implement such a logic is up to you, e.g. check if the page can connect to a web service. The outcome of that logic should be a simple boolean value: is this web server in a healthy state or not.

Then you can set the interval for the health checks in seconds:

Set interval of scheduled health checks

Note that these checks are real web requests so it creates some additional load on your web site. Therefore make the status URL as lightweight as possible.

Then you can set the upper limit of the response timeout and the acceptable status codes as well. The response match text box has the following purpose: say that your status page writes a specific string in the response if the status is fine, such as “True” or “Success”. You can put that string in this text box. If the response from the status page is different from this string then the machine is deemed unhealthy.

You can test the status response by pressing the Verify URL test button:

Verify URL test button ARR

If you again turn off the application pool of one of the farm members then you should see that ARR does not route any traffic to that server. Also, the Monitoring and Management window should tell you that the server is not healthy:

Unhealthy server in web farm

High availability for ARR

As mentioned before ARR doesn’t have any built-in high availability feature. If the ARR server is down then the web farm will be unavailable. This doesn’t sound too convincing as one of the reasons we set up web farms is to ensure high availability, right? One solution is to go for a full-blown hardware based commercial load balancer but those typically cost a lot of money. If you are looking for a cheaper alternative then Network Load Balancing (NLB) can be useful. NLB is a load balancer with limited capabilities but can be used together with ARR. NLB must be installed and configured on the web servers of the farm. See the previous post on NLB.

This concludes our discussion on the basics of ARR.

Web farms in .NET and IIS part 2: Network Load Balancer

This post is direct continuation of the post on the general introduction into web farms. We briefly mentioned NLB in the previous post: it performs load balancing by manipulating the MAC address of the network adapters.

This product is in fact not the primary choice for load balancing nowadays. It is very easy to use but it lacks many features that a full blown load balancer has but it has its place, especially in conjunction with Application Request Routing ARR – more on that in the next post.

Web traffic is routed to all servers in the web farm but only one of them will actually respond while the others simply ignore the request. Therefore NLB doesn’t have any load balancing device in front of the web farm – the farm machines work together to “solve an issue”.

Network load balancer

You first need to activate NLB on each machine in the web farm. If you have Windows Server 2008 R2 then in the Start menu select Administrative Tools and then Server Manager. In the Server Manager window select the Features node and click the Add Features menu point in the Action menu. Select NLB in the list that appears:

NLB activation

Click Install and if the installation was successful then you’ll be greeted with the following message:

NLB activation success

The NLB manager will then be available through a simple search:

NLB among search results

I don’t actually have access to 2 or more private machines with Windows Server installed and I don’t want to misuse my company’s network either for my private blogging purposes so it’s probably best to point you to a video showing how to set up NLB. I’d suggest you to watch the video to get a general idea but make sure you read my comments below before you actually set up the NLB cluster:

How to set up NLB – a Youtube video

Let’s add some information to the setup process:

In the New Cluster: Host Parameters window you can choose the default state of the host when it comes online: started, stopped or suspended. Started is a good option of course. The ‘Retain suspended state after computer restarts’ checkbox is asking you if the host should be put into a suspended state in case it is rebooted. This is an interesting feature: say that you need to update one of the hosts and the updates require a machine restart. You may not want the host to jump back online again as the changes you made may be breaking ones that need to be tested first.

In the same window you can set the priority of the cluster member. Normally the first one you create will have priority 1, the next one will be priority 2 and so on. Keep in mind that the servers normally function as peers to each other so the default 1,2…n increments are fine.

In the New Cluster: Cluster Parameters window you need to select the Cluster operation mode: unicast, multicast or IGMP multicast. Normally it’s going to be unicast but in a virtual environment you’ll probably need to select multicast. If your network supports multicast then either of the multicast types will be the best solution. Make sure to ask your network engineers in the office if you’re not sure which option is applicable to you.

In the same window you can add a Full internet name. This is optional, you can even leave it blank. It gives you an administrative name for the NLB cluster.

In the New Cluster: Port Rules window you can define which ports will be balanced:

NLB port rules

Click ‘Edit’ and the Add/Edit Port Rule window will open:

NLB port rules

As this is a web farm you may as well choose to load balance port 80 only so set 80 in the From and To port range option:

NLB from port 80 to port 80

We are dealing with TCP so you may as well select TCP from the Protocols options:

NLB Tcp

In the same window you select affinity under the Filtering mode options – this becomes available because we select the Multiple host option as we have 2 hosts as opposed to the Single host option. The choices for affinity are none, single or network. Normally the default choice is None. This means that when a request comes from the certain IP address and we get a new request from the IP address then we don’t care which web server the client is routed to.

This is what you should aim for: no sticky sessions. You can store the session state on a different machine – this is a topic I’ll take up in this series on web farms. Avoiding sticky sessions makes load balancing more effective. With sticky sessions the load balancer is constrained to direct the same user to the same web server even if that server is under heavy load so we lose some of the efficiency of load balancing. The option ‘Single’ means that the user with the same IP address should always be directed to the same machine. The ‘Network’ option is the same as ‘Single’ but for a subgroup of users. This last option is very rarely used.

You can add another Port Rule for SSL: the From and To Port Range options will be set to 443.

All requests coming to a port not defined in this window will be ignored because NLB will not know how to load balance it.

Now you can press finish and the NLB manager will start creating our cluster. You’ll see that the status is Pending at first:

NLB cluster creation pending

Eventually the status will change to Converged which means we can add a new web server: right click the cluster name, which should be the name you provided in the Full internet name text box, and choose Add Host to Cluster which will lead you through the same windows as when you set up the first node above. Many values such as the port rules will already be populated based on your previous entries. The NLB manager will add this node to the cluster when you’re finished setting it up.

At the end of this process you should see two Converged web farm members in the NLB manager window. You can verify the setup by pinging the name of the cluster you chose in the Full internet name text box. Enter the following in the command prompt: ping
You should see that it answers with the IP of the cluster that you see in the NLB manager, e.g. nlb.mysite.com (123.456.789.10). You can now also navigate to nlb.mysite.com in a web browser and it will probably take you to the first priority web farm member, but this is not for certain: NLB can of course route the request to whichever member in the cluster. In case you set up the system with affinity then you should see that you get to the same cluster member upon subsequent requests.

Keep in mind that NLB has no concept of health checks so it will route to any member of the web farm regardless of the state of the members. Even if a bad server responds with a 503 NLB will not take any note of that and will happily route the request to that machine. This is especially harmful if you’ve set up affinity and the user is always directed to the same machine in the immediate future.

You can easily temporarily remove a cluster member, e.g. if you want to perform some patch on it. Right-click the cluster member node in the NLB manager, click Control Host and select Stop or Drainstop. Stopping means that the node will not accept any connections. Drainstop means that the node will not accept any new connections.

In the above scenario with 2 web farm members stopping one of the two nodes will make NLB route all the web traffic to the one available machine. That’s basically a very simple solution for high availability. NLB handles server failures automatically – when one fails then it does not take part in the decision process on which server should handle the request.

This concludes the introduction to NLB. In the next post we’ll look at ARR.

Web farms in .NET and IIS part 1: a general introduction

Introduction

In this series I’ll try to give you an overview of web farms in the context of IIS and .NET. The target audience is programmers who want to get started with web farms and the MS technologies built around them. I used IIS 7.5 and .NET4.5 in all demos but you should be fine with IIS7.0 and .NET4.0 as well and things should not be too different in IIS8.0 either.

What is a web farm?

A web farm is when you have two servers that perform the same service. You make an exact copy of an existing web server and put a load balancer in front of them like this:

Web farms basic diagram

It is the load balancer that catches all web requests to your domain and distributes them among the available servers based on their current load.

The above structure depicts the web farm configuration type called Local Content. In this scenario each web farm machine keeps the content locally. It is up to you or your system administrator to deploy the web site to each node after all the necessary tests have been passed. If the web site writes to a local file then the contents of that file should be propagated immediately to every node in the web farm.

With Local Content the servers are completely isolated. If something goes wrong with one of them then the system can continue to function with the other servers up and running. This setup is especially well suited for distributing the load evenly across the servers.

Disadvantages include the need for an automated content replication across servers which may become quite complicated if you have many elements to replicate: web content, certificates, COM+ objects, GAC, registry entries etc. Also, as mentioned above, if the web site writes to disk then the contents of that file must be propagated to the other nodes immediately. You can alternatively have a file share but that introduces a single point of failure so make sure it is redundant.

Local Content is probably the most common solution for many high traffic websites on the Internet today. There are other options though:

  • Shared network content, which uses a central location to manage the content where all web servers in the farm point to that location
  • Shared Storage Area Network (SAN) or Storage Spaces in Windows Server 2012, which allow the storage space to be attached as a local volume so that it can be mounted as a drive or a folder on the system

We’ll concentrate on the Local Content option as it is the easiest to get started with and it suits most web farm scenarios out there. If you’re planning to build the next Google or Facebook then your requirements are way beyond the scope of this post anyway: take a look at the web farming frameworks by Microsoft mentioned at the very end of this post. They are most suitable for large websites, especially Windows Azure Services.

Why use a web farm?

The main advantage is reliability. The load balancer “knows” if one of the web servers is out of service, due to maintenance or a general failure, it doesn’t matter, and makes sure that no web request is routed to that particular server. If you need to patch one of the servers in the farm you can simply temporarily remove it from the farm, perform the update and then bring the server up again:

One server off

You can even deploy your web deployment package on each server one after the other and still maintain a continuous service to your customers.

The second main advantage of a web farm is to be able to scale up the web tier. In case you have a single web server and you notice that it cannot handle the amount of web traffic you can copy the server so that the load will be spread out by the load balancer. The servers don’t have to be powerful machines with a lot of CPU and RAM. This is called scaling out.

By contrast scaling out the data tier, i.e. the database server has been a lot more difficult. There are available technologies today that make this possible, such as NoSql databases. However, the traditional solution to increase the responsiveness of the data tier has been to scale up – note ‘up’, not ‘out’ – which means adding more capacity to the machine serving as the data tier: more RAM, more CPU, bigger servers. This approach is more expensive than buying more smaller web machines, so scaling out has an advantage in terms of cost effectiveness:

Data tier vs web tier

Load balancers

How do load balancers distribute the web traffic? There are several algorithms:

  • Round-robin: each request is assigned to the next server in the list, one server after the other. This is also called the poor man’s load balancer as this is not true load balancing. Web traffic is not distributed according to the actual load of each server.
  • Weight-based: each server is given a weight and requests are assigned to the servers according to their weight. Can be an option if your web servers are not of equal quality and you want to direct more traffic to the stronger ones.
  • Random: the server to handle the request is randomly selected
  • Sticky sessions: the load balancer keeps track of the sessions and ensures that return visits within the session always return to the same server
  • Least current request: route traffic to the server that currently has the least amount of requests
  • Response time: route traffic to the web server with the shortest response time
  • User or URL information: some load balancers offer the ability to distribute traffic based on the URL or the user information. Users from one geographic location region may be sent to the server in that location. Requests can be routed based on the URL, the query string, cookies etc.

Apart from algorithms we can group load balancers according to the technology they use:

  • Reverse Proxy: a reverse proxy takes an incoming request and makes another request on behalf of the user. We say that the Reverse Proxy server is a middle-man or a man-in-the-middle in between the web server and the client. The load balancer maintains two separate TCP connections: one with the user and one with the web server. This option requires only minimal changes to your network architecture. The load balancer has full access to the all the traffic on the way through allowing it to check for any attacks and to manipulate the URL or header information. The downside is that as the reverse proxy server maintains the connection with the client you may need to set a long time-out to prepare for long sessions, e.g. in case of a large file download. This opens the possibility for DoS attacks. Also, the web servers will see the load balancer server as the client. Thus any logic that is based on headers like REMOTE_ADDR or REMOTE_HOST will see the IP of the proxy server rather than the original client. There are software solutions out there that rewrite the server variables and fool the web servers into thinking that they had a direct line with the client.
  • Transparent Reverse Proxy: similar to Reverse Proxy except that the TCP connection between the load balancer and the web server is set with the client IP as the source IP so the web server will think that the request came directly from the client. In this scenario the web servers must use the load balancer as their default gateway.
  • Direct Server Return (DSR): this solution runs under different names such as nPath routing, 1 arm LB, Direct Routing, or SwitchBack. This method forwards the web request by setting the web server’s MAC address. The result is that the web server responds directly back to the client. This method is very fast which is also its main advantage. As the web response doesn’t go through the load balancer, even less capable load balancing solutions can handle a relatively large amount of web requests. However, this solution doesn’t offer some of the great options of other load balancers, such as SSL offloading – more on that later
  • NAT load balancing: NAT, which stands for Network Address Translation, works by changing the destination IP address of the packets
  • Microsoft Network Load Balancing: NLB manipulates the MAC address of the network adapters. The servers talk among themselves to decide which one of them will respond to the request. The next blog post is dedicated to NLB.

Let’s pick 3 types of load balancers and the features available to them:

  • Physical load balancers that sit in front of the web farm, also called Hardware
  • ARR: Application Request Routing which is an extension to IIS that can be placed in front of the web tier or directly on the web tier
  • NLB: Network Load Balancing which is built into Windows Server and performs some basic load balancing behaviour

Load balancers feature comparison

No additional failure points:

This point means whether the loadbalancing solution introduces any additional failure points in the overall network.

Physical machines are placed in front of your web farm and they can of course fail. You can put a multiple of these to minimise the possibility of a failure but we still have this possible failure point.

With ARR you can put the load balancer in front of your web farm on a separate machine or a web farm of load balancers or on the same web tier as the web servers. If it’s on a separate tier then it has some additional load balancing features. Putting it on the same tier adds complexity to the configuration but eliminates additional failure points, hence the -X sign in the appropriate cell.

NLB runs on the web server itself so there are no additional failure points.

Health checks

This feature means whether the load balancer can check whether the web server is healthy. This usually means a check where we instruct the load balancer to periodically send a request to the web servers and expect some type of response: either a full HTML page or just a HTTP 200.

NLB is only solution that does not have this feature. NLB will route traffic to any web server and will be oblivious of the answer: can be a HTTP 500 or even no answer at all.

Caching

This feature means the caching of static – or at least relatively static – elements on your web pages, such as CSS or JS, or even entire HTML pages. The effect is that the load balancer does not have to contact the web servers for that type of content which decreases the response times.

NLB does not have this feature. If you put ARR on your web tier then this feature is not available really as it will be your web servers that perform caching.

SSL offload

SSL Offload means that the load balancer will take over the SSL encryption-decryption process from the web servers which also adds to the overall efficiency. SSL is fairly expensive from a CPU perspective so it’s nice to relieve the web machine of that responsibility and hand it over to the probably lot more powerful load balancer.

NLB doesn’t have this feature. Also, if you put ARR on your web tier then this feature is not available really as it will be your web servers that perform SSL encryption and decryption.

A benefit of this feature is that you only have to install the certificate on the load balancer. Otherwise you must make sure to replicate the SSL certificate(s) on every node of the web farm.

If you go down this path then make sure to go through the SSL issuing process on one of the web farm servers – create a Certificate Signing Request (CSR) and send it to a certificate authority (CA). The certificate that the CA generates will only work on the server where the CSR was generated. Install the certificate on the web farm server where you initiated the process and then you can export it to the other servers. The CSR can only be used on one server but an exported certificate can be used on multiple servers.

There’s a new feature in IIS8 called Central Certificate Store which lets you synchronise your certificates across multiple servers.

Geo location

Physical loadbalancers and ARR provide some geolocation features. You can employ many load balancers throughout the world to be close to your customers or have your load balancer point to different geographically distributed data centers. In reality you’re better off looking at cloud based solutions or CDNs such as Akamai, Windows Azure or Amazon.

Low upfront cost

Hardware load balancers are very expensive. ARR and NLB are for free meaning that you don’t have to pay anything extra as they are built-in features of Windows Server and IIS. You probably want to put ARR on a separate machine so that will involve some extra cost but nowhere near what hardware loadbalancers will cost you.

Non-HTTP traffic

Hardware LBs and NLB can handle non-HTTP traffic whereas ARR is a completely HTTP based solution. So if you’re looking into possibilities to distribute other types of traffic such as for SMTP based mail servers then ARR is not an option.

Sticky sessions

This feature means that if a client returns for a second request then the load balancer will redirect that traffic to the same web server. It is also called client affinity. This can be important for web servers that store session state locally so that when the same visitor comes back then we don’t want the state relevant to that user to be unavailable because the request was routed to a different web server.

Hardware LBs and ARR provide a lot of options to introduce sticky sessions including cookie-based solutions. NLB can only perform IP-based sticky sessions, it doesn’t know about cookies and HTTP traffic.

Your target should be to avoid sticky sessions and solve your session management in a different way – more on state management in a future post. If you have sticky sessions then the load balancer is forced to direct traffic to a certain server irrespective of its actual load, thus beating the purpose of load distribution. Also, if the server that received the first request becomes unavailable then the user will lose all session data and may receive an exception or unexpected default values in place of the values saved in the session variables.

Other types of load balancers

Software

With software load balancers you can provide your own hardware while using the vendor-supported software for load balancing. The advantage is that you can provide your own hardware to meet your load balancing needs which can save you a lot of money.

We will in a later post look at Application Request Routing (ARR) which is Microsoft’s own software based reverse proxy load balancer which is a plug-in to IIS.

Another solution is HAProxy but it doesn’t run on Windows.

A commercial solution that runs on Windows is KEMP LoadMaster by KEMP Technologies.

Frameworks

There are frameworks that unite load balancers and other functionality together into a cohesive set of functions. Web Farm Framework and Windows Azure Services are both frameworks provided by Microsoft that provide additional functionality on top of load balancing. We’ll look at WFF in a later post in more depth.

How to bundle and minify CoffeeScript files in .NET4.5 MVC4 with C#

In the previous blog post I showed you how the bundling and minification mechanism in MVC4 works with CSS and JavaScript files. Some of you may have CoffeeScript files in their projects and you may be wondering if they can be bundled as well. The answer is yes, and it’s not complicated at all.

Add a new folder to your MVC4 application called CoffeeScript. Add a file called customers.coffee to it and insert the following CoffeeScript code:

class Customer
	constructor: (@name) ->

	complain: ->
		alert @name + " says: WHERE IS MY ORDER???!!!!"

cust = new Customer("Angry customer")
cust.complain()

This should not be too complicated I believe: we construct a Customer object and call its complain() method.

The next step is to import a package called CoffeeBundler from NuGet: PM> install-package CoffeeBundler. This will add the necessary DLLs to your projects. Now we have access to another type of bundler which will translate CoffeeScript into JavaScript and also perform the bundling and minification processes.

Next go to the BundleConfig.RegisterBundles method and add the following bit of code:

Bundle coffeeBundler = new ScriptBundle("~/bundles/coffee")
                .Include("~/CoffeeScript/customers.coffee");
            coffeeBundler.Transforms.Insert(0, new CoffeeBundler.CoffeeBundler());
            bundles.Add(coffeeBundler);

As CoffeeScript is nothing but JavaScript we still need to create a ScriptBundle object and include our CoffeeScript file in it. We also need to add a transform which will translate the CoffeeScript files into JavaScript, compile them and bundle/minify them. We also want to make sure that this is the first transformation that runs, hence the 0 in the Insert method. By default the JS bundler is the first in the transformation process.

Now let’s open _Layout.cshtml and insert the following bit of code right before the closing /body tag:

<script src="@BundleTable.Bundles.ResolveBundleUrl("~/bundles/coffee")"></script>

In case you do a build now you may receive some errors that complain about a file called AppStart_RegisterCoffeeBundler.cs. This was added automatically when we inserted the CoffeeBundler package from NuGet. You can safely delete this file; its automatically generated code had not quite caught up with .NET4.5 when writing this blog post.

The reason we use the longer script tag to call the ResolveBundleUrl instead of the shorter Scripts.Render is the same: the CoffeeBundler is a bit behind the developments in .NET4.5 and it’s safer to use the longer version.

Now run the application. If all went well then you should see a standard JavaScript alert stating that there’s an angry customer. Open the source view to check the generated HTML. You should see that the CoffeeScript bundle has been created:

<script src="/bundles/coffee?v=_Jtpxzv6QVFgvnfRHCOt5_bHmKJW0D27L4nwCa0u1gU1"></script>

Call that bundle from the browser, the address should be http://localhost:xxxx/bundles/coffee and you should see the JavaScript that the CoffeeScript bundler has generated:

(function(){var n,t;n=function(){function n(n){this.name=n}return n.prototype.complain=function(){return alert(this.name+" says: WHERE IS MY ORDER???!!!!")},n}(),t=new n("Angry customer"),t.complain()}).call(this)

So, simple as that!

View the list of MVC and Web API related posts here.

Elliot Balynn's Blog

A directory of wonderful thoughts

Software Engineering

Web development

Disparate Opinions

Various tidbits

chsakell's Blog

WEB APPLICATION DEVELOPMENT TUTORIALS WITH OPEN-SOURCE PROJECTS

Once Upon a Camayoc

Bite-size insight on Cyber Security for the not too technical.

%d bloggers like this: