Using a Windows service in your .NET project part 5: the Windows Service project basics
October 20, 2014 9 Comments
Introduction
In the previous post of this series we added the console UI to the application. The user can now add a HttpJob to the MongoDb database but there’s no job handler yet. In this post we’ll start building the Windows service which will do just that.
I’ll assume you have no or very limited knowledge of Windows services so I’ll go through this at quite a slow pace.
We’ll be working on the demo project we’ve been building so far so have it ready in Visual Studio 2012/2013.
The Windows Service layer
There’s a special project type in Visual Studio professional called… …Windows Service! It’s found under the Windows category VS 2012/2013 Pro:

Call it Demo.HttpJobRunner and add it to the solution. The template will add a couple of elements to the project:

You’ll recognise App.config probably. As the Windows Service will be a standalone application it must have its own configuration file with its own settings, connection strings etc. It won’t be able to read the app.config file of Demo.ConsoleConsumer of course.
Program.cs seems probably familiar from standard console apps where Program.cs includes the entry point to the application, i.e. Main. This is no different as there we have a Main method which calls upon an array of services to be started. You can add other services to the ServicesToRun method but we’ll have only one. The Main in Program.cs will at present start the service called Service1. That refers to Service1.cs of course. That’s the default name of the file, similar to “Class1” in C# library projects. You’ll see that there are 2 elements called Service1. The top element is the design view which includes the code behind file Service1.cs. Right-click the design file, select Rename, and rename it to HttpJobRunner. You’ll get a question asking if you want to rename the class to HttpJobRunner, click Yes. This is what you should have after the renaming:
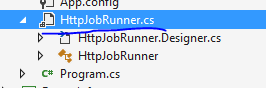
So now we have 3 elements called HttpJobRunner. The two “normal” C# classes are partial so they are joint files really. One of the HttpJobRunner.cs files will have the following class declaration:
partial class HttpJobRunner
This small file contains code required to properly run the service, we won’t change anything in there.
The other part of HttpJobRunner has a different declaration:
public partial class HttpJobRunner : ServiceBase
So it derives from ServiceBase in the System.ServiceProcess namespace. The class includes the overridden OnStart and OnStop methods which are empty by default:
public partial class HttpJobRunner : ServiceBase
{
	public HttpJobRunner()
	{
		InitializeComponent();
	}

	protected override void OnStart(string[] args)
	{
	}

	protected override void OnStop()
	{
	}
}
These methods are triggered when the service is started and stopped. We’ll return to these methods in the next post.
Service installers
The service will need to be installed. Add a new item of type Installer class to the service project:

The template will add the following elements:
![]()
We’ll change the properties of our Windows service within the installer. There are two installer-type objects that we’ll use:
- ServiceInstaller: to define the service description, display name, service name, start type and some other properties like service dependencies
- ServiceProcessInstaller: the define under which account the service should be running
Windows Service properties
Navigate to the partial HttpJobRunnerInstaller class which includes the InitializeComponent method:

Under…
private System.ComponentModel.IContainer components = null;
…add the following installer classes and a service name field:
private ServiceInstaller _httpJobServiceInstaller;
private ServiceProcessInstaller _httpJobServiceProcessInstaller;
private String _serviceName = "HttpJobRunner";
In InitializeComponent() we already have one line of code that constructs a new Container() object. We’ll leave it there. Below that let’s construct the installer objects:
_httpJobServiceInstaller = new ServiceInstaller();
_httpJobServiceProcessInstaller = new ServiceProcessInstaller();
Next we’ll set up the service properties:
_httpJobServiceInstaller.Description = "HttpJob runner service which carries out a series of HTTP calls";
_httpJobServiceInstaller.DisplayName = "HttpJob automatic runner";
_httpJobServiceInstaller.ServiceName = _serviceName;
_httpJobServiceInstaller.StartType = ServiceStartMode.Automatic;
The service name is not the same as the display name. The service name is how Windows can find the service.
Example:

Right-click a service and select Properties. “Name” corresponds to DisplayName.
We have the following startup types:
- Automatic: start the service as soon as the computer starts. The user doesn’t even need to log in
- Manual: the user must manually start the service
- Disabled: the service won’t start until the user changes the startup type and starts the service manually
You’ll notice a tab called Dependencies in the Properties window. It lists any other Windows service service that this particular service depends on. If those services are not available then the dependent service won’t run either. You can add the dependencies by name using the ServicesDependedOn property. Example:
_httpJobServiceInstaller.ServicesDependedOn = new string[] { "servicename1", "servicename2" };
A Windows Service can run under a specific security context:
- LocalService: runs as a non-privileged user on the local computer with anonymous credentials
- NetworkService: enables the service to authenticate to another computer on the network
- LocalSystem: almost unlimited privileges where the service presents the computer’s credentials to any remote server
- User: runs under the security settings of a user
The following will specify the security context using the ServiceAccount enumeration:
_httpJobServiceProcessInstaller.Account = ServiceAccount.LocalSystem;
In case you want to run the service under a specific user then you can add the username and password details here:
_httpJobServiceProcessInstaller.Account = ServiceAccount.User;
_httpJobServiceProcessInstaller.Username = "username";
_httpJobServiceProcessInstaller.Password = "password";
Finally we add our installers to the list of installers that need to run:
Installers.AddRange(new System.Configuration.Install.Installer[]
	{
		_httpJobServiceInstaller
		, _httpJobServiceProcessInstaller
	});
So to recap we have the following code in InitializeComponent right now:
private void InitializeComponent()
{
	components = new System.ComponentModel.Container();
	_httpJobServiceInstaller = new ServiceInstaller();
	_httpJobServiceProcessInstaller = new ServiceProcessInstaller();
	_httpJobServiceInstaller.Description = "HttpJob runner service which carries out a series of HTTP calls";
	_httpJobServiceInstaller.DisplayName = "HttpJob automatic runner";
	_httpJobServiceInstaller.ServiceName = "HttpJobRunner";
	_httpJobServiceInstaller.StartType = ServiceStartMode.Automatic;

	_httpJobServiceProcessInstaller.Account = ServiceAccount.LocalSystem;

	Installers.AddRange(new System.Configuration.Install.Installer[]
		{
			_httpJobServiceInstaller
			, _httpJobServiceProcessInstaller
		});
}
After the installation we’d like the service to start automatically. Add the following override below InitializeComponent():
protected override void OnAfterInstall(System.Collections.IDictionary savedState)
{
	base.OnAfterInstall(savedState);
	using (var serviceController = new ServiceController(_httpJobServiceInstaller.ServiceName, Environment.MachineName))
	{
		serviceController.Start();
	}
}
Without this code the service would be sitting inactive after the installation.
We’ll set one last option before we’re ready to move on. In the Properties window of a service you’ll note a tab called Recovery:
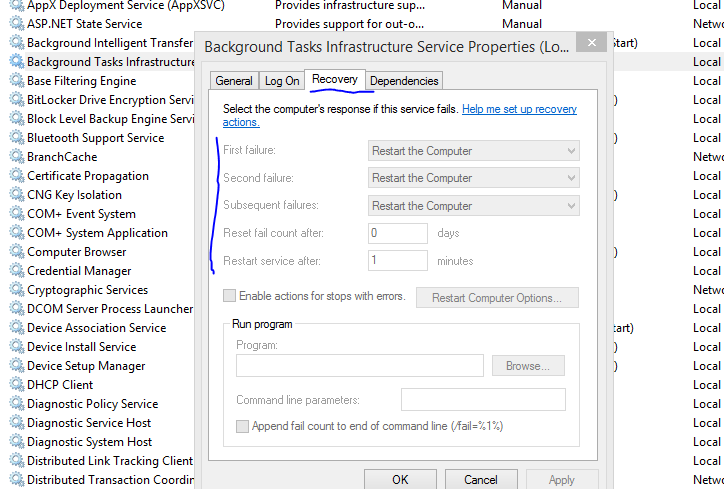
There are 4 options here for all failure types:
- Take no action: if there’s an unhandled exception in the Service then it will stop and will stay inactive until restarted. This may not be optimal because if the service encounters a failure then it will just stop and wait
- Restart the service: restart the service after an unexpected shutdown
- Run a program: run an executable program with some parameters
- Restart the computer: probably the most drastic recovery type
Setting the recovery type in code is not as straightforward as we’ve seen so far. We have to call the command line tool for Services, called “sc” programmatically. The process must run after the installation has been committed. The following code will set the recovery options to “restart the service”:
private void SetRecoveryOptions()
{
	int exitCode;
	using (Process process = new Process())
	{
		ProcessStartInfo processStartInfo = new ProcessStartInfo();
		processStartInfo.FileName = "sc";
		processStartInfo.WindowStyle = ProcessWindowStyle.Hidden;
		processStartInfo.Arguments = string.Format("failure \"{0}\" reset= 0 actions= restart/1000", _serviceName);
		process.Start();
		process.WaitForExit();
		exitCode = process.ExitCode;
	}

	if (exitCode != 0)
	{
		throw new InvalidOperationException(string.Format("sc failure setting process exited with code {0}", exitCode));
	}
}
The above code will be called from an overridden method:
protected override void OnCommitted(System.Collections.IDictionary savedState)
{
	base.OnCommitted(savedState);
	SetRecoveryOptions();
}
Note the following: it requires administrator rights to change the status of a Windows service through “sc”. BTW “sc” refers to c:\windows\system32\sc.exe which allows the manipulation of Windows services in a command prompt. So it is possible that if we in the next module run the installation script then the “OnCommitted” phase will fail even if we run the script as an administrator. The reason is that the Process object itself won’t have admin rights. We’ll add an extra safety in the installation script to account for that possibility. The outcome depends on the UCL settings.
You might think that the SetRecoveryOptions method is then not needed if we do the same in the script later. I’ll leave it as it is so that you see how it can be done in code and you can decide how to set up your installation options.
We’re done with the basics. There are many other methods that you can override in the installer. Just type “override” in the editor and press Space. You’ll get a range of methods that you can override to tweak what should happen during the installation process.
Other properties
There are many other properties of a Windows service that you cannot change here. Instead you would turn to the InitializeComponent method of HttpJobRunner.cs where by default we have the current implementation:
private void InitializeComponent()
{
	components = new System.ComponentModel.Container();
	this.ServiceName = "Service1";
}
Change the ServiceName to “HttpJobRunner” here as well otherwise messages logged to the Event Log will appear under the name of “Service1”. If you type “this.” in the editor then IntelliSense will give you all the properties that you can set. Some interesting ones are those whose name starts with “Can”, such as “CanShutDown”. You can specify if the service can be paused, shut down or stopped. In case you’re looking for a property that you cannot set through the installer then it’s a safe bet that you’ll find it here.
This will be enough of the basics. We’ll continue with the installation in the next post.
View the list of posts on Architecture and Patterns here.


Hi, Thanks for this article. I’ve replaced all of this with TopShelf: https://github.com/Topshelf/Topshelf/
Hi Andras,
I am trying to set Recovery settings but it seems not working, could you please help me for the same. i am using windows 8.1. Below is my code file.
Code:
using System.Configuration.Install;
using System.ServiceProcess;
using System.Diagnostics;
using System;
using System.Collections;
namespace VentyxUDPConnection
{
partial class ProjectInstaller
{
///
/// Required designer variable.
///
private System.ComponentModel.IContainer components = null;
private System.ServiceProcess.ServiceProcessInstaller serviceProcessInstaller1;
private System.ServiceProcess.ServiceInstaller serviceInstaller1;
///
/// Clean up any resources being used.
///
/// true if managed resources should be disposed; otherwise, false.
protected override void Dispose(bool disposing)
{
if (disposing && (components != null))
{
components.Dispose();
}
base.Dispose(disposing);
}
#region Component Designer generated code
///
/// Required method for Designer support – do not modify
/// the contents of this method with the code editor.
///
private void InitializeComponent()
{
this.serviceProcessInstaller1 = new System.ServiceProcess.ServiceProcessInstaller();
this.serviceInstaller1 = new System.ServiceProcess.ServiceInstaller();
//
// serviceProcessInstaller1
//
this.serviceProcessInstaller1.Account = System.ServiceProcess.ServiceAccount.LocalService;
this.serviceProcessInstaller1.Password = null;
this.serviceProcessInstaller1.Username = null;
//
// serviceInstaller1
//
this.serviceInstaller1.ServiceName = “VentyxUDPConnection”;
this.serviceInstaller1.StartType = System.ServiceProcess.ServiceStartMode.Automatic;
//
// ProjectInstaller
//
this.Installers.AddRange(new System.Configuration.Install.Installer[] {
this.serviceProcessInstaller1,
this.serviceInstaller1});
this.serviceInstaller1.AfterInstall += serviceInstaller_AfterInstall;
}
private void serviceInstaller_AfterInstall(object sender, InstallEventArgs e )
{
ServiceController sc = new ServiceController(serviceInstaller1.ServiceName);
sc.Start();
}
#endregion
protected override void OnCommitted(System.Collections.IDictionary savedState)
{
base.OnCommitted(savedState);
SetRecoveryOptions();
}
private void SetRecoveryOptions()
{
int exitCode;
using (Process process = new Process())
{
ProcessStartInfo processStartInfo = new ProcessStartInfo();
processStartInfo.FileName = “sc”;
processStartInfo.WindowStyle = ProcessWindowStyle.Hidden;
processStartInfo.Arguments = string.Format(“failure \”{0}\” reset= 0 actions= restart/1000″, serviceInstaller1.ServiceName);
process.Start();
process.WaitForExit();
exitCode = process.ExitCode;
}
if (exitCode != 0)
{
throw new InvalidOperationException(string.Format(“sc failure setting process exited with code {0}”, exitCode));
}
}
}
}
Thanks,
Akash Yadav
Hi Akash,
If “sc” fails then it is almost certainly due to insufficient rights. The installer cannot run the sc command as it requires administrator rights.
Do you get any exception message?
//Andras
I would just like to mention a piece of code you might be missing in the method SetRecoveryOptions()
You create the processStartInfo but never set it to the process that you want to start. This is confusing because the error we get is FileName is not set, but we clearly are setting it.
Adding this line should help:
process.StartInfo = processStartInfo;
process.Start();
Thanks for your correction Gino.
//Andras
Pingback: Architecture and patterns | Michael's Excerpts
Pingback: Architecture and patterns | Michael's Excerpts
Hi Andras,
Is this supposed to go in the Installer.Designer.cs file? Is there a way to do it somewhere else as not really supposed to edit code in the generated files.
Thanks
Hi Katy, you can check the source code of this demo on GitHub here: https://github.com/andras-nemes/windowsservicedemo
//Andras