Architecture of a Big Data messaging and aggregation system using Amazon Web Services part 3

Introduction

In the previous post of this series we went through a possible data storage solution for our raw data points. We said that Amazon S3 was a likely candidate for our needs. We also discussed a little bit how the raw data points should be formatted in the storage files and how the S3 buckets should be organised.

In this post we’ll see how to deploy our Java Kinesis Client app and we’ll also look into a possible mechanism for data aggregation.

Deploying the Kinesis client application: Beanstalk for Java

We’ll need to see how the Kinesis client application can be deployed. It doesn’t make any difference which technology you use: Java, .NET, Python etc., the client app will be a worker process that must be deployed within a host.

Currently I’m only familiar with hosting Java-based Kinesis client applications but the proposed solution might work for other platforms. Amazon’s Elastic Beanstalk offers a highly scalable deployment platform for a variety of application types: .NET, Java, Ruby etc. For a .NET KCL app you may be looking into Microsoft Azure if you’d like to deploy the solution in the cloud.

Beanstalk is a wrapper around a full-blown EC2 machine with lots of details managed for you. If you start a new EC2 instance then you can use your Amazon credentials to log onto it, customise its settings, deploy various software on it etc., in other words use as a “normal” virtual machine. With Beanstalk a lot of settings will be managed for you and you won’t be able to log onto the underlying EC2 instance. Beanstalk also lets you manage deployment packages and you can easily add new environments and applications and deploy different versions of your product on them. It is an ideal platform to house a worker application like our Kinesis client. You can also add autoscaling rules that describe when a new instance should be added to a cluster. So you’ll get a lot of extras in exchange for not having the full control over the EC2 instance.

I’ve written an article on how to deploy a Kinesis client application on Beanstalk available here.

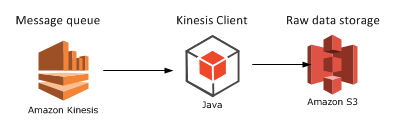
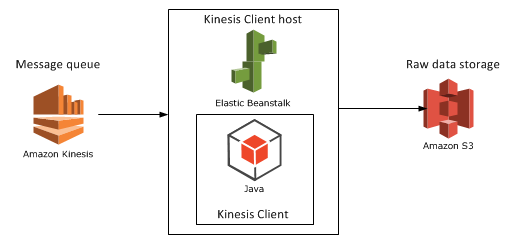
Let’s add Beanstalk as the Kinesis client host to our diagram:

Step 4 with Beanstalk as host

Aggregation mechanism option 1: Elastic MapReduce

Elastic MapReduce (EMR) is Amazon’s web service with the Hadoop framework installed. What’s MapReduce? I’ve introduced MapReduce in an unrelated post elsewhere on this blog. I’ll copy the relevant section for a short introduction:

Short summary of MapReduce

MapReduce – or Map/Filter/Reduce – is eagerly used in data mining and big data applications to find information from a large, potentially unstructured data set. E.g. finding the average age of all Employees who have been employed for more than 5 years is a good candidate for this algorithm.

The individual parts of Map/Filter/Reduce, i.e. the Map, the Filter and the Reduce are steps or operations in a chain to compute something from a collection. Not all 3 steps are required in all data mining cases. Examples:

  • Finding the average age of employees who have been working at a company for more than 5 years: you map the age property of each employee to a list of integers but filter out those who have been working for less than 5 years. Then you calculate the average of the elements in the integer list, i.e. reduce the list to a single outcome.
  • Finding the ids of every employee: if the IDs are strings then you can map the ID fields into a list of strings, there’s no need for any filtering or reducing.
  • Finding the average age of all employees: you map the age of each employee into an integer list and then calculate the average of those integers in the reduce phase, there’s no need for filtering
  • Find all employees over 50 years of age: we filter out the employees who are younger than 50, there’s no need for mapping or reducing the employees collection.

MapReduce implementations in reality can become quite complex depending on the query and structure of the source data.

You can read more about MapReduce in general here.

EMR continued

Hadoop is eagerly used in the distributed computing world where large amounts of potentially unstructured input files are stored across several servers. The final goal is of course to process these raw data files in some way, like what we’re trying to do in this series. If you’re planning to work with Big Data and data-mining then you’ll definitely come across Hadoop at some point. Hadoop is a large system with a steep learning curve.

Also, there’s a whole ecosystem built on top of Hadoop to simplify writing MapReduce functions and queries. There are even companies out there, like Hortonworks, who specialise in GUI tools around Hadoop so that you don’t have to write plain queries in a command line tool.

Some of the technologies around Hadoop are the following:

  • Java MapReduce: you can write MapReduce applications with Java. These are quite low-level operations and probably not too many Big Data developers go with this option in practice but I might be wrong here
  • Hive: an SQL-like language that creates Java MapReduce functions under the hood and runs them. This is a lot less complex solution than writing a Java MapReduce function
  • Pig: Pig – or Pig Latin – is another language/technology to handle large amounts of data in a fast, parallel and efficient way

…and a whole lot more but Hive and Pig seem to be the most popular ones at the time of writing this post.

Hadoop is normally installed on Linux machines although it can be deployed on Windows with some tricks – and luck :-). However, on production systems you’ll probably not want to have Hadoop on Windows. Therefore if you start a new instance of EMR in Amazon then you’ll be given a Linux EC2 machine with Hadoop and a couple of other tools installed, e.g. Hive and Pig will follow along although you can opt out of those when you start a new Hadoop instance. It’s good to have them installed so that you can test your Hive/Pig scripts on them.

Connecting EMR with S3

Now the big question is how we can import the S3 data and analyse them on a Hadoop EMR instance. Amazon extended the Hive language so that it can easily interact with S3. The following Hive statement imports all files from a given S3 bucket. Note that every record within the S3 bucket/folder will be imported, you don’t need to provide the file names.

CREATE EXTERNAL TABLE IF NOT EXISTS raw_data_points (customerId string, url string,date string,response_time int,http_verb string,http_response_code int)
PARTITIONED BY (customerId string)
ROW FORMAT DELIMITED
FIELDS TERMINATED BY ','
LOCATION 's3://raw-data-points/00-15-11-10-2014';

I won’t go into every detail of these statements, you’ll need to explore Hive yourself, but here’s the gist of it:

  • We create a temporary table with the columns listed in brackets
  • We indicate that the fields in the raw data source are delimited by ‘,’
  • Finally we show where the raw data files are located

You can then run the Hive aggregation functions on that temporary table and export the result into another data source – which we’ll explore later. You can probably achieve the same with Pig, which is claimed to run faster than Hive, but I’m not familiar with it at all.

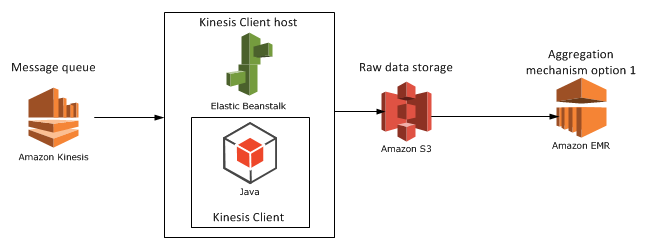
We’ll look at another candidate for the aggregation mechanism, RedShift in the next post. For the time being let’s add EMR to our diagram:

Step 5 with EMR

View all posts related to Amazon Web Services here.

Replacing substrings using Regex in C# .NET: string cleaning example

We often need to sanitize string inputs where the input value is out of our control. Some of those inputs can come with unwanted characters. The following method using Regex removes all non-alphanumeric characters except for ‘@’, ‘-‘ and ‘.’:

private static string RemoveNonAlphaNumericCharacters(String input)
{
	return Regex.Replace(input, @"[^\w\.@-]", string.Empty);
}

Calling this method like…

string cleanString = RemoveNonAlphaNumericCharacters("()h{e??l#'l>>o<<");

…returns “hello”.

View all posts related to string and text operations here.

Big Data: using Amazon Kinesis with the AWS.NET API Part 1: introduction

Introduction

Big Data is definitely an important buzzword nowadays. Organisations have to process large amounts of information real time in form of messages in order to make decisions about the future of the company. Companies can also use these messages as data points of something they monitor constantly: sales, response times, stock prices, etc. Their goal is presumably to process the data and extract information from it that their customers find useful and are willing to pay for.

Whatever the purpose there must be a system that is able to handle the influx of messages. You don’t want to lose a single message or let a faulty one stop the chain. You’ll want to have the message queue up and running all the time and make it flexible and scalable so that it can scale up and down depending on the current load. Also, ideally you’ll want to start with the “real” work as soon as possible and not spend too much time on infrastructure management: new servers, load balancers, installing message queue systems etc. Depending on your preferences, it may be better to invest in a ready-made service at least for the initial life of your application. If you then decide that the product is not worth the effort then you can simply terminate the service and then probably haven’t lost as much money as if you had to manage the infrastructure yourself from the beginning.

This is the first installment of a series dedicated to out-of-the-box components built and powered by Amazon Web Services (AWS) enabling Big Data handling. In fact it will be a series of series as I’ll divide the different parts of the chain into their own “compartments”:

  • Message queue
  • Message persistence
  • Analysis
  • Storing the extracted data

Almost all code will be C# with the exception of SQL-like languages in the “Analysis” section. You’ll need to have an account in Amazon Web Services if you want to try the code examples yourself. Amazon has a free-tier of some of their services which is usually enough for testing purposes before your product turns into something serious. Even if there’s no free tier available, like in the case of Kinesis, the costs you incur with minimal tests are far from prohibiting. Amazon is bringing down its prices on AWS components quite often as their volumes grow larger. By signing up with Amazon and creating a user you’ll also get a pair of security keys: an Amazon Access Key and a Secret Access Key.

Note that we’ll be concentrating on showing how to work with the .NET AWS SDK. We won’t organise our code according to guidelines like SOLID and layered architecture – it’s your responsibility to split your code into manageable bits and pieces.

Here we’re starting with the entry point of the system, i.e. the message handler.

Amazon Kinesis

Amazon Kinesis is a highly scalable cloud-based messaging system which can handle extremely large amounts of messages. There’s another series dedicated to a high-level view of a possible Big Data handling architecture. It takes up the same topics as this series but without going down to the code level. If you’re interested in getting the larger picture I really encourage you to check it out. The first post of that series takes up Kinesis so I’ll copy the relevant sections here.

The raw data

What kind of raw data are we talking about? Any type of textual data you can think of. It’s of course an advantage if you can give some structure to the raw data in the form of JSON, XML, CSV or other delimited data.

On the one hand you can have well-formatted JSON data that hits the entry point of your system:

{
    "CustomerId": "abc123",
    "DateUnixMs": 1416603010000,
    "Activity": "buy",
    "DurationMs": 43253
}

Alternatively the same data can arrive in other forms, such as CSV:

abc123,1416603010000,buy,43253

…or as some arbitrary textual input:

Customer id: abc123
Unix date (ms): 1416603010000
Activity: buy
Duration (ms): 43253

It is perfectly feasible that the raw data messages won’t all follow the same input format. Message 1 may be JSON, message 2 may be XML, message 3 may be formatted like this last example above.

The message handler: Kinesis

Amazon Kinesis is a highly scalable message handler that can easily “swallow” large amounts of raw messages. The home page contains a lot of marketing stuff but there’s a load of documentation available for developers, starting here. Most of it is in Java though.

In a nutshell:

  • A Kinesis “channel” is called a stream. A stream has a name that clients can send their messages to and that consumers of the stream can read from
  • Each stream is divided into shards. You can specify the read and write throughput of your Kinesis stream when you set it up in the AWS console
  • A single message can not exceed 50 KB
  • A message is stored in the stream for 24 hours before it’s deleted

You can read more about the limits, such as max number of shards and max throughput here. Kinesis is relatively cheap and it’s an ideal out-of-the-box entry point for big data analysis.

Kinesis will take a lot of responsibility from your shoulders: scaling, stream and shard management, infrastructure management etc. It’s possible to create a new stream in 5 minutes and you’ll be able to post – actually PUT – messages to that stream immediately after it was created. On the other hand the level of configuration is quite limited which may be both good and bad, it depends on your goals. Examples:

  • There’s no way to add any logic to the stream in the GUI
  • You cannot easily limit the messages to the stream, e.g. by defining a message schema so that malformed messages are discarded automatically
  • You cannot define what should happen to the messages in the stream, e.g. in case you want to do some pre-aggregation

However, I don’t think these are real limitations as other message queue solutions will probably be similar.

In the next post we’ll create a Kinesis stream, install the .NET AWS SDK and define our thin domain.

View all posts related to Amazon Web Services and Big Data here.

Replacing substrings using Regex in C# .NET: date format example

Say your application receives the dates in the following format:

mm/dd/yy

…but what you actually need is this:

dd-mm-yy

You can try and achieve that with string operations such as IndexOf and Replace. You can however perform more sophisticated substring operations using regular expressions. The following method will perform the required change:

private static string ReformatDate(String dateInput)
{
	return Regex.Replace(dateInput, "\\b(?<month>\\d{1,2})/(?<day>\\d{1,2})/(?<year>\\d{2,4})\\b"
		, "${day}-${month}-${year}");
}

Calling this method with “10/28/14” returns “28-10-14”.

View all posts related to string and text operations here.

Reformatting extracted substrings using Match.Result in C# .NET

Say you have the following Uri:

http://localhost:8080/webapps/bestapp

…and you’d like to extract the protocol and the port number and concatenate them. One option is a combination of a regular expression and matching groups within the regex:

private static void ReformatSubStringsFromUri(string uri)
{
	Regex regex = new Regex(@"^(?<protocol>\w+)://[^/]+?(?<port>:\d+)?/");
	Match match = regex.Match(uri);
	if (match.Success)
	{
		Console.WriteLine(match.Result("${protocol}${port}"));
	}
}

The groups are defined by “protocol” and “port” and are referred to in the Result method. The result method is used to reformat the extracted groups, i.e the substrings. In this case we just concatenate them. Calling this method with the URL in above yields “http:8080”.

However you can a more descriptive string format, e.g.:

Console.WriteLine(match.Result("Protocol: ${protocol}, port: ${port}"));

…which prints “Protocol: http, port: :8080”.

View all posts related to string and text operations here.

Building a web service with Node.js in Visual Studio Part 11: PUT and DELETE operations

Introduction

In the previous post we tested the GET operations in our demo web service through the C# console tester application. In this post we’ll look at two other HTTP verbs in action. We’ll insert and test a PUT endpoint to update a customer. In particular we’ll add new orders to an existing customer. In addition we’ll remove a customer through a DELETE endpoint. This post will also finish up the series on Node.js.

We’ll extend the CustomerOrdersApi demo application so have it ready in Visual Studio.

Updating a customer

Let’s start with the repository and work our way up to the controller. Add the following method to customerRepository.js:

module.exports.addOrders = function (customerId, newOrders, next) {
    databaseAccess.getDbHandle(function (err, db) {
        if (err) {
            next(err, null);
        }
        else {
            var collection = db.collection("customers");
            var mongoDb = require('mongodb');
            var BSON = mongoDb.BSONPure;
            var objectId = new BSON.ObjectID(customerId);
            collection.find({ '_id': objectId }).count(function (err, count) {
                if (count == 0) {
                    err = "No matching customer";
                    next(err, null);
                }
                else {
                    collection.update({ '_id': objectId }, { $addToSet: { orders: { $each: newOrders } } }, function (err, result) {
                        if (err) {
                            next(err, null);
                        }
                        else {
                            next(null, result);
                        }
                    });
                }
            });
        }
    });
};

Most of this code should look familiar from the previous posts on this topic. We check whether a customer with the incoming customer ID exists. If not then we return an exception in the “next” callback. Otherwise we update the customer. The newOrders parameter will hold the orders to be added in an array. The update statement may look strange at first but the MongoDb addToSet operator coupled with the “each” operator enables us to push all elements in an array into an existing one. If we simply use the push operator then it will add the newOrders array into the orders array of the customer, i.e. we’ll end up with an array within an array which is not what we want. The each operator will go through the elements in newOrders and add them into the orders array. If the update function goes well then MongoDb will return the number of elements updated which will be assigned to the “result” parameter. We’re expecting it to be 1 as there’s only one customer with a given ID.

Let’s extend customerService.js:

module.exports.addOrders = function (customerId, orderItems, next) {
    if (!customerId) {
        var err = "Missing customer id property";
        next(err, null);
    }
    else {
        customerRepository.addOrders(customerId, orderItems, function (err, res) {
            if (err) {
                next(err, null);
            }
            else {
                next(null, res);
            }
        });
    }
};

Here comes the new function in index.js within the services folder:

module.exports.addOrders = function (customerId, orderItems, next) {
    customerService.addOrders(customerId, orderItems, function (err, res) {
        if (err) {
            next(err, null);
        }
        else {
            next(null, res);
        }
    });
};

…and finally we can build the PUT endpoint in customersController.js:

app.put("/customers", function (req, res) {
        var orders = req.body.orders;
        var customerId = req.body.customerId;
        customerService.addOrders(customerId, orders, function (err, itemCount) {
            if (err) {
                res.status(400).send(err);
            }
            else {
                res.set('Content-Type', 'text/plain');
                res.status(200).send(itemCount.toString());
            }
        });
    });

We read the “orders” and “customerId” parameters from the request body like when we inserted a new customer. We return HTTP 200, i.e. “OK” in case the operation was successful. We also respond with the number of updated items in a plain text format.

Let’s test this from our little tester console application. Add the following method to ApiTesterService.cs:

public int TestUpdateFunction(String customerId, List<Order> newOrders)
{
	HttpRequestMessage putRequest = new HttpRequestMessage(HttpMethod.Put, new Uri("http://localhost:1337/customers/"));
	putRequest.Headers.ExpectContinue = false;
	AddOrdersToCustomerRequest req = new AddOrdersToCustomerRequest() { CustomerId = customerId, NewOrders = newOrders };
	string jsonBody = JsonConvert.SerializeObject(req);
	putRequest.Content = new StringContent(jsonBody, Encoding.UTF8, "application/json");
	HttpClient httpClient = new HttpClient();
	httpClient.Timeout = new TimeSpan(0, 10, 0);
	Task<HttpResponseMessage> httpRequest = httpClient.SendAsync(putRequest,
			HttpCompletionOption.ResponseContentRead, CancellationToken.None);
	HttpResponseMessage httpResponse = httpRequest.Result;
	HttpStatusCode statusCode = httpResponse.StatusCode;

	HttpContent responseContent = httpResponse.Content;
	if (responseContent != null)
	{
		Task<String> stringContentsTask = responseContent.ReadAsStringAsync();
		String stringContents = stringContentsTask.Result;
		if (statusCode == HttpStatusCode.OK)
		{
			return Convert.ToInt32(stringContents);
		}
		else
		{
			throw new Exception(string.Format("No customer updated: {0}", stringContents));
		}
	}
	throw new Exception("No customer updated");
}

…where AddOrdersToCustomerRequest looks as follows:

public class AddOrdersToCustomerRequest
{
	[JsonProperty(PropertyName="customerId")]
	public String CustomerId { get; set; }
	[JsonProperty(PropertyName="orders")]
	public List<Order> NewOrders { get; set; }
}

We set the JSON property names according to the expected values we set in the controller. We send the JSON payload to the PUT endpoint and convert the response into an integer. We can call this method from Program.cs as follows:

private static void TestCustomerUpdate()
{
	Console.WriteLine("Testing item update.");
	Console.WriteLine("=================================");
	try
	{
		ApiTesterService service = new ApiTesterService();
		List<Customer> allCustomers = service.GetAllCustomers();
		Customer customer = SelectRandom(allCustomers);
		List<Order> newOrders = new List<Order>()
		{
			new Order(){Item = "Food", Price = 2, Quantity = 3}
			, new Order(){Item = "Drink", Price = 3, Quantity = 4}
			, new Order(){Item = "Taxi", Price = 10, Quantity = 1}
		};
		int updatedItemsCount = service.TestUpdateFunction(customer.Id, newOrders);
		Console.WriteLine("Updated customer {0} ", customer.Name);
		Console.WriteLine("Updated items count: {0}", updatedItemsCount);
	}
	catch (Exception ex)
	{
		Console.WriteLine("Exception caught while testing PUT: {0}", ex.Message);
	}
	Console.WriteLine("=================================");
	Console.WriteLine("End of PUT operation test.");
}

We first extract all customers, then select one at random using the SelectRandom method we saw in the previous post. We then build an arbitrary orders list and call the TestUpdateFunction of the service. If all goes well then we print the name of the updated customer and the number of updated items which we expect to be 1. Otherwise we print the exception message. Call this method from Main:

static void Main(string[] args)
{
	TestCustomerUpdate();

	Console.WriteLine("Main done...");
	Console.ReadKey();
}

Start the application with F5. As the Node.js project is set as the startup project you’ll see it start in a browser as before. Do the following to start the tester console app:

  • Right-click it in Solution Explorer
  • Select Debug
  • Select Start new instance

You should see output similar to the following:

Testing PUT operation through tester application

If you then navigate to /customers in the appropriate browser window then you should see the new order items. In my case the JSON output looks as follows:

[{"_id":"544cb61fda8014d9145c85e6","name":"Great customer","orders":[{"item":"Food","quantity":3,"itemPrice":2},{"item":"Drink","quantity":4,"itemPrice":3},{"item":"Taxi","quantity":1,"itemPrice":10}]},{"_id":"546b56f1b8fd6abc122cc8ff","name":"hello","orders":[]}]

This was one application of PUT. You can use the same endpoint to update other parts of your domain, e.g. the customer name.

Deleting a customer

We’ll create a DELETE endpoint to remove a customer. We cannot attach a request body to a DELETE request so we’ll instead send the ID of the customer to be deleted in the URL. We saw an example of that when we retrieved a single customer based on the ID.

Here’s the remove function in customerRepository.js:

module.exports.remove = function (customerId, next) {
    databaseAccess.getDbHandle(function (err, db) {
        if (err) {
            next(err, null);
        }
        else {
            var collection = db.collection("customers");
            var mongoDb = require('mongodb');
            var BSON = mongoDb.BSONPure;
            var objectId = new BSON.ObjectID(customerId);
            collection.remove({ '_id': objectId }, function (err, result) {
                if (err) {
                    next(err, null);
                }
                else {
                    next(null, result);
                }
            });
        }
    });
};

Like in the case of UPDATE, MongoDb will return the number of deleted elements in the “result” parameter. Let’s extend customerService.js:

module.exports.deleteCustomer = function (customerId, next) {
    if (!customerId) {
        var err = "Missing customer id property";
        next(err, null);
    }
    else {
        customerRepository.remove(customerId, function (err, res) {
            if (err) {
                next(err, null);
            }
            else {
                next(null, res);
            }
        });
    }
};

…and index.js in the services folder:

module.exports.deleteCustomer = function (customerId, next) {
    customerService.deleteCustomer(customerId, function (err, res) {
        if (err) {
            next(err, null);
        }
        else {
            next(null, res);
        }
    });
};

Finally let’s add the DELETE endpoint to customersController:

app.delete("/customers/:id", function (req, res) {
        var customerId = req.params.id;
        customerService.deleteCustomer(customerId, function (err, itemCount) {
            if (err) {
                res.status(400).send(err);
            }
            else {
                res.set('Content-Type', 'text/plain');
                res.status(200).send(itemCount.toString());
            }
        });
    });

Like above, we return HTTP 200 and the number of deleted items if the operation has gone well.

Back in the tester app let’s add the following test method to ApiTesterService:

public int TestDeleteFunction(string customerId)
{
	HttpRequestMessage getRequest = new HttpRequestMessage(HttpMethod.Delete, new Uri("http://localhost:1337/customers/" + customerId));
	getRequest.Headers.ExpectContinue = false;
	HttpClient httpClient = new HttpClient();
	httpClient.Timeout = new TimeSpan(0, 10, 0);
	Task<HttpResponseMessage> httpRequest = httpClient.SendAsync(getRequest,
			HttpCompletionOption.ResponseContentRead, CancellationToken.None);
	HttpResponseMessage httpResponse = httpRequest.Result;
	HttpStatusCode statusCode = httpResponse.StatusCode;
	HttpContent responseContent = httpResponse.Content;
	if (responseContent != null)
	{
		Task<String> stringContentsTask = responseContent.ReadAsStringAsync();
		String stringContents = stringContentsTask.Result;
		if (statusCode == HttpStatusCode.OK)
		{
			return Convert.ToInt32(stringContents);
		}
		else
		{
			throw new Exception(string.Format("No customer deleted: {0}", stringContents));
		}
	}
	throw new Exception("No customer deleted");
}

This method is very similar to its update counterpart. We send our request to the DELETE endpoint and wait for the response. If all goes well then we return the number of deleted items to the caller. The caller can look like this in Program.cs:

private static void TestCustomerDeletion()
{
	Console.WriteLine("Testing item deletion.");
	Console.WriteLine("=================================");
	try
	{
		ApiTesterService service = new ApiTesterService();
		List<Customer> allCustomers = service.GetAllCustomers();
		Customer customer = SelectRandom(allCustomers);

		int deletedItemsCount = service.TestDeleteFunction(customer.Id);
		Console.WriteLine("Deleted customer {0} ", customer.Name);
		Console.WriteLine("Deleted items count: {0}", deletedItemsCount);
	}
	catch (Exception ex)
	{
		Console.WriteLine("Exception caught while testing DELETE: {0}", ex.Message);
	}

	Console.WriteLine("=================================");
	Console.WriteLine("End of DELETE operation test.");
}

Like above, we retrieve all existing customers and select one at random for deletion.

Call the above method from Main:

static void Main(string[] args)
{			
	TestCustomerDeletion();

	Console.WriteLine("Main done...");
	Console.ReadKey();
}

Start both the web and the console application like we did above. You should see output similar to the following:

Testing DELETE through tester application

There you have it. We’ve built a starter Node.js application with the 4 basic web operations: GET, POST, PUT and DELETE. Hopefully this will be enough for you to start building your own Node.js project.

View all posts related to Node here.

Architecture of a Big Data messaging and aggregation system using Amazon Web Services part 2

Introduction

In the previous post of this series we outlined the system we’d like to build. We also decided to go for Amazon Kinesis as the message queue handler and that we’ll need an application which will consume messages from the Kinesis message stream.

In this post we’ll continue to build our design diagram and discuss where to store the raw data coming from Kinesis.

Storing the raw messages: Amazon S3

So now our Kinesis application, whether it’s Java, Python, .NET or anything else, is continuously receiving messages from the stream. It will probably perform all or some of the following tasks:

  • Validate all incoming messages
  • Filter out the invalid ones: they can be ignored completely or logged in a special way for visual inspection
  • Perform some kind of sorting or grouping based on some message parameter: customer ID, UTC date or something similar
  • Finally store the raw data in some data store

This “some data store” needs to provide fast, cheap, durable and scalable storage. We assume that the data store will need to handle a lot of constant write operations but read operations may not be as frequent. The raw data will be extracted later on during the analysis phase which occurs periodically, say every 15-30 minutes, but not all the time. Aggregating and analysing raw data every 15 minutes will suit many “real time” scenarios.

However, we might need to go in an find particular raw data points at a later stage. We possibly need to debug the system and check visually what the data points look like. Also, some aggregated data may look suspicious in some way so that we have to verify its consistency.

One possible solution that fits all these requirements is Amazon S3. It’s a blob storage where you can store any type of file in buckets: images, text, HTML pages, multimedia files, anything. All files are stored by a key which is typically the full file name.

The files can be organised in buckets. Each bucket can have one or more subfolders which in turn can have their own subfolders and so on. Note that these folders are not the same type of folder you’d have on Windows but rather just a visual way to organise your files. Here’s an example where the top bucket is called “eux-scripts” which has 4 subfolders:

S3 bucket subfolder example

Here comes an example of .jar and .sh files stored in S3:

S3 files example

Keep in mind that S3 is not used for updates though. Once you’ve uploaded a file to S3 then it cannot be updated in a one-step operation. Even if you want to edit a text file there’s no editor for it. You’ll need to delete the old file and upload a new one instead.

Storing our raw data

So how can S3 be used to store our raw data? Suppose that we receive the raw data formatted as JSON:

{
    "CustomerId": "abc123",
    "DateUnixMs": 1416603010000,
    "Activity": "buy",
    "DurationMs": 43253
}

You can store the raw data in text files in S3 in the format you wish. The format will most likely depend on the mechanism that will eventually pull data from S3. Amazon data storage and analysis solutions such as RedShift or Elastic MapReduce (EMR) have been designed to read data from S3 efficiently – we’ll discuss both in this series. So at this stage you’ll need to do some forward thinking:

  • A: What mechanism will need to read from the raw data store for aggregation?
  • B: How can we easily – or relatively easily – read the raw data visually by just opening a raw data file?

For B you might want to store the raw data as it is, i.e. as JSON. E.g. you can have a text file in S3 called “raw-data-customer-abc123-2014-11-10.txt” with the following data points:

{"CustomerId": "abc123", "DateUnixMs": 1416603010000, "Activity": "buy", "DurationMs": 43253}
{"CustomerId": "abc123", "DateUnixMs": 1416603020000, "Activity": "buy", "DurationMs": 53253}
{"CustomerId": "abc123", "DateUnixMs": 1416603030000, "Activity": "buy", "DurationMs": 63253}
{"CustomerId": "abc123", "DateUnixMs": 1416603040000, "Activity": "buy", "DurationMs": 73253}

…i.e. with one data point per line.

However, this format is not suitable for point A above. Other mechanisms will have a hard time understanding this data format. For RedShift and EMR to work most efficiently we’ll need to store the raw data in some delimited fields such as CSV or tab delimited fields. So the above data points can then be stored as follows in a CSV file:

abc123,1416603010000,buy,43253
abc123,1416603020000,buy,53253
abc123,1416603030000,buy,63253
abc123,1416603040000,buy,73253

This is probably OK for point B above as well. It’s not too hard on your eyes to understand this data structure so we’ll settle for that.

File organisation refinements

We now know a little about S3 and have decided to go for a delimited storage format. The next question is how we actually organise our raw data files into buckets and folders. Again, we’ll need to consider points A and B above. In addition you’ll need to consider the frequency of your data aggregations: once a day, every hour, every quarter?

You might first go for a customer ID – or some other ID – based grouping, so e.g. you’ll have a top bucket and sub folders for each customer:

  • Top bucket: “raw-data-points”
  • Subfolder: “customer123”
  • Subfolder: “customer456”
  • Subfolder: “customer789”
  • …etc.

…and within each subfolder you can have subfolders based on dates in the raw data points, e.g.:

  • Sub-subfolder: “2014-10-11”
  • Sub-subfolder: “2014-10-12”
  • Sub-subfolder: “2014-10-13”
  • Sub-subfolder: “2014-10-14”
  • …etc.

That looks very nice and it probably satisfies question B above but not so much regarding question A. This structure is difficult to handle for an aggregation mechanism as you’ll need to provide complex search criteria for the aggregation. In addition, suppose you want to aggregate the data every 30 minutes and you dump all raw data points into one of those sub-subfolders. Then again you’ll need to set up difficult search criteria for the aggregation mechanism to extract just the correct raw data points.

One possible solution is the following:

  • Decide on the minimum aggregation frequency you’d like to support in your system – let’s take 30 minutes for the sake of this discussion
  • Have one dedicated top bucket like “raw-data-points” above
  • Below this top bucket organise the data points into sub folders based on dates

The names of the date sub-folders can be based on the minimum aggregation frequency. You’ll basically put the files into intervals where the date parts are reversed according to the following format:

minute-hour-day-month-year

Examples:

  • 00-13-15-11-2014: subfolder to hold the raw data for the interval 2014 November 15, 13:00:00 until 13:29:59 inclusive
  • 30-13-15-11-2014: subfolder to hold the raw data for the interval 2014 November 15, 13:30:00 until 13:59:59 inclusive
  • 00-14-15-11-2014: subfolder to hold the raw data for the interval 2014 November 15, 14:00:00 until 14:29:59 inclusive

…and so on. Each subfolder can then hold text files with the raw data points. In order to find a particular storage file of a customer you can do some pre-grouping in the Kinesis client application and not just save every data point one by one in S3: group the raw data points according to the customer ID and the date of the data point and save the raw files accordingly. You can then have the following text files in S3:

  • abc123-2014-11-15-13-32-43.txt
  • abc123-2014-11-15-13-32-44.txt
  • abc123-2014-11-15-13-32-45.txt

…where the names follow this format:

customerId-year-month-day-hour-minute-second

So within each file you’ll have the CSV or tab delimited raw data that occurred in that given second. In case you want to go for a minute based pre-grouping then’ll end up with the following files:

  • abc123-2014-11-15-13-31.txt
  • abc123-2014-11-15-13-32.txt
  • abc123-2014-11-15-13-33.txt

…and so on. This is the same format as above but at the level of minutes instead.

Keep in mind that all of the above can be customised based on your data structure. The main point is that S3 is an ideal way to store large amounts of raw data points within the Amazon infrastructure and that you’ll need to carefully think through how to organise your raw data point files so that they are easily handled by an aggregation mechanism.

Finally let’s extend our diagram:

Step 3 Kinesis with KCL and S3

We’ll look at a potential aggregation mechanism in the next post: Elastic MapReduce.

View all posts related to Amazon Web Services here.

Architecture of a Big Data messaging and aggregation system using Amazon Web Services part 1

Introduction

Amazon has a very wide range of cloud-based services. At the time of writing this post Amazon offered the following services:

Amazon web services offerings

It feels like Amazon is building a solution to any software architecture problem one can think of. I have been exposed to a limited number of them professionally and most of them will figure in this series: S3, DynamoDb, Data Pipeline, Elastic Beanstalk, Elastic MapReduce and RedShift. Note that we’ll not see any detailed code examples as that could fill an entire book. Here we only talk about an overall architecture where we build up the data flow step by step. I’m planning to post about how to use these components programmatically using .NET and Java during 2015 anyway.

Here’s a short description of the system we’d like to build:

  • A large amount of incoming messages needs to be analysed – by “large amount” we mean thousands per second
  • Each message contains a data point with some observation important to your business: sales data, response times, price changes, etc.
  • Every message needs to be processed and stored so that they can be analysed – the individual data points may need to be retrieved to control the quality of the analysis
  • The stored messages need to be analysed automatically and periodically – or at random with manual intervention
  • The result of the analysis must be stored in a database where you can view it and possibly draw conclusions

The above scenario is quite generic in Big Data analysis where a large amount of possibly unstructured messages needs to be analysed. The result of the analysis must be meaningful for your business in some way. Maybe they will help you in your decision making process. Also, they can provide useful aggregation data that you can sell to your customers.

There are a number of different product offerings and possible solutions to manage such a system nowadays. We’ll go through one of them in this series.

The raw data

What kind of raw data are we talking about? Any type of textual data you can think of. It’s of course an advantage if you can give some structure to the raw data in the form of JSON, XML, CSV or other delimited data.

On the one hand you can have well-formatted JSON data that hits the entry point of your system:

{
    "CustomerId": "abc123",
    "DateUnixMs": 1416603010000,
    "Activity": "buy",
    "DurationMs": 43253
}

Alternatively the same data can arrive in other forms, such as CSV:

abc123,1416603010000,buy,43253

…or as some arbitrary textual input:

Customer id: abc123
Unix date (ms): 1416603010000
Activity: buy
Duration (ms): 43253

It is perfectly feasible that the raw data messages won’t all follow the same input format. Message 1 may be JSON, message 2 may be XML, message 3 may be formatted like this last example above.

The message handler: Kinesis

Amazon Kinesis is a highly scalable message handler that can easily “swallow” large amounts of raw messages. The home page contains a lot of marketing stuff but there’s a load of documentation available for developers, starting here.

In a nutshell:

  • A Kinesis “channel” is called a stream. A stream has a name that clients can send their messages to and that consumers of the stream can read from
  • Each stream is divided into shards. You can specify the read and write throughput of your Kinesis stream when you set it up in the AWS console
  • A single message can not exceed 50 KB
  • A message is stored in the stream for 24 hours before it’s deleted

You can read more about the limits, such as max number of shards and max throughput here. Kinesis is relatively cheap and it’s an ideal out-of-the-box entry point for big data analysis.

So let’s place the first item on our architecture diagram:

Step 1 Kinesis

The Kinesis consumer

Kinesis stores the messages for only 24 hours and you cannot instruct it to do anything specific with the message. There are no options like “store the message in a database” or “calculate the average value” for a Kinesis stream. The message is loaded into the stream and waits until it is either auto-deleted or pulled by a consumer.

What do we mean by a Kinesis consumer? It is a listener application that pulls the messages out of the stream in batches. The listener is a worker process that continuously monitors the stream. Amazon has SDKs in a large number of languages listed here: Java, Python, .NET etc.

It’s basically any application that processes messages from a given Kinesis stream. If you’re a Java developer then there’s an out-of-the-box starting point on GitHub available here. Here’s the official Amazon documentation of the Kinesis Client Library.

On a general note: most documentation and resources regarding Amazon Web Services will be available in Java. I would recommend that, if you have the choice, then Java should be option #1 for your development purposes.

Let’s extend our diagram where I picked Java as the development platform but in practice it could be any from the available SDKs:

Step 2 Kinesis and KCL

How can this application be deployed? It depends on the technology you’ve selected, but for Java Amazon Beanstalk is a straightforward option. This post gives you details on how to do it.

We’ll continue building our system with a potential raw message store mechanism in the next post: Amazon S3.

View all posts related to Amazon Web Services here.

Finding all href values in a HTML string with C# .NET

Say you’d like to collect all link URLs in a HTML text. E.g.:

<html>
   <p>
     <a href=\"http://www.fantasticsite.com\">Visit fantasticsite!</a>
   </p>
   <div>
     <a href=\"http://www.cnn.com\">Read the news</a>
   </div>
</html>

The goal is to find “http://www.fantasticsite.com&#8221; and “http://www.cnn.com&#8221;. Using an XML parser could be a solution if the HTML code is well formatted XML. This is of course not always the case so the dreaded regular expressions provide a viable alternative.

The following code uses a Regex to find those sections in the input text that match a regular expression:

static void Main(string[] args)
{
	string input = "<html><p><a href=\"http://www.fantasticsite.com\">Visit fantasticsite!</a></p><div><a href=\"http://www.cnn.com\">Read the news</a></div></html>";
	FindHrefs(input);
	Console.WriteLine("Main done...");
	Console.ReadKey();
}

private static void FindHrefs(string input)
{
	Regex regex = new Regex("href\\s*=\\s*(?:\"(?<1>[^\"]*)\"|(?<1>\\S+))", RegexOptions.IgnoreCase);
	Match match;
	for (match = regex.Match(input); match.Success; match = match.NextMatch())
	{
		Console.WriteLine("Found a href. Groups: ");
		foreach (Group group in match.Groups)
		{
			Console.WriteLine("Group value: {0}", group);
		}				
	}

}

This gives the following output:

FindHrefs Regexp in action

View all posts related to string and text operations here.

Building a web service with Node.js in Visual Studio Part 10: testing GET actions

Introduction

In the previous post of this series we tested the insertion of new customers through a simple C# console application.

In this post we’ll extend our demo C# tester application to test GET actions.

We’ll be working on our demo application CustomerOrdersApi so have it ready in Visual Studio and let’s get to it.

Testing GET

We created our domain objects in the previous post with JSON-related attributes: Customer and Order. We’ll now use these objects to test the GET operations of the web service. We created a class called ApiTesterService to run the tests for us. Open that file and add the following two methods:

public List<Customer> GetAllCustomers()
{
	HttpRequestMessage getRequest = new HttpRequestMessage(HttpMethod.Get, new Uri("http://localhost:1337/customers"));
	getRequest.Headers.ExpectContinue = false;
	HttpClient httpClient = new HttpClient();
	httpClient.Timeout = new TimeSpan(0, 10, 0);
	Task<HttpResponseMessage> httpRequest = httpClient.SendAsync(getRequest,
			HttpCompletionOption.ResponseContentRead, CancellationToken.None);
	HttpResponseMessage httpResponse = httpRequest.Result;
	HttpStatusCode statusCode = httpResponse.StatusCode;
	HttpContent responseContent = httpResponse.Content;
	if (responseContent != null)
	{
		Task<String> stringContentsTask = responseContent.ReadAsStringAsync();
		String stringContents = stringContentsTask.Result;
		List<Customer> allCustomers = JsonConvert.DeserializeObject<List<Customer>>(stringContents);
		return allCustomers;
	}

	throw new IOException("Exception when retrieving all customers");
}

public Customer GetSpecificCustomer(String id)
{
	HttpRequestMessage getRequest = new HttpRequestMessage(HttpMethod.Get, new Uri("http://localhost:1337/customers/" + id));
	getRequest.Headers.ExpectContinue = false;
	HttpClient httpClient = new HttpClient();
	httpClient.Timeout = new TimeSpan(0, 10, 0);
	Task<HttpResponseMessage> httpRequest = httpClient.SendAsync(getRequest,
			HttpCompletionOption.ResponseContentRead, CancellationToken.None);
	HttpResponseMessage httpResponse = httpRequest.Result;
	HttpStatusCode statusCode = httpResponse.StatusCode;
	HttpContent responseContent = httpResponse.Content;
	if (responseContent != null)
	{
		Task<String> stringContentsTask = responseContent.ReadAsStringAsync();
		String stringContents = stringContentsTask.Result;
		List<Customer> customers = JsonConvert.DeserializeObject<List<Customer>>(stringContents);
		return customers[0];
	}
	throw new IOException("Exception when retrieving single customer.");
}

I know this is a lot of duplication but this will suffice for demo purposes. GetAllCustomers(), like the name implies will retrieve all customers from the Node.js web service. GetSpecificCustomer(string id) will retrieve a single customer by its ID. You may be wondering why we get a list of customers in GetSpecificCustomer. MongoDb will return all matching documents in an array. So if there’s only one matching document then it will be put into an array as well. Therefore we extract the first and only element from that list and return it from the function. We saw something similar in the previous post where we tested the POST operation: MongoDb responded with an array which included a single element, i.e. the one that was inserted.

So we’re testing the two GET endpoints of our Node.js service:

app.get("/customers" ...
app.get("/customers/:id" ...

We can call these methods from Program.cs through the following helper method:

private static void TestCustomerRetrieval()
{
	Console.WriteLine("Testing item retrieval.");
	Console.WriteLine("Retrieving all customers:");
	Console.WriteLine("=================================");
	ApiTesterService service = new ApiTesterService();
	try
	{
		List<Customer> allCustomers = service.GetAllCustomers();
		Console.WriteLine("Found {0} customers: ", allCustomers.Count);
		foreach (Customer c in allCustomers)
		{
			Console.WriteLine("Id: {0}, name: {1}, has {2} order(s).", c.Id, c.Name, c.Orders.Count);
			foreach (Order o in c.Orders)
			{
				Console.WriteLine("Item: {0}, price: {1}, quantity: {2}", o.Item, o.Price, o.Quantity);
			}
		}

		Console.WriteLine();
		Customer customer = SelectRandom(allCustomers);
		Console.WriteLine("Retrieving single customer with ID {0}.", customer.Id);
		Customer getById = service.GetSpecificCustomer(customer.Id);

		Console.WriteLine("Id: {0}, name: {1}, has {2} order(s).", getById.Id, getById.Name, getById.Orders.Count);
		foreach (Order o in getById.Orders)
		{
			Console.WriteLine("Item: {0}, prigetByIde: {1}, quantity: {2}", o.Item, o.Price, o.Quantity);
		}
	}
	catch (Exception ex)
	{
		Console.WriteLine("Exception caught while testing GET: {0}", ex.Message);
	}

	Console.WriteLine("=================================");
	Console.WriteLine("End of item retrieval tests.");
}

The above method first retrieves all customers from the service and prints some information about them: their IDs and orders. Then a customer is selected at random and we test the “get by id” functionality. Here’s the SelectRandom method:

private static Customer SelectRandom(List<Customer> allCustomers)
{
	Random random = new Random();
	int i = random.Next(0, allCustomers.Count);
	return allCustomers[i];
}

Call TestCustomerRetrieval from Main:

static void Main(string[] args)
{			
	TestCustomerUp();

	Console.WriteLine("Main done...");
	Console.ReadKey();
}

Start the application with F5. As the Node.js project is set as the startup project you’ll see it start in a browser as before. Do the following to start the tester console app:

  • Right-click it in Solution Explorer
  • Select Debug
  • Select Start new instance

If all goes well then you’ll see some customer information in the command window depending on what you’ve entered into the customers collection before:

testing GET through tester application

The web service responds with JSON similar to the following in the case of “get all customers”:

[{"_id":"544cbaf1da8014d9145c85e7","name":"Donald Duck","orders":[]},{"_id":"544cb61fda8014d9145c85e6","name":"Great customer","orders":[{"item":"Book","quantity":2,"itemPrice":10},{"item":"Car","quantity":1,"itemPrice":2000}]},{"_id":"546b56f1b8fd6abc122cc8ff","name":"hello","orders":[]}]

…and here’s the raw response body of “get by id”:

[{"_id":"544cbaf1da8014d9145c85e7","name":"Donald Duck","orders":[]}]

Note that this JSON is also an array even so we’ll need to read the first element from the customers list in the GetSpecificCustomer function as noted above.

In the next post, which will finish this series, we’ll take a look at updates and deletions, i.e. the PUT and DELETE operations.

View all posts related to Node here.

Elliot Balynn's Blog

A directory of wonderful thoughts

Software Engineering

Web development

Disparate Opinions

Various tidbits

chsakell's Blog

WEB APPLICATION DEVELOPMENT TUTORIALS WITH OPEN-SOURCE PROJECTS

Once Upon a Camayoc

ARCHIVED: Bite-size insight on Cyber Security for the not too technical.