Handling claims transformation in an OWIN middleware in .NET MVC part 1

Introduction

Claims have become widespread in software projects to tighten the security aspects of an application. We looked at claims before on this blog – see the link in the next paragraph – but time goes by and new features have been added to this technology lately. This is especially true as far as OWIN is concerned. In this mini-series we’ll concentrate on a very narrow aspect of claims in .NET MVC: claims transformation in OWIN middleware.

Read more of this post

How to enable SSL for a .NET project in Visual Studio

Say you have a .NET MVC or Web API project and you’d like to run it on SSL. In other words you’d like to start up the project on a URL similar to https://localhost:xxxx.

The first step is easy. You just select the MVC/Web API project name in the solution and locate the property called “SSL Enabled” in properties window:

Read more of this post

Web API 2 security extensibility points part 5: OWIN

Introduction

In the previous post we discussed how to add a custom authorisation filter to your .NET web application. We saw how you could derive from the AuthorizeAttribute class and implement your own logic for the IsAuthorized and HandleUnauthorizedRequest methods. The methods in the custom authorisation filter are called after any authentication filter is applied and before the appropriate controller action is executed.

In this post we’ll look at another entry point where you can apply your custom security logic in a .NET web application: OWIN

Read more of this post

Web API 2 security extensibility points part 4: custom authorisation filters

Introduction

In the previous post we built a custom HTTP message handler for our demo Web API 2 application. We saw how a registered message handler intercepts all calls to your API before authentication filters are executed. We also wrote a couple of examples where we checked for the presence of a custom header and of an authorisation header. We finally showed how to set the principal for the current HTTP call.

In this post we’ll see another way you can intercept the calls to your API. Authorisation filters are executed after authentication filters and before your controller action methods. That is the last stage where you can add your custom auth-related logic.

Read more of this post

Web API 2 security extensibility points part 3: custom message handlers

Introduction

In the previous post we looked at how to implement your own custom authentication filter. Authentication filters – and filters of type IFilter in general – are executed just before your controller action methods are run. We saw how to implement the IAuthenticationFilter interface and how to apply the custom filter both as an attribute and as a global filter.

In this post we’ll look at HTTP message handlers and specifically how to add your own message handler. Message handlers are executed even before any custom filter so they provide an early entry point into the life cycle of a web application. There’s nothing stopping us from adding an initial security check or a full-blown login mechanism already at that stage. We can check e.g. if a mandatory custom header has been provided and reject all incoming HTTP calls that don’t fulfil this requirement up front.

Read more of this post

Web API 2 security extensibility points part 2: custom authentication filter

Introduction

In the previous post we introduced the topic and main goals of this series. We also set up a demo Web API 2 project which we’ll use throughout. We also briefly investigated the HTTP request context and how we could extract information about the current user of the HTTP request from it.

In this post we’ll see how to write your own custom authentication filter attribute. We’ll only look at a simple example to show how to access the request context from an authentication filter. Further down you’ll find a reference to a post on http://www.asp.net which takes up a much more detailed example.

Read more of this post

Web API 2 security extensibility points part 1: starting point and HTTP request context

Introduction

Web API 2 comes with a number of new security features. In this new series we’ll concentrate on the HTTP request context and its Principal property. In particular we’ll see how to hook into the different extensibility points in the Web API. These extensibility points offer you to plug in your security-related checks at different points in the application lifetime when a request hits your API. You can carry out a number of checks and modify the request Principal according to your business rules and needs.

I’m building the demo in Visual Studio 2013. I’m not sure at this point how much the Web API template will change in Visual Studio 2015.

Read more of this post

Building a Web API 2 project from scratch using OWIN/Katana .NET Part 4: async controllers and mini-DDD

Introduction

In the previous post we briefly looked at a new hosting project by Microsoft called Helios. It is meant to be the future of web application deployment where Helios removes the necessity of having the entire System.Web dependency in your web project. We saw that Helios is only in a preview state so it shouldn’t be used for real-life projects yet.

In this post we’ll diverge from OWIN/Katana and instead see how we can add asynchronous controller methods to our current CustomersApi web project. We’ll also build a miniature version of a layered application. We’ll put the layers into separate folders for simplicity.

Read more of this post

HTTPS and X509 certificates in .NET Part 5: validating certificates in code

Introduction

In the previous post we looked at some basic classes in the .NET framework that deal with X509 certificates. We saw how to load, inspect, install and remove certificates.

In this post we’ll continue working with certificates in code and concentrate on validation techniques.

Certificate validation in C#

The two most important objects in .NET that will help you validate a certificate are X509Chain and X509ChainPolicy.

The X509Chain object represents the chain of trust when checking the validity of a certificate. X509ChainPolicy fine-tunes how you’d like to validate the certificate, i.e. which criteria the chain of trust should fulfil.

Let’s see how the self-signed certificate we created before can be validated. Consider the following sample code:

private static void RunValidation()
{
	X509Store computerCaStore = new X509Store(StoreName.My, StoreLocation.LocalMachine);
	try
	{
		computerCaStore.Open(OpenFlags.ReadOnly);
		X509Certificate2Collection certificatesInStore = computerCaStore.Certificates;
		X509Certificate2Collection findResult = certificatesInStore.Find(X509FindType.FindBySubjectName, "mylocalsite.local", false);				
		foreach (X509Certificate2 cert in findResult)
		{
			X509Chain chain = new X509Chain();
			X509ChainPolicy chainPolicy = new X509ChainPolicy()
			{
				RevocationMode = X509RevocationMode.Online,
				RevocationFlag = X509RevocationFlag.EntireChain
			};
			chain.ChainPolicy = chainPolicy;
			if (!chain.Build(cert))
			{
				foreach (X509ChainElement chainElement in chain.ChainElements)
				{
					foreach (X509ChainStatus chainStatus in chainElement.ChainElementStatus)
					{
						Debug.WriteLine(chainStatus.StatusInformation);
					}
				}
			}
		}				
	}
	finally
	{
		computerCaStore.Close();
	}
}

You’ll recognise the part of this code where we open the certificate store and load the self-signed derived certificate. Note that the Find method will return a collection of X509 certificates but there’s no way to extract just a single element from a X509Certificate2Collection object. Even if you know that there’s only one certificate that fulfils the search criteria you’ll need to iterate over the collection.

Anyway, the validation part of the code starts within the foreach loop by constructing an X509Chain object. We then build a policy for the chain by specifying a couple of properties.

The RevokationMode enumeration will define whether or not we want to check the revocation list for this certificate: check it on-line, off-line or not at all. X509RevocationFlag will specify if we want to check the revocation list with or without the CA root. The X509ChainPolicy object has some more properties that will let you fine-grain the chain policy. The VerificationFlags enumeration will let you switch off parts of the chain, e.g.:

VerificationFlags = X509VerificationFlags.IgnoreInvalidName | X509VerificationFlags.IgnoreNotTimeValid

Normally you’d want to verify all properties so you’ll leave VerificationFlags untouched.

We then want to build the chain by calling the Build method with the certificate. If Build returns false then we know that something isn’t correct with the validation chain. So for each element in the chain elements we want to check the element status messages.

If you run the above code then you should get a validation error:

“The revocation function was unable to check revocation for the certificate.”

That’s because we specified that the online revocation list should be checked. However, there’s no revocation list anywhere on Earth that knows about our self-signed certificate. If we change the code to…

X509ChainPolicy chainPolicy = new X509ChainPolicy()
{
	RevocationMode = X509RevocationMode.NoCheck,
        RevocationFlag = X509RevocationFlag.EntireChain
};

…then the Build method passes as everything is fine with the certificate.

Open IIS for another test. We’ll use the IIS GUI to quickly create another certificate. Double-click on the following icon:

Certificates button in IIS

Then click on the following link in the right-hand panel:

Create self signed certificate link in IIS

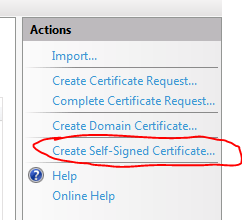
Provide some friendly name for the certificate and click OK.

The certificate should appear in the Personal folder in the Certificates snap-in after a refresh. I called my certificate “iiscertificate”:

Certificate created in IIS visible in MMC snap in

If you double-click this certificate then you’ll see that it is valid. Now if we change the code back to online revocation list checking…

X509ChainPolicy chainPolicy = new X509ChainPolicy()
{
	RevocationMode = X509RevocationMode.Online,
        RevocationFlag = X509RevocationFlag.EntireChain
};

…and search for the IIS certificate…:

X509Certificate2Collection findResult = certificatesInStore.Find(X509FindType.FindBySubjectName, "andras1.Apica.local", false);

…then Build will return true, the IIS certificate is fully trusted even after the CRL is checked.

The certificate was also inserted into the Trusted Root Certification Authorities folder:

IIS certificate also listed among CA certificates

If you don’t see it then refresh the list by pressing F5.

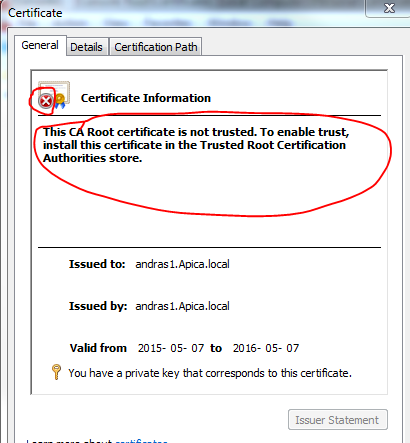
Now remove the certificate from the trusted CA folder. Then go back to the Personal folder and double-click the IIS certificate. You should see that it is not trusted any more:

IIS certificate not trusted after removing from global CA store

If we run the same code again then Build returns false and we get the following validation error:

“A certificate chain processed, but terminated in a root certificate which is not trusted by the trust provider.”

The message clearly says that the root certificate is not trusted.

A more compact solution

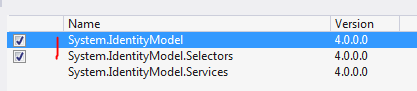
The above code lets you fine-grain your chain building logic. There are specialised X509 validators in .NET that provide a more compact way of validating a certificate. Add the following references to your project:

References for X509 validators

The below example will build a validator that validates the chain of trust with all the validation flags turned on:

X509CertificateValidator chainTrustValidator = X509CertificateValidator.ChainTrust;
try
{
	chainTrustValidator.Validate(cert);
}
catch (Exception ex)
{
	Debug.WriteLine(ex.Message);
}

The Validate method will throw an exception if the validation fails. The untrusted IIS certificate will give the following exception message:

“The X.509 certificate CN=andras1.Apica.local chain building failed. The certificate that was used has a trust chain that cannot be verified. Replace the certificate or change the certificateValidationMode. A certificate chain processed, but terminated in a root certificate which is not trusted by the trust provider.”

That’s all folks about the basics of certificate validation in .NET.

This was the last post in this HTTPS basics series.

You can view the list of posts on Security and Cryptography here.

HTTPS and X509 certificates in .NET Part 4: working with certificates in code

Introduction

In the previous post we successfully installed our self-signed CA certificate in the Trusted Root CA folder. We also installed a derived certificate in the Personal certificates folder. We then saw how to make IIS use our certificate for a secured web site.

In this post we’ll start looking into the certificate-related classes in .NET.

Loading a certificate from a file

Digital certificates are represented by the X509Certificate2 class in .NET located in the System.Security.Cryptography.X509Certificates namespace. The class has numerous overloaded constructors. You can pass in the file path to the certificate, a byte array content, a password etc. Let’s see whether we can load the CA certificate we created before in this series:

Read more of this post

Elliot Balynn's Blog

A directory of wonderful thoughts

Software Engineering

Web development

Disparate Opinions

Various tidbits

chsakell's Blog

WEB APPLICATION DEVELOPMENT TUTORIALS WITH OPEN-SOURCE PROJECTS

Once Upon a Camayoc

ARCHIVED: Bite-size insight on Cyber Security for the not too technical.