In this post we’ll go into more details of WS-Federation in .NET4.5 using the MVC4 internet project we produced in the previous post. More specifically we’ll look at the changes that the Identity and Access Tool made to our project when we introduced the local STS.
We’ll introduce the following topics:
- External login specification
- Setting up trust
- Certificate validation
- Token validation
- Federation metadata
In the demo we’ll continue with the MVC4 application we started in the earlier posts. We’ll also test a real STS instead of the built-in local one.
External login
In a traditional .NET forms-based web app you would specify the login page as follows:
<authentication mode="Forms">
      <forms loginUrl="~/Account/Login" timeout="2880" />
    </authentication>
This login page is then an internal page of the web application.
A web app that is fully claims-based will be void of any internal Login page as we saw in the previous post. Instead we’ll specify an external Login like this:
<system.identityModel.services>
    <federationConfiguration>

      <wsFederation passiveRedirectEnabled="true"
                    issuer="http://localhost:12808/wsFederationSTS/Issue"
                    realm="http://localhost:2532/" requireHttps="false" />
    </federationConfiguration>
  </system.identityModel.services>
This was added by the Identity and Access Tool to web.config. Issuer is the URL of the login service. As you see it is an external URL as opposed to the relative one of the forms-auth solution. The realm is the identifier of your application, usually its URL. It is used by the STS to know who the token is meant for so that it can build application specific security tokens.
Setting up trust
Another important section added by the Identity and Access Tool sets up the trust between the web app and the local STS:
<issuerNameRegistry type="System.IdentityModel.Tokens.ValidatingIssuerNameRegistry,    System.IdentityModel.Tokens.ValidatingIssuerNameRegistry">
	<authority name="LocalSTS">
		<keys>
			<add thumbprint="9B74CB2F320F7AAFC156E1252270B1DC01EF40D0" />
		</keys>
		<validIssuers>
			<add name="LocalSTS" />
		</validIssuers>
	</authority>
</issuerNameRegistry>
This is located within the system.identityModel element. The issuerNameRegistry specifies the details of the trust relationship between the web app and the STS. You can specify a type, which will be a class that allows to set up the trust through configuration. There’s a built-in implementation called ValidatingIssuerNameRegistry which works just fine. You can provide your own solution by deriving from that class if you want to describe the trust relationship in another way, e.g. through a database.
The above configuration is telling us the following: we have one valid, i.e. trusted issuer whose X509 signature -i.e. thumbprint – is 9B74CB2F320F7AAFC156E1252270B1DC01EF40D0 and bears the name ‘LocalSTS’. Our application will accept claims from this issuer. .NET will automatically look at the thumbprint of the issuer in the token and check the value(s) against the one in web.config. If the token was signed by a different X509 certificate then the token will be rejected. If the values match then the ‘Issuer’ property of the token will be assigned the symbolic name of ‘LocalSTS’. The ‘Isser’ property of each claim will receive this value as well.
Certificate validation
There’s an optional step after the token has been accepted by the web app, i.e. after the token has passed the first level of scrutiny which is checking the thumbprint.
Normally that initial check is enough for us to say that the token is real. The keys element contains very strong statements about which certificates are the trusted ones. In addition, however, we can perform an additional check on the certificate itself as follows:
<certificateValidation certificateValidationMode="ChainTrust" revocationMode="Online" />
This will check if your certificate store includes a certificate with the same thumbprint and that it has not been revoked in the meantime. ChainTrust means that .NET will check if the specified issuer, i.e. LocalSTS is available in your trusted CA folder in your certificate store. revocationMode Online means that we want to go the CRL – Certificate Revocation List – endpoint of the CA to see if the certificate has been revoked.
This extra validation step is often not needed as stated above. It adds extra complexity to your application: the same X509 certificate that was used to sign the token must be installed on the application server and the web server must have access to the CRL endpoint. If you are satisfied with the list of thumbprints and do not want to carry out any additional checks then you can set this type of validation to none as follows:
<certificateValidation certificateValidationMode="None" />
This is inserted by the Identity and Access Tool by default within the identityConfiguration node.
Token validation
Token validation is different from certificate validation. When validating a token we want to make sure that it is really meant for our application. This is expressed by the following element added by the Identity and Access Tool to the web.config file:
      <audienceUris>
        <add value="http://localhost:2532/" />
      </audienceUris>
Imagine that there are two applications that trust the same STS and that a token meant for myniceapplication is redirected to myotherniceapplication. As they both trust the same certificate then myotherniceapplication will also accept the token meant for myniceapplication. This can lead to subtle security holes that can be difficult to discover.
The STS will embed the name of the realm in the token. Recall that the realm is also specified as the unique ID in the query string sent to the STS login page. The same value will be put back inside the token. The above audienceUri setting will check if the URI value, i.e. http://localhost:2532 is the same as the one embedded in the token. This will make sure that the token was really meant for our own web application.
Federation metadata
Federation metadata is an XML document that describes the STS: WS-Federation endpoint, which certificate is used to sign the token etc. Most STSs support this document format. The Identity and Access Tool specifies this document in the web.config as follows:
<add key="ida:FederationMetadataLocation" value="http://localhost:13866/wsFederationSTS/FederationMetadata/2007-06/FederationMetadata.xml" />
We will look at this document in more detail in the demo.
Demo
Now we’ll see how to set up and use a real STS.
For the demo we’ll use an STS built by Thinktecture. The Thinktecture IdentityServer was created using .NET4.5, it is open source and can be used as a starting point of a custom-made STS in your own project. Navigate to the following link:
Thinktecture IdentityServer 2.1
Download the zip file containing the source code from the ‘Download’ link. Make sure you select version 2.1. That is the most recent version available as of May 16 2013. The STS will need to be installed on your machine. There’s an easy step-by-step video guide available for version 2.0 under the ‘Documentation’ link. The video guide is available here. There are very little visual changes from v2.0 to 2.1 so you should be able to set up the system based on that guide. I will not recount what’s said there. So, follow the steps and come back here when you’re done. Make sure you follow each step carefully and that you’ll have 2 users ready: one admin and one ‘normal’ user who corresponds to the user we created before on the Register page of our MVC4 web app. I created a user with the same user name as the one I created on the Register page as my custom claims auth – CustomAuthorisationManager.cs – and claims transformation – CustomClaimsTransformer.cs – logic is based on that. If this is the case in your implementation then make sure that the username of the STS user matches the one you’ve been working with so far.
When you’re done your local Thinktecture STS page should look as follows when logging in as an admin:

Select the ‘home’ link and click on ‘View WS-Federation Metadata’:

You will be presented with the Federation Metadata which describes the STS. This is the document we referred to under the ‘Federation metadata’ section above. Some interesting bits and pieces:
You will find the URL of the STS sign-in page under the PassiveRequestorEndpoint element:

Locate the KeyInfo element where you will see the certificate which will sign the outgoing token:

The Identity and Access Tool will use this metadata document to set up our configuration. Take a note of the URL of this XML page, we’ll need it soon. It should look similar to the following:
https://your_local_server_name/idsrv/FederationMetadata/2007-06/FederationMetadata.xml
Before we go on let’s give a meaningful name to the Thinktecture issuer:

By default the Site ID value is some URL ending with “changethis”. Give it some meaningful name instead, I chose ThinkTectureSTS, but it’s your choice. The Site Id will be reflected in the federation metadata:

Open our MVC4 internet application in Visual Studio 2012. Right click the web project name and select ‘Identity and Access…’ from the context menu. In the previous blog post we tested the first option in the Identity and Access window, i.e. the ‘Use the Local Development STS to test your application’ one. This time select the second option, i.e. ‘Use a business identity provider’.
You’ll need to specify the path to the STS metadata document. Paste in the link to FederationMetadata.xml as noted above:

You can also specify the realm, i.e. the ID of your web application in the same window. This can be the localhost URL as given in the wizard or some symbolic name, like DonaldDuck. Normally it is the URL of the web page, so we’ll leave it as it is for the time being.
Press OK and see what happens. The web.config file has been modified to accommodate the new STS. Things to note:
The Federation Metadata XML file has been inserted in the appsettings section:
<add key="ida:FederationMetadataLocation" value="https://localhost/IdentityServer/FederationMetadata/2007-06/FederationMetadata.xml" />
We inserted the system.identityModel and system.identityModel.services config sections in previous posts. However, the wizard would have inserted them for us if they had not been there already.
Our trusted issuers list has been modified to include the new local certificate instead of the default LocalSTS:
<issuerNameRegistry type="System.IdentityModel.Tokens.ValidatingIssuerNameRegistry, System.IdentityModel.Tokens.ValidatingIssuerNameRegistry">
        <authority name="ThinkTectureSTS">
          <keys>
            <add thumbprint="79EE2CF0CA42818DDBECA1A191480DFFEDBCF4AB" />
          </keys>
          <validIssuers>
            <add name="ThinkTectureSTS" />
          </validIssuers>
        </authority>
      </issuerNameRegistry>
The name of the Thinktecture STS is the default one which is provided during the STS installation process. You’ll notice that the name of the issuer is the same as the Site ID we chose when we set up the STS. It is important that the two values are the same, otherwise you will get a strange WIF exception: WIF10201: No valid key mapping found for securityToken: ‘System.IdentityModel.Tokens.X509SecurityToken’ and issuer: ‘http://identityserver.v2.thinktecture.com/trust/changethis’.
The issuer URI has also been modified accordingly:
   <system.identityModel.services>
    <federationConfiguration>
      <cookieHandler requireSsl="false" />
      <wsFederation passiveRedirectEnabled="true"
		issuer="https://localhost/IdentityServer/issue/wsfed" realm="http://localhost:2532/" requireHttps="false" />
    </federationConfiguration>
  </system.identityModel.services>
You’ll notice that the attributes ‘requireSsl’ and ‘requireHttps’ in the above XML are set to false. This is acceptable for testing purposes but you should make sure to set have SSL ready for the production environment. ‘passiveRedirectEnabled=true’ means that upon a 401 response the user is redirected to the login page of the STS, i.e. at https://localhost/IdentityServer/issue/wsfed in this example. The realm http://localhost:2532 will be attached to the query string as the ID of our web site.
The audience URI is the URI of our test web site:
<audienceUris>
    <add value="http://localhost:2532/" />
</audienceUris>
This value is typically the same as the realm under the federationConfiguration element.
As we saw in the previous post the wizard will make sure that all visiting users must be authenticated:
<authorization>
      <deny users="?" />
    </authorization>
The effect is that as soon as a user tries to view your site they will be redirected to the STS. Let’s remove this element to allow anonymous users as well. Run the application now. You may be presented with an exception saying that the element ‘certificateValidation’ occurs more than once. We added this element in the previous post and the wizard was not smart enough to detect it in web.config. If you get this exception then remove one of the elements and re-run the application.
If you remember then we made our About page protected. Click that link and… …you should be redirected to the Thinktecture login page. The URL will conform to the format we discussed before and will look similar to the following:
https://andras1/idsrv/issue/wsfed?wa=wsignin1.0&wtrealm=http%3a%2f%2flocalhost%3a2533%2f&wctx=rm%3d0%26id%3dpassive%26ru%3d%252fHome%252fAbout&wct=2013-02-11T20%3a48%3a36Z
Log in with the user you created during the Thinktecture STS setup and you should actually receive an error message:

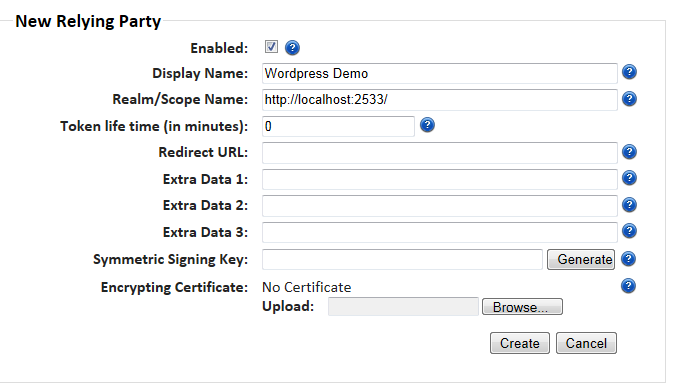
The reason is that the STS does not give out tokens to arbitrary applications. The application first needs to be registered with the STS. We’ll do it now:
Navigate to the STS home page and sign in as an admin. If you followed the video presentation on the Thinktecture STS installation then you’ll have an admin user ready.
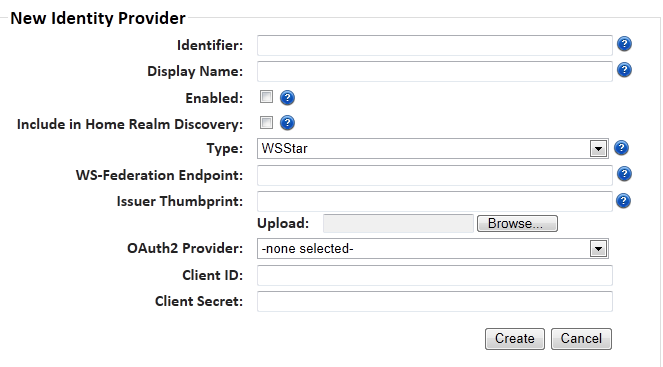
Click the ‘administration’ link and select Relying Parties & Resources:

Press the ‘New’ button:

Make sure you specify the same realm as in the web.config:

Press Create.
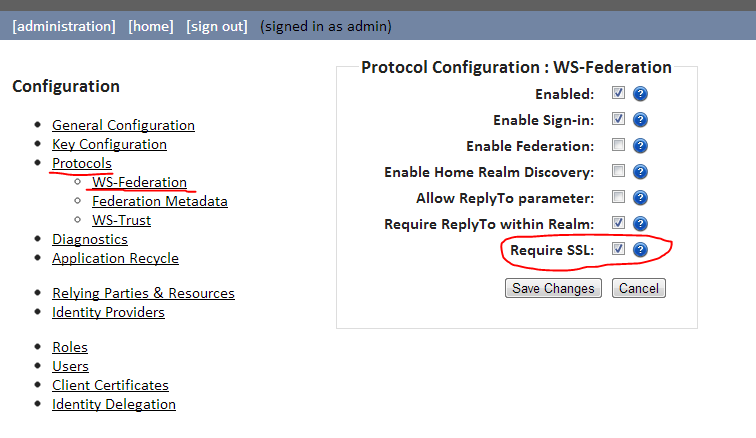
Re-run our MVC4 demo application and click the About link… …and you’ll most likely receive one more exception: the return URL requires SSL. Didn’t we specify ‘requireSsl’ as false in the web.config file? It turns out that SSL must be disabled on the STS as well.
Go to the STS home page and log in as an admin. Select ‘administration’, protocols and WS-Federation and uncheck the Require SSL option:

Save the changes and run the MVC4 application again. As usual, you can set breakpoints within CustomClaimsTransformer.Authenticate and CustomAuthorisationManager.CheckAccess to see if our custom made claims managers still work.
Select About and you should be redirected to the STS login page. Enter the username and password of the ‘normal’ user you created during the Thinktecture Identity Server installation process and press ‘Sign In’. You should be redirected to the About page meaning that the logi nwas successful.
If you have set the breakpoints in place then you’ll see that code execution stops within our custom claims managers showing that they still work as expected. Feel free to step through the code with F11 and inspect how the Claims collection is built up.
If everything went fine then you’ll be presented with the About page. Great, we’ve just implemented a real STS solution! In addition, all our custom Claims auth managers work exactly the same as before.
In the next post we’ll discuss some more advanced topics.
You can view the list of posts on Security and Cryptography here.