Domain Driven Design with Web API extensions part 6: domain events with RabbitMq
November 9, 2015 2 Comments
Introduction
In the previous post we looked at some basic theory behind messaging between independent applications. We discussed a couple of options to solve the problem. In this post we’ll start building our messaging environment using RabbitMq.
As noted before there’s a series dedicated to RabbitMq on this blog starting here. You can read the first 2-3 posts to get the basic idea.
In summary it is a high availability messaging framework which implements the Advanced Message Queue Protocol (AMQP). AMQP is an open standard wire level protocol similar to HTTP. It is also independent of any particular vendor. Here are some key concepts of AMQP:
- Message broker: the messaging server which applications connect to
- Exchange: there will be a number of exchanges on the broker which are message routers. A client submits a message to an exchange which will be routed to one or more queues. It’s possible to set up a queue with no exchanges at all in the simplest scenario, which is in fact what we’re going to do
- Queue: a store for messages which normally implements the first-in-first-out pattern
- Binding: a rule that connects the exchange to a queue. The rule also determines which queue the message will be routed to. Like in the case of exchanges, it’s possible to have no binding rules attached to a queue and we won’t set any in the demo
In this extension series we’ll only look at the most basic usage of RabbitMq: the Web API project will push a message to a queue and the simulated financial application will pull the message from it. You can go through the referred series to learn more about messaging and what RabbitMq can do at a basic level.
Installation
Follow the instructions on the first page of the RabbitMq series. Note that at the time of writing that series RabbitMq had version 3.2.3. The current version is 3.5.6 but that should not be an issue. I still have the older version on my computer, I’ll keep using it for the demo. However, I’ll use the current version of the RabbitMq .NET package later on in the code.
By the end of the installation process you should have a local RabbitMq page on http://localhost:15672/. Open the page and log on with username/password ‘guest’ and have a look around. There won’t bee too much to test as there are no queues, no exchanges or messages yet. Feel free to try some of the tests and demos from the RabbitMq series. We’ll keep the RabbitMq related stuff to a minimum here.
The financial application
We’ll add our glorious financial app directly to our WebSuiteDDD demo solution. Add a new project of type C# console application and call it WebSuiteDDD.FinancialPlanner. We’ll first set up the message queue for the most simple one way messaging scenario. Note that we’ll keep this console application simple and not bother about any patterns, software design, SOLID etc., that’s not the point of the exercise.
Add the following NuGet package to the console application:

Here’s the program code for Program.cs of the console application that will create a message queue:
using System;
using System.Collections.Generic;
using System.Linq;
using System.Text;
using System.Threading.Tasks;
using RabbitMQ.Client;

namespace WebSuiteDDD.FinancialPlanner
{
	class Program
	{
		private static string _hostName = "localhost";
		private static string _userName = "guest";
		private static string _password = "guest";
		private static string _loadtestEventMessageQueueName = "LoadtestEventMessageQueue";

		static void Main(string[] args)
		{
			BuildMessageQueue();
		}

		private static void BuildMessageQueue()
		{
			IConnection connection = GetRabbitMqConnection();
			IModel model = connection.CreateModel();
			model.QueueDeclare(_loadtestEventMessageQueueName, true, false, false, null);
		}

		private static IConnection GetRabbitMqConnection()
		{
			ConnectionFactory connectionFactory = new ConnectionFactory();
			connectionFactory.HostName = _hostName;
			connectionFactory.UserName = _userName;
			connectionFactory.Password = _password;
			return connectionFactory.CreateConnection();
		}
	}
}
Run the console application. If it runs without any exception then log onto the RabbitMq web console and check if the queue has really been created:
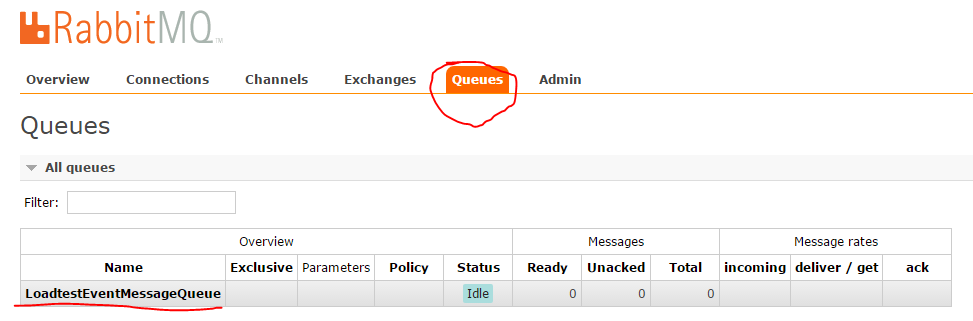
The parameter “true” in the call to QueueDeclare will ensure that the queue is durable, i.e. it will be available even after restarting your PC.
Now either remove or comment out the call to the BuildMessageQueue method from Main. We’ll come back to this console application later to add the message pulling part of the code.
Web project extensions
We’ll now turn our attention to the WebSuiteDDD demo project again.
First we want to store the message queue name somewhere where it can be stored without having to redeploy the solution. We could store it in the database, the web config file, some web service, some cloud storage mechanism etc. There are multiple possible solutions and the exact implementation may change in the future. That calls for an abstraction! We want to abstract away how a certain setting is retrieved. At the same time we’ll stick to the convention that settings are stored as key-value pairs.
Locate the Infrastructure.Common layer and add a new folder called ApplicationSettings. Add an interface to it called IConfigurationRepository:
public interface IConfigurationRepository
{
	T GetConfigurationValue<T>(string key);
	T GetConfigurationValue<T>(string key, T defaultValue);
}
Our implementation will be based on reading the config value from the configuration file. Add a class called ConfigFileConfigurationRepository to the ApplicationSettings folder:
public class ConfigFileConfigurationRepository : IConfigurationRepository
{
	public T GetConfigurationValue<T>(string key)
	{
		string value = ConfigurationManager.AppSettings[key];
		if (value == null)
		{
			throw new KeyNotFoundException("Key " + key + " not found.");
		}
		try
		{
			if (typeof(Enum).IsAssignableFrom(typeof(T)))
				return (T)Enum.Parse(typeof(T), value);
			return (T)Convert.ChangeType(value, typeof(T));
		}
		catch (Exception ex)
		{
			throw ex;
		}
	}

	public T GetConfigurationValue<T>(string key, T defaultValue)
	{
		string value = ConfigurationManager.AppSettings[key];
		if (value == null)
		{
			return defaultValue;
		}
		try
		{
			if (typeof(Enum).IsAssignableFrom(typeof(T)))
				return (T)Enum.Parse(typeof(T), value);
			return (T)Convert.ChangeType(value, typeof(T));
		}
		catch (Exception ex)
		{
			return defaultValue;
		}
	}
}
It’s very likely that Visual Studio will complain that ConfigurationManager is not found. You’ll have to add a reference to the System.Configuration dll as ConfigurationManager is located in the System.Configuration namespace:

To finish off this post add the following setting to the app settings section of web.config of the Web API project:
<appSettings>
	<add key="LoadtestEventMessageQueueName" value="LoadtestEventMessageQueue"/>
	<add key="LoadtestEventMessageQueueHost" value="localhost"/>
	<add key="LoadtestEventMessageQueueUsername" value="guest"/>
	<add key="LoadtestEventMessageQueuePassword" value="guest"/>
</appSettings>
We’re getting close to the grand finale where the domain event will be sent to the message queue where the financial application can read it. We’ll do that in the next post which finishes this extension series.
View the list of posts on Architecture and Patterns here.


Pingback: Domain Driven Design with Web API extensions part 6: domain events with RabbitMQ | Dinesh Ram Kali.
Pingback: Domain Driven Design with Web API extensions part 7: domain events with RabbitMq completed | Dinesh Ram Kali.