Domain Driven Design with Web API extensions part 7: domain events with RabbitMq completed
November 12, 2015 1 Comment
Introduction
In the previous post we set up the local RabbitMq environment. We also created a simple console application that built the message queue where the DDD demo project and the simulated financial application will communicate. We also prepared the way for the completion of the messaging process by creating an app setting reader and adding the RabbitMq related settings to web config.
In this post we’ll complete the demo by sending a message to the queue and reading it from the dummy financial console application.
The messaging event handler
Let’s implement the RabbitMq domain event handler. First add the same RabbitMq.Client NuGet package to the WebSuiteDemo.Loadtesting.ApplicationServices project as in the previous post:

Next we’ll add the following implementation of the IDomainEventHandler interface into the Implementations folder of the ApplicationServices layer
using System;
using System.Collections.Generic;
using System.Linq;
using System.Text;
using System.Threading.Tasks;
using RabbitMQ.Client;
using WebSuiteDDD.Infrastructure.Common.ApplicationSettings;
using WebSuiteDDD.SharedKernel.DomainEvents;
using WebSuiteDemo.Loadtesting.Domain;
using WebSuiteDemo.Loadtesting.Domain.DomainEvents;

namespace WebSuiteDemo.Loadtesting.ApplicationServices.Implementations
{
	public class TimetableChangedRabbitMqMessagingEventHandler : IDomainEventHandler
	{
		private readonly IConfigurationRepository _configurationRepository;

		public TimetableChangedRabbitMqMessagingEventHandler(IConfigurationRepository configurationRepository)
		{
			if (configurationRepository == null) throw new ArgumentNullException("ConfigurationRepository");
			_configurationRepository = configurationRepository;
		}

		public void Handle(EventArgs eventArgs)
		{
			TimetableChangedEventArgs e = eventArgs as TimetableChangedEventArgs;
			if (e != null)
			{
				AddOrUpdateLoadtestsValidationResult addOrUpdateValidationResult = e.AddOrUpdateLoadtestsValidationResult;
				if ((addOrUpdateValidationResult.ToBeInserted.Any() || addOrUpdateValidationResult.ToBeUpdated.Any())
						&& !addOrUpdateValidationResult.Failed.Any())
				{
					IConnection connection = GetRabbitMqConnection();
					IModel model = connection.CreateModel();
					string message = addOrUpdateValidationResult.OperationResultSummary;
					IBasicProperties basicProperties = model.CreateBasicProperties();
					byte[] messageBytes = Encoding.UTF8.GetBytes(message);
					string queue = _configurationRepository.GetConfigurationValue<string>("LoadtestEventMessageQueueName", "LoadtestEventMessageQueue");
					model.BasicPublish("", queue, basicProperties, messageBytes);
				}
			}
		}

		private IConnection GetRabbitMqConnection()
		{
			ConnectionFactory connectionFactory = new ConnectionFactory();
			connectionFactory.HostName = _configurationRepository.GetConfigurationValue<string>("LoadtestEventMessageQueueHost", "localhost");
			connectionFactory.UserName = _configurationRepository.GetConfigurationValue<string>("LoadtestEventMessageQueueUsername", "guest");
			connectionFactory.Password = _configurationRepository.GetConfigurationValue<string>("LoadtestEventMessageQueuePassword", "guest");
			return connectionFactory.CreateConnection();
		}
	}
}
We extract the queue-related properties such as host, password etc. from the configuration repository. We also provide some default names if the settings do not exist. The RabbitMq related code is as simple as it gets. We just build the connection and post a byte array to the relevant queue.
We can now register the event handler in global.asax:
protected void Application_Start()
{
	DomainEventMediator.RegisterDomainEventHandler(new TimetableChangedEmailEventHandler(new FakeEmailService()));
	DomainEventMediator.RegisterDomainEventHandler(new TimetableChangedRabbitMqMessagingEventHandler(new ConfigFileConfigurationRepository()));
	GlobalConfiguration.Configure(WebApiConfig.Register);
}
That’s it, we don’t need to do anything else. There are no extensions to the Timetable or the TimetableServices class. They are happily unaware of our new event handler.
Start the Web API demo and add a new load test through the test console application like before. It should trigger both event handlers. Check the changes in the RabbitMq web console. The message was registered.
The following graphs show the message increase from 0 to 1:
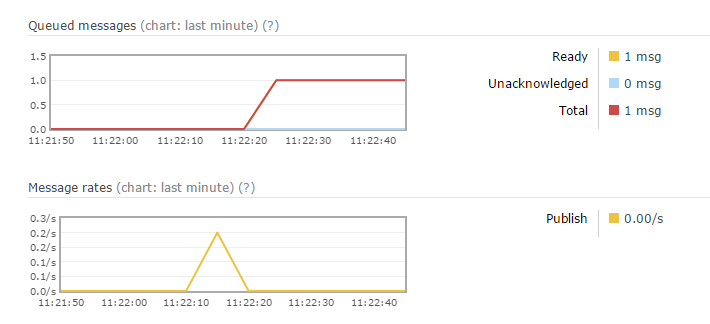
And the following table shows that there’s one message waiting in the queue:

We’ll now set up the WebSuiteDDD.FinancialPlanner project as well. Here’s the code for Program.cs that will monitor the queue:
using System;
using System.Collections.Generic;
using System.Linq;
using System.Text;
using System.Threading.Tasks;
using RabbitMQ.Client;
using RabbitMQ.Client.Events;

namespace WebSuiteDDD.FinancialPlanner
{
	class Program
	{
		private static string _hostName = "localhost";
		private static string _userName = "guest";
		private static string _password = "guest";
		private static string _loadtestEventMessageQueueName = "LoadtestEventMessageQueue";

		static void Main(string[] args)
		{
			//BuildMessageQueue();
			ReceiveMessages();
		}

		private static void BuildMessageQueue()
		{
			IConnection connection = GetRabbitMqConnection();
			IModel model = connection.CreateModel();
			model.QueueDeclare(_loadtestEventMessageQueueName, true, false, false, null);
		}

		private static void ReceiveMessages()
		{
			IConnection connection = GetRabbitMqConnection();
			IModel model = connection.CreateModel();
			model.BasicQos(0, 1, false); //basic quality of service
			QueueingBasicConsumer consumer = new QueueingBasicConsumer(model);
			model.BasicConsume(_loadtestEventMessageQueueName, false, consumer);
			while (true)
			{
				BasicDeliverEventArgs deliveryArguments = consumer.Queue.Dequeue() as BasicDeliverEventArgs;
				String message = Encoding.UTF8.GetString(deliveryArguments.Body);
				Console.WriteLine("Message received: {0}", message);
				model.BasicAck(deliveryArguments.DeliveryTag, false);
			}
		}

		private static IConnection GetRabbitMqConnection()
		{
			ConnectionFactory connectionFactory = new ConnectionFactory();
			connectionFactory.HostName = _hostName;
			connectionFactory.UserName = _userName;
			connectionFactory.Password = _password;
			return connectionFactory.CreateConnection();
		}
	}
}
The ReceiveMessages method will read and acknowledge the messages from the queue called LoadtestEventMessageQueue. If you run the FinancialPlanner app now it should read the message from the queue and print it in the console window.
We can now start playing with our system. Start both the Web API Demo project and FinancialPlanner console app. Add a couple of load tests and you’ll see that both event handlers are triggered, i.e. we send out an email and also publish a message to RabbitMq. The message is then processed by the FinancialPlanner. Here’s the message shown in the planner application:

…and here’s our “email”:
From: The developer, to: The Boss, message: Load tests added or updated, server: 123.456.678, subject: Load tests added or updated
That’s the conclusion of this extension series. I hope you’ve learnt something new and useful.
View the list of posts on Architecture and Patterns here.


Pingback: Domain Driven Design with Web API extensions part 7: domain events with RabbitMq completed | Dinesh Ram Kali.