Introduction to .NET Web API 2 with C# Part 3: authentication
April 10, 2014 39 Comments
Introduction
So far in this intro course we haven’t discussed authentication although we enabled it when we created the demo Web Api app. In this demo we’ll see how to make an authenticated request to the API. Let’s imagine that our rockband data is top secret. Therefore not just anyone should gain access to it.
Open the demo app and the simple HTML web app we’ve been working on and let’s get started.
Authentication
Recall from the previous post in this series that we made an anonymous call to the API via the Get Rockbands button from the HTML web app. We’ll see how the need of authentication changes the picture.
Open RockbandsController.cs and place the following attribute over the class declaration:
[Authorize]
public class RockbandsController : ApiController
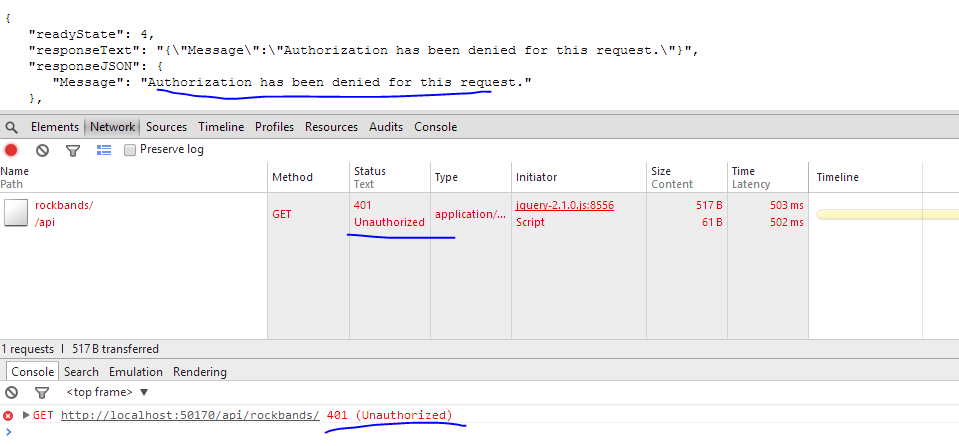
Run both apps. Have the Chrome developer tools open in the browser for default.html. Press the Get Rockbands button and you should get a 401 back:
So we’ll need to authenticate first. However, in order to authenticate we’ll need to sign up with the API app. However, there’s no familiar Signup link as the API page is not the usual MVC page with the login and sign-up links in the top right hand corner. Navigate to /Help on the Web API page to view the available HTTP endpoints. You’ll find a number of actions under the Account category. The POST api/account/register entry looks promising. Click on that link to view what we need to send to the service:

That doesn’t look terribly difficult. Let’s build a simple UI for that in the HTML web app. Place the following HTML below the h1 tags:
<form id="userSignup">
        <input type="text" name="username" placeholder="Name" />
        <input type="password" name="password" placeholder="Password" />
        <input type="password" name="confirmpassword" placeholder="Confirm password" />
        <input type="submit" id="signup" value="Sign up" />
</form>
Note the “name” attributes of the input tags. They correspond to the properties in the JSON that the Register action expects. The case doesn’t matter: userName, USERNAME, etc. will all do the job.
We’ll now need some javascript to send the data to the service. It’s good that we set up CORS in the previous post so we can call the service from here. We already have some javascript on that page to get the rockband data. Place the following bit of code…
var register = function () {
                var registrationUrl = "http://localhost:50170/api/Account/Register";
                var registrationData = $("#userSignup").serialize();
                $.post(registrationUrl, registrationData).always(showRockbands);
                return false;
            };

$("#signup").click(register);
…above…
$("#getRockbands").click(getRockbands);
We call the Register controller with a POST request and send the serialised form data in the message body. We’ll show the response using the showRockbands method we defined earlier. Re-run default.html and try to register without filling in the form:

Not surprisingly we get a validation exception.
Fill in the text boxes and you should get an empty response which means that the request succeeded:

So we’re registered but we still cannot access the rockband data. We’ll need to send along an access token. In fact we need to send it along with every request that requires authentication. It’s not the same as a cookie in the case of forms authentication. Instead, we’ll need to send the token in the request header. This is done by logging in with the website using the login credentials and get hold of the access token from the website. If you look at the Help page again in the API app you won’t find any logical candidate for this task. There’s no “login” or “gettoken” endpoint.
The secret is hidden in a completely different place. Locate Startup.Auth.cs in the App_Start folder. This file uses OWIN technology. I’m planning to write a short series on OWIN and KATANA later in case you’re interested in those technologies. The interesting bit of code is the following:
OAuthOptions = new OAuthAuthorizationServerOptions
{
                TokenEndpointPath = new PathString("/Token"),
                Provider = new ApplicationOAuthProvider(PublicClientId, UserManagerFactory),
                AuthorizeEndpointPath = new PathString("/api/Account/ExternalLogin"),
                AccessTokenExpireTimeSpan = TimeSpan.FromDays(14),
                AllowInsecureHttp = true
};
The ‘/Token’ bit looks promising. We’ll need to send a POST to /Token with our credentials which will return an access token. You can even test it in a browser, but it won’t succeed of course:

This means that we need to specify a grant type which is missing, hence the “unsupported grant type” error message. The endpoint is expecting some data called “grant_type=[type of grant]”. Let’s see how we can build that.
Add the following piece of HTML to the form on the HTML page:
<form id="userSignup">
        <input type="text" name="username" placeholder="Name" />
        <input type="password" name="password" placeholder="Password" />
        <input type="password" name="confirmpassword" placeholder="Confirm password" />
        <input type="submit" id="signup" value="Sign up" />
        <input type="submit" id="signin" value="Sign in" />
</form>
Our form will also function as a login form. Not a very practical solution but it will do for demo purposes.
Add the following bit of JavaScript…:
var signin = function () {
                var tokenUrl = "http://localhost:50170/Token";
                var loginData = $("#userSignup").serialize();
                loginData = loginData + "&grant_type=password";
                $.post(tokenUrl, loginData).always(showRockbands);
                return false;
            };

$("#signin").click(signin);
…above…
$("#signup").click(register);
We’re calling the /Token endpoint and send along a grant type of password. This is telling the endpoint that we need an access token based on the username and password in the form data.
Run both applications and fill in the username and password you signed up with in the previous step. You should see… …the same error as we saw before we enabled CORS. But didn’t we enable CORS already? Yes, but that was in the context of the Web API. We need to do something similar for the /Token endpoint which hides OWIN middleware. Locate ApplicationOAuthProvider.cs in the Providers folder of the Web API project. Search for the following method:
public override async Task GrantResourceOwnerCredentials(OAuthGrantResourceOwnerCredentialsContext context)
You’ll see a using block in the method body. Add the following code below the using block:
context.OwinContext.Response.Headers.Add("Access-Control-Allow-Origin", new[] { "*" });
Re-run the web api demo app and try to sign in. It should succeed and the token should be visible on the screen:

You’ll find a short course on OAuth here which explains what the parts in this JSON mean if you’re curious. The most important bit of information is the access_token. We’ll need to extract it from the JSON and send it along with every subsequent request to the API. This will allow the request through the Authorize attribute. Modify the JavaScript code…
$.post(tokenUrl, loginData).always(showRockbands);
…to the following:
$.post(tokenUrl, loginData)
                    .success(saveAccessToken)
                    .always(showRockbands);
…where saveAccessToken is defined as follows:
var token = "";

var saveAccessToken = function (data) {
      token = data.access_token;
};
We save the access_token property from the JSON that came back from the web api auth request.
Replace…
var getRockbands = function () {
         $.get(rockbandSourceUrl).always(showRockbands);
         return false;
};
…with an AJAX request:
var getRockbands = function () {
                $.ajax(rockbandSourceUrl,
                {
                    type: "GET"
                    , headers: getHeaders()
                }).always(showRockbands);
                return false;
};
…where getHeaders() is defined as follows:
var getHeaders = function () {
                if (token){
                    return { "Authorization": "Bearer " + token };
                }
};
Re-run the HTML app and login first. Wait for the access token to appear. Then click Get Rockbands and there you are:

This is slightly more complicated than it should be but it may change in the future. There’s actually a readily available single-page version of we’ve just done among the MVC 5 templates.
If you create a new ASP.NET Web application in Visual Studio you can select the Single Page Application template:

It will set up authentication, MVC, Web API, OWIN, jQuery and knockout.js for you for a fancy start-up single page application. Start the application and click on the links. It looks like you’re navigating through controllers but it’s really the same page where knockout.js takes care of showing and hiding different parts on the UI. You can sign up with a username and password and then you’ll see a familiar view but now with the usual welcome message and the Log off link in the top right hand corner:

The signup function uses the Account controller and a POST to the /Token endpoint like we did above.
You can view the list of posts on Security and Cryptography here.
View the list of MVC and Web API related posts here.


Hi Andras, I think you’ve got a typo when you serialize data from the form to send it to Account/Register method. Shoudn’t you call “$(“#userSignup”).serialize()” instead of “$(“#signUp”).serialize()”
Thank’s for your great posts!
Hi Bartosz, you’re right, thanks, corrected it.
//Andras
Great post, Thanks
greetings Damien
Great post, Thanks
Excellent post!!!!
Great post but currently access_token is only saved in var. If I reload the page, the access_token is gone. This access_token must be saved as cookie or something but how you can access it from HTML?
Great post but currently access_token is saved in var. If I reload the page, it is gone. How to get the access_token from the HTML again? I assume it is must be stored as cookie. Thanks.
Actually i can store it in javascript.cookie but is there any better approach? Thanks.
You can also call a server side function with ajax and save it in the database or a session variable.
//Andras
Hi Andras,
Great post. How to I authorize api request? such as GET, POST etc…
Thanks,
Hi Nur,
What do you mean exactly? Like how to allow running GET vs. POST requests?
Please elaborate.
//Andras
Hi Andras,
I want to build authentication. I used AuthorizeationFilterAttribute. But, I don’t know how client call this.
Here is my code:
public class APIAuthorizeAttribute : AuthorizationFilterAttribute
{
public override void OnAuthorization(System.Web.Http.Controllers.HttpActionContext actionContext)
{
var authHeader = actionContext.Request.Headers.Authorization;
if (authHeader != null)
{
if (authHeader.Scheme.Equals(“basic”, StringComparison.OrdinalIgnoreCase) && !String.IsNullOrWhiteSpace(authHeader.Parameter))
{
try
{
// connect to db and verify user parameter
if(success) {
var currentPrincipal = new GenericPrincipal(new GenericIdentity(apiName), null);
Thread.CurrentPrincipal = currentPrincipal;
return;
}
catch (System.Web.HttpRequestValidationException e)
{
actionContext.Response = actionContext.Request.CreateResponse(HttpStatusCode.BadRequest);
}
}
}
actionContext.Response = actionContext.Request.CreateResponse(HttpStatusCode.Unauthorized);
}
[APIAuthorize]
public class IntlRateController : ApiController
{
}
This is my first time build web API. So, I don’t know I am doing correct or not.
Thanks,
never mind. I did.
Thanks,
Hi Andras Thank you for your nice article
Can you share the project in one link? or file?? because i just want to do something Authentication like this and every example using Fiddler and they are not useful.. but you explain to how to use token and set it can you share project with us..?? If its possible thanks
Hi Saul,
All demo projects can be downloaded from GitHub. Check out the menu item called Github for the necessary links.
//Andras
Hi Andras Thank you for sharing your demos they are very useful. I just want to ask you one little question . I want to write a WebApi using security with token but my users is not person my users will be servers because i’m thinking to link my WebApi in my project so do you have any idea for this situation how can i store my server register user and my data is it in same database or two different database (one of is local for register and one of is my data?) Could you give me a suggession please?
Hi Saul,
You can create a special user dedicated for the server calls and log in as that user maybe?
//Andras
Thanks much, I think you have part of what I want to do here but maybe not all, else I misunderstood.
I have a web api project and I have a SPA project (separate projects in the same solution). I want the SPA project to authenticate with the web api project. Is this what you are doing before you started mentioning SPA? Isn’t The SPA template you mention toward the end trying to use its own identify infrastructure. How do I get it to use the web api project to authenticate (and all the other functionality)?
Markus, no, I didn’t use the SPA template for the auth demo. I only mentioned it to make people aware of it. I simply used a HTML page with JS on it, nothing fancy.
//Andras
Hi Andras. Thanks a lot for this post. What changes need be done in your project to use web API identity authentication based on user information stored in SQL database?
Hi Alex,
The user is stored in a local SQL database, so you’ll probably only need to specify another connection string. Unless I’ve missed something in your question. I go through authorisation in MVC5 more here. That series shows the backend parts of authentication in an MVC/Web API project.
//Andras
Thank you
Pingback: Uso de Claims y bearer tokens en ASP.NET Identity 2.0
Used your info, works well and appreciate your time.
Reblogged this on denhul.
Hi, great posts on this
I cant get the last part to work as the method mentioned
public override async Task GrantResourceOwnerCredentials(OAuthGrantResourceOwnerCredentialsContext context)
doesn’t have a using block (Have I missed something), relatively new to this so any help would be most appreciated thanks, I have tried putting in the line
context.OwinContext.Response.Headers.Add(“Access-Control-Allow-Origin”, new[] { “*” });
but still getting a 500 error when requesting the token?
Entire Method (from ApplicationOAuthProvider.cs)
public override async Task GrantResourceOwnerCredentials(OAuthGrantResourceOwnerCredentialsContext context)
{
var userManager = context.OwinContext.GetUserManager();
//cors
context.OwinContext.Response.Headers.Add(“Access-Control-Allow-Origin”, new[] { “*” });
//end cors
var user = await userManager.FindAsync(context.UserName, context.Password);
if (user == null)
{
context.SetError(“invalid_grant”, “The user name or password is incorrect.”);
return;
}
var oAuthIdentity = await user.GenerateUserIdentityAsync(userManager,OAuthDefaults.AuthenticationType);
var cookiesIdentity = await user.GenerateUserIdentityAsync(userManager,CookieAuthenticationDefaults.AuthenticationType);
var properties = CreateProperties(user.UserName);
var ticket = new AuthenticationTicket(oAuthIdentity, properties);
context.Validated(ticket);
context.Request.Context.Authentication.SignIn(cookiesIdentity);
}
Hi Daniel,
Check the sourcecode on GitHub here: GitHub repo. You may have missed some detail.
//Andras
That worked, although one line of code needed changing
var cors = new EnableCorsAttribute(“*”, “*”, “GET,POST”);
config.EnableCors();
to
var cors = new EnableCorsAttribute(“*”, “*”, “GET,POST”);
config.EnableCors(cors);
Thanks again, great post 🙂
Thanks Andras you may have just saved me a bunch of work …
You are Guru of Authentication. I read your SAML/Federation articles and WebAPI one.. it is amazing the insight and strong hold you have and the way you present details. You really help a lot with your articles. Great job and Thank you!
Hello, thanks for your kind words but please don’t call me a guru 🙂
A guru should be an internationally well-known expert of a subject, like Dominick Baier on .NET security and I have a lot to learn.
//Andras
Andras, your posts range from the extremely helpful, like this series, to the fabulous, like your DDD series. Thanks so much
One small update on this post: as of June 2015 api/account/register now seems to require an email field as well as the name and password fields. After getting the error message, I added it and all was well.
Hi Chris, thanks for the update. //Andras
Unfortunately, the /Token workaround for CORS in ApplicationOAuthProvider.cs no longer works as of June 2015. This may be because Microsoft has changed what the variable user instantiates in GrantResourceOwnerCredentials.
Before:
using (UserManager userManager = _userManagerFactory())
{
IdentityUser user = await userManager.FindAsync(context.UserName, context.Password);
…
}
Now:
var userManager = context.OwinContext.GetUserManager();
ApplicationUser user = await userManager.FindAsync(context.UserName, context.Password);
I’ve tried several things but bottom line is I’m not knowledgeable enough to get CORS to work with the new object.
Anybody have an idea of how to handle this change?
what about of logout button ?
You can create a single page application and check how the log off functionality is implemented there. //Andras
Hi, nice post, very helpful too.
In my scenario, I have a login page login.html, after get the token I want to go with index.html, obiously I need to bring the token.
¿How can i handle this?.
I’m trying to response header in GrantResourceOwnerCredentials method, just like this:
context.OwinContext.Response.Headers.Add(“location”, new[] { “localhost:port/index.html” });
then catch the header in client app.
In the other hand I’m checking the xhr status and processing like this:
$.post(tokenUrl, loginData).done(function (data, statusText, xhr) {
if (xhr.status = 200)
$(location).attr(“href”, “index.html”);
});
I don’t know which is the best practice to apply here ¿Could you give me an idea to handle this?.
Great post! Very helpful, and excellent explanations. Thank you!
odd but my web api project doesnt have “api/account/register” nor Startup.Auth.cs