How to manage Amazon Machine Images with the .NET Amazon SDK Part 2: monitoring and terminating AMI instances, managing Security Groups
July 18, 2013 1 Comment
In the previous post we successfully sent a launch request to the selected AMI. We’ll now see how to monitor its status and terminate it.
Open up the Console application we worked on previously. We finished off where the user selected an AMI and we sent a launch request to EC2 in order to get one instance running of that AMI. The method that retrieves the status of the machine looks as follows:
private static string RetrieveInstanceStatus(string instanceId, Region selectedRegion)
{
	AmazonEC2Client amazonEc2client = GetAmazonClient(selectedRegion.Endpoint);
	try
	{
		DescribeInstancesRequest instancesRequest = new DescribeInstancesRequest();
		Filter filter = new Filter();
		filter.Name = "instance-id";
		filter.Value = new List<string>() { instanceId };
		instancesRequest.Filter = new List<Filter>() { filter };
		DescribeInstancesResponse instancesResponse = amazonEc2client.DescribeInstances(instancesRequest);
		DescribeInstancesResult instancesResult = instancesResponse.DescribeInstancesResult;
		Reservation reservations = instancesResult.Reservation[0];
		RunningInstance runningInstance = reservations.RunningInstance[0];
		return runningInstance.InstanceState.Name;
	}
	catch
	{
		throw;
	}
}
Most of the code will look familiar from the previous post. We send in the selected region and the ID of the instance of the selected AMI. Remember that we requested to start up exactly one instance of the AMI. When you launch that instance then the instance will get a unique id which is a property of the RunningInstance object. The LaunchImage method returned a list of RunningInstance objects where we’ll find that ID, we’ll get to that in a second. Back in the above method we’ll set a filter to the DescribeInstancesRequest object as we’re only interested in that very instance. We don’t care about the status of other instances. Again, as we know that we only launched one instance it’s OK to return the first element in the Reservation and RunningInstance collections which we get back from the DescribeInstancesResult object.
A short aside: it’s perfectly feasible to start multiple instances of the same image. You’ll need to set the MinCount and MaxCount properties of the RunInstancesRequest object accordingly. Take a look at the LaunchImage method we implemented earlier. This returns a list of RunningInstance objects that you can use to collect all the individual instance IDs. The instance ID list can be sent into a slightly modified RetrieveInstanceStatus method which accepts a list of instance ids instead of just one instance id as in this specific implementation. The filter value of the DescribeInstancesRequest will then be set to the list of IDs and you’ll get back the status of all instances.
Let’s add one more helper method to Program.cs that loops until the image instance has reached the “running” state:
private static void MonitorInstanceStartup(string instanceId, Region selectedRegion)
{
	string status = "N/A";
	while (status != "running")
	{
		status = RetrieveInstanceStatus(instanceId, selectedRegion);
		Console.WriteLine(string.Format("Current status of instance {0}: {1}", instanceId, status));
		Thread.Sleep(1000);
	}
}
So we simply wait for the machine to reach the “running” state. The extended Main method looks like this:
static void Main(string[] args)
{
	List<Region> amazonRegions = GetAmazonRegions();
	PrintAmazonRegions(amazonRegions);
	int usersChoice = GetSelectedRegionOfUser(amazonRegions);
	Region selectedRegion = amazonRegions[usersChoice - 1];
	List<Amazon.EC2.Model.Image> imagesInRegion = GetSuitableImages(selectedRegion);
	PrintAmis(imagesInRegion);
	int usersImageChoice = GetSelectedImageOfUser(imagesInRegion);
	Image selectedImage = imagesInRegion[usersImageChoice - 1];
	List<RunningInstance> launchedInstances = LaunchImage(selectedImage, selectedRegion);
	MonitorInstanceStartup(launchedInstances[0].InstanceId, selectedRegion);

	Console.ReadKey();
}
Let’s run the app. If everything goes well then you should see an output similar to this:

I’ll check in the EC2 management window as well:

A word of caution: although the state of the machine is running it really should say ‘initialising’ at first and then running. You’ll notice that it doesn’t take long to reach the running state, maybe 10-15 seconds. However, the instance may not reach a truly usable “running” state until 2-3 more minutes. “Running” can be compared to the first blue screen on a Windows machine where it says “Starting Windows”. That is not really running yet, right? And then the startup process runs, extra applications and processes are loaded etc. and when all that’s done then you can start working on your machine normally.
Let’s see how we can terminate the instance:
private static Tuple<string, string> TerminateInstance(string instanceId, Region selectedRegion)
{
	AmazonEC2Client amazonEc2client = GetAmazonClient(selectedRegion.Endpoint);
	try
	{
		TerminateInstancesRequest terminateRequest = new TerminateInstancesRequest();
		terminateRequest.InstanceId = new List<string>() { instanceId };
		TerminateInstancesResponse terminateResponse = amazonEc2client.TerminateInstances(terminateRequest);
		TerminateInstancesResult terminateResult = terminateResponse.TerminateInstancesResult;
		List<InstanceStateChange> stateChanges = terminateResult.TerminatingInstance;
		return new Tuple<string, string>(stateChanges[0].CurrentState.Name, stateChanges[0].PreviousState.Name);
	}
	catch
	{
		throw;
	}
}
As usual we set the current region in the Amazon client. Then we send a TerminateInstancesRequest whose purpose is quite self-explanatory I believe. You can terminate multiple instances by sending in a list of instance ids. In our case it’s a list containing one element only. We get back a list of InstanceStateChange object where we can read among other things the current state of the Instance and the state that it had just before the termination request was made.
Run the application and you may see an output similar to the following:
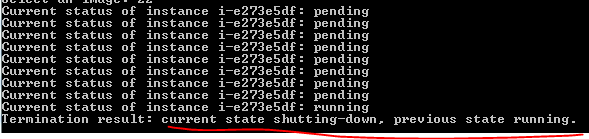
So you see that the “running” state changes to “shutting-down” after the termination request was issued. Let’s also monitor the shutting-down phase until the instance is fully terminated:
private static void MonitorInstanceShutdown(string instanceId, Region selectedRegion)
{
	string status = "N/A";
	while (status != "terminated")
	{
		status = RetrieveInstanceStatus(instanceId, selectedRegion);
		Console.WriteLine(string.Format("Current status of instance {0}: {1}", instanceId, status));
		Thread.Sleep(1000);
	}
}
Add the following to Main:
MonitorInstanceShutdown(launchedInstances[0].InstanceId, selectedRegion);
Run the application and you may see something similar to this:

Let’s check in the EC2 manager as well just to make sure it worked:

Security groups
A security group is a firewall to control the access to the instances. You can read about it on the AWS website here. You can control Security Groups programmatically.
Use the following code to search for a certain security group by name:
private static void SearchSecurityGroup(Region selectedRegion)
{
	DescribeSecurityGroupsRequest securityGroupRequest = new DescribeSecurityGroupsRequest();
	Filter groupNameFilter = new Filter();
	groupNameFilter.Name = "group-name";
	groupNameFilter.Value = new List<String>() { "Security group name" };
	List<Filter> securityGroupRequestFilter = new List<Filter>();
	securityGroupRequestFilter.Add(groupNameFilter);
	securityGroupRequest.Filter = securityGroupRequestFilter;
	DescribeSecurityGroupsResponse securityGroupResponse = GetAmazonClient(selectedRegion.Endpoint).DescribeSecurityGroups(securityGroupRequest);
	DescribeSecurityGroupsResult securityGroupResult = securityGroupResponse.DescribeSecurityGroupsResult;
	List<SecurityGroup> securityGroups = securityGroupResult.SecurityGroup;
}
The code follows the AWS SDK style we’ve seen so far: construct a Request object, set a Filter on it, send the request to the selected region and read the result from the Response. I encourage you to inspect the SecurityGroup object to see what properties can be extracted from it.
You can inspect the Ip permissions of the selected security group as follows:
private static void InspectIpPermissions(SecurityGroup selectedSecurityGroup)
{
	List<IpPermission> ipPermissions = selectedSecurityGroup.IpPermission;
	foreach (IpPermission ipPermission in ipPermissions)
	{
		StringBuilder ipRangeBuilder = new StringBuilder();
		foreach (String ipRange in ipPermission.IpRange)
		{
			ipRangeBuilder.Append(ipRange).Append(", ");
		}
		Console.WriteLine(string.Format("Protocol: {0}, from port: {1}, to port: {2}, ip range: {3}", ipPermission.IpProtocol	, ipPermission.FromPort, ipPermission.ToPort, ipRangeBuilder.ToString()));
	}
}
You can extract the IP and port ranges and some other properties of the IpPermission object.
The following method creates a new Security Group and opens up port HTTP and HTTPS traffic for all incoming IPs on the TCP protocol:
private static void CreateSecurityGroup(Region selectedRegion)
{
	CreateSecurityGroupRequest createGroupRequest = new CreateSecurityGroupRequest();
	createGroupRequest.GroupName = "Security group name";
	createGroupRequest.GroupDescription = "Security group description";
	AmazonEC2Client amazonEc2Client = GetAmazonClient(selectedRegion.Endpoint);
	amazonEc2Client.CreateSecurityGroup(createGroupRequest);
	int[] ports = { 80, 443 };
	foreach (int i in ports)
	{
		AuthorizeSecurityGroupIngressRequest ingressRequest = new AuthorizeSecurityGroupIngressRequest();
		ingressRequest.GroupName = "Security group name";
		ingressRequest.IpProtocol = "tcp";
		ingressRequest.FromPort = i;
		ingressRequest.ToPort = i;
		ingressRequest.CidrIp = "0.0.0.0/0";
		amazonEc2Client.AuthorizeSecurityGroupIngress(ingressRequest);
	}
}
You can also remove Security Groups using the following code:
private static void DeleteSecurityGroup(Region selectedRegion)
{
	AmazonEC2Client amazonEc2Client = GetAmazonClient(selectedRegion.Endpoint);
	DeleteSecurityGroupRequest deleteGroupRequest = new DeleteSecurityGroupRequest();
	deleteGroupRequest.GroupName = "Group name to be deleted";
	DeleteSecurityGroupResponse deleteGroupResponse = amazonEc2Client.DeleteSecurityGroup(deleteGroupRequest);

}