Create code at runtime with Reflection in .NET C#: Assembly

We’ve looked at how to inspect assemblies, types and similar elements in other posts on Reflection – see link below. With Reflection you cannot only inspect assemblies but create new ones on the fly.

Why would you create a new .NET assembly programmatically? A typical scenario is when you have an application which allows users to create their plugins that your application can use in some way. Normally programmers can create such plugins and compile them into libraries based on some instructions on your website. However, what to do if you want to allow non-programmers to create their plugins? Or if the rules for creating the plugin are so complex that you don’t even trust programmers with the task? Then you can have a GUI where people can make their choices and you create the plugin for them based on the options they have selected.

The entry point to creating assemblies in code is found in the System.Reflection.Emit namespace. It contains Builder classes to build the elements of an assembly: AssemblyBuilder, EnumBuilder, EventBuilder, MethodBuilder etc. Most builders are quite descriptive of their function where the string before ‘Builder’ shows what can be built with it:

  • AssemblyBuilder
  • ConstructorBuilder
  • EnumBuilder
  • EventBuilder
  • FieldBuilder
  • LocalBuilder: to build local variables for methods and constructors
  • MethodBuilder
  • ModuleBuilder
  • ParameterBuilder: to build method parameters
  • PropertyBuilder
  • TypeBuilder

The first step towards creating an assembly with types and methods is creating an assembly and a module:

string assemblySimpleName = "MyGreatPlugin";
string assemblyFileName = string.Concat(assemblySimpleName, ".dll");
AssemblyName assemblyName = new AssemblyName(assemblySimpleName);			
AssemblyBuilder assemblyBuilder = AppDomain.CurrentDomain.DefineDynamicAssembly(assemblyName, AssemblyBuilderAccess.RunAndSave);

ModuleBuilder moduleBuilder = assemblyBuilder.DefineDynamicModule("MyPluginModule", assemblyFileName);

We first set up some basic information about the assembly simple name and the library name. We use the simple assembly name to construct an AssemblyName object. This is in turn used to create an AssemblyBuilder with the DefineDynamicAssembly method of the AppDomain class. The AssemblyBuilderAccess enumeration defines what the users can do with the assembly. Possible values:

  • RunAndSave: to save and execute an assembly which is probably what you want in a plugin scenario
  • Run: can be executed but not saved
  • RunAndCollect: can be executed and reclaimed from memory, read more here
  • Save: can be saved but not executed
  • ReflectionOnly: can be loaded into memory to inspect its element with Reflection but cannot be executed

Next we use the assembly builder to get a ModuleBuilder. The parameters into the DefineDynamicModule are the module name and the DLL file name where the module will be stored.

We’ll create a Type in the module in the next part.

View all posts on Reflection here.

Using a Windows service in your .NET project part 5: the Windows Service project basics

Introduction

In the previous post of this series we added the console UI to the application. The user can now add a HttpJob to the MongoDb database but there’s no job handler yet. In this post we’ll start building the Windows service which will do just that.

I’ll assume you have no or very limited knowledge of Windows services so I’ll go through this at quite a slow pace.

We’ll be working on the demo project we’ve been building so far so have it ready in Visual Studio 2012/2013.

The Windows Service layer

There’s a special project type in Visual Studio professional called… …Windows Service! It’s found under the Windows category VS 2012/2013 Pro:

Windows Service project type in Visual Studio

Call it Demo.HttpJobRunner and add it to the solution. The template will add a couple of elements to the project:

Windows Service as it is first set up by Visual Studio

You’ll recognise App.config probably. As the Windows Service will be a standalone application it must have its own configuration file with its own settings, connection strings etc. It won’t be able to read the app.config file of Demo.ConsoleConsumer of course.

Program.cs seems probably familiar from standard console apps where Program.cs includes the entry point to the application, i.e. Main. This is no different as there we have a Main method which calls upon an array of services to be started. You can add other services to the ServicesToRun method but we’ll have only one. The Main in Program.cs will at present start the service called Service1. That refers to Service1.cs of course. That’s the default name of the file, similar to “Class1” in C# library projects. You’ll see that there are 2 elements called Service1. The top element is the design view which includes the code behind file Service1.cs. Right-click the design file, select Rename, and rename it to HttpJobRunner. You’ll get a question asking if you want to rename the class to HttpJobRunner, click Yes. This is what you should have after the renaming:

Service file name after renaming

So now we have 3 elements called HttpJobRunner. The two “normal” C# classes are partial so they are joint files really. One of the HttpJobRunner.cs files will have the following class declaration:

partial class HttpJobRunner

This small file contains code required to properly run the service, we won’t change anything in there.

The other part of HttpJobRunner has a different declaration:

public partial class HttpJobRunner : ServiceBase

So it derives from ServiceBase in the System.ServiceProcess namespace. The class includes the overridden OnStart and OnStop methods which are empty by default:

public partial class HttpJobRunner : ServiceBase
{
	public HttpJobRunner()
	{
		InitializeComponent();
	}

	protected override void OnStart(string[] args)
	{
	}

	protected override void OnStop()
	{
	}
}

These methods are triggered when the service is started and stopped. We’ll return to these methods in the next post.

Service installers

The service will need to be installed. Add a new item of type Installer class to the service project:

Add installer class to Windows Service

The template will add the following elements:

Initial view of Windows Service installer

We’ll change the properties of our Windows service within the installer. There are two installer-type objects that we’ll use:

  • ServiceInstaller: to define the service description, display name, service name, start type and some other properties like service dependencies
  • ServiceProcessInstaller: the define under which account the service should be running

Windows Service properties

Navigate to the partial HttpJobRunnerInstaller class which includes the InitializeComponent method:

Initialise component method in windows service installer

Under…

private System.ComponentModel.IContainer components = null;

…add the following installer classes and a service name field:

private ServiceInstaller _httpJobServiceInstaller;
private ServiceProcessInstaller _httpJobServiceProcessInstaller;
private String _serviceName = "HttpJobRunner";

In InitializeComponent() we already have one line of code that constructs a new Container() object. We’ll leave it there. Below that let’s construct the installer objects:

_httpJobServiceInstaller = new ServiceInstaller();
_httpJobServiceProcessInstaller = new ServiceProcessInstaller();

Next we’ll set up the service properties:

_httpJobServiceInstaller.Description = "HttpJob runner service which carries out a series of HTTP calls";
_httpJobServiceInstaller.DisplayName = "HttpJob automatic runner";
_httpJobServiceInstaller.ServiceName = _serviceName;
_httpJobServiceInstaller.StartType = ServiceStartMode.Automatic;

The service name is not the same as the display name. The service name is how Windows can find the service.

Example:

Windows service anatomy in the services window

Right-click a service and select Properties. “Name” corresponds to DisplayName.

We have the following startup types:

  • Automatic: start the service as soon as the computer starts. The user doesn’t even need to log in
  • Manual: the user must manually start the service
  • Disabled: the service won’t start until the user changes the startup type and starts the service manually

You’ll notice a tab called Dependencies in the Properties window. It lists any other Windows service service that this particular service depends on. If those services are not available then the dependent service won’t run either. You can add the dependencies by name using the ServicesDependedOn property. Example:

_httpJobServiceInstaller.ServicesDependedOn = new string[] { "servicename1", "servicename2" };

A Windows Service can run under a specific security context:

  • LocalService: runs as a non-privileged user on the local computer with anonymous credentials
  • NetworkService: enables the service to authenticate to another computer on the network
  • LocalSystem: almost unlimited privileges where the service presents the computer’s credentials to any remote server
  • User: runs under the security settings of a user

The following will specify the security context using the ServiceAccount enumeration:

_httpJobServiceProcessInstaller.Account = ServiceAccount.LocalSystem;

In case you want to run the service under a specific user then you can add the username and password details here:

_httpJobServiceProcessInstaller.Account = ServiceAccount.User;
_httpJobServiceProcessInstaller.Username = "username";
_httpJobServiceProcessInstaller.Password = "password";

Finally we add our installers to the list of installers that need to run:

Installers.AddRange(new System.Configuration.Install.Installer[]
	{
		_httpJobServiceInstaller
		, _httpJobServiceProcessInstaller
	});

So to recap we have the following code in InitializeComponent right now:

private void InitializeComponent()
{
	components = new System.ComponentModel.Container();
	_httpJobServiceInstaller = new ServiceInstaller();
	_httpJobServiceProcessInstaller = new ServiceProcessInstaller();
	_httpJobServiceInstaller.Description = "HttpJob runner service which carries out a series of HTTP calls";
	_httpJobServiceInstaller.DisplayName = "HttpJob automatic runner";
	_httpJobServiceInstaller.ServiceName = "HttpJobRunner";
	_httpJobServiceInstaller.StartType = ServiceStartMode.Automatic;

	_httpJobServiceProcessInstaller.Account = ServiceAccount.LocalSystem;

	Installers.AddRange(new System.Configuration.Install.Installer[]
		{
			_httpJobServiceInstaller
			, _httpJobServiceProcessInstaller
		});
}

After the installation we’d like the service to start automatically. Add the following override below InitializeComponent():

protected override void OnAfterInstall(System.Collections.IDictionary savedState)
{
	base.OnAfterInstall(savedState);
	using (var serviceController = new ServiceController(_httpJobServiceInstaller.ServiceName, Environment.MachineName))
	{
		serviceController.Start();
	}
}

Without this code the service would be sitting inactive after the installation.

We’ll set one last option before we’re ready to move on. In the Properties window of a service you’ll note a tab called Recovery:

Recovery options

There are 4 options here for all failure types:

  • Take no action: if there’s an unhandled exception in the Service then it will stop and will stay inactive until restarted. This may not be optimal because if the service encounters a failure then it will just stop and wait
  • Restart the service: restart the service after an unexpected shutdown
  • Run a program: run an executable program with some parameters
  • Restart the computer: probably the most drastic recovery type

Setting the recovery type in code is not as straightforward as we’ve seen so far. We have to call the command line tool for Services, called “sc” programmatically. The process must run after the installation has been committed. The following code will set the recovery options to “restart the service”:

private void SetRecoveryOptions()
{
	int exitCode;
	using (Process process = new Process())
	{
		ProcessStartInfo processStartInfo = new ProcessStartInfo();
		processStartInfo.FileName = "sc";
		processStartInfo.WindowStyle = ProcessWindowStyle.Hidden;
		processStartInfo.Arguments = string.Format("failure \"{0}\" reset= 0 actions= restart/1000", _serviceName);
		process.Start();
		process.WaitForExit();
		exitCode = process.ExitCode;
	}

	if (exitCode != 0)
	{
		throw new InvalidOperationException(string.Format("sc failure setting process exited with code {0}", exitCode));
	}
}

The above code will be called from an overridden method:

protected override void OnCommitted(System.Collections.IDictionary savedState)
{
	base.OnCommitted(savedState);
	SetRecoveryOptions();
}

Note the following: it requires administrator rights to change the status of a Windows service through “sc”. BTW “sc” refers to c:\windows\system32\sc.exe which allows the manipulation of Windows services in a command prompt. So it is possible that if we in the next module run the installation script then the “OnCommitted” phase will fail even if we run the script as an administrator. The reason is that the Process object itself won’t have admin rights. We’ll add an extra safety in the installation script to account for that possibility. The outcome depends on the UCL settings.

You might think that the SetRecoveryOptions method is then not needed if we do the same in the script later. I’ll leave it as it is so that you see how it can be done in code and you can decide how to set up your installation options.

We’re done with the basics. There are many other methods that you can override in the installer. Just type “override” in the editor and press Space. You’ll get a range of methods that you can override to tweak what should happen during the installation process.

Other properties

There are many other properties of a Windows service that you cannot change here. Instead you would turn to the InitializeComponent method of HttpJobRunner.cs where by default we have the current implementation:

private void InitializeComponent()
{
	components = new System.ComponentModel.Container();
	this.ServiceName = "Service1";		
}

Change the ServiceName to “HttpJobRunner” here as well otherwise messages logged to the Event Log will appear under the name of “Service1”. If you type “this.” in the editor then IntelliSense will give you all the properties that you can set. Some interesting ones are those whose name starts with “Can”, such as “CanShutDown”. You can specify if the service can be paused, shut down or stopped. In case you’re looking for a property that you cannot set through the installer then it’s a safe bet that you’ll find it here.

This will be enough of the basics. We’ll continue with the installation in the next post.

View the list of posts on Architecture and Patterns here.

Dynamically finding the value of a static field with Reflection in .NET C#

Say you do not have access to a .NET assembly at compile time but you want to execute code in it or read programmatic data from it.

One such scenario is when you’d like to extract some important field information from a class. Why would you ever need that?

Imagine that you have an application where people can upload their own plugins in the form of DLL’s. However, users do not programmatically build their own libraries in Visual Studio but rather use a GUI which will dynamically build a class file and compile it into a DLL based on the user’s selections on the GUI. This is possible if your users are not programmers or if the rules for the plugins are so complex that you wouldn’t want people to write their own solutions.

In such a scenario the class builder could write some important metadata in the form of static fields in the class, such as Version. E.g. if your app has multiple versions then the code generator would put the current version into the class so that your app can verify it. Then you can disallow plugins that were created with an older version of the app if the current version is not backward compatible.

Open Visual Studio 2012/2013 and create a new C# class library project called Domain. Add the following Customer class to it:

public class Customer
{
	private string _name;

	public Customer() : this("N/A")
	{}

	public Customer(string name)
	{
		_name = name;
	}

        public static readonly int VERSION = 2;
}

Build the solution and locate the compiled Domain.dll library. It should be located in either the Debug or Release folder within the bin folder depending on the compilation configuration in VS. Copy the .dll and put it somewhere else on your main drive where you can easily find it. We’re pretending that you got the library from another source but you for whatever reason cannot reference it at compile time.

Let’s see how we can dynamically extract the version number:

string pathToDomain = @"C:\Studies\Reflection\Domain.dll";
Assembly domainAssembly = Assembly.LoadFrom(pathToDomain);
Type customerType = domainAssembly.GetType("Domain.Customer");
FieldInfo versionInfo = customerType.GetField("VERSION");
int version = Convert.ToInt32(versionInfo.GetValue(null));

You should obviously adjust the path to Domain.dll.

Most of this code looks familiar from the posts on Reflection. We load the DLL and find the field called VERSION on the Customer type. We then extract the value of the field and pass in null as the instance parameter on which the field value should be found. It is null since the field is static, i.e. there’s no need for an instance. This is very similar to what we saw when calling a static method here.

Using a Windows service in your .NET project part 4: the consumer layer

Introduction

In the previous post of this series we built the application service of the demo application. We’re now ready to build the consumer layer.

For demo purposes we’ll only build a Console-based consumer where the user can insert the URLs to run and monitor the progress. In reality the consumer layer would most likely be an MVC application which can then be refreshed periodically to get the latest status. Alternatively you can turn to web sockets with SignalR to push the updates to the screen. In our example, however, a console app will suffice to reach the goal of using a Windows service.

We’ll build upon the demo app we’ve been using so far so have it ready in Visual Studio

The consumer layer

Add a new Console application to the demo solution called Demo.DemoConsumer. Add a reference to all other layers in the solution:

  • Repository
  • ApplicationService
  • Domain
  • Infrastructure

First we’ll need a method that builds an IHttpJobService that the Console can work with:

private static IHttpJobService BuildHttpJobService()
{
	IConfigurationRepository configurationRepository = new ConfigFileConfigurationRepository();
	IDatabaseConnectionSettingsService dbConnectionSettingsService = new HttpJobDatabaseConnectionService(configurationRepository);
	IJobRepository jobRepository = new JobRepository(dbConnectionSettingsService);
	IHttpJobService httpJobService = new HttpJobService(jobRepository);
	return httpJobService;
}

There’s nothing magic here I hope. We simply build an IHttpJobService from various other ingredients according to their dependencies.

Then we’ll build a simple console UI to type in the URLs to run. Insert the following method to Program.cs where the user can enter URLs and break the loop with an empty string:

private static List<Uri> EnterUrlJobs()
{
	HttpJob httpJob = new HttpJob();
	List<Uri> uris = new List<Uri>();
	Console.WriteLine("Enter a range of URLs. Leave empty and press ENTER when done.");
	Console.Write("Url 1: ");
	string url = Console.ReadLine();
	uris.Add(new Uri(url));
	int urlCounter = 2;
	while (!string.IsNullOrEmpty(url))
	{
		Console.Write("Url {0}: ", urlCounter);
		url = Console.ReadLine();
		if (!string.IsNullOrEmpty(url))
		{
			uris.Add(new Uri(url));
			urlCounter++;
		}
	}		
			
	return uris;
}

The following method will insert a new HttpJob and return the insertion response:

private static InsertHttpJobResponse InsertHttpJob(List<Uri> uris, IHttpJobService httpJobService)
{
	InsertHttpJobRequest insertRequest = new InsertHttpJobRequest(uris);
	InsertHttpJobResponse insertResponse = httpJobService.InsertHttpJob(insertRequest);
	return insertResponse;
}

Finally we need a method to monitor the job and print the job status on the screen:

private static void MonitorJob(Guid correlationId, IHttpJobService httpJobService)
{
	GetHttpJobRequest getJobRequest = new GetHttpJobRequest() { CorrelationId = correlationId };
	GetHttpJobResponse getjobResponse = httpJobService.GetHttpJob(getJobRequest);
	bool jobFinished = getjobResponse.Job.Finished;
	while (!jobFinished)
	{
		Console.WriteLine(getjobResponse.Job.ToString());
		getjobResponse = httpJobService.GetHttpJob(getJobRequest);
		jobFinished = getjobResponse.Job.Finished;
		if (!jobFinished)
		{
			Thread.Sleep(2000);
			Console.WriteLine();
		}
	}
	getjobResponse = httpJobService.GetHttpJob(getJobRequest);
	Console.WriteLine(getjobResponse.Job.ToString());
}

We keep extracting the updated HttpJob until it has reached the Finished status. We wait for 2 seconds between each iteration. After the loop we want to print the final job status.

The methods can be called as following from Main:

static void Main(string[] args)
{
	List<Uri> uris = EnterUrlJobs();
	IHttpJobService httpJobService = BuildHttpJobService();
	InsertHttpJobResponse insertResponse = InsertHttpJob(uris, httpJobService);
	MonitorJob(insertResponse.JobCorrelationId, httpJobService);

	Console.WriteLine("Main finishing, press any key to exit...");
	Console.ReadKey();
}

Run this code to see it in action. You’ll be able enter a number of URLs first. Note that there’s no extra validation so be precise and enter the full address, like “https://www.google.com&#8221;. When you’re done just press enter without entering a URL. The monitoring phase will begin:

Initial Program output with no runner yet

There’s of course nothing that carries out the job yet so the while loop never exits in MonitorJob.

We’ll start building the Windows service in the next post.

View the list of posts on Architecture and Patterns here.

Dynamically invoking a static method with Reflection in .NET C#

Say you do not have access to a .NET assembly at compile time but you want to run code in it. It’s possible to dynamically load an assembly and run code in it without early access.

Here we’ll see how to invoke a static method of a type in a referenced assembly. It is very similar to how you would invoke an instance-level method. Check out the following post for related topics:

Open Visual Studio 2012/2013 and create a new C# class library project called Domain. Add the following Customer class to it:

public class Customer
{
	private string _name;

	public Customer() : this("N/A")
	{}

	public Customer(string name)
	{
		_name = name;
	}

        public static int CallStaticMethod(int inputOne, int inputTwo)
	{
		return inputOne + inputTwo;
	}
}

Build the solution and locate the compiled Domain.dll library. It should be located in either the Debug or Release folder within the bin folder depending on the compilation configuration in VS. Copy the .dll and put it somewhere else on your main drive where you can easily find it. We’re pretending that you got the library from another source but you for whatever reason cannot reference it at compile time. E.g. the source is loaded into your app as a plugin which follows some naming conventions so that your code can unwrap it and invoke its code.

Let’s see how we can dynamically call the CallStaticMethod method and read its result:

string pathToDomain = @"C:\Studies\Reflection\Domain.dll";
Assembly domainAssembly = Assembly.LoadFrom(pathToDomain);
Type customerType = domainAssembly.GetType("Domain.Customer");
MethodInfo staticMethodInfo = customerType.GetMethod("CallStaticMethod");
int returnValue = Convert.ToInt32(staticMethodInfo.Invoke(null, new object[] { 3,5 }));

You should obviously adjust the path to Domain.dll.

The code to call a static method is almost the same as calling an instance-level one. The key difference is that we pass in null as the first parameter to Invoke. That parameter specifies which instance the method should be invoked on. As there’s no instance here, we can skip the step of first invoking the constructor of Customer.

‘returnValue’ will be 8 as expected.

View all posts on Reflection here.

Dynamically invoking a property with Reflection in .NET C#

Say you do not have access to a .NET assembly at compile time but you want to run code in it. It’s possible to dynamically load an assembly and run code in it without early access.

Here we’ll see how to invoke a property of a type in a referenced assembly.

In this post we saw how to invoke a constructor and here how to invoke a method of a Type.

Open Visual Studio 2012/2013 and create a new C# class library project called Domain. Add the following Customer class to it:

public class Customer
{
	private string _name;

	public Customer() : this("N/A")
	{}

	public Customer(string name)
	{
		_name = name;
	}

        public int AccountValue { get; set; }
}

Build the solution and locate the compiled Domain.dll library. It should be located in either the Debug or Release folder within the bin folder depending on the compilation configuration in VS. Copy the .dll and put it somewhere else on your main drive where you can easily find it. We’re pretending that you got the library from another source but you for whatever reason cannot reference it at compile time. E.g. the source is loaded into your app as a plugin which follows some naming conventions so that your code can unwrap it and invoke its code.

Let’s see how we can get hold of the AccountValue property. First we’ll invoke the overloaded constructor:

string pathToDomain = @"C:\Studies\Reflection\Domain.dll";
Assembly domainAssembly = Assembly.LoadFrom(pathToDomain);
Type customerType = domainAssembly.GetType("Domain.Customer");
Type[] stringArgumentTypes = new Type[] { typeof(string) };
ConstructorInfo stringConstructor = customerType.GetConstructor(stringArgumentTypes);
object newStringCustomer = stringConstructor.Invoke(new object[] { "Elvis" });

Then we locate the AccountValue method and set its value. We also provide an object to represent the integer argument to the property. Keep in mind that properties are “normal” methods as we saw in this post so we need to supply an argument to the Set method:

PropertyInfo accountProperty = customerType.GetProperty("AccountValue");
accountProperty.SetValue(newStringCustomer, 1200);

Next we read the property value using the Get version:

int accountPropertyValue = Convert.ToInt32(accountProperty.GetValue(newStringCustomer));

‘accountPropertyValue’ will be 1200 as expected.

View all posts on Reflection here.

Using a Windows service in your .NET project part 3: the application service layer

Introduction

In the previous post we built the Domain and Repository layers of the demo app. We’ll now build the application service layer that connects the two with the consumer layer which we’ll build in the next post.

Normally the consumer layer, such as a Web UI should not directly contact the repository for its data. The application service is responsible for joining all necessary repositories and other services to provide the data that the consumer layer needs to show.

We’ll build upon the demo app we’ve been working on so far in this series so have it ready in Visual Studio.

Short return to Infrastructure

Before we begin we’ll need two new elements in the Infrastructure layer. You’ll recall from the previous post that the abstract MongoDbRepository class will need an IDatabaseConnectionSettingsService interface to read the connection string and database name. We’ll store those in the app.config file which we’ll create in the next post. However, these settings could potentially be stored in various different places: a database, a web service, etc.

We saw in this post how reading settings can be hidden behind an interface. We’ll take a similar approach here.

Add a new folder called ConfigurationService to the Infrastructure layer. Insert the following interface into it:

public interface IConfigurationRepository
{
	T GetConfigurationValue<T>(string key);
	T GetConfigurationValue<T>(string key, T defaultValue);
	string GetConnectionString(string connectionStringName);
}

Normally settings come in name-value pairs so we pass some key value and expect the corresponding setting value back.

For the implementation we’ll take the ConfigurationManager class located in the System.Configuration namespace. You’ll need to add this dll to the references list of the Infrastructure layer. Here’s the implementing class:

public class ConfigFileConfigurationRepository : IConfigurationRepository
{
	public T GetConfigurationValue<T>(string key)
	{
		string value = ConfigurationManager.AppSettings[key];
		if (value == null)
		{
			throw new KeyNotFoundException("Key " + key + " not found.");
		}
		try
		{
			if (typeof(Enum).IsAssignableFrom(typeof(T)))
				return (T)Enum.Parse(typeof(T), value);
			return (T)Convert.ChangeType(value, typeof(T));
		}
		catch (Exception ex)
		{
			throw ex;
		}
	}

	public T GetConfigurationValue<T>(string key, T defaultValue)
	{
		string value = ConfigurationManager.AppSettings[key];
		if (value == null)
		{
			return defaultValue;
		}
		try
		{
			if (typeof(Enum).IsAssignableFrom(typeof(T)))
				return (T)Enum.Parse(typeof(T), value);
			return (T)Convert.ChangeType(value, typeof(T));
		}
		catch (Exception ex)
		{
			return defaultValue;
		}
	}

	public string GetConnectionString(string connectionStringName)
	{
		return ConfigurationManager.ConnectionStrings[connectionStringName].ConnectionString;
	}
}

We’ll see shortly how this abstraction is used.

The service layer

Add a new C# library called Demo.ApplicationService to the solution. Add a project reference to the Domain and Infrastructure layers. Insert 3 folders:

  • Messaging
  • JobServices
  • DatabaseConnectionService

Let’s get the database connection service out of the way first. The implementation will need a dependency of type IConfigurationRepository to read the connection string and database name values. Insert the following class into the DatabaseConnectionService folder:

public class HttpJobDatabaseConnectionService : IDatabaseConnectionSettingsService
{
	private readonly IConfigurationRepository _configurationRepository;

	public HttpJobDatabaseConnectionService(IConfigurationRepository configurationRepository)
	{
		if (configurationRepository == null) throw new ArgumentNullException("IConfigurationRepository");
		_configurationRepository = configurationRepository;
	}

	public string GetDatabaseConnectionString()
	{
		return _configurationRepository.GetConnectionString(Constants.HttpJobsConnectionStringKeyName);
	}

	public string GetDatabaseName()
	{
		return _configurationRepository.GetConfigurationValue<string>(Constants.HttpJobsDatabaseNameSettingKeyName);
	}
}

This class reads the setting key names from another class called Constants:

public static class Constants
{
	public static string HttpJobsConnectionStringKeyName = "HttpJobsConnectionString";
	public static string HttpJobsDatabaseNameSettingKeyName = "HttpJobsDatabaseName";
}

So we’ll store the connection string with the key “HttpJobsConnectionString” and the database name with the key “HttpJobsDatabaseName”. Remember, these settings could be stored anywhere hence the need to inject the service which actually reads the settings. We’ll fill in the app settings file shortly.

Service abstractions

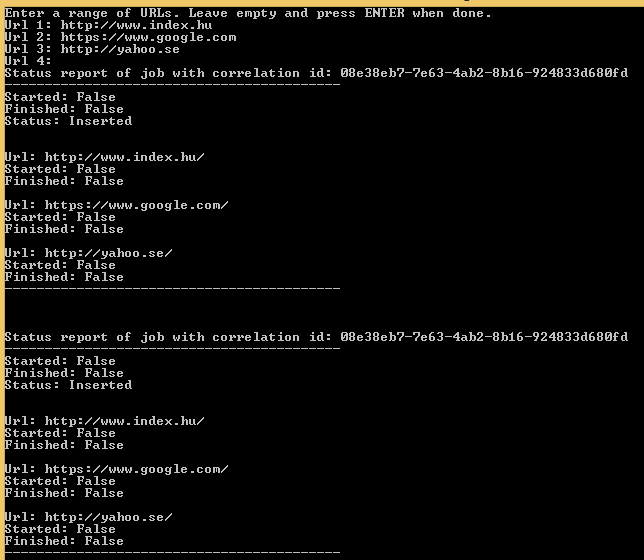
OK, let’s create the abstractions for the Job related services. An IHttpJobService should be able to retrieve a specific job, retrieve all new jobs, insert a new job and update an existing job. Add the following interface to the JobServices folder:

public interface IHttpJobService
{
	InsertHttpJobResponse InsertHttpJob(InsertHttpJobRequest request);
	GetHttpJobResponse GetHttpJob(GetHttpJobRequest request);
	UpdateHttpJobResponse UpdateHttpJob(UpdateHttpJobRequest request);
	GetHttpJobsResponse GetNewHttpJobs();
}

We have several new but simple RequestResponse objects here. They are used to relay all necessary inputs to the Service instead of creating many overloaded variants of the same methods. Insert the following classes to the Messaging folder:

public abstract class BaseResponse
{
	public Exception OperationException { get; set; }
}
public class InsertHttpJobResponse : BaseResponse
{
	public Guid JobCorrelationId { get; set; }
}
public class InsertHttpJobRequest
{
	private List<Uri> _urisToRun;

	public InsertHttpJobRequest(List<Uri> urisToRun)
	{
		if (urisToRun == null || !urisToRun.Any())
		{
			throw new ArgumentException("The URI list cannot be empty.");				
		}
		_urisToRun = urisToRun;
	}

	public List<Uri> UrisToRun
	{
		get
		{
			return _urisToRun;
		}
	}
}
public class GetHttpJobResponse : BaseResponse
{
	public HttpJob Job { get; set; }
}
public class GetHttpJobRequest
{
	public Guid CorrelationId { get; set; }
}
public class UpdateHttpJobResponse : BaseResponse
{}
public class UpdateHttpJobRequest
{
	private HttpJob _updatedJob;
	public UpdateHttpJobRequest(HttpJob updatedJob)
	{
		_updatedJob = updatedJob;
	}

	public HttpJob UpdatedHttpJob
	{
		get
		{
			return _updatedJob;
		}
	}
}
public class GetHttpJobsResponse : BaseResponse
{
	public IEnumerable<HttpJob> HttpJobs { get; set; }
}

Those were the elements needed for the HttpJob service. We’ll need a separate service to carry out a single JobUrl within a HttpJob object. Add the following interface to the JobServices folder:

public interface IHttpJobUrlService
{
	Task<JobUrlProcessResponse> CarryOutSingleJobUrl(Uri uri);
}

Carrying out a HTTP call can take some time so we’ll go for an asynchronous model using the Task library. JobUrlProcessResponse is similar to the above Response objects. Insert the following class to the Messaging folder:

public class JobUrlProcessResponse : BaseResponse
{
	public int HttpResponseCode { get; set; }
	public string HttpContent { get; set; }
	public TimeSpan TotalResponseTime { get; set; }
}

You’ll recognise the properties from the JobUrl domain object: we’ll need to read the HTTP response code, the HTML content and the response time from a single URL call.

We need one final abstraction: an interface which co-ordinates the functions of IHttpJobService and IHttpJobUrlService. In other words we need a service that carries out a complete job. Insert the following interface into the JobServices folder:

public interface IHttpJobExecutionService
{
	Task Execute(HttpJob httpJob);
}

Again, it takes time to carry out a job so we’ll go for asynchronous calls here as well.

If you don’t understand why these methods are meant to be asynchronous and why they return Task objects then start here.

Concrete service classes

OK, enough of abstractions, let’s look at the implementations now. HttpJobService which implements IHttpJobService will work with the IJobRepository interface to carry out the repository-related actions such as insertions and updates. Insert the following class to the JobServices folder:

public class HttpJobService : IHttpJobService
{
	private readonly IJobRepository _jobRepository;

	public HttpJobService(IJobRepository jobRepository)
	{
		if (jobRepository == null) throw new ArgumentNullException("Job repository!!");
		_jobRepository = jobRepository;
	}

	public InsertHttpJobResponse InsertHttpJob(InsertHttpJobRequest request)
	{
		InsertHttpJobResponse response = new InsertHttpJobResponse();
		HttpJob job = new HttpJob();
		job.StatusMessage = "Inserted";
		List<JobUrl> jobUrls = new List<JobUrl>();
		foreach (Uri uri in request.UrisToRun)
		{
			jobUrls.Add(new JobUrl() { Uri = uri });
		}
		job.UrlsToRun = jobUrls;
		try
		{
			Guid correlationId = _jobRepository.InsertNewHttpJob(job);
			response.JobCorrelationId = correlationId;
		}
		catch (Exception ex)
		{
			response.OperationException = ex;
		}
		return response;
	}

	public GetHttpJobResponse GetHttpJob(GetHttpJobRequest request)
	{
		GetHttpJobResponse response = new GetHttpJobResponse();

		try
		{
			response.Job = _jobRepository.FindBy(request.CorrelationId);
		}
		catch (Exception ex)
		{
			response.OperationException = ex;
		}

		return response;
	}

	public UpdateHttpJobResponse UpdateHttpJob(UpdateHttpJobRequest request)
	{
		UpdateHttpJobResponse response = new UpdateHttpJobResponse();			
		try
		{
			_jobRepository.Update(request.UpdatedHttpJob);
		}
		catch (Exception ex)
		{
			response.OperationException = ex;
		}
		return response;
	}

	public GetHttpJobsResponse GetNewHttpJobs()
	{
		GetHttpJobsResponse response = new GetHttpJobsResponse();
		try
		{
			response.HttpJobs = _jobRepository.GetUnhandledJobs();
		}
		catch (Exception ex)
		{
			response.OperationException = ex;
		}
		return response;
	}
}

I think the code is really simple and straightforward, there’s nothing magic in it.

HttpJobUrlService which implements IHttpJobUrlService will need an IHttpService interface to carry out the HTTP calls. We saw the IHttpService interface in the first post of this series. Insert the following class into the JobServices folder:

public class HttpJobUrlService : IHttpJobUrlService
{
	private readonly IHttpService _httpService;

	public HttpJobUrlService(IHttpService httpService)
	{
		if (httpService == null) throw new ArgumentNullException("HttpService");
		_httpService = httpService;
	}

	public async Task<JobUrlProcessResponse> CarryOutSingleJobUrl(Uri uri)
	{
		JobUrlProcessResponse response = new JobUrlProcessResponse();
		
		try
		{				
			MakeHttpCallRequest httpCallRequest = new MakeHttpCallRequest();
			httpCallRequest.HttpMethod = HttpMethodType.Get;
			httpCallRequest.Uri = uri;
			DateTime start = DateTime.UtcNow;
			MakeHttpCallResponse httpCallResponse = await httpService.MakeHttpCallAsync(httpCallRequest);
         		DateTime stop = DateTime.UtcNow;
			TimeSpan diff = stop - start;
			response.TotalResponseTime = diff;
			if (!string.IsNullOrEmpty(httpCallResponse.ExceptionMessage))
			{
				response.HttpContent = httpCallResponse.ExceptionMessage;
				response.HttpResponseCode = -1;
			}
			else
			{					
				response.HttpContent = httpCallResponse.HttpResponse;
				response.HttpResponseCode = httpCallResponse.HttpResponseCode;
			}				
		}
		catch (Exception ex)
		{
			response.OperationException = ex;
		}
			
		return response;
	}
}

We initiate a HTTP request through the injected IHttpService service and note the time between the start and end of the call. This might not be the most precise way to measure the response time of a URL but it’s good enough for the demo. Then we populate the HttpContent and HttpResponseCode properties of the JobUrlProcessResponse object based on the result stored in MakeHttpCallResponse.

Finally, we have an implementation of the IHttpJobExecutionService interface. This implementation will use IHttpJobService and IHttpJobUrlService to carry out its work. Insert the following class into the JobServices folder:

public class HttpJobExecutionService : IHttpJobExecutionService
{
	private readonly IHttpJobService _httpJobService;
	private readonly IHttpJobUrlService _httpJobUrlService;

	public HttpJobExecutionService(IHttpJobService httpJobService, IHttpJobUrlService httpJobUrlService)
	{
		if (httpJobService == null) throw new ArgumentNullException("HttpJobService");
		if (httpJobUrlService == null) throw new ArgumentNullException("HttpJobUrlService");
		_httpJobService = httpJobService;
		_httpJobUrlService = httpJobUrlService;
	}

	public async Task Execute(HttpJob httpJob)
	{
		httpJob.Started = true;
		httpJob.StatusMessage = string.Format("Starting job {0}.", httpJob.CorrelationId);
		_httpJobService.UpdateHttpJob(new UpdateHttpJobRequest(httpJob));
		TimeSpan totalTime = new TimeSpan(0, 0, 0);
		foreach (JobUrl jobUrl in httpJob.UrlsToRun)
		{
			jobUrl.Started = true;
			httpJob.StatusMessage = string.Concat("Starting url ", jobUrl.Uri);
			_httpJobService.UpdateHttpJob(new UpdateHttpJobRequest(httpJob));
			JobUrlProcessResponse jobUrlProcessResponse = await _httpJobUrlService.CarryOutSingleJobUrl(jobUrl.Uri);				
			jobUrl.Finished = true;
			jobUrl.HttpContent = jobUrlProcessResponse.HttpContent.Length > 30 ? jobUrlProcessResponse.HttpContent.Substring(0, 30) : jobUrlProcessResponse.HttpContent;
			jobUrl.HttpResponseCode = jobUrlProcessResponse.HttpResponseCode;
			jobUrl.TotalResponseTime = jobUrlProcessResponse.TotalResponseTime;
			httpJob.StatusMessage = string.Concat("Finished url ", jobUrl.Uri);
			_httpJobService.UpdateHttpJob(new UpdateHttpJobRequest(httpJob));
			totalTime += jobUrlProcessResponse.TotalResponseTime;
		}
		httpJob.Finished = true;
		httpJob.TotalJobDuration = totalTime;
		httpJob.StatusMessage = string.Format("Job {0} finished.", httpJob.CorrelationId);
		_httpJobService.UpdateHttpJob(new UpdateHttpJobRequest(httpJob));
	}		
}

In the Execute method we first update the job status to Started. Then we go through each URL in the UrlsToRun list of the HttpJob object. In the for-each loop we update the status of the URL to started and then save the HTTP response code and content. We also add the response time of the URL to the total response time of the job. Finally we update the job status to Finished and assign the total response time to the appropriate property.

That’s it, we have the service layer ready to go.

In the next post we’ll build the consumer layer which will be a simple Console app.

View the list of posts on Architecture and Patterns here.

Dynamically invoking a method with Reflection in .NET C#

Say you do not have access to a .NET assembly at compile time but you want to run code in it. It’s possible to dynamically load an assembly and run code in it without early access.

Here we’ll see how to invoke a method of a type in a referenced assembly.

Open Visual Studio 2012/2013 and create a new C# class library project called Domain. Add the following Customer class to it:

public class Customer
{
	private string _name;

	public Customer() : this("N/A")
	{}

	public Customer(string name)
	{
		_name = name;
	}

        public void DoVoidMethod(int intParameter, string stringParameter)
	{
		Console.WriteLine("Within Customer.DoVoidMethod. Parameters: {0}, {1}", intParameter, stringParameter);
	}

	public int DoRetMethod(int intParameter)
	{
		return intParameter + 1;
	}
}

Build the solution and locate the compiled Domain.dll library. It should be located in either the Debug or Release folder within the bin folder depending on the compilation configuration in VS. Copy the .dll and put it somewhere else on your main drive where you can easily find it. We’re pretending that you got the library from another source but you for whatever reason cannot reference it at compile time. E.g. the source is loaded into your app as a plugin which follows some naming conventions so that your code can unwrap it and invoke its code.

In this post we saw how to invoke a constructor so we won’t go into that again. Once you have an instance of the object then you can use the Type object to find the available methods, properties, events etc. of that type: MethodInfo, EventInfo, PropertyInfo etc.

Let’s see how we can get hold of the void method. First we’ll invoke the overloaded constructor:

string pathToDomain = @"C:\Studies\Reflection\Domain.dll";
Assembly domainAssembly = Assembly.LoadFrom(pathToDomain);
Type customerType = domainAssembly.GetType("Domain.Customer");
Type[] stringArgumentTypes = new Type[] { typeof(string) };
ConstructorInfo stringConstructor = customerType.GetConstructor(stringArgumentTypes);
object newStringCustomer = stringConstructor.Invoke(new object[] { "Elvis" });

Then we locate the DoVoidMethod method and invoke it on the newStringCustomer object. We also provide an object array to represent the arguments to the method.

MethodInfo voidMethodInfo = customerType.GetMethod("DoVoidMethod");
voidMethodInfo.Invoke(newStringCustomer, new object[] { 3, "hello" });

If you run this code then a Console window should pop up with the message “Within Customer.DoVoidMethod. Parameters: 3, hello” on it.

Next we’ll invoke the DoRetMethod method and read its return value:

MethodInfo retMethodInfo = customerType.GetMethod("DoRetMethod");
int returnValue = Convert.ToInt32(retMethodInfo.Invoke(newStringCustomer, new object[] { 4 }));

The returnValue variable will be 5 as expected.

View all posts on Reflection here.

Using a Windows service in your .NET project part 2: the domain and repository

Introduction

In the previous post we went through the goals of this series and also started building a demo app. At present we have an Infrastructure layer in the solution to abstract away the service that makes the HTTP calls. As we said the demo project will carry out HTTP calls and measure the response times.

In this post we’ll build the domain and repository layers. We’ll build upon the demo project so have it ready in Visual Studio.

The domain

The domain will be quite small with only two domain objects and one abstract repository. Add a C# library to the solution called Demo.Domain. Add the following object to it:

public class JobUrl
{
	public Uri Uri { get; set; }
	public int HttpResponseCode { get; set; }
	public string HttpContent { get; set; }
	public bool Started { get; set; }
	public bool Finished { get; set; }
	public TimeSpan TotalResponseTime { get; set; }
}

JobUrl has the following properties:

  • Uri: the Uri to call
  • HttpResponseCode: the HTTP response from the call such as 200, 403 etc.
  • HttpContent: the pure HTML content of the URI
  • Started: whether the HTTP call to the URI has been initiated
  • Finished: whether the HTTP call has been processed
  • TotalResponseTime: the response time of the URL

We want to be able to carry out multiple HTTP calls within a single job so we’ll need the following “wrapper” object:

public class HttpJob
{
	public List<JobUrl> UrlsToRun { get; set; }
	public string StatusMessage { get; set; }
	public bool Started { get; set; }
	public bool Finished { get; set; }
	public TimeSpan TotalJobDuration { get; set; }
	public Guid CorrelationId { get; set; }

	public override string ToString()
	{
		string NL = Environment.NewLine;
		StringBuilder sb = new StringBuilder();
		sb.Append("Status report of job with correlation id: ").Append(CorrelationId).Append(NL);
		sb.Append("------------------------------------------").Append(NL);
		sb.Append("Started: ").Append(Started).Append(NL);
		sb.Append("Finished: ").Append(Finished).Append(NL);
		sb.Append("Status: ").Append(StatusMessage).Append(NL).Append(NL);

		foreach (JobUrl jobUrl in UrlsToRun)
		{
			sb.Append(NL);
			sb.Append("Url: ").Append(jobUrl.Uri).Append(NL);
			sb.Append("Started: ").Append(jobUrl.Started).Append(NL);
			sb.Append("Finished: ").Append(jobUrl.Finished).Append(NL);
			if (jobUrl.Finished)
			{
				sb.Append("Http response code: ").Append(jobUrl.HttpResponseCode).Append(NL);
				sb.Append("Partial content: ").Append(jobUrl.HttpContent).Append(NL);
				sb.Append("Response time: ").Append(Convert.ToInt32(jobUrl.TotalResponseTime.TotalMilliseconds)).Append(" ms").Append(NL);					
			}
		}

		if (Finished)
		{
			sb.Append("Total job duration: ").Append(Convert.ToInt32(TotalJobDuration.TotalMilliseconds)).Append(" ms. ").Append(NL);
		}
		sb.Append("------------------------------------------").Append(NL).Append(NL);

		return sb.ToString();
	}
}

HttpJob has the following properties:

  • UrlsToRun: the URIs to be visited in the job
  • StatusMessage: a status message such as “starting” or “in progress”
  • Started: whether the job has been started
  • Finished: whether the job has been finished
  • TotalJobDuration: the sum of the response times of the individual URLs
  • CorrelationId: in essence the job ID which can be used to retrieve the job from the data store

Then we have an overridden ToString method which builds a long string to show the current status of the job. We’ll see it in action towards the end of the series.

We’ll also need an abstract repository where we declare the capabilities of the job repository. This abstraction must be then implemented by a concrete repository such as Entity Framework or NHibernate. Add the following interface to the Domain layer:

public interface IJobRepository
{
	Guid InsertNewHttpJob(HttpJob httpJob);
	HttpJob FindBy(Guid correlationId);
	void Update(HttpJob httpJob);
	IEnumerable<HttpJob> GetUnhandledJobs();
}

So in this interface we declare that any concrete repository implementation should be able to do the following:

  • Insert a new HttpJob and return a correlation ID
  • Find a job based on the correlation ID
  • Update a job
  • Find all “unhandled” jobs i.e. the ones that have not been started yet

This concludes the Domain layer.

The repository layer

As mentioned in the previous post we’ll use the file-based MongoDb as the data storage mechanism. Don’t worry if you’ve never used it, it’s very easy to get going and you’ll learn something new. We won’t see much of MongoDb in action here anyway. I have a series devoted to MongoDb that you can go through if you wish, the list of posts is available here.

In order to move on though you’ll need to install MongoDb. If you want to keep it short then go through the section called “Setup on Windows” in part two of the MongoDb series. In case you want to read the foundations then here’s part one for you.

At the end of the setup process you should have MongoDb up and running as a Windows service:

MongoDb as Windows Service

Add a new C# library called Demo.Repository.MongoDb to the solution. Add a project reference to the Domain and Infrastructure layers. We’ll also need to work with MongoDb in a programmatic way so add the following Nuget package:

MongoDb C# driver

Add a new folder called DatabaseObjects and insert a class called DbHttpJobs into that folder:

public class DbHttpJob : HttpJob
{
	public ObjectId Id { get; set; }
}

Let’s stop for a second

What on Earth is this??? We can save just about any object in MongoDb on one condition: the object must have a property called Id which will be used as the primary key for the object. The most straightforward implementation for the Id is the MongoDb ObjectId type which is similar to a GUID. We won’t work with it at all but it’s a must for MongoDb so we simply add it to the DbHttpJob object which inherits everything else from HttpJob.

Why not use the correlation ID as the ID in the DB??? We could certainly do that by decorating the CorrelationId property of the HttpJob object with the BsonId attribute. However, that would require us to add a reference to the MongoDb C# driver in the Domain layer and add that MongoDb-specific attribute to our POCO model(s).

And so what??? If you’ve gone through the series on Domain Driven Design then you’ll understand the concept of POCO classes that are oblivious of the underlying storage mechanism. This is called persistence ignorance. A POCO should be as POCO as possible. As soon as we add data storage specific elements to a POCO then it’s not really POCO any more I think. There will be traces of the concrete repository in the POCO, so at best it can be called a contaminated POCO. The domain layer will have a tight coupling to the underlying concrete repository which could be avoided. In case you’d like to share the class with someone else who also needs to work with the domain then that person will also inherit MongoDb from you whereas they might work with an entirely different data storage mechanism.

If we go down that path and introduce MongoDb at the domain level then it can be difficult to change the storage mechanism later. Say that you want to store the HttpJob objects in Sql Server with Entity Framework or in Amazon S3 later on. Then you’ll first have to decouple the Domain layer from MongoDb and replace it with another technology, right? Well, hopefully you won’t make the same mistake again and keep the technology-specific code in the technology-specific layer.

OK, let’s move on

After some theory we’ll move on with the practical discussion. A MongoDb repository will need two things in order to find the database: the connection string and the database name. These elements will most likely be stored in a settings file like app.config or web.config but they could come from any other store: a database, a web service etc. This sounds like we’ll need to abstract away the service that finds the connection-related elements.

Let’s return briefly to the Infrastructure layer. Add a new folder called DatabaseConnectionSettingsService and insert the following interface:

public interface IDatabaseConnectionSettingsService
{
	string GetDatabaseConnectionString();
	string GetDatabaseName();
}

Back in the repository layer we can build the abstract base class for all repositories. Insert the following class to the project:

public abstract class MongoDbRepository
{
	private readonly IDatabaseConnectionSettingsService _databaseConnectionSettingsService;
	private MongoClient _mongoClient;
	private MongoServer _mongoServer;
	private MongoDatabase _mongoDatabase;

	public MongoDbRepository(IDatabaseConnectionSettingsService databaseConnectionSettingsService)
	{
		if (databaseConnectionSettingsService == null) throw new ArgumentNullException();
		_databaseConnectionSettingsService = databaseConnectionSettingsService;
		_mongoClient = new MongoClient(_databaseConnectionSettingsService.GetDatabaseConnectionString());
		_mongoServer = _mongoClient.GetServer();
		_mongoDatabase = _mongoServer.GetDatabase(_databaseConnectionSettingsService.GetDatabaseName());
	}

	public MongoDatabase HttpJobsDatabase
	{
		get
		{
			return _mongoDatabase;
		}
	}

	public MongoCollection<DbHttpJob> HttpJobs
	{
		get
		{
			return HttpJobsDatabase.GetCollection<DbHttpJob>("httpjobs");
		}
	}
}

You’ll recognise the IDatabaseConnectionSettingsService interface which is injected to the MongoDbRepository constructor. I won’t go into the MongoDb-specific details here, just keep in mind the following:

  • A “collection” in MongoDb is similar to a “table” in MS SQL
  • The collection name “httpjobs” could be anything, like “mickeymouse”, it doesn’t matter really – the type variable declares the type of objects stored in the collection
  • There’s no need to check for the presence of a database or a collection – they will be created by MongoDb upon the first data entry
  • The HttpJobs property is similar to DbContext.Cars in EntityFramework i.e. it gets a reference to the collection of DbHttpJobs in the database

We’re now ready to implement the IJobRepository interface. Add the following class to the project:

public class JobRepository : MongoDbRepository, IJobRepository
{
	public JobRepository(IDatabaseConnectionSettingsService databaseConnectionSettingsService)
		: base(databaseConnectionSettingsService)
	{}

	public Guid InsertNewHttpJob(HttpJob httpJob)
	{
		Guid correlationId = Guid.NewGuid();
		httpJob.CorrelationId = correlationId;
		DbHttpJob dbHttpJob = httpJob.ConvertToInsertDbObject();
		HttpJobs.Insert(dbHttpJob);
		return correlationId;
	}

	public HttpJob FindBy(Guid correlationId)
	{
		return FindInDb(correlationId);
	}

	public void Update(HttpJob httpJob)
	{
		DbHttpJob existing = FindInDb(httpJob.CorrelationId);
		existing.Finished = httpJob.Finished;
		existing.Started = httpJob.Started;
		existing.StatusMessage = httpJob.StatusMessage;
		existing.TotalJobDuration = httpJob.TotalJobDuration;
		existing.UrlsToRun = httpJob.UrlsToRun;
		HttpJobs.Save(existing);
	}

	public IEnumerable<HttpJob> GetUnhandledJobs()
	{
		IMongoQuery query = Query<DbHttpJob>.EQ(j => j.Started, false);
		return HttpJobs.Find(query);
	}

	private DbHttpJob FindInDb(Guid correlationId)
	{
		IMongoQuery query = Query<DbHttpJob>.EQ(j => j.CorrelationId, correlationId);
		DbHttpJob firstJob = HttpJobs.FindOne(query);
		return firstJob;
	}		
}

Again, I won’t go into the MongoDb specific code. It is quite easy to follow anyway as it’s only about retrieving, inserting and updating a HttpJob object.

There’s one extension method called ConvertToInsertDbObject() which looks as follows:

namespace Demo.Repository.MongoDb
{
	public static class ModelExtensions
	{
		public static DbHttpJob ConvertToInsertDbObject(this HttpJob domain)
		{
			return new DbHttpJob()
			{
				CorrelationId = domain.CorrelationId
				, Finished = domain.Finished
				, Started = domain.Started
				, StatusMessage = domain.StatusMessage
				, TotalJobDuration = domain.TotalJobDuration
				, UrlsToRun = domain.UrlsToRun
				, Id = ObjectId.GenerateNewId()
			};
		}		
	}
}

You can put this anywhere in the MongoDb layer. The method simply constructs a new DbHttpJob object with a new ObjectId ready for insertion. The generation of the Id is not really necessary as MongoDb will create one for us in case it’s null but I prefer to be specific.

We’re done with the repository layer. In the next post we’ll look at the Service layer.

View the list of posts on Architecture and Patterns here.

Dynamically invoking a constructor with Reflection in .NET C#

Say you do not have access to a .NET assembly at compile time but you want to run code in it. It’s possible to dynamically load an assembly and run code in it without early access.

Here we’ll see how to invoke a constructor of a type in a referenced assembly.

Normally, if you have a direct reference to an assembly then you can simply initialise new objects using the ‘new’ keyword. In the absence of a direct reference this is not possible.

Open Visual Studio 2012/2013 and create a new C# class library project called Domain. Add the following Customer class to it:

public class Customer
{
	private string _name;

	public Customer() : this("N/A")
	{}

	public Customer(string name)
	{
		_name = name;
	}
}

Build the solution and locate the compiled Domain.dll library. It should be located in either the Debug or Release folder within the bin folder depending on the compilation configuration in VS. Copy the .dll and put it somewhere else on your main drive where you can easily find it. We’re pretending that you got the library from another source but you for whatever reason cannot reference it at compile time. E.g. the source is loaded into your app as a plugin which follows some naming conventions so that your code can unwrap it and invoke its code.

Create a separate project in VS and make it a console app. Here’s how you load the assembly:

string pathToDomain = @"C:\pathToLib\Domain.dll";
Assembly domainAssembly = Assembly.LoadFrom(pathToDomain);

Next we get hold of the Customer type using its full name as follows:

Type customerType = domainAssembly.GetType("Domain.Customer");

We can locate the empty constructor of Customer in the following way:

Type[] emptyArgumentTypes = Type.EmptyTypes;
ConstructorInfo emptyConstructor = customerType.GetConstructor(emptyArgumentTypes);

You can learn more about ConstructorInfo here. In short it derives from MethodBase and it represents a Constructor which is a special type of method that returns an instance of a type. In the above code we specified that we wanted an empty constructor using an array of empty types. We can also locate the overloaded constructor by providing the type of the arguments list:

Type[] stringArgumentTypes = new Type[] { typeof(string) };
ConstructorInfo stringConstructor = customerType.GetConstructor(stringArgumentTypes);

You can invoke these constructors as follows:

object newEmptyCustomer = emptyConstructor.Invoke(new object[] { });
object newStringCustomer = stringConstructor.Invoke(new object[] { "Elvis" });

If step through this example with F11 then you’ll see that the Customer class appears in VS as the code reaches the constructor invocation examples.

View all posts on Reflection here.

Elliot Balynn's Blog

A directory of wonderful thoughts

Software Engineering

Web development

Disparate Opinions

Various tidbits

chsakell's Blog

WEB APPLICATION DEVELOPMENT TUTORIALS WITH OPEN-SOURCE PROJECTS

Once Upon a Camayoc

ARCHIVED: Bite-size insight on Cyber Security for the not too technical.