Big Data: using Amazon Kinesis with the AWS.NET API Part 3: sending to the stream

Introduction

In the previous post of this series we set up the Kinesis stream, installed the .NET SDK and inserted a very simple domain object into a Kinesis producer console application.

In this post we’ll start posting to our Kinesis stream.

Open the AmazonKinesisProducer demo application and let’s get to it.

Preparations

We cannot just call the services within the AWS SDK without proper authentication. This is an important reference page to handle your credentials in a safe way. We’ll the take the recommended approach and create a profile in the SDK Store and reference it from app.config.

This series is not about AWS authentication so we won’t go into temporary credentials but later on you may be interested in that option too. Since we’re programmers and it takes a single line of code to set up a profile we’ll go with the programmatic options. Add the following line to Main:

Amazon.Util.ProfileManager.RegisterProfile("demo-aws-profile", "your access key id", "your secret access key");

I suggest you remove the code from the application later on in case you want to distribute it. Run the application and it should execute without exceptions. Next open app.config and add the appSettings section with the following elements:

<appSettings>
        <add key="AWSProfileName" value="demo-aws-profile"/>
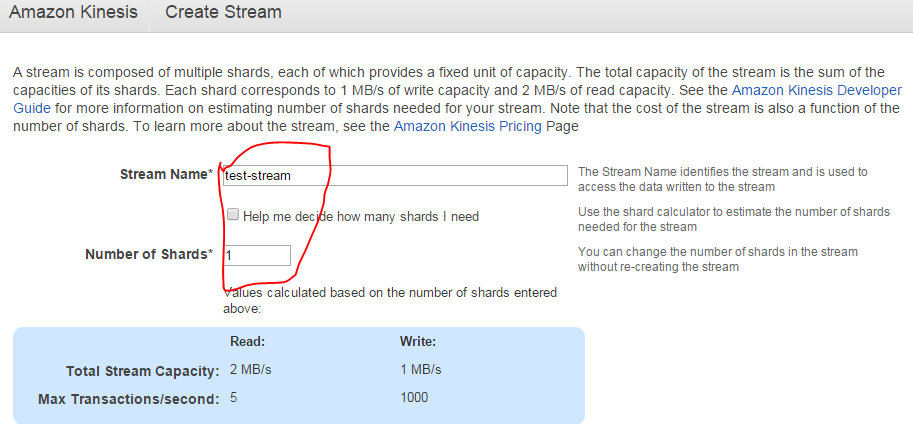
	<add key="KinesisStreamName" value="test-stream"/>
</appSettings>

Generating web transactions

We’ll create web transaction objects using the console. Add the following private methods to Program.cs:

private static List<WebTransaction> GetTransactions()
{
	List<WebTransaction> webTransactions = new List<WebTransaction>();
	Console.WriteLine("Enter your web transactions. ");
	Console.Write("URL - type 'x' and press Enter to exit: ");
	string url = Console.ReadLine();
	while (url != "x")
	{
		WebTransaction wt = new WebTransaction();
		wt.Url = url;
		wt.UtcDateUnixMs = ConvertToUnixMillis(DateTime.UtcNow);

		Console.Write("Customer name: ");
		string customerName = Console.ReadLine();
		wt.CustomerName = customerName;

		Console.Write("Response time (ms): ");
		int responseTime = Convert.ToInt32(Console.ReadLine());
		wt.ResponseTimeMs = responseTime;

		Console.Write("Web method: ");
		string method = Console.ReadLine();
		wt.WebMethod = method;

		webTransactions.Add(wt);

		Console.Write("URL - enter 'x' and press enter to exit: ");
		url = Console.ReadLine();
	}
	return webTransactions;
}

private static long ConvertToUnixMillis(DateTime dateToConvert)
{
	return Convert.ToInt64(dateToConvert.Subtract(new DateTime(1970,1,1,0,0,0,0)).TotalMilliseconds);
}

GetTransactions() is a simple loop you must have done in your C# course #2 or 3. Note that I haven’t added any validation, such as the feasibility of the web method or the response time. So be gentle and enter “correct” values later on during the tests. ConvertToUnixMillis simply converts a date to a UNIX timestamp in milliseconds. .NET4.5 doesn’t natively support UNIX dates but it’s coming in C# 6.

Sending the transactions to the stream

We’ll send each message one by one in the following method which you can add to Program.cs:

private static void SendWebTransactionsToQueue(List<WebTransaction> transactions)
{
	AmazonKinesisConfig config = new AmazonKinesisConfig();
	config.RegionEndpoint = Amazon.RegionEndpoint.EUWest1;
	AmazonKinesisClient kinesisClient = new AmazonKinesisClient(config);
	String kinesisStreamName = ConfigurationManager.AppSettings["KinesisStreamName"];

	foreach (WebTransaction wt in transactions)
	{
		string dataAsJson = JsonConvert.SerializeObject(wt);
		byte[] dataAsBytes = Encoding.UTF8.GetBytes(dataAsJson);
		using (MemoryStream memoryStream = new MemoryStream(dataAsBytes))
		{
			try
			{						
				PutRecordRequest requestRecord = new PutRecordRequest();
				requestRecord.StreamName = kinesisStreamName;
				requestRecord.PartitionKey = "url-response-times";
				requestRecord.Data = memoryStream;

				PutRecordResponse responseRecord = kinesisClient.PutRecord(requestRecord);
				Console.WriteLine("Successfully sent record {0} to Kinesis. Sequence number: {1}", wt.Url, responseRecord.SequenceNumber);
			}
			catch (Exception ex)
			{
				Console.WriteLine("Failed to send record {0} to Kinesis. Exception: {1}", wt.Url, ex.Message);
			}
		}
	}
}

You’ll need to reference the System.Configuration library to make this work.

We first configure our access to Kinesis using the AmazonKinesisConfig object. We set the region to the one where we set up the stream. In my case it’s eu-west-1, but you may need to provide something else. We also read the stream name from app.config.

Then for each of the WebTransaction objects we go through the following process:

  • Get the JSON representation of the object
  • Convert the JSON to a byte array
  • Put byte array into a MemoryStream
  • We set up the PutRecordRequest object with the stream name, the partition key and the data we want to publish
  • The record is sent to Kinesis using the PutRecord method
  • If it’s successful then we print the sequence number of the message
  • Otherwise we print an exception message

What is a partition key? It is a key to group the data within a stream into shards. And a sequence number? It is a unique ID that each message gets upon insertion into the stream. This page with the key concepts will be a good friend of yours while working with Kinesis.

Test

We can call these functions from Main as follows:

List<WebTransaction> webTransactions = GetTransactions();
SendWebTransactionsToQueue(webTransactions);

Console.WriteLine("Main done...");
Console.ReadKey();

Start the application and create a couple of WebTransaction objects using the console. Then if all goes well you should see a printout similar to the following in the console window:

Messages sent to Kinesis stream console output

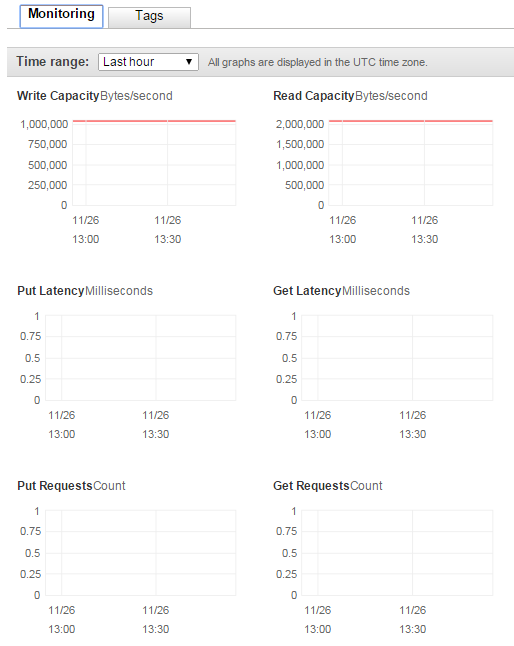
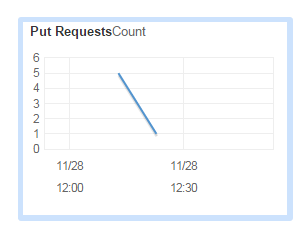
Let’s see what the Kinesis dashboard is telling us:

PutRequest count on AWS Kinesis dashboard

The PutRequest graph increased to 5 – and since I then put one more message to the stream the number decreased to 1:

PutRequest count on AWS Kinesis dashboard

In the next post we’ll see how to read the messages from the stream.

View all posts related to Amazon Web Services and Big Data here.

Replacing substrings using Regex in C# .NET: phone number example

In this post we saw an application of Regex and Match to reformat date strings. Let’s check another example: change the following phone number formats…:

  • (xxx)xxx-xxxx: (123)456-7890
  • (xxx) xxx-xxxx: (123) 456-7890
  • xxx-xxx-xxxx: 123-456-7890
  • xxxxxxxxxx: 1234567890

…into (xxx) xxx-xxxx.

Here’s a possible solution:

private static string ReformatPhone(string phone)
{
	Match match = Regex.Match(phone, @"^\(?(\d{3})\)?[\s\-]?(\d{3})\-?(\d{4})$");
	return string.Format("({0}) {1}-{2}", match.Groups[1], match.Groups[2], match.Groups[3]);
}

If you call this function with any of the above 4 examples it will return “(123) 456-7890”.

View all posts related to string and text operations here.

Phone and ZIP format checker examples from C# .NET

It’s a common task to check the validity of an input in any application. Some inputs must follow a specific format, like phone numbers and ZIP codes. Here come two regular expression examples that will help you with that:

private static bool IsValidPhone(string candidate)
{
	return Regex.IsMatch(candidate, @"^\(?\d{3}\)?[\s\-]?\d{3}\-?\d{4}$");
}

The above regular expression will return true for the following formats:

  • (xxx)xxx-xxxx: (123)456-7890
  • (xxx) xxx-xxxx: (123) 456-7890
  • xxx-xxx-xxxx: 123-456-7890
  • xxxxxxxxxx: 1234567890

Let’s now see a possible solution for a US ZIP code:

private static bool IsValidZip(string candidate)
{
	return Regex.IsMatch(candidate, @"^\d{5}(\-\d{4})?$");
}

This function returns true for the following formats:

  • xxxxx-xxxx: 01234-5678
  • xxxxx: 01234

View all posts related to string and text operations here.

Using Amazon Kinesis with the AWS.NET API Part 2: stream, NET SDK and domain setup

Introduction

In the previous post we went through an introduction of Amazon Kinesis. We established that Kinesis is an ideal out-of-the-box starting point for your Big Data analysis needs. It takes a lot of burden off your shoulders regarding scaling, maintenance and redundancy. We also said that Kinesis only provided a 24-hour storage of the messages so we’ll need to build an application, a Kinesis Client, that will ultimately process the messages in some way: filtering, sorting, saving etc.

In this post we’ll create our Kinesis stream and install the AWS SDK.

Creating the stream

Log onto the AWS console and locate the Kinesis service:

Kinesis icon on AWS console

Probably every service you use with AWS has a region that you can select in the top right section of the UI:

Amazon region selector

These regions are significant for the services with a couple of exceptions. E.g. S3, which we’ll discuss in the next series, is global and has less regional significance. In the case of Kinesis when you create a new stream then that stream will be available in the selected region. It doesn’t, however, mean that users cannot send messages to a stream in Ireland from Australia. However, it will take Australian users a bit more time to send messages to this stream than it does for a user in the UK. Also, we’ll see later that the region must be specified in code when configuring the access to AWS otherwise you may be wondering why your stream cannot be located.

You can create a new stream with the Create Stream button:

Create stream button on Amazon Kinesis

Note that Kinesis has at the time of writing this post no free-tier pricing. According to the current pricing table example it costs about $4.22 a day to process 1000 messages per second where each message is 5KB in size. We will only test with some individual messages in this series so the total cost should be minimal.

Enter a stream name and set the number of shards to 1, that will be enough for testing:

Creating a test stream in Kinesis

Press “Create” and you’ll be redirected to the original screen with the list of streams. Your new stream should be in “CREATING” status:

Kinesis stream in creating status

…which will shortly switch to “ACTIVE”.

You can click the name of the stream which will open a screen with a number of performance indicators:

Kinesis stream performance indicators

We haven’t processed any messages yet so there are no put or get requests yet.

That’s it, we have a functioning Kinesis stream up and running. Let’s move on.

Installing the SDK

The Amazon .NET SDK is available through NuGet. Open Visual Studio 2012/2013 and create a new C# console application called AmazonKinesisProducer. The purpose of this application will be to send messages to the stream. In reality the message producer could by any type of application:

  • A website
  • A Windows/Android/iOS app
  • A Windows service
  • A traditional desktop app

…i.e. any application that’s capable of sending HTTP/S PUT requests to a service endpoint. We’ll keep it simple and not waste time with view-related tasks.

Install the following NuGet package:

AWS SDK NuGet package

We’ll also be working with JSON data so let’s also install the popular NewtonSoft Json package as well:

Json.NET NuGet package

Domain

In this section we’ll set up the data structure of the messages we’ll be processing. I’ll reuse a simplified version of the messages we had in a real-life project similar to what we’re going through. We’ll pretend that we’re measuring the total response time of web pages that our customers visit.

A real-life solution would involve a JavaScript solution embedded into the HTML of certain pages. That JavaScript will collect data like “transaction start” and “transaction finish” which make it possible to measure the response time of a web page as it’s experienced by a real end user. The JavaScript will then send the transaction data to a web service as JSON.

In our case of course we’ll not go through all that. We’ll pre-produce our data points using a C# object and JSON.

Insert the following class into the Kinesis producer app:

public class WebTransaction
{
	public long UtcDateUnixMs { get; set; }
	public string CustomerName { get; set; }
	public string Url { get; set; }
	public string WebMethod { get; set; }
	public int ResponseTimeMs { get; set; }
}

Dates are easiest to handle as UNIX timestamps in milliseconds as most systems will be able to handle it. DateTime in .NET4.5 doesn’t have any built-in support for UNIX timestamps but that’s easy to solve. Formatted date strings are more difficult to parse so we won’t go with that. You’ll probably understand the purpose of the other properties.

We’ll start sending message to our stream in the next post.

View all posts related to Amazon Web Services and Big Data here.

Architecture of a Big Data messaging and aggregation system using Amazon Web Services part 4

Introduction

In the previous post we looked at two components in our architecture:

  • Elastic Beanstalk to host the Java Kinesis Client Application
  • Elastic MapReduce, a Hadoop-based Amazon component as an alternative data aggregation platform

In this post we’ll look at another AWS component that very well suits data aggregation jobs: RedShift.

Amazon RedShift

Amazon RedShift is Amazon’s data warehousing solution. It follows a columnar DBMS architecture and it was designed especially for heavy data mining requests.

RedShift is based on PostgreSQL with some Amazon specific additions e.g. for importing raw data values from and S3 bucket. PostgreSQL syntax is very similar to other SQL languages you may be familiar with such as MS SQL. Therefore learning the basics of the language doesn’t require a lot of time and effort and you can become productive quite fast.

Having said all that, here comes a warning – a serious warning. The version of PostgreSQL employed on RedShift has some serious limitations compared to the full blown PostgreSQL. E.g. stored procedures, triggers, functions, auto-incrementing primary keys, enforced secondary keys etc. are NOT SUPPORTED. RedShift is still optimised for aggregation functions but it’s a good idea to be aware of the limits. This page has links to the lists of all missing or limited features.

RedShift vs. Elastic MapReduce

You may be asking which of the two aggregation mechanism is faster, EMR with Hive or RedShift with PostgreSQL. According to the tests we’ve performed in our project RedShift aggregation jobs run faster. A lot faster. RedShift can also be used as the storage device for the aggregated data. Other platforms like web services or desktop apps can easily pull the data from a RedShift table. You can also store the aggregated data on EMR on the Hadoop file system but those are not as readily available to other external platforms. We’ll look at some more storage options in the next part of this series so I won’t give any more details here.

This doesn’t mean that EMR is completely out of game but if you’re facing a scenario such as the one described in this series then you’re probably better off using RedShift for the aggregation purposes.

DB schema for RedShift

Data warehousing requires a different mindset to what you might be accustomed to from your DB-driven development experience. In a “normal” database of a web app you’ll probably have tables according to your domain like “Customer”, “Product”, “Order” etc. Then you’ll have secondary keys and intermediate tables to represent 1-to-M and M-to-M relationships. Also, you’ll probably keep your tables normalised.

That’s often simply not good enough for analytic and data mining applications. In data analysis apps your customers will be after some complex aggregation queries:

  • What was the maximum response time of /Products.aspx on my web page for users in Seattle using IE 10 on January 12 2015?
  • What was the average sales of product ‘ABC’ in our physical shops in the North-America region between 01 and 20 December 2014?
  • What is the total value of product XYZ sold on our web shop from iOS mobile apps in France in February 2015 after running a campaign?

You can replace “average” and “maximum” with any other aggregation type such as the 95th-percentile and median. With so many aggregation combinations your aggregation scripts would need to go through a very long list of aggregations. Also, trying to save every thinkable aggregation combination in different tables would cause the number of tables to explode. Such a setup will require a lot of lookups and joins which greatly reduce the performance. We haven’t even mentioned the difficulty with adding new aggregation types and storing historical data.

Data mining applications have adopted two schema types specially designed to solve this problem:

  • Star schema: a design with a Fact table in the middle and one or more Dimension tables around. The dimension tables are often denormalised
  • Snowflake schema: very similar to a star schema but the dimension tables are normalised. Therefore the fact table is surrounded by the dimension tables and their own broken-out sub-tables

I will not even attempt to describe these schema types here as the post – and the series – would explode with stuff that’s out of scope. I just wanted to make you aware of these ideas. Here’s an example for each type from Wikipedia to give you a taste.

Star:

Star schema example

Snowflake:

Snowflake schema example

They are often used by analytic applications such as SQL Server Analysis Services. If you’re planning to take on data mining at a serious level then it’s inevitable to get accustomed with them.

Of course, if you’re only planning to support some basic aggregation types then such schema designs may be overkill. It all depends on your goals.

RedShift is very well suited for both Star and Snowflake schema types. There’s long article that goes through Star and Snowflake in RedShift available here.

Let’s add RedShift to our diagram as another alternative:

Amazon Big Data Diagram with RedShift

In the next post – which will finish up this series – we’ll look into potential storage mechanisms for both RedShift and EMR.

View all posts related to Amazon Web Services here.

Architecture of a Big Data messaging and aggregation system using Amazon Web Services part 3

Introduction

In the previous post of this series we went through a possible data storage solution for our raw data points. We said that Amazon S3 was a likely candidate for our needs. We also discussed a little bit how the raw data points should be formatted in the storage files and how the S3 buckets should be organised.

In this post we’ll see how to deploy our Java Kinesis Client app and we’ll also look into a possible mechanism for data aggregation.

Deploying the Kinesis client application: Beanstalk for Java

We’ll need to see how the Kinesis client application can be deployed. It doesn’t make any difference which technology you use: Java, .NET, Python etc., the client app will be a worker process that must be deployed within a host.

Currently I’m only familiar with hosting Java-based Kinesis client applications but the proposed solution might work for other platforms. Amazon’s Elastic Beanstalk offers a highly scalable deployment platform for a variety of application types: .NET, Java, Ruby etc. For a .NET KCL app you may be looking into Microsoft Azure if you’d like to deploy the solution in the cloud.

Beanstalk is a wrapper around a full-blown EC2 machine with lots of details managed for you. If you start a new EC2 instance then you can use your Amazon credentials to log onto it, customise its settings, deploy various software on it etc., in other words use as a “normal” virtual machine. With Beanstalk a lot of settings will be managed for you and you won’t be able to log onto the underlying EC2 instance. Beanstalk also lets you manage deployment packages and you can easily add new environments and applications and deploy different versions of your product on them. It is an ideal platform to house a worker application like our Kinesis client. You can also add autoscaling rules that describe when a new instance should be added to a cluster. So you’ll get a lot of extras in exchange for not having the full control over the EC2 instance.

I’ve written an article on how to deploy a Kinesis client application on Beanstalk available here.

Let’s add Beanstalk as the Kinesis client host to our diagram:

Step 4 with Beanstalk as host

Aggregation mechanism option 1: Elastic MapReduce

Elastic MapReduce (EMR) is Amazon’s web service with the Hadoop framework installed. What’s MapReduce? I’ve introduced MapReduce in an unrelated post elsewhere on this blog. I’ll copy the relevant section for a short introduction:

Short summary of MapReduce

MapReduce – or Map/Filter/Reduce – is eagerly used in data mining and big data applications to find information from a large, potentially unstructured data set. E.g. finding the average age of all Employees who have been employed for more than 5 years is a good candidate for this algorithm.

The individual parts of Map/Filter/Reduce, i.e. the Map, the Filter and the Reduce are steps or operations in a chain to compute something from a collection. Not all 3 steps are required in all data mining cases. Examples:

  • Finding the average age of employees who have been working at a company for more than 5 years: you map the age property of each employee to a list of integers but filter out those who have been working for less than 5 years. Then you calculate the average of the elements in the integer list, i.e. reduce the list to a single outcome.
  • Finding the ids of every employee: if the IDs are strings then you can map the ID fields into a list of strings, there’s no need for any filtering or reducing.
  • Finding the average age of all employees: you map the age of each employee into an integer list and then calculate the average of those integers in the reduce phase, there’s no need for filtering
  • Find all employees over 50 years of age: we filter out the employees who are younger than 50, there’s no need for mapping or reducing the employees collection.

MapReduce implementations in reality can become quite complex depending on the query and structure of the source data.

You can read more about MapReduce in general here.

EMR continued

Hadoop is eagerly used in the distributed computing world where large amounts of potentially unstructured input files are stored across several servers. The final goal is of course to process these raw data files in some way, like what we’re trying to do in this series. If you’re planning to work with Big Data and data-mining then you’ll definitely come across Hadoop at some point. Hadoop is a large system with a steep learning curve.

Also, there’s a whole ecosystem built on top of Hadoop to simplify writing MapReduce functions and queries. There are even companies out there, like Hortonworks, who specialise in GUI tools around Hadoop so that you don’t have to write plain queries in a command line tool.

Some of the technologies around Hadoop are the following:

  • Java MapReduce: you can write MapReduce applications with Java. These are quite low-level operations and probably not too many Big Data developers go with this option in practice but I might be wrong here
  • Hive: an SQL-like language that creates Java MapReduce functions under the hood and runs them. This is a lot less complex solution than writing a Java MapReduce function
  • Pig: Pig – or Pig Latin – is another language/technology to handle large amounts of data in a fast, parallel and efficient way

…and a whole lot more but Hive and Pig seem to be the most popular ones at the time of writing this post.

Hadoop is normally installed on Linux machines although it can be deployed on Windows with some tricks – and luck :-). However, on production systems you’ll probably not want to have Hadoop on Windows. Therefore if you start a new instance of EMR in Amazon then you’ll be given a Linux EC2 machine with Hadoop and a couple of other tools installed, e.g. Hive and Pig will follow along although you can opt out of those when you start a new Hadoop instance. It’s good to have them installed so that you can test your Hive/Pig scripts on them.

Connecting EMR with S3

Now the big question is how we can import the S3 data and analyse them on a Hadoop EMR instance. Amazon extended the Hive language so that it can easily interact with S3. The following Hive statement imports all files from a given S3 bucket. Note that every record within the S3 bucket/folder will be imported, you don’t need to provide the file names.

CREATE EXTERNAL TABLE IF NOT EXISTS raw_data_points (customerId string, url string,date string,response_time int,http_verb string,http_response_code int)
PARTITIONED BY (customerId string)
ROW FORMAT DELIMITED
FIELDS TERMINATED BY ','
LOCATION 's3://raw-data-points/00-15-11-10-2014';

I won’t go into every detail of these statements, you’ll need to explore Hive yourself, but here’s the gist of it:

  • We create a temporary table with the columns listed in brackets
  • We indicate that the fields in the raw data source are delimited by ‘,’
  • Finally we show where the raw data files are located

You can then run the Hive aggregation functions on that temporary table and export the result into another data source – which we’ll explore later. You can probably achieve the same with Pig, which is claimed to run faster than Hive, but I’m not familiar with it at all.

We’ll look at another candidate for the aggregation mechanism, RedShift in the next post. For the time being let’s add EMR to our diagram:

Step 5 with EMR

View all posts related to Amazon Web Services here.

Replacing substrings using Regex in C# .NET: string cleaning example

We often need to sanitize string inputs where the input value is out of our control. Some of those inputs can come with unwanted characters. The following method using Regex removes all non-alphanumeric characters except for ‘@’, ‘-‘ and ‘.’:

private static string RemoveNonAlphaNumericCharacters(String input)
{
	return Regex.Replace(input, @"[^\w\.@-]", string.Empty);
}

Calling this method like…

string cleanString = RemoveNonAlphaNumericCharacters("()h{e??l#'l>>o<<");

…returns “hello”.

View all posts related to string and text operations here.

Big Data: using Amazon Kinesis with the AWS.NET API Part 1: introduction

Introduction

Big Data is definitely an important buzzword nowadays. Organisations have to process large amounts of information real time in form of messages in order to make decisions about the future of the company. Companies can also use these messages as data points of something they monitor constantly: sales, response times, stock prices, etc. Their goal is presumably to process the data and extract information from it that their customers find useful and are willing to pay for.

Whatever the purpose there must be a system that is able to handle the influx of messages. You don’t want to lose a single message or let a faulty one stop the chain. You’ll want to have the message queue up and running all the time and make it flexible and scalable so that it can scale up and down depending on the current load. Also, ideally you’ll want to start with the “real” work as soon as possible and not spend too much time on infrastructure management: new servers, load balancers, installing message queue systems etc. Depending on your preferences, it may be better to invest in a ready-made service at least for the initial life of your application. If you then decide that the product is not worth the effort then you can simply terminate the service and then probably haven’t lost as much money as if you had to manage the infrastructure yourself from the beginning.

This is the first installment of a series dedicated to out-of-the-box components built and powered by Amazon Web Services (AWS) enabling Big Data handling. In fact it will be a series of series as I’ll divide the different parts of the chain into their own “compartments”:

  • Message queue
  • Message persistence
  • Analysis
  • Storing the extracted data

Almost all code will be C# with the exception of SQL-like languages in the “Analysis” section. You’ll need to have an account in Amazon Web Services if you want to try the code examples yourself. Amazon has a free-tier of some of their services which is usually enough for testing purposes before your product turns into something serious. Even if there’s no free tier available, like in the case of Kinesis, the costs you incur with minimal tests are far from prohibiting. Amazon is bringing down its prices on AWS components quite often as their volumes grow larger. By signing up with Amazon and creating a user you’ll also get a pair of security keys: an Amazon Access Key and a Secret Access Key.

Note that we’ll be concentrating on showing how to work with the .NET AWS SDK. We won’t organise our code according to guidelines like SOLID and layered architecture – it’s your responsibility to split your code into manageable bits and pieces.

Here we’re starting with the entry point of the system, i.e. the message handler.

Amazon Kinesis

Amazon Kinesis is a highly scalable cloud-based messaging system which can handle extremely large amounts of messages. There’s another series dedicated to a high-level view of a possible Big Data handling architecture. It takes up the same topics as this series but without going down to the code level. If you’re interested in getting the larger picture I really encourage you to check it out. The first post of that series takes up Kinesis so I’ll copy the relevant sections here.

The raw data

What kind of raw data are we talking about? Any type of textual data you can think of. It’s of course an advantage if you can give some structure to the raw data in the form of JSON, XML, CSV or other delimited data.

On the one hand you can have well-formatted JSON data that hits the entry point of your system:

{
    "CustomerId": "abc123",
    "DateUnixMs": 1416603010000,
    "Activity": "buy",
    "DurationMs": 43253
}

Alternatively the same data can arrive in other forms, such as CSV:

abc123,1416603010000,buy,43253

…or as some arbitrary textual input:

Customer id: abc123
Unix date (ms): 1416603010000
Activity: buy
Duration (ms): 43253

It is perfectly feasible that the raw data messages won’t all follow the same input format. Message 1 may be JSON, message 2 may be XML, message 3 may be formatted like this last example above.

The message handler: Kinesis

Amazon Kinesis is a highly scalable message handler that can easily “swallow” large amounts of raw messages. The home page contains a lot of marketing stuff but there’s a load of documentation available for developers, starting here. Most of it is in Java though.

In a nutshell:

  • A Kinesis “channel” is called a stream. A stream has a name that clients can send their messages to and that consumers of the stream can read from
  • Each stream is divided into shards. You can specify the read and write throughput of your Kinesis stream when you set it up in the AWS console
  • A single message can not exceed 50 KB
  • A message is stored in the stream for 24 hours before it’s deleted

You can read more about the limits, such as max number of shards and max throughput here. Kinesis is relatively cheap and it’s an ideal out-of-the-box entry point for big data analysis.

Kinesis will take a lot of responsibility from your shoulders: scaling, stream and shard management, infrastructure management etc. It’s possible to create a new stream in 5 minutes and you’ll be able to post – actually PUT – messages to that stream immediately after it was created. On the other hand the level of configuration is quite limited which may be both good and bad, it depends on your goals. Examples:

  • There’s no way to add any logic to the stream in the GUI
  • You cannot easily limit the messages to the stream, e.g. by defining a message schema so that malformed messages are discarded automatically
  • You cannot define what should happen to the messages in the stream, e.g. in case you want to do some pre-aggregation

However, I don’t think these are real limitations as other message queue solutions will probably be similar.

In the next post we’ll create a Kinesis stream, install the .NET AWS SDK and define our thin domain.

View all posts related to Amazon Web Services and Big Data here.

Replacing substrings using Regex in C# .NET: date format example

Say your application receives the dates in the following format:

mm/dd/yy

…but what you actually need is this:

dd-mm-yy

You can try and achieve that with string operations such as IndexOf and Replace. You can however perform more sophisticated substring operations using regular expressions. The following method will perform the required change:

private static string ReformatDate(String dateInput)
{
	return Regex.Replace(dateInput, "\\b(?<month>\\d{1,2})/(?<day>\\d{1,2})/(?<year>\\d{2,4})\\b"
		, "${day}-${month}-${year}");
}

Calling this method with “10/28/14” returns “28-10-14”.

View all posts related to string and text operations here.

Reformatting extracted substrings using Match.Result in C# .NET

Say you have the following Uri:

http://localhost:8080/webapps/bestapp

…and you’d like to extract the protocol and the port number and concatenate them. One option is a combination of a regular expression and matching groups within the regex:

private static void ReformatSubStringsFromUri(string uri)
{
	Regex regex = new Regex(@"^(?<protocol>\w+)://[^/]+?(?<port>:\d+)?/");
	Match match = regex.Match(uri);
	if (match.Success)
	{
		Console.WriteLine(match.Result("${protocol}${port}"));
	}
}

The groups are defined by “protocol” and “port” and are referred to in the Result method. The result method is used to reformat the extracted groups, i.e the substrings. In this case we just concatenate them. Calling this method with the URL in above yields “http:8080”.

However you can a more descriptive string format, e.g.:

Console.WriteLine(match.Result("Protocol: ${protocol}, port: ${port}"));

…which prints “Protocol: http, port: :8080”.

View all posts related to string and text operations here.

Elliot Balynn's Blog

A directory of wonderful thoughts

Software Engineering

Web development

Disparate Opinions

Various tidbits

chsakell's Blog

WEB APPLICATION DEVELOPMENT TUTORIALS WITH OPEN-SOURCE PROJECTS

Once Upon a Camayoc

ARCHIVED: Bite-size insight on Cyber Security for the not too technical.