Introduction to ASP.NET Core part 12: data annotation of view models
February 13, 2017 2 Comments
Introduction
In the previous post we went through how to insert a new Book entity using a form. We used a view model for this purpose. Two different Create action methods take care of the insertion process in the Books controller. One accepts HTTP GET requests and only presents an empty form with the various book insertion view model properties. The corresponding view has a form that’s built using a Html helper which takes care of setting up the form with the correct naming conventions so that the view model properties can be correctly populated. We also extended our rudimentary layered architecture to simulate that the Book entity is saved in a data store. Finally we also mentioned the usage of the anti-forgery token attribute which guards against a cross site request forgery attack.
In this post we’ll look at how attributes on our attributes can help us refine our view models and how they are rendered in the view.
Attributes on view models
We’ll return to our InsertBookViewModel object:
public class InsertBookViewModel
{
	public string Title { get; set; }
	public string Author { get; set; }
	public int NumberOfPages { get; set; }
	public decimal Price { get; set; }
	public Genre Genre { get; set; }
}
There are various attribute types we can attach to these properties that affect the behaviour of the view model in various ways. These attributes reside in the System.ComponentModel.DataAnnotations namespace. As it stands now our book insertion form is very basic. Apart from the lack of styling, which is of no interest to us at this phase, there’s no data validation, there are no restrictions imposed on the values that the user can enter and the NumberOfPages label is not too fancy.
Controlling the display
The Display attribute can define the label for the property in the view:
public class InsertBookViewModel
{
        [Display(Prompt = "Enter title")]
	public string Title { get; set; }
	public string Author { get; set; }
	[Display(Name = "Number of pages")]
	public int NumberOfPages { get; set; }
	[Display(Name = "Price in USD")]
	public decimal Price { get; set; }
	public Genre Genre { get; set; }
}
The Display attribute has a number of properties with Name and Prompt probably the one used most often. Name defines the label of the property and Prompt will set a placeholder that disappears as soon as the user starts typing in the text box:

Form validation
Data validation has several attributes:
- Required: the user must enter a value
- Range: the user must enter a numeric value within an interval
- MinLength and MaxLength: the string must be either be at least or at most as long as the defined lengths
- Regular expression: the value must match a regular expression, useful for emails, phone numbers, social security numbers, postal codes etc.
- Compare: compare two strings, most useful for password validation
These annotations will provide a basic level of validation of the form data in the backend. It’s important to keep in mind that these attributes won’t magically create client side validation scripts. Also, complex validation will still be part of your domain logic. E.g. at my company the customer can perform load testing of their websites. The rules around who and when they can start a load test are quite complex and intricate which cannot possibly be expressed with data annotations. Data annotations can validate simple things like the passwords match when a new user wants to sign up with our service. This level of validation is perfect to reject the most obvious mistakes. Don’t try to put all your domain validation rules in data annotations, they should be part of the domain classes.
Before we apply some of these attributes we need to extend the book insertion form. We should enter placeholders to show the validation exception messages to our users. There’s a Html helper called ValidationMessageFor that we can apply here:
@model DotNetCoreBookstore.Models.InsertBookViewModel

<html xmlns="http://www.w3.org/1999/xhtml">
<head>
    <title>Insert a new Book</title>
</head>
<body>
    <h1>Insert a new book</h1>
    @using (Html.BeginForm())
    {
        <div>
            @Html.LabelFor(m => m.Author)
            @Html.TextBoxFor(m => m.Author)
            @Html.ValidationMessageFor(m => m.Author)
        </div>
        <div>
            @Html.LabelFor(m => m.Title)
            @Html.TextBoxFor(m => m.Title)
            @Html.ValidationMessageFor(m => m.Title)
        </div>
        <div>
            @Html.LabelFor(m => m.Price)
            @Html.TextBoxFor(m => m.Price)
            @Html.ValidationMessageFor(m => m.Price)
        </div>
        <div>
            @Html.LabelFor(m => m.NumberOfPages)
            @Html.TextBoxFor(m => m.NumberOfPages)
            @Html.ValidationMessageFor(m => m.NumberOfPages)
        </div>
        <div>
            @Html.LabelFor(m => m.Genre)
            @Html.DropDownListFor(m => m.Genre, Html.GetEnumSelectList(typeof(DotNetCoreBookstore.Domains.Genre)))
        </div>
        <div>
            <input type="submit" name="create-book" value="Save" />
        </div>
    }
</body>
</html>
Here are a couple of examples for the data validation attributes on the book insertion view model:
public class InsertBookViewModel
{
	[Display(Prompt = "Enter title")]
	[Required(ErrorMessage = "The title is required"), MaxLength(10, ErrorMessage = "A book title cannot exceed 10 characters")]
	public string Title { get; set; }
	[Required(ErrorMessage = "The author is required"), MaxLength(15, ErrorMessage = "A book author cannot exceed 15 characters")]
	public string Author { get; set; }
	[Display(Name = "Number of pages")]
	[Required(ErrorMessage = "Number of pages is required"), Range(1, 10000, ErrorMessage = "Min pages: 1, max pages: 10000")]
	public int NumberOfPages { get; set; }
	[Required(ErrorMessage = "Enter a price"), Range(1, 1000, ErrorMessage = "Min price: 1, max price: 1000")]
	[Display(Name = "Price in USD")]
	public decimal Price { get; set; }
	public Genre Genre { get; set; }
}
We’re not done yet. If you test entering an invalid book now all you’ll see is that the page is redirected to the book index page and the book with the invalid data is still inserted into the data store. Data annotation in itself will not prevent the controller from executing its POST Create action method. We’ll need to check the model state first. If there’s a validation error then the model state will know about it but the exceptions it has in its list won’t be applied automatically in our controller code. The POST Create method will need to be extended as follows:
[HttpPost]
[ValidateAntiForgeryToken]
public IActionResult Create(InsertBookViewModel insertBookViewModel)
{
	if (ModelState.IsValid)
	{
		Book newBook = new Book()
		{
			Author = insertBookViewModel.Author,
			Genre = insertBookViewModel.Genre,
			NumberOfPages = insertBookViewModel.NumberOfPages,
			Price = insertBookViewModel.Price,
			Title = insertBookViewModel.Title
		};
		_bookService.AddNew(newBook);
		return RedirectToAction("Index");
	}

	return View();
}
If the model state is valid then we enter a book. Otherwise the same view will be presented. MVC will figure out that we mean the current book insertion view presented by GET Create. That’s how the user will see the data validation exceptions:
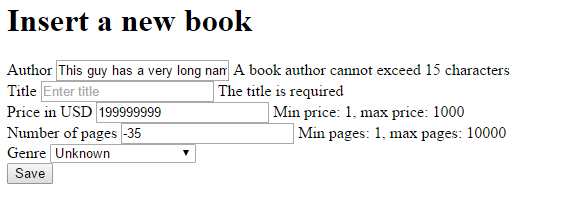
As soon as you insert valid data the book will be added to the in-memory data store.
There’s also another way to present the data validation messages. The validation summary helper method can be placed within the form:
@using (Html.BeginForm())
    {
        @Html.ValidationSummary()
        <div>
//rest of code ignored

Data type annotation
There’s one more important annotation type called DataType. It gives a hint to MVC what kind of input to render in the view. We’ll misuse the Title attribute for this purpose. As you start typing…
[DataType(DataType.)]
…in Visual Studio above a view model property then you’ll see that it offers a wide range of data types like credit card, password, email, URL etc.
In order to fully reap the benefits of the DataType attribute we need to make a little change in Create.cshtml. The currently used TextBoxFor gives no freedom to MVC to decide what kind of input type it should render. We tell it to show a text box which will be an input of type text:
<input class="input-validation-error" data-val="true" data-val-maxlength="A book title cannot exceed 10 characters" data-val-maxlength-max="10" data-val-required="The title is required" id="Title" name="Title" placeholder="Enter title" type="text" value="" />
We can ask MVC to help us by using the EditorFor helper method instead:
@Html.LabelFor(m => m.Title)
@Html.EditorFor(m => m.Title)
@Html.ValidationMessageFor(m => m.Title)
Put the following data type annotation above the Title property in InsertBookViewModel:
[DataType(DataType.Url)]
public string Title { get; set; }
Run the application and inspect the HTML source of the Create view:
<input class="text-box single-line" data-val="true" data-val-maxlength="A book title cannot exceed 10 characters" data-val-maxlength-max="10" data-val-required="The title is required" id="Title" name="Title" placeholder="Enter title" type="url" value="" />
Note how the type was set to “url” instead of “text”.
Now try to enter a book with a title that doesn’t look like a URL. I’m testing in Chrome and it gives me the following validation message:

The DataType enumeration also has a Text value which will set the type to “text” like we had before. Feel free to test the other data types too. The password type is widely used in signup and login forms. Its effect is that the user won’t see the characters in the text box but only some black dots. That’s of course the well know behaviour of password text boxes.
The post has demonstrated an additional advantage with using view models in our controllers. The attributes can be placed in our view models instead of putting them directly on our domain classes which would be very wrong. Domain models should stay as clean as possible and not be littered with view related attributes that are solely in place for the controller and its matching view.
We’ll continue in the next post.
View the list of MVC and Web API related posts here.


Continue your series! Excellent working!
love these series. it’s very good source for learning asp.net core