Introduction to ASP.NET Core part 11: inserting a new Book in a form
February 9, 2017 Leave a comment
Introduction
In the previous post we continued our exploration of MVC in ASP.NET Core by building a details page for the books. We can now click a link for each Book view model in the table and view some more details about the selected book. We also rearranged the code and introduced rudimentary layers of a controller, a service, a domain and a repository for our Book entity. Then we exposed ourselves to the first example of a HTML helper in the Index and Details Razor views with the anchor tag builder. HTML helpers are very useful tools in Razor that help us build dynamic HTML. If you used Razor views before then this is nothing new to you.
In this post we’ll continue on the same path as in the previous part. We’ll build a view to insert a new book entity. We’ll see a couple more HTML helpers to make model binding easier.
The empty insertion page
We’ll start by adding a link to the books Index page which will lead to the Create view which we’ll build in a short bit. Add the following action link below the table in Index.cshtml that belongs to the Index action method of the BooksController:
@Html.ActionLink("Add new", "Create")
We now know that the link text will be “Add new” and it will be mapped to a Create action method of the same controller we’re on, i.e. the BooksController. Therefore we’ll need a Create method in BooksController.cs. The view which will allow the insertion of a new Book object should have empty text fields for all Book properties and also a drop down list that contains all possible values of Genre. We can go with a matching view model that holds the properties necessary for insertion. Add the following C# class to the Models folder:
using DotNetCoreBookstore.Domains;

namespace DotNetCoreBookstore.Models
{
	public class InsertBookViewModel
    {
		public string Title { get; set; }
		public string Author { get; set; }
		public int NumberOfPages { get; set; }
		public decimal Price { get; set; }
		public Genre Genre { get; set; }
	}
}
That’s almost the same properties as the Book entity has except for the ID. Usually the ID is assigned by the repository, we don’t want the user to enter a numeric ID in a form. We also “borrowed” the Genre enumeration from the Domains folder.
Our first objective is to present an empty form where the user can fill in the text boxes for those properties. We’ll need a Create action method that produces a View with an empty InsertBookViewModel. The view will need a form with the appropriate fields and a button that submits the form. Where is the form data sent afterwards? If we go with the defaults then MVC will look for a Create method that accepts POST requests and whose parameter(s) can be bound to the fields of the form. A very useful HTML helper in Razor helps us build forms and MVC will do its best to bind the values entered in the form to the properties of the InsertBookViewModel parameter.
So we’ll end up with two Create methods. One for the empty form presentation which accepts GET requests and another for the form submit that accepts POST requests. It’s easy to declare the HTTP verb using attributes as we’ll soon see.
We’ll build the view first. Insert a Razor view called Create into the Views/Books folder:
@model DotNetCoreBookstore.Models.InsertBookViewModel

<html xmlns="http://www.w3.org/1999/xhtml">
<head>
    <title>Insert a new Book</title>
</head>
<body>
    <h1>Insert a new book</h1>
    @using (Html.BeginForm())
    {
        <div>
            @Html.LabelFor(m => m.Author)
            @Html.TextBoxFor(m => m.Author)
        </div>
        <div>
            @Html.LabelFor(m => m.Title)
            @Html.TextBoxFor(m => m.Title)
        </div>
        <div>
            @Html.LabelFor(m => m.Price)
            @Html.TextBoxFor(m => m.Price)
        </div>
        <div>
            @Html.LabelFor(m => m.NumberOfPages)
            @Html.TextBoxFor(m => m.NumberOfPages)
        </div>
        <div>
            @Html.LabelFor(m => m.Genre)
            @Html.DropDownListFor(m => m.Genre, Html.GetEnumSelectList(typeof(DotNetCoreBookstore.Domains.Genre)))
        </div>
        <div>
            <input type="submit" name="create-book" value="Save" />
        </div>
    }
</body>
</html>
The BeginForm helper method opens the form tag. Since it implements IDisposable the helper closes the form tag when disposed. We have a couple of commonly used HTML helper methods such as LabelFor and TextBoxFor. They create labels and text boxes for the properties of the incoming view model. The lambda expressions will make sure that all naming conventions for the text boxes are followed so that their values can be bound to the InsertBookViewModel object that will be submitted to the POST Create action method. Then we see the DropDownListFor helper which as its name suggests helps us build a drop down list for a model. It accepts the property for which we’re creating the drop down list and then a list of select list items. Html has a very useful helper method here that creates a select item list from an enumeration. We just need to provide the enumeration type and it will do the rest.
BeginForm has a number of overloads where we can specify a different controller and action method name if necessary. We can also provide route values and HTML attributes.
Next we can add the two Create action methods to the Books controller:
[HttpGet]
public IActionResult Create()
{
	InsertBookViewModel insertBookViewModel = new InsertBookViewModel();
	return View(insertBookViewModel);
}

[HttpPost]
public IActionResult Create(InsertBookViewModel insertBookViewModel)
{
	return Ok();
}
The GET Create method will be called when the user clicks on the Add New action link we added in the beginning of the post. The POST Create method is called when the user presses the Save button of the form. The POST method implementation is very rudimentary to start with, we want to test our code up to this point first. You can set a breakpoint where we return the Ok response.
Run the application and navigate to /books. There should be a link underneath the list of books:

Click the link to come to our glorious form and provide some values. Make sure the values are of the correct type, i.e. price and number of pages are numeric. We have no validation in place, we’ll take a look at it later:
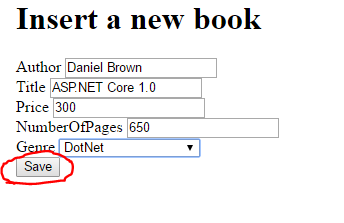
Before pressing the Save button you can view the page source and see what kind of HTML was created by the Html helpers. The most important bit as far as data binding is concerned is that the name attributes of the various input fields, like…:
<input id="Title" name="Title" type="text" value="" />
…correspond to the property names of InsertBookViewModel. That’s how MVC will be able to bind the provided values to the object properties.
Press Save and you should see that code execution breaks at the return statement of POST Create. You can now inspect the incoming InsertBookViewModel object. You’ll see that all properties have been properly assigned based on the user inputs.
Modifying the service and the repository
Let’s extend the scope to the book service and repository as well. We want to simulate a book insertion into a data store.
Add the following function to IBookRepository:
void AddNew(Book book);
…which has the following implementation in DebugBookRepository:
public void AddNew(Book book)
{
	book.Id = _testBooks.Count + 1;
	_testBooks.Add(book);
}
The ID assignment is simply adding 1 to the size of the books collection.
IBookService has a similar function:
void AddNew(Book book);
…with DebugBookService calling the repository as follows:
public void AddNew(Book book)
{
	try
	{
		_bookRepository.AddNew(book);
	}
	catch
	{
		throw;
	}
}
We can finally update the POST Create method in BooksController. Note also that we put a ValidateAntiForgeryToken attribute on the function:
[HttpPost]
[ValidateAntiForgeryToken]
public IActionResult Create(InsertBookViewModel insertBookViewModel)
{
	Book newBook = new Book()
	{
		Author = insertBookViewModel.Author,
		Genre = insertBookViewModel.Genre,
		NumberOfPages = insertBookViewModel.NumberOfPages,
		Price = insertBookViewModel.Price,
		Title = insertBookViewModel.Title
	};
	_bookService.AddNew(newBook);
	return RedirectToAction("Index");
}
The InsertBookViewModel is converted into a Book entity before calling the book service. We then want to show the Index view and feed in the updated list of books.
The new book entry won’t be visible on the Index page after adding a new book. This is obvious since our data store only exists in memory but that’s OK for now. We’ll eventually come to using a real database later in the series.
We talked about the usefulness of ValidateAntiForgeryToken in this post dedicated to the type of web attack called cross site request forgery. The difference in .NET Core is that the verification token is generated for the form automatically, there’s no need to call @Html.AntiForgeryToken() after BeginForm like in the referenced post. If you go to /books/create and inspect the HTML source then you should see HTML markup similar to the following before the closing form tag:
<input name="__RequestVerificationToken" type="hidden" value="CfDJ8Gc4M0hWoMNOhDz6AqNes8jiBzc6tnzs9H6dmi3R50df0atfD8X8qaUr_G8KfJcOS7vAAPk1qgf_332QGH91MmFD-_1TVS3ru1bqinCRY6tgGEzeHhybWg85drNhINw4saAsGUX-JZGtZUqwDZiz5lg" />
This value will be validated when posting the form. That’s a security measure for a web application that’s easy to implement in code.
We’ll continue in the next post.
View the list of MVC and Web API related posts here.

