Test Driven Development in .NET Part 2: continuing with Red, Green, Refactor

In the previous post we looked at the very basics of test first development in .NET and more specifically the Red-Green-Refactor cycle. This post is a direct continuation so we’ll build on the test project we started working on.

Pass the test

Currently we have a failing test in our test project: the SharesTest() fails. Remove the ‘throw new NotImplementedException’ from the Partition method and replace it with the simplest possible return statement that will make the compiler happy:

return new Partition();

Run the tests now and we should still have a failing test: the Size property was initialised to 0 which is different from the expected value of one:

Shares test still fails

It’s now time to make sure that our test passes. The simplest way is probably the following:

public Partition Partition(List<Share> sharesList)
        {
            return new Partition() { Size = sharesList.Count };
        }

Run the test now and you should see that SharesTest indeed passes:

Shares test passed

We assign the Count property of the sharesList parameter to the Size property of the Partition object. As we passed in a list with a single share then the result will be 1 which is the expected result. This is of course not a real life implementation yet. The Partition method doesn’t even look at the integer in the Partitioner constructor. That’s OK as we’ll now move on to the next step in the cycle: Refactoring.

The code generator called the integer parameter of the Partition constructor ‘p’. That’s not very descriptive so change the code as follows:

        private int _partitionSize;

        public Partitioner(int partitionSize)
        {
            this._partitionSize = partitionSize;
        }

Re-run the test to make sure it’s working. This is a good exercise: you change something in the implementation and then run the tests to check whether you broke something.

We now know a bit more about the purpose of SharesTest: it tests whether a group of size one is partitioned into a Partition of size one. There are different ways to name a test but a descriptive approach can be worthwhile. Rename the SharesTest method to Partitioning_a_list_of_one_item_by_one_produces_a_partition_of_size_one().

Run the test and you’ll see the new method name appear in the Test Explorer. As the name describes what the test does it’s easy to see which functions pass or fail. SharesTest doesn’t tell you anything: what Shares? What functionality? It passes, but what is it that passes? Choosing a long name like that saves you a lot of time: the title tells you which functionality is broken.

We can again stop for some reflection: is it enough to test a single case? Should we check other partition values such as -1, 0, 2, 100 etc.? Testing the value of 1 is probably not enough as the users may pass in values that are outside of your control.

You may be tempted to add several assertions into one test but resist that: you should only have a single assertion within one test. We should always have one single assertion per unit test. We test one scenario and not more. Then if the test fails then you’ll immediately see which functionality is failing.

Insert a new test in FinanceTests, a test that checks if a collection of 2 items returns a Partition of size 2:

        [Test]
        public void Partitioning_a_list_of_two_items_by_one_produces_a_partition_of_size_two()
        {
            List<Share> sharesList = new List<Share>();
            Share shareOne = new Share();
            shareOne.Maximum = 100;
            shareOne.Minimum = 13;
            sharesList.Add(shareOne);
            sharesList.Add(new Share() { Maximum = 50, Minimum = 10 });            

            Partitioner partitioner = new Partitioner(1);
            Partition partition = partitioner.Partition(sharesList);

            Assert.AreEqual(2, partition.Size);
        }

We now have a collection of 2 shares. The collection is partitioned into groups of one and we expect the resulting Partition two have two elements. Run the tests and you’ll see that it passes. It’s obvious: our implementation of the Partition method still doesn’t even look at the _partitionSize property so it doesn’t make any difference whether we pass in a collection of 2, 5 or 100. So it’s now time to come up with something more realistic.

Add another property to the Partition object:

public IList<IList<Share>> PartitioningResult;

The result of the partitioning process should be a list of lists shares. If we start with a list of 10 shares which should be cut into two subgroups of 5 then we’ll end up with a list of lists where the individual subgroups have a size of 5. The Partition method might look like this:

public Partition Partition(List<Share> sharesList)
        {
            IList<IList<Share>> partitioningResult = new List<IList<Share>>();
            int total = 0;
            while (total < sharesList.Count)
            {
                List<Share> subGroup = sharesList.Skip(total).Take(_partitionSize).ToList();
                partitioningResult.Add(subGroup);
                total += _partitionSize;
            }

            return new Partition() { PartitioningResult = partitioningResult, Size = partitioningResult.Count };
        }

Inspect the code and make sure you understand what it is doing. It is straightforward: it chops up the incoming sharesList parameter into subgroups using LINQ and assigns the subgroups to the Partition object along with a new definition of Size. Run the tests and you’ll see that it passes.

The next phase would be to decide what scenarios to test: what if we have a list of 5 shares and want to partition them into groups of two. Should the Partition function throw an exception? Should it return lists of 2-2-1? Or should it drop the element(s) that don’t fit the partition size? These are all questions that the domain expert should be able to answer so that you can write proper tests.

You can see now that a well written test suite will function as a list of specifications. You can of course have the specs listed in a Word document, but honestly, who has the time and energy to read and maintain that? How can you test the specifications in a Word document? If you instead write the tests directly in the Visual Studio editor those will never expire and with meaningful test method names will tell you clearly how the software is supposed to behave.

Test code quality

Test code is also an integral part of the solution so it should also be maintainable. You may think that the test project is less important than production code. The truth is that all important design rules, such as DRY (Don’t Repeat Yourself) still apply here. It needs to be well organised and documented so that you can find your way around when you come back to it to make changes.

As you add more and more test cases in our Finance test project you may be tempted to copy and paste the original Partitioning_a_list_of_one_item_by_one_produces_a_partition_of_size_one method, rename it and replace the parameters that are required Partitioner, Partition and Assert. Why would you copy and paste any bit of code? To save time: it boring to type out the List of shares variable that’s needed in every assertion.

It’s a better idea to go with a helper method:

private List<Share> CreateSharesListOfSize(int size)
        {
            List<Share> shares = new List<Share>();
            for (int i = 0; i < size; i++)
            {
                shares.Add(new Share(){Maximum = 130, Minimum = 15};
            }
            return shares;
        }

The refactored test methods will look like this:

        [Test]
        public void Partitioning_a_list_of_one_item_by_one_produces_a_partition_of_size_one()
        {
            List<Share> sharesList = CreateSharesListOfSize(1);
            Partitioner partitioner = new Partitioner(1);
            Partition partition = partitioner.Partition(sharesList);

            Assert.AreEqual(1, partition.Size);
        }

        [Test]
        public void Partitioning_a_list_of_two_items_by_one_produces_a_partition_of_size_two()
        {
            List<Share> sharesList = CreateSharesListOfSize(2);           

            Partitioner partitioner = new Partitioner(1);
            Partition partition = partitioner.Partition(sharesList);

            Assert.AreEqual(2, partition.Size);
        }

Additional considerations of tests

Besides being maintainable tests should be:

  • Repeatable
  • Independent
  • Test only public members
  • Atomic
  • Deterministic
  • Fast

A repeatable test means that if a test fails then it should always fail. We can’t say that a test fails between 10am and 5pm, otherwise there’s some external Date function that the test has no control of. Make sure that all those dependencies are controlled by the test method to avoid any such constraints.

Independent tests are tests that can be run in any order without affecting the pass/fail result. There should be no specification saying that test A must be run before test B for it to give the correct result. Don’t make a test dependent on the state left over by another test. Every test should have all necessary dependencies at their disposal and should start with a clean slate.

Testing public members only puts us in the shoes of the client, i.e. the consumer of the API. While writing the initial tests you are forced to think through the design of the API: what objects and methods are needed, what should we call them, what parameters should they take etc. A client is ultimately interested in the public design of the API not in the private elements which they do not even have visibility of. In addition, by testing public members only we can concentrate on the business rules and leave unimportant internal implementation details alone. An unimportant implementation detail is e.g. the assignment of the private variable in the Partitioner constructor. Do we really need to test if the Partitioner’s private integer field was assigned the value of the incoming parameter? Not really, it’s so trivial and it’s an internal implementation detail.

Atomic means that a unit test tests only one thing at a time, meaning you will have only one Assert statement within the body of the unit test.

A deterministic unit test is one that always provides one affirmative outcome: either pass or fail with 100% certainty, “maybe” and “almost” are not good enough.

You can guess what “fast” means. However, it’s not enough to say “yeah, it’s quite fast”. A good unit test runs VERY fast, we’re talking about 10-50 milliseconds. You should eliminate all factors that slow down the execution of the unit test. Accessing external resources such as web services, databases, physical files make unit test execution slower – and also less reliable as those resources must always be up and running and be in a state that is required by the code under test. We will look at such scenarios on later posts dealing with mocking dependencies.

How to organise the tests

There are certainly many ways to organise a test project. 10 developers may give you 11 different answers, but the following can work for many out there:

  • Make sure to include your tests in a separate .NET project
  • You should have as many test projects as you have ‘normal’ projects. Example: if your solution consists of Application.Web and Application.Domains then you should have two corresponding .NET test projects: Application.Web.Tests and Application.Domains.Tests
  • One level down is the namespace, e.g. Finance. For every namespace you should have a Namespace_Test folder in the correct .NET test projects, Finance_Test in this example
  • Below the namespace we have the Class, e.g. Share. For each class you should have a Class_Test folder, Share_Test in this example
  • Within the Share_Test folder we’ll have our test class which tests the behaviour of the Share object
  • Behaviour means the core business logic and making sure that unimportant internal implementation details are not tested. Those tests are not worth writing. E.g. testing a getter and setter is futile unless they incorporate important business logic, such as refusing certain values

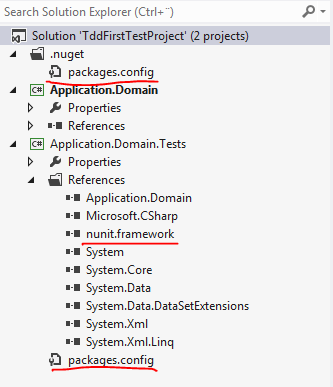
So our little .NET solution might look like this after some renaming:

Proposed test class organisation

You may be asking why the test suite of the Partitioner class has such a strange name, When_partitioning_shares.cs. Besides the fact that it is what we test, i.e. partition a list of shares, check how the test class name and the individual test cases can be read in the Test explorer:

Naming the test class

When partitioning shares, partitioning a list of two items by one produces a partition of size two. This sentence gives you the scenario and the expected outcome.

Keep test code DRY

The DRY, i.e. don’t repeat yourself principle applies to the test code as well. There will be parts in the code that all the test methods will need. In our example a list of shares is created in Partitioning_a_list_of_one_item_by_one_produces_a_partition_of_size_one() and Partitioning_a_list_of_two_items_by_one_produces_a_partition_of_size_two(). Remove these two methods and instead add the following two:

[Test]
        public void Partitioning_a_list_of_four_items_by_one_produces_a_partition_of_size_four()
        {
            List<Share> sharesList = CreateSharesListOfSize(4);

            Partitioner partitioner = new Partitioner(1);
            Partition partition = partitioner.Partition(sharesList);

            Assert.AreEqual(4, partition.Size);
        }

        [Test]
        public void Partitioning_a_list_of_four_items_by_four_produces_a_partition_of_size_one()
        {
            List<Share> sharesList = CreateSharesListOfSize(4);

            Partitioner partitioner = new Partitioner(4);
            Partition partition = partitioner.Partition(sharesList);

            Assert.AreEqual(1, partition.Size);
        }

        [Test]
        public void Partitioning_a_list_of_four_items_by_two_produces_a_partition_of_size_two()
        {
            List<Share> sharesList = CreateSharesListOfSize(4);

            Partitioner partitioner = new Partitioner(2);
            Partition partition = partitioner.Partition(sharesList);

            Assert.AreEqual(2, partition.Size);
        }

i.e. we run two tests on a list of 4 shares in all 3 cases. The code that builds the the list is repeated in every test method. As it turns out NUnit – and in fact all major test frameworks out there – makes it easy to run a piece of code before every test method is run in the test suite. This “pre-test” code must be decorated with the [SetUp] attribute. Update the test suite to the following:

[TestFixture]
    public class When_partitioning_shares
    {
        List<Share> _sharesList;

        [SetUp]
        public void SetupTest()
        {
            _sharesList = CreateSharesListOfSize(4);
        }

        [Test]
        public void Partitioning_a_list_of_four_items_by_one_produces_a_partition_of_size_four()
        {
            Partitioner partitioner = new Partitioner(1);
            Partition partition = partitioner.Partition(_sharesList);

            Assert.AreEqual(4, partition.Size);
        }

        [Test]
        public void Partitioning_a_list_of_four_items_by_four_produces_a_partition_of_size_one()
        {
            Partitioner partitioner = new Partitioner(4);
            Partition partition = partitioner.Partition(_sharesList);

            Assert.AreEqual(1, partition.Size);
        }

        [Test]
        public void Partitioning_a_list_of_four_items_by_two_produces_a_partition_of_size_two()
        {
            Partitioner partitioner = new Partitioner(2);
            Partition partition = partitioner.Partition(_sharesList);

            Assert.AreEqual(2, partition.Size);
        }

        private List<Share> CreateSharesListOfSize(int size)
        {
            List<Share> shares = new List<Share>();
            for (int i = 0; i < size; i++)
            {
                shares.Add(new Share(){Maximum = 130, Minimum = 15});
            }
            return shares;
        }
    }

The SetupTest method will be run before every other test method in the file. It simply assigns a value of four shares to the private _sharesList variable.

Conversely if you decorate your method with the TearDown attribute it will be run AFTER each test method execution. The TearDown method can be used to reset some state to an initial value or clean up resources.

It’s quite tedious to create all these test cases, right? It would be best to create one test method and somehow run the same method using many different input parameters without having to copy-paste the existing code. It is possible using the TestFixture attribute. How it is done will be the topic of the next post – amongst several other features.

Test Driven Development in .NET Part 1: the absolute basics of Red, Green, Refactor

In this series of posts we’ll look at ways of introducing Test Driven Development in a .NET project. I’ll assume that you know the benefits of TDD in general and rather wish to proceed with possible implementations in .NET.

The test project

Open Visual Studio 2012 and create a Blank Solution. Right click the solution and select Add… New Project. Add a new C# class library called Application.Domain. You can safely remove the automatically inserted Class1.cs file. You should have a starting point similar to the following:

TDD project starting point Visual Studio

This Domain project represents the business logic we want to test.

Add another C# class library to the application and call it Application.Domain.Tests. Delete Class1.cs. As we want to test the domain logic we need to add a reference to the Application.Domain project to the Tests project.

Also, we’ll need to include a testing framework in our solution. Our framework of choice is the very popular NUnit. Right-click References in Application.Domain.Tests and select Manage NuGet Packages. Search for ‘nunit’ and then install two following two packages:

NUnit projects in NuGet

The NUnit.Runner will be our test runner, i.e. the programme that runs the tests in the Tests project.

You should end up with the below structure in Visual Studio:

VS solution with NUnit installed

We are now ready to add the first test to our project.

A test is nothing else but a normal C# class with some specific attributes. These attributes declare that a class is used for testing or that a method is a test method that needs to run when we test our logic. Every testing framework will have these attributes and they can be very different but serve the same purpose. In NUnit a test class is declared with the TextFixture attribute and a test method is decorated with the Test attribute. These attributes help the test runner identify where to look for tests. It won’t just run random methods, we need to tell it where to look.

This means that it is perfectly acceptable to have e.g. helper methods within the Tests project. The test runner will not run a method that is not decorated with the Test attribute. You can have as many test methods within a Test project as you wish.

The test framework will also have a special set of keywords dedicated to assertions. After all we want our test methods to tell us whether the test has passed or not. Example: we expect our calculator to return 2 when testing for ‘1+1’ and we can instruct the test method to assert that this is the case. This assertion will then pass or fail and we’ll see the result in the test runner window.

Add a new class to Tests called DomainTestFixture and decorate it with the TestFixture attribute:

[TestFixture]
    public class DomainTestFixture
    {
    }

You will be asked to add a using statement to reference the NUnit.Framework namespace.

A test method is one which doesn’t take any parameters and doesn’t return any values. Add the first test to the test class:

[TestFixture]
    public class DomainTestFixture
    {
        [Test]
        public void FirstTest()
        {

        }
    }

To introduce an assertion use the Assert object. Type ‘Assert’ within FirstTest followed by a period. IntelliSense will show a whole range of possible assertions: AreEqual, AreNotEqual, Greater, GreaterOrEqual etc. Inspect the available assertions using IntelliSense as you wish. Let’s test a simple math problem as follows:

[Test]
        public void FirstTest()
        {
            int result = 10 - 5;
            Assert.AreEqual(4, result);
        }

…where ‘4’ is the expected value of the operation and ‘result’ is the result by some operation. Imagine that ‘result’ comes from a Calculator application and we want to test its subtraction function by passing in 10 and 5. Let’s say that we make a mistake and expect 10 – 5 to be 4. This test should obviously fail.

In order to run the test in the NUnit test runner go to Tools, Extensions and Updates. Click ‘Online’ and the search for NUnit. Install the following package:

NUnit test adapter in Visual Studio

You’ll need to restart Visual Studio for the changes to take effect. Then go to Test, Run, All Tests (Ctrl R, A) which will compile the project and run the NUnit tests. You will receive the outcome in the Test Explorer window:

NUnit test explorer first test

As expected, our test failed miserably. You’ll see that the expected value was 4 but the actual outcome was 5. You’ll also receive some metadata: where the test occurred – FirstTest -, the source – DomainTestFixture.cs and the stacktrace.

Go back and fix the assertion:

Assert.AreEqual(5, result);

Select Run All in the Test Explorer and you’ll see that the red turned green and our test has passed. We can move on to a more realistic scenario and we will follow a test-first approach: we’ll write a test for a bit of code that does not even exist yet. The code to be tested will be generated while writing the test.

Let’s add a new class in Tests called FinanceTests.cs. We’ll pretend that we’re working on a financial application that administers shares. It happens often that you’re not sure what to call your test classes and test methods but don’t worry about them too much. Those are only names that can be changed very easily. Let’s add our first Test:

[TestFixture]
    public class FinanceTests
    {
        [Test]
        public void SharesTest()
        {

        }
    }

You’ll see that SharesTest sounds extremely general but remember: in the beginning we may not even know exactly what our Domain looks like. We’ll now test the behaviour of a collection of shares. Add the following bit of code to SharesTest:

List<Share> sharesList = new List<Share>();

This won’t compile obviously at first but we can use Visual Studio to create the object for us. Place the cursor on ‘Share’ and press Ctrl +’.’. You’ll see that a small menu pops up underneath ‘Share’. You can select between Generate class and Generate new type. Select Generate new type. Inspect the possible values in each drop-down menu in the Generate New Type window, they should be self-explanatory. Select the following values and press OK:

Generate new type in VS

You’ll see that a file called Share.cs was created in the Domain project. Next add the following to SharesList:

Share shareOne = new Share();
shareOne.Maximum = 100;
shareOne.Minimum = 13;
sharesList.Add(shareOne);

Again, the code won’t compile first. You can follow the same procedure as with the Share class: place the cursor on ‘Maximum’ and press Ctrl + ‘.’. Select ‘Generate property stub’. Go to Share.cs and you’ll see that an Integer property called Maximum has been added. Do the same with ‘Minimum’. At this point your Share class should look like this:

public class Share
    {
        public int Maximum { get; set; }
        public int Minimum { get; set; }
    }

You’ll notice that at this point we only added a single Share to our shares list. That’s OK, we’ll start with the simplest possible case. This is always a good idea in TDD: always start with the simplest case which is easy to test and easy to write an assertion for. Example: if you want to test a Calculator you probably won’t start with e + Pi as the first test case but something simpler such as 2 + 3. When your test is complete for the simple cases then you can move on to the more difficult ones.

Next we would like to do something with this Shares collection. Let’s imagine that we’re writing code to group the elements in the collection in some way. So we may write the following code in SharesTest():

Partitioner partitioner = new Partitioner(1);
            var partition = partitioner.Partition(sharesList);

This is the time to reflect: what name should we give to the class that will group the list elements? What should the method be called? What type of value should it return? I’m a not great fan of the ‘var’ keyword but in this case it comes in handy as I’m not sure what type of object the Partition method should return. The integer we pass in the Partitioner constructor means that we want to group elements by one. Again, we should stop and reflect: does it make sense to allow users to group items by one? Can they pass in 0 or negative values? Or even int.Max? Should we throw an exception then? These are all rules that you will need to consider, possibly with the product owner or the domain expert.

If we allow users to group the items by one then we should probably test for it. Add the following assertion:

Assert.AreEqual(1, partition.Size);

…meaning that if we instruct the Partitioner to create groups of one then the size of the resulting partition should be 1. Now I have also decided that the Partition() method should return a… …Partition! Update the relevant line as follows:

Partition partition = partitioner.Partition(sharesList);

Using the technique we used before create the Partitioner and Partition classes, the Partition method stub and the Size property stub. Don’t worry about the implementations yet. Make sure that you select the Domain project when creating the classes. The Partitioner class should look as follows:

public class Partitioner
    {
        private int p;

        public Partitioner(int p)
        {
            // TODO: Complete member initialization
            this.p = p;
        }

        public Partition Partition(List<Share> sharesList)
        {
            throw new NotImplementedException();
        }
    }

Partition.cs:

public class Partition
    {
        public object Size { get; set; }
    }

Overwrite the type of the Size property to ‘int’.

At this point the projects should compile just fine. Run the test by pressing Ctrl R, A and see what happens. You will of course see that our SharesTest has failed:

First shares test failure in visual studio

We have not implemented the Partition method yet, so we obviously cannot have a passing test.

This is exactly the first thing that we wanted to happen: a failing test.

The Red – Green – Refactor cycle

The Red – Green – Refactor cycle is a fundamental one in TDD. We’re at the Red stage at present as we have a failing test which correspond to Step 1: Create a failing test. You may wonder why this is necessary: a failing test makes sure that our method under test is testable. It is important to see that it can fail. If a method never ever can fail then it is not testable. Therefore make sure that you follow this first step in your test creation. The first step involves other important things we have to consider: name of the classes, name of methods, parameter types, return types, business rules etc. These are all very important considerations that you need to take into during this first step.

Step 2, i.e. Green involves a minimalistic implementation of our method stub(s): write just enough to make the test pass, i.e. replace the red light with green. Do not write the complete implementation of the method just yet, that will happen in different stages.

Step 3 is Refactoring, which is the gradual implementation of the method under test. This is a gradual process where you extend the implementation of the method without changing its external behaviour, i.e. the signature, and run the test over and over again to make sure that the method still fulfills the assertion. Did the change break the tests? Or do the tests still pass? You can come back to your code a year later and still have the tests in place. They will tell you immediately if you’ve broken something.

You may think that all this is only some kind of funny game to produce extremely simple code. We all know that real life code is a lot more complicated: ask a database, run a file search, contact a web service etc. How can those be tested? Is TDD only meant for the easy stuff in memory? No, TDD can be used to test virtually anything – as long as the code is testable. If you follow test first development then testability is more or less guaranteed. There are ways to remove those external dependencies such as Services, Repositories, web service calls etc. and test the REAL purpose of the method. The real purpose of a method is rarely just to open a file – it probably needs to read some data and analyse it.

If, however, you write lengthy implementations at first and then write the tests then testability is at risk. It’s easy to fall into traps that make testability difficult: dependencies, multiple tasks within a method – violating the Single Responsibility Principle, side effects etc. can all inadvertently creep in.

We’ll stop here at the Red phase of the TDD cycle – the next post will look the Green and Refactor.

Claims-based authentication in .NET4.5 MVC4 with C#: External authentication with WS-Federation Part 1

Our model MVC4 internet applications in this series had one important feature in common: they all provided the authentication logic internally.

This is the traditional approach to logging in on a web page: there is a login page within the application which provides the gateway to the protected parts of the website. Upon providing the login credentials and pressing the ‘Log in’ button the web application will check the the validity of those credentials against some data store and accept or reject the request.

We will build on the demo application from the previous post on claims in MVC4. If you are new to Claims in .NET4.5 then I’d recommend that you start from the beginning.

External authentication: introduction

There are several reasons why the internal auth approach might not be the most suitable one:

  • This is not a trivial exercise: logging in and out must happen in a secure way
  • Your attention therefore may be diverted from the ‘true’ purpose of your application, i.e. the very reason for its existence
  • You may not like programming in Security-related topics which holds you back from writing the ‘real’ application logic of your app
  • Multiple authentication types are often problematic to implement: you can typically only provide one specific type of authentication on your site and it’s usually a Forms-based one
  • As the auth logic is internal to your app it is difficult to re-use in other apps that need the same type of login: the result is a copy-paste type of horror

Thus it would be nice to somehow factor out the authentication logic in a separate project/application which can perform the authentication for your web app and for any other apps that also need authentication against the same user store. The benefits of such a scenario are the following:

  • Multiple applications can share the login logic
  • Keep the authentication logic in one place and avoid the copy-paste scenario: if the logic changes it will be automatically propagated in all consuming applications, also called the RELYING PARTIES
  • It’s possible to re-use the auth session across several applications so that the user does not need to log in on multiple sites: this is called Single SignOn
  • The external apps, i.e. the relying parties can get rid of their internal auth data allowing developers to concentrate on the ‘real stuff’
  • The responsibilities are more clearly divided: the relying party carries out the business logic and the auth app takes care of the authentication
  • The relying parties can establish a trust relationship with the auth app using Federation: this is important as the external apps should not blindly accept a authentication result as it may come from an unreliable source
  • The team of developers can be divided up more efficiently: domain experts who work on the real business logic and security experts that work on the authentication and user store part
  • You can put the external auth app anywhere: on a different physical server, in the cloud, behind some web service, etc.
  • Your web app can be set up to accept claims from multiple authentication services: as long as the claims are coming from a trusted source your web app will not care which one they are coming from

What would such a scenario look like? First I’ll try to describe the scenario in words.

The external authentication app we have been talking about is called a Security Token Service, or an STS in short. It is also called an Identity Provider. The STS is a normal website with its own login page sitting on some web server.

Imagine the following:

  • You have a web page that relies on external authentication
  • Thus it will be void of all types of auth logic and it will have no Login page either
  • A client wishes to reach a protected page within your web app
  • The client will then be redirected to the LOGIN PAGE OF THE STS
  • The STS performs the authentication and issues a security token to the client upon successful login
  • This token, which we’ll talk more about later, probably does not include too many claims: user ID, user name, email
  • This token will also include an identifier that identifies the issuer of the token in a reliable way
  • The token is sent back to the client which is then redirected to the external application where the user originally wanted to log in
  • The relying party inspects the token, checks the issuer, maybe transforms the claims and can reject or accept the user depending on the validity of the token and the claims within the token
  • Example: if the issuer of the token is not coming from a trusted auth service, the signature in the token has been tampered with or an important claim is missing or is malformed then you can still reject the request in your web app very early on
  • If everything is fine with the token then the relying web app will establish a ClaimsPrincipal the same way as we saw before in related blog posts

The flow can be shown graphically as follows:

An STS model

The security token is meaningless for the client. As mentioned above, it will be used by your web app to check its validity, transform the claims etc. Also, just to stress the point, it is not important any more where the STS is located.

Security Assertion Markup Language: SAML

You may be wondering what the security token issued by the STS looks like. There are some standard and certainly lots of company-specific formats out there. The default in .NET4.5 follows the SAML format, which is sort of a specialised XML. Here comes a portion of such a token from Wikipedia:

SAML example

You’ll see the Issuer, the X509 cert data, i.e. the digital signature and the NameID in the picture. The signature will be used to see if the token has been tampered with after it left the STS and if the issuer is a trusted one. There’s typically not much else shown in a SAML token. It is up to the STS what kind of data it will include in the SAML token. The STS may provide a different set of initial claims depending on the type of application wishing to be authenticated. The good news is that you will not have to work with SAML directly; .NET will translate the XML into Claims automatically. It is also important to note that if you have complete control over the STS then it is up you what you include in the SAML: anything from UserId to EyeColour and FavouriteBand can be sent along.

WS-Federation

The protocol that makes this trust relationship and token communication possible is called WS-Federation. It is a standard and is now available in .NET4.5. The flow of communication in words is as follows:

  • The client tries to access a protected page on your Claims-enabled site by sending a HTTP GET request
  • .NET will see that the request is void of any security token so it will be redirected to the Login page of the STS by another HTTP 302 request
  • The URL of the redirect will include a special query string that may look something like this: wsfed?wa=wsignin1.0&wtrealm=[ID of relying party]
  • The query string says that we want to sign in to a certain Realm, which is the identifier of the relying party, usually its URL
  • Upon successful login the STS somehow needs to send the SAML token to the relying party, so let’s stop here for a second…

The STS will send back a form with method = “POST” which will be redirected from the client to the relying party. This form might look like the following:

<form method="post" action="address of relying party">
    <input name="wresult" value="<saml:assertion..." />
    <script>
        window.setTimeout('document.forms[0].submit()', 0);
    </script>
</form>

The STS attaches the SAML to the value attribute of the input field within the form. The form is then submitted using a very simple piece of embedded JavaScript. Let’s continue with the flow:

  • The form is POSTed back to the relying party from the client
  • The relying party will validate the token and its contents and turn it into an Identity

It’s important to stress that this is not some Microsoft specific framework targeting .NET applications only. WS-Federation is part of the larger WS* family of web service specifications. It can happen that you have an STS built with .NET and a Ruby on Rails web app that you would like to connect to the STS. The fact that the STS was implemented using .NET is an unimportant detail in the bigger picture as the communication is based on a widely accepted standard. If you are in this situation then you need to check if Ruby has built-in support for WS-Federation, which I’m pretty sure it does although I know precious little about that framework.

Security Token Service

What does an actual STS look like then? There are several commercial products out there. Examples:

.NET4.5 includes base classes that allow you to build your own STS. Beware though that this is not a trivial exercise. You must be very knowledgeable and experienced in programming Security.

There’s an open source STS available on GitHub: Thinktecture IdentityServer which we’ll take a closer look at in the next blog post.

For now you won’t need any of the real STS solutions out there while developing your solution. You can download an extension to Visual Studio which enables you to use a Development STS with pre-set claims. We will use this in the demo.

Demo

You will need to download and install the Identity and Access Tool extension from here for the demo.

This is a great tool for development purposes; you won’t need a real STS but you can still write your code that accepts the security token as if it comes from a real STS. Then when you’re done you simply replace the tool with the STS of your choice.

Open the MVC4 application from the previous post. As it currently stands this application still uses Forms-based authentication and we’ll try to convert it to a Claims-based one.

Before we change anything let’s note some important identity-related aspects of web.config:

1. We have our system.identityModel section where we registered the custom authentication and custom authorisation managers:

<system.identityModel>
    <identityConfiguration>
      <claimsAuthenticationManager type="ClaimsInMvc4.CustomClaimsTransformer,ClaimsInMvc4" />
      <claimsAuthorizationManager type="ClaimsInMvc4.CustomAuthorisationManager,ClaimsInMvc4" />
    </identityConfiguration>
  </system.identityModel>

2. We let users log in by their usernames and passwords on our login page:

<authentication mode="Forms">
      <forms loginUrl="~/Account/Login" timeout="2880" />
    </authentication>

3. We registered a session authentication module under the modules node:

<modules>
      <add name="SessionAuthenticationModule" type="System.IdentityModel.Services.SessionAuthenticationModule, System.IdentityModel.Services, Version=4.0.0.0, Culture=neutral, PublicKeyToken=b77a5c561934e089"></add>
</modules>

4. There is no authorization element, meaning we let anonymous users view the unprotected pages of the website.

Upon successful installation of the Identity and Access Tool you should see a new menu point when you right-click the project:

Identity tool menu point

Click on the underlined menu point which will open up the Identity and Access window:

Identity and access window

You have here a number of options to add an STS to your project:

  • Local Development STS is the one you’ll want to use for development purposes if you don’t have a real STS available
  • A business identity provider, like the ones listed above, e.g. Oracle
  • An Azure cloud based STS

Select the first option. You can then select the ‘Local Development STS’ tab:

Local development STS tab

You will see a list of test claims that the web application will receive, such as the name ‘Terry’. Again, keep in mind that there’s no way to directly log on to a fully claims-based web app; here we pretend that an external STS is sending these claims to your application after a user has successfully signed in on the login page of the STS. You can configure this list according to the needs of your token validation and authorisation logic.

Change the value of the name claim, i.e. the very first one to the name of the user you created in the previous blog posts, so I’ve changed mine to ‘Andras’.

You can select the SAML version: either 1.1 or 2.0. This depends on the available versions of the STS of your choice. In our case it doesn’t make any difference, so leave option 1.1 selected.

Click OK and let’s see what happens. At first you won’t see any changes. Let’s inspect web.config though:

1. The system.identityModel has been extended to include claims-related elements:

<system.identityModel>
    <identityConfiguration>
      <claimsAuthenticationManager type="ClaimsMvc.CustomClaimsTransformer,ClaimsMvc" />
      <claimsAuthorizationManager type="ClaimsMvc.CustomAuthorisationManager,ClaimsMvc" />
      <audienceUris>
        <add value="http://localhost:2533/" />
      </audienceUris>
      <issuerNameRegistry type="System.IdentityModel.Tokens.ValidatingIssuerNameRegistry, System.IdentityModel.Tokens.ValidatingIssuerNameRegistry">
        <authority name="LocalSTS">
          <keys>
            <add thumbprint="9B74CB2F320F7AAFC156E1252270B1DC01EF40D0" />
          </keys>
          <validIssuers>
            <add name="LocalSTS" />
          </validIssuers>
        </authority>
      </issuerNameRegistry>
      <certificateValidation certificateValidationMode="None" />
    </identityConfiguration>
  </system.identityModel>

We will discuss these elements in more detail in the next blog post. Note the following: the Identity and Access Tool is periodically updated and can be downloaded from within Visual Studio. Select Extensions and Updates… in the Tools menu. Make sure you check if there are any updates available under the Updates menu point:

Tools updates in Visual Studio

When I published the first version of this post – some time in March 2013 – the above XML was slightly different. I updated the Identity and Access Tool on 12 May 2013 which yielded the above system.identityModel node. It is possible that when you read this post the Access Tool will again yield something different. Let me know in the comments section if you notice a change and I’ll update this post accordingly.

2. Forms-based login is gone:

<authentication mode="None" />

3. The modules element has been extended with WS-Federation:

<modules>
      <add name="SessionAuthenticationModule" type="System.IdentityModel.Services.SessionAuthenticationModule, System.IdentityModel.Services, Version=4.0.0.0, Culture=neutral, PublicKeyToken=b77a5c561934e089">
      </add>
      <remove name="FormsAuthentication" />
      <add name="WSFederationAuthenticationModule" type="System.IdentityModel.Services.WSFederationAuthenticationModule, System.IdentityModel.Services, Version=4.0.0.0, Culture=neutral, PublicKeyToken=b77a5c561934e089" preCondition="managedHandler" />
    </modules>

4. By default we’ll deny access to anonymous users:

<authorization>
      <deny users="?" />
    </authorization>

Run the application and you may be greeted with the following error message:

Must have admin rights to local STS

If you started VS in admin mode then you shouldn’t see this, I’ll just restart mine.

Watch the browser bar carefully while the page is loading. At some point there should be a URL similar to this:

http://localhost:12175/wsFederationSTS/Issue/?wa=wsignin1.0&wtrealm=http%3a%2f%2flocalhost%3a2533%2f&wctx=rm%3d0%26id%3dpassive%26ru%3d%252f&wct=2013-05-12T12%3a22%3a58Z

This is the external ‘login page’, but there’s of course no external login page of the model STS. This is what’s happening:

  • Web.config has been changed by the identity tool to deny access to all anonymous users
  • When you run the application you will initially be an anonymous user
  • Your request is redirected to the model STS page on localhost:12175. Remember that this was the port number that we selected in the Identity and Access window. Don’t worry if yours has a different port number, it doesn’t make any difference
  • You will probably recognise the format of the URL with ‘?wa=wsignin1.0&wtrealm=’ followed by the URL of the MVC4 website
  • The local STS returns the list of claims we specified in the Identity and Access window
  • The request is redirected to our web page and the user is logged in
  • The request is redirected by the forms-based mechanism we discussed above where the form containing the SAML value of the authentication token was submitted by JavaScript

Recall that we protected the About page with the ClaimsAuthorize attribute:

[ClaimsAuthorize("Show", "Code")]
        public ActionResult About()

…which will activate our custom authorisation logic in CustomAuthorisationManager.cs:

public class CustomAuthorisationManager : ClaimsAuthorizationManager
    {
        public override bool CheckAccess(AuthorizationContext context)
        {
            string resource = context.Resource.First().Value;
            string action = context.Action.First().Value;

            if (action == "Show" && resource == "Code")
            {
                bool livesInSweden = context.Principal.HasClaim(ClaimTypes.Country, "Sweden");
                bool isAndras = context.Principal.HasClaim(ClaimTypes.GivenName, "Andras");
                return isAndras && livesInSweden;
            }

            return false;
        }
    }

Add two breakpoints to the application: one within CustomClaimsTransformer.Authenticate and one within CustomAuthorisationManager.CheckAccess. Re-run the application. If the code execution hasn’t stopped then click the Log off link to force a new ‘login’ via the local STS. Code execution should stop at CustomClaimsTransformer.Authenticate. This is good news as our custom auth manager still kicks in and dresses up the Principal with our custom claims…:

private ClaimsPrincipal DressUpPrincipal(String userName)
        {
            List<Claim> claims = new List<Claim>();

            //simulate database lookup
            if (userName.IndexOf("andras", StringComparison.InvariantCultureIgnoreCase) > -1)
            {
                claims.Add(new Claim(ClaimTypes.Country, "Sweden"));
                claims.Add(new Claim(ClaimTypes.GivenName, "Andras"));
                claims.Add(new Claim(ClaimTypes.Name, "Andras"));
                claims.Add(new Claim(ClaimTypes.NameIdentifier, "Andras"));
                claims.Add(new Claim(ClaimTypes.Role, "IT"));
            }
            else
            {
                claims.Add(new Claim(ClaimTypes.GivenName, userName));
                claims.Add(new Claim(ClaimTypes.Name, userName));
                claims.Add(new Claim(ClaimTypes.NameIdentifier, userName));
            }

            return new ClaimsPrincipal(new ClaimsIdentity(claims, "Custom"));
        }

…and also establishes the authentication session as per the CreateSession method. Now click the About link on the front page. As this is a protected page code execution will stop within CustomAuthorisationManager.CheckAccess which shows that even this custom manager class works as it should. Upon successful authorisation the About page should load as expected.

So our previous investments are still worth the effort. The external login doesn’t invalidate our claims authentication and claims transformation logic.

In the next post we’ll look at the changes in web.config in more details and hook up our MVC4 with a real STS.

You can view the list of posts on Security and Cryptography here.

Claims-based authentication in MVC4 with .NET4.5 C# part 3: claims based authorisation

In the previous post we discussed how to the save the authentication session so that we didn’t need to perform the same auth logic on every page request. In this post we will look at how authorisation can be performed using claims in an MVC project.

Introduction

There are two main approaches to authorisation in an ASP.NET web application: pipeline authorisation and Intra-app authorisation.

Pipeline auth means performing coarse grained, URL-based authorisation. You may require the presence of a valid auth header in every request that comes to your server. Or the authenticated user must be in a certain Role in order to reach a certain protected URL. The advantage with this approach is that authorisation happens very early in the application lifecycle so you can reject a request very early on. In this scenario you will typically have little info about the user and what resource they are trying to access but these can be enough to reject a large number of users.

An example of pipeline auth in our simple MVC4 web we’ve been working on this series can be found in CustomClaimsTransformer.Authenticate. This is the stage where you can check the presence of a certain claim that your auth logic absolutely must have in order to make an early decision. If it’s missing, then you may not care about what the user is trying to do, the request will be rejected.

Another example of pipeline auth comes from the good old ‘location’ elements in an ASP.NET web forms config where you could specify URL-based auth:

<location path="customers">
    <system.web>
      <authorization>
        <allow roles="IT"/>
        <deny users="*"/>
      </authorization>
    </system.web>
  </location>

This is an acceptable approach in web-forms projects where the URL has a close affinity to the project file system, i.e. the value of the ‘path’ attribute represents an .aspx file. In MVC /Customers will of course not lead to an aspx page called Customers. In MVC urls and resources are unlikely to have a one-to-one match. You don’t call physical files the same way as in a web-forms app. If the routing mechanism is changed then the path attribute will be meaningless. So all of a sudden people will have access to previously protected parts of your web app. Generally try to avoid this approach in an MVC application as it creates a tight coupling between the routing table and the project file structure.

Yet another example of pipeline auth is the ClaimsAuthorisationManager which can be registered in the web.config. This will sound familiar to you if you looked at the post on the very basics of claims. This is also a URL based approach, but it’s based on Claims and not Roles.

Intra-app auth on the other hand means fine-grained checks within your code logic. The benefit is that you have the chance to collect as much information as possible about the user and the resources they are trying to use. Then you can tweak your authorisation logic on a wider information basis. In this scenario you will have more info on the user and make your reject/accept decision later in the app lifecycle than in the Pipeline auth scenario.

A definite advantage of this approach is that it is not URL based any more so it is independent of the routing tables. You will have more knowledge about the authorisation domain because you’ll typically know exactly what claims the user holds and what they are trying to achieve on your site.

PrincipalPermission and ClaimsPrincipalPermission

You can follow a declarative approach using the ClaimsPrincipalPermission attribute or an imperative one within the method body. Either way you’ll work with Claims and not Roles as in the ‘old’ days with the well-known ‘Role=”IT”‘ and .IsInRole(“Admin”) type of checks:

[PrincipalPermission(SecurityAction.Demand, Role="IT")]

The old way of performing authorisation is not recommended now that we have access to claims in .NET4.5. Roles encouraged you to mix authorisation and business logic and they were limited to, well, Roles as the way of controlling access. However, you might have required more fine-grained control over your decision making. Then you ended up with specialised roles, like Admin, SuperAdmin, SuperSuperAdmin, MarketingOnThirdFloor etc. Decorating your methods with the PrincipalPermission attribute also disrupts unit testing as even the unit testing thread must have a User in the Role specified in the attribute. Also, if the current principal is not in the required group then an ugly security exception is thrown which you have to deal with somehow.

In this post we saw a detailed discussion on the ClaimsPrincipalPermission which replaces the PrincipalPermission. Here comes an example to refresh your memory:

[ClaimsPrincipalPermission(SecurityAction.Demand, Operation="Show", Resource="Code")]

In short: we don’t care which group or role the user is in any longer. This attribute describes the method it decorates. It involves a ‘Show’ operation on the ‘Code’ resource. If the current user wants to run this method then they better make sure that they have these claims. It will be the ClaimsAuthorizationManager that decides if the current principal is allowed to call the action ‘Show’ on the resource ‘Code’. The principal still must have certain claims, just like they had to be in a certain Role before. However, the authorisation logic is now separated out to a different part of the application. You can even have that logic in a web service on a different machine so that the auth logic can be handled entirely separately from your application.

Another benefit is the following: what constitutes a certain Role can change over time. What is ‘IT’? Who belongs to that group? So later on you may have to come back to every method with the attribute ‘Role=”IT”‘ and change it to e.g. “Geeks” because ‘IT’ has changed its definition at your company. On the other hand a method that has the function to ‘Show’ a resource called ‘Code’ will probably have that function over a long time, possible over the entire life time of the finalised production version of the application.

So, this attribute solves some of the problems with the PrincipalPermission. However, it does not solve all of them. It still gets in the way of unit testing and it still throws a SecurityException.

The Authorize attribute

The MVC ‘equivalent’ of the ClaimsPrincipal attribute is the Authorize attribute. It is still limited to roles:

[Authorize]
public ActionResult ShowMeTheCode()

[Authorize(Roles="IT")]
public ActionResult ShowMeTheCode()

It does not use the action/resource properties of the method and you still mix your auth logic with the ‘real’ application code leading to the same Separation of Concerns problem we mentioned above. However, this attribute is not invoked during unit testing and it does not throw Exceptions either. Instead, it returns a 404 which is a lot nicer way of dealing with unauthorised access.

We are only one step from the MVC4 claims-based authorisation nirvana. It would be great to have an Authorize attribute where you can specify the Resource and the Action just like in the case of ClaimsPrincipalPermission. You could derive from the existing Authorize attribute and implement this kind of logic there. The good news is that this has been done for you and it can be downloaded from NuGet. The NuGet package includes the imperative equivalent of the declarative attribute as well. So if you need to check if the user has access rights within a certain method, then there’s a claims-enabled solution in MVC4. We’ll use this attribute in the demo.

Demo

The initial steps of building the authorisation module have been outlined in this blog post. I will not repeat all of the details here again.

Open up the project where we left off in the previous blog post. If you remember then we included a CustomClaimsTransformer class to implement our own claims transformation logic. This is our claims based authentication module. We would like to extend the project to include authorisation as well.

First add a new class to the web project called CustomAuthorisationManager. It will need to derive from ClaimsAuthorizationManager in the System.Security.Claims namespace:

public class CustomAuthorisationManager : ClaimsAuthorizationManager
    {
        public override bool CheckAccess(AuthorizationContext context)
        {
            return base.CheckAccess(context);
        }
    }

Recall that you can extract the Resource, the Action and the Principal from the AuthorizationContext object parameter.

Now let’s say we want to make sure that only those with the name Andras who live in Sweden are allowed to view the code. I would do it as follows:

public override bool CheckAccess(AuthorizationContext context)
        {
            string resource = context.Resource.First().Value;
            string action = context.Action.First().Value;

            if (action == "Show" && resource == "Code")
            {
                bool livesInSweden = context.Principal.HasClaim(ClaimTypes.Country, "Sweden");
                bool isAndras = context.Principal.HasClaim(ClaimTypes.GivenName, "Andras");
                return isAndras && livesInSweden;
            }

            return false;
        }

Set a breakpoint at the first row of the method body, we’ll need it later.

This should be straightforward: we extract the Action and the Resource – note that there can be multiple values, hence the ‘First()’ – and then check where the user lives and what their given name is. If those claims are missing or are not set to the required values then we return false.

Next we have to register this class in the web.config under the claimsAuthenticationManager we registered in the previous part:

<system.identityModel>
    <identityConfiguration>
      <claimsAuthenticationManager type="ClaimsInMvc4.CustomClaimsTransformer,ClaimsInMvc4" />
      <claimsAuthorizationManager type="ClaimsInMvc4.CustomAuthorisationManager,ClaimsInMvc4"/>
    </identityConfiguration>
  </system.identityModel>

The type attribute is formatted as follows: [namespace.classname],[assembly].

Next we want to make sure that this logic is called when a protected action is called. We will try the claims-enabled version of the MVC4 Authorize attribute. Right-click ‘References’ and select ‘Manage NuGet Packages…’. Search for ‘Thinktecture’ and install the below package:

Thinktecture auth package NuGet

This package will give you access to a new attribute called ClaimsAuthorize where you can pass in the Action and Resource parameters.

Imagine that our About page includes some highly sensitive data that can only be viewed by the ones specified in CustomAuthorisationManager.CheckAccess. So let’s decorate the About action of the Home controller. Note that the attribute comes in two versions: one for MVC4 and one for WebAPI. If you haven’t heard of Web API, then it is a technology to build RESTful web services whose structure is very much based on MVC. You can read more about it here.

Reference the version for Mvc:

Two versions of claims authorize

…and decorate the About action as follows:

[ClaimsAuthorize("Show", "Code")]
        public ActionResult About()
        {
            ViewBag.Message = "Your app description page.";

            return View();
        }

This is telling us that the About action will perform a ‘Show’ action on the resource called ‘Code’.

Run the application now. Click on the ‘About’ link without logging in first. You should be redirected to the Log-in page. Enter the username and password and press the ‘Log in’ button. If everything went well then code execution should stop at our breakpoint within CustomAuthorisationManager.CheckAccess. Step through the method using F11 to see what happens. You can even inspect the AuthorizationContext object in the Locals window to see what it contains:

AuthorizationContext object

If the logged on user has the correct claims then you should be redirected to the About page. I will here again stress the point of getting away from the traditional Roles based authorisation of ASP.NET. We are not dealing with Roles any longer. We do not care who is in which group. Instead we describe using the Action and Resource parameters of the ClaimsAuthorize attribute what the logged on user is trying to achieve on our website. Based on that information we can make a better decision using the claims of the user whether to allow or deny access. The auth logic is separated away from the ‘real’ application in a class on its own which is called automatically if it is registered in web.config. The auth logic can even be ‘outsourced’ to a web service which can even be the basis of a separate user management application.

You can specify multiple Resource values in the attribute as follows:

[ClaimsAuthorize("Show", "Code", "TvProgram", "Fireworks")]
        public ActionResult About()
        {
            ViewBag.Message = "Your app description page.";

            return View();
        }

…i.e. you just pass in the names of the Resources after the Action.

You can achieve the same imperatively within the method body as follows:

public ActionResult About()
        {
            if (ClaimsAuthorization.CheckAccess("Show", "Code"))
            {
                ViewBag.Message = "This is the secret code.";
            }
            else
            {
                ViewBag.Message = "Too bad.";
            }

            return View();
        }

The CheckAccess method has an overloaded version which accepts an AuthorizationContext object, which gives the highest degree of freedom to specify all the resources and actions that are needed by the auth logic.

In case you wish to protect the entire controller, then it’s possible as well:

[ClaimsAuthorize("Show", "Everything")]
    public class HomeController : Controller

If you want to apply the attribute to the entire application you can do it by adding the attribute to the global filters in App_Data/FilterConfig as follows:

public class FilterConfig
    {
        public static void RegisterGlobalFilters(GlobalFilterCollection filters)
        {
            filters.Add(new HandleErrorAttribute());
            filters.Add(new ClaimsAuthorizeAttribute());
        }
    }

This discussion should be enough for you to get started with Claims-based authentication and authorisation in an MVC4 internet application. In the next post we’ll start looking at separating out the login mechanism entirely: Single SignOn and Single SignOut.

You can view the list of posts on Security and Cryptography here.

Elliot Balynn's Blog

A directory of wonderful thoughts

Software Engineering

Web development

Disparate Opinions

Various tidbits

chsakell's Blog

WEB APPLICATION DEVELOPMENT TUTORIALS WITH OPEN-SOURCE PROJECTS

Once Upon a Camayoc

ARCHIVED: Bite-size insight on Cyber Security for the not too technical.