Introduction to Claims based security in .NET4.5 with C# Part 4: authorisation with claims
February 21, 2013 12 Comments
At the end of the previous blog post on Claims transformation we ended up with a basic console application where we transformed the incoming Claims collection according to our own needs. We will now make use of those claims to control access to parts of our code.
Overview
The traditional way of authorising access certain parts of our application in .NET was usually performed through the .IsInRole method if you took the .NET Membership framework. You may have ended up with a bunch of if-else cases: if the user is in the Marketing group, then do this, else if the user is a Customer, then do something else. This is not optimal as we’re mixing our business logic with authorisation and is hard to maintain. Also, the number of groups could grow a lot over time. Maybe you didn’t want to allow access to a certain action for everyone in Marketing. Then you’d have to add specialised groups likes MarketingManager, MarketingAdmin, MarketingSimple etc. Also, if a certain action could be carried out by Marketing, Sales and Admins, then you’d have to remember to check if the user is in any of these roles. Claims allow more fine-grained control over authorisation. You are not constrained to Roles and Groups any more. Example: if you have a method called InsertUser then you can set the access to that method by decorating it with the following attribute:
[ClaimsPrincipalPermission(SecurityAction.Demand, Operation="Insert", Resource="User")]
This looks a lot like how we used to write before .NET4.5 with the PrincipalPermission attribute. The fundamental difference is that with PrincipalPermission we checked if the user was in a certain role as follows:
[PrincipalPermission(SecurityAction.Demand, Role = "Administrator")]
…which means that you are allowed to carry out this method only if you are in the Administrator role. The new way of setting permissions is that we state that we have an Operation called “Insert” paired with a Resource called “User”. It is not specified WHO is allowed to carry out the action because that type of check does not fit in our business logic. A method called InsertUser will most likely involve inserting a user as described by the attributes and this is unlikely to change over time. However, rules over WHO is allowed to carry out an action will almost certainly change. The new ClaimsPrincipalPermission attribute doesn’t care about which role a user is in. It only states what the method is doing: ‘This method INSERTs a new USER’.
We can write our own AuthorizationManager by deriving from the ClaimsAuthorizationManager superclass. The ClaimsPrincipalPermission attribute will invoke our custom authorisation class where we can check if the user is allowed to carry out the Operation defined by the attribute on the Resource defined by the attribute. Maybe the user is allowed to INSERT certain objects, but not new Users, maybe only new Products.
It is good idea to separate out the authorisation logic as much as possible, possibly even hiding it behind an API in a different assembly so that it can be updated and deployed independently from your main application.
Authorisation demo
Open the solution we built in the previous post. Add the following skeleton to Main:
private static void ShowMeTheCode()
        {

        }
Before claims and .NET4.5 you may have introduced if-else clauses within the method to decide who can do what: if the user is so and so, then follow this path, else follow another path. This leads to an ugly mix of business and auth logic. Instead we’ll follow the way we looked at in the introduction:
        [ClaimsPrincipalPermission(SecurityAction.Demand, Operation="Show", Resource="Code")]
        private static void ShowMeTheCode()
        {
            Console.WriteLine("Console.WriteLine");
        }
Before the ShowMeTheCode is run we demand that the user has access to the Operation ‘Show’ and the Resource ‘Code’. The method simply displays a short string and the attribute is telling us that the current user must make sure he has the right claims.
How can we evaluate that? Add a new class to the project called CustomAuthorisationManager. The class will derive from ClaimsAuthorizationManager in the System.Security.Claims namespace:
public class CustomAuthorisationManager : ClaimsAuthorizationManager
    {
    }
We must override the CheckAccess method:
        public override bool CheckAccess(AuthorizationContext context)
        {
            return base.CheckAccess(context);
        }
Set a breakpoint at the call to base.CheckAccess. Also, extend UseCurrentPrincipal to call the ShowMeTheCode() method:
        private static void UseCurrentPrincipal()
        {
            ShowMeTheCode();
        }
Set another breakpoint within the UseCurrentPrincipal method and run the application. The execution will stop at the call to ShowMeTheCode() within UseCurrentPrincipal. Use F11 to continue and you’ll see that nothing special happens, the ShowMeTheCode method executes and the program finishes. So what happened to our custom authorisation code? Just like in the case of the CustomClaimsTransformer class the CustomAuthorisationManager class also needs to be registered in web.config. Extend the system.identityModel node as follows:
<system.identityModel>
    <identityConfiguration>
      <claimsAuthenticationManager type="ClaimsTransformationDemo.CustomClaimsTransformer,ClaimsTransformationDemo"/>
      <claimsAuthorizationManager type="ClaimsTransformationDemo.CustomAuthorisationManager,ClaimsTransformationDemo"/>
    </identityConfiguration>
  </system.identityModel>
You’ll see an element called claimsAuthorizationManager where you must specified the fully qualified name of the custom auth class and the assembly. So let’s try running the application again. This time the execution should stop at base.CheckAccess within the CheckAccess method. Before you let the code execution continue inspect the incoming AuthorizationContext object. Click on ‘AuthorizationContext’ and press F12 to see what’s available in that class.
This object will include information about the user who’s trying to access the method. The ‘Principal’ property will describe the current User. You also have access to the Resource(s) and the Action(s) that the user is trying to run. Note that these last two are both claim collections.
Now inspect the incoming AuthorizationContext object in the Locals window. You can check the Resource and Action values as follows:
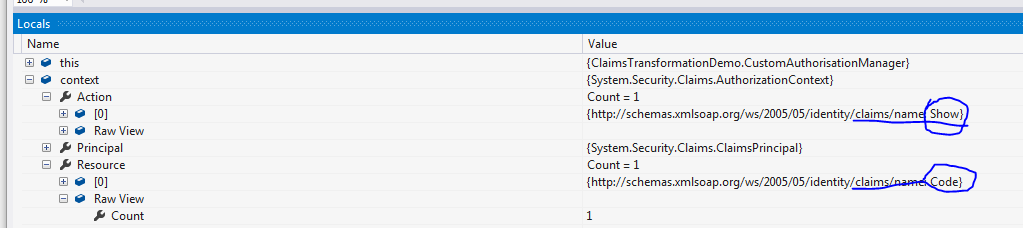
These values were passed in via the ClaimsPrincipalPermission attribute and are converted into claims, i.e. not simple string values. These claims are added into a Claims collection which allows us to extend the claims that are necessary to run a specific method. Maybe it’s not enough to have access to one resource, but 3 and that user must be allowed to insert AND update these resources. This gives us an opportunity to build more elaborate access rules. In that case the simple Resource and Actions strings in the ClaimsPrincipalPermission attribute will not suffice. We’ll need to construct our AuthorizationContext object and manually call our auth logic. We’ll take a look at how that works further down.
You can also see the two claims we specified for the user in the previous post:
![]()
Let’s change the CheckAccess method to the following:
        public override bool CheckAccess(AuthorizationContext context)
        {
            string resource = context.Resource.First().Value;
            string action = context.Action.First().Value;

            if (action == "Show" && resource == "Code")
            {
                bool likesJava = context.Principal.HasClaim("http://www.mysite.com/likesjavatoo", "True");
                return likesJava;
            }

            return false;
        }
First we extract the resource and action values. The HasClaim method will check if the current principal has the right claim type and that it has a value of ‘true’. So if the current user likes Java then we’ll allow them to run the ShowMeTheCode method. In all other cases we’ll return false, i.e. no-one else should have access to that method.
Set a breakpoint at ‘string resource = context.Resource.First().Value;’ and run the application. Step through the CheckAccess method line by line. You’ll see that the current user has been given access and is allowed to carry out the protected code. Simulate a change in the auth logic by having the exact opposite return value:
return !likesJava;
Run the application and you should get a SecurityException with the following message:
ID4266: Request for ClaimsPrincipalPermission failed for: Action: ‘System.Collections.ObjectModel.Collection`1[System.Security.Claims.Claim]’, Resource: ‘System.Collections.ObjectModel.Collection`1[System.Security.Claims.Claim]’.
Obviously you’d need to catch this type of exception when you call this method. The point, however, is that now people who like Java are not allowed to run the protected method.
Remove the ‘!’ from the return statement to go back to the previous state.
In case you don’t like attributes then the auth manager can be called imperatively as follows:
ClaimsPrincipalPermission.CheckAccess("Code", "Show");
In case of complicated auth rules
As mentioned above it’s possible to have a collection of Resources and Actions. In that case the simple ClaimsPrincipalPermission will not be enough. We have to first reference our auth logic manually and invoke the CheckAccess method on that. You can then define your own Claims collections in the AuthorizationContext object:
ClaimsAuthorizationManager authManager =
                FederatedAuthentication.FederationConfiguration.IdentityConfiguration.ClaimsAuthorizationManager;

            Collection<Claim> resourceClaims = new Collection<Claim>();
            resourceClaims.Add(new Claim("resource1", "value1"));
            resourceClaims.Add(new Claim("resource2", "value2"));

            Collection<Claim> actionClaims = new Collection<Claim>();
            actionClaims.Add(new Claim("action1", "insert"));
            actionClaims.Add(new Claim("action2", "update"));

            AuthorizationContext authContext = new AuthorizationContext(ClaimsPrincipal.Current, resourceClaims, actionClaims);
            bool allowed = authManager.CheckAccess(authContext);
The authManager.CheckAccess call will go to our custom auth logic. You can use the returned bool value to tweak your code. This provides the ultimate flexibility to control authorisation in case of a complex auth logic with multiple resources and actions.
This completes the discussion about Claims basics. In the next post we’ll start looking at Claims in an MVC4 internet application.
You can view the list of posts on Security and Cryptography here.


Hey hi,
Can you please tell me where and how i should catch this error. ID4266: Request for ClaimsPrincipalPermission failed for: Action: ‘System.Collections.ObjectModel.Collection`1[System.Security.Claims.Claim]‘, Resource: ‘System.Collections.ObjectModel.Collection`1[System.Security.Claims.Claim]‘.
because everytime i an not authroized it takes halts at disassembly and throws the above error
Hello,
You can register a global exception handling mechanism to catch all unhandled exceptions. Depending on the type of exception you can show different messages to the user. In an MVC/WebForms app you can configure web.config to redirect the user to a separate dedicated page and show the exception message.
However, this is not related to claims so I’ll not show you here how to do all this. You’ll need to do some research yourself.
//Andras
Is there a “cleaner” way to handle it when CheckAccess() returns false that does’t involve catching the exception? I’m half considering using an AuthorizationFilter instead, on which I’d be able to set the result to a 401. What do you think of that approach?
Hi António,
I’m not sure actually, I haven’t used it in an Auth filter.
//Andras
Pingback: Authentication/Authorization Road Map | Hollywood Software Development
Hi Andras. Thanks for your sleuthing and extraordinarily generous posts on authorisation. You might help others besides myself if, in the present installment, you explained _where_ the final code snippet (with the authmanager object) goes. I could see it in show UseCurrentPrincipal(), which calls ShowMeTheCode(), But since you are adding new claims, it might also go in CreatePrincipal(), where another claim has been created. In short, I’m confused. Thanks in advance for any response.
Hello,
Do you mean where this bit of code goes?
ClaimsAuthorizationManager authManager =
    FederatedAuthentication.FederationConfiguration.IdentityConfiguration.ClaimsAuthorizationManager;

Collection<Claim> resourceClaims = new Collection<Claim>();
resourceClaims.Add(new Claim("resource1", "value1"));
resourceClaims.Add(new Claim("resource2", "value2"));

Collection<Claim> actionClaims = new Collection<Claim>();
actionClaims.Add(new Claim("action1", "insert"));
actionClaims.Add(new Claim("action2", "update"));

AuthorizationContext authContext = new AuthorizationContext(ClaimsPrincipal.Current, resourceClaims, actionClaims);
bool allowed = authManager.CheckAccess(authContext);
Console.WriteLine("Console.WriteLine");
It goes within the ShowMeTheCode method.
//Andras
Thanks, Andras. That last line makes it obvious but it’s missing on my screen. You probably know this, but in VS 2013 the line
bool allowed = authManager.CheckAccess(authContext);
throws an error …’System.Security.Claims.ClaimsAuthenticationManager’ does not contain a definition for ‘CheckAccess’ and no extension method ‘CheckAccess’ accepting a first argument of type ‘System.Security.Claims.ClaimsAuthenticationManager’ could be found (are you missing a using directive or an assembly reference?)
… despite the fact that a few lines above it has no problem defining authManager!
Two small questions:
1. Would it make sense to use (bool) allowed as a condition for Console.WriteLine?
if (allowed) { Console.WriteLine(“Console.WriteLine”); }
2. Would it make sense in a console app to register the CustomAuthorisationManater class in app.config instead of web.config?
Thanks again for your world-class blog.
Hello,
Why does it throw an exception? Have you referenced the System.IdentityModel and System.identitymodel.services libraries?
This series works with a console app where we modify the app.config file, so yes, that’s absolutely possible.
//Andras
Hi, nice article. If I am right, using these claims have one really big disadvantage: Claims are set after successful login and are checked using attributes every time method is called so if anyone change permissions in database after user was logged, these changes will not be reflected until next login. Am I right?
Hi Andras, thanks for you great tutorial. I’m wondering what is your sugestion regarding implementing federation authorization in WebApi? Client is Angular + web api as backend
Hi Andras.I have a problem with authorization in wcf-restfull .
Could you please take a look at this question and give me your opinion .Thabk you
https://stackoverflow.com/questions/45767892/my-authorize-custom-function-in-wcf-doesnt-execute-should-i-define-it-in-webco