Test Driven Development in .NET Part 1: the absolute basics of Red, Green, Refactor
March 25, 2013 3 Comments
In this series of posts we’ll look at ways of introducing Test Driven Development in a .NET project. I’ll assume that you know the benefits of TDD in general and rather wish to proceed with possible implementations in .NET.
The test project
Open Visual Studio 2012 and create a Blank Solution. Right click the solution and select Add… New Project. Add a new C# class library called Application.Domain. You can safely remove the automatically inserted Class1.cs file. You should have a starting point similar to the following:

This Domain project represents the business logic we want to test.
Add another C# class library to the application and call it Application.Domain.Tests. Delete Class1.cs. As we want to test the domain logic we need to add a reference to the Application.Domain project to the Tests project.
Also, we’ll need to include a testing framework in our solution. Our framework of choice is the very popular NUnit. Right-click References in Application.Domain.Tests and select Manage NuGet Packages. Search for ‘nunit’ and then install two following two packages:
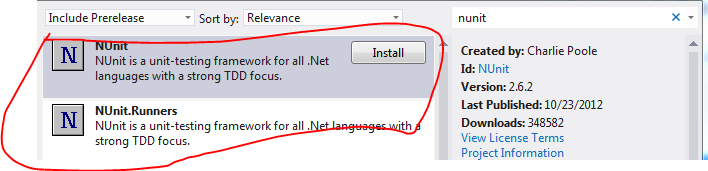
The NUnit.Runner will be our test runner, i.e. the programme that runs the tests in the Tests project.
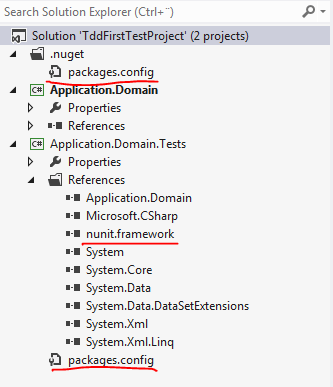
You should end up with the below structure in Visual Studio:
We are now ready to add the first test to our project.
A test is nothing else but a normal C# class with some specific attributes. These attributes declare that a class is used for testing or that a method is a test method that needs to run when we test our logic. Every testing framework will have these attributes and they can be very different but serve the same purpose. In NUnit a test class is declared with the TextFixture attribute and a test method is decorated with the Test attribute. These attributes help the test runner identify where to look for tests. It won’t just run random methods, we need to tell it where to look.
This means that it is perfectly acceptable to have e.g. helper methods within the Tests project. The test runner will not run a method that is not decorated with the Test attribute. You can have as many test methods within a Test project as you wish.
The test framework will also have a special set of keywords dedicated to assertions. After all we want our test methods to tell us whether the test has passed or not. Example: we expect our calculator to return 2 when testing for ‘1+1’ and we can instruct the test method to assert that this is the case. This assertion will then pass or fail and we’ll see the result in the test runner window.
Add a new class to Tests called DomainTestFixture and decorate it with the TestFixture attribute:
[TestFixture]
    public class DomainTestFixture
    {
    }
You will be asked to add a using statement to reference the NUnit.Framework namespace.
A test method is one which doesn’t take any parameters and doesn’t return any values. Add the first test to the test class:
[TestFixture]
    public class DomainTestFixture
    {
        [Test]
        public void FirstTest()
        {

        }
    }
To introduce an assertion use the Assert object. Type ‘Assert’ within FirstTest followed by a period. IntelliSense will show a whole range of possible assertions: AreEqual, AreNotEqual, Greater, GreaterOrEqual etc. Inspect the available assertions using IntelliSense as you wish. Let’s test a simple math problem as follows:
[Test]
        public void FirstTest()
        {
            int result = 10 - 5;
            Assert.AreEqual(4, result);
        }
…where ‘4’ is the expected value of the operation and ‘result’ is the result by some operation. Imagine that ‘result’ comes from a Calculator application and we want to test its subtraction function by passing in 10 and 5. Let’s say that we make a mistake and expect 10 – 5 to be 4. This test should obviously fail.
In order to run the test in the NUnit test runner go to Tools, Extensions and Updates. Click ‘Online’ and the search for NUnit. Install the following package:

You’ll need to restart Visual Studio for the changes to take effect. Then go to Test, Run, All Tests (Ctrl R, A) which will compile the project and run the NUnit tests. You will receive the outcome in the Test Explorer window:

As expected, our test failed miserably. You’ll see that the expected value was 4 but the actual outcome was 5. You’ll also receive some metadata: where the test occurred – FirstTest -, the source – DomainTestFixture.cs and the stacktrace.
Go back and fix the assertion:
Assert.AreEqual(5, result);
Select Run All in the Test Explorer and you’ll see that the red turned green and our test has passed. We can move on to a more realistic scenario and we will follow a test-first approach: we’ll write a test for a bit of code that does not even exist yet. The code to be tested will be generated while writing the test.
Let’s add a new class in Tests called FinanceTests.cs. We’ll pretend that we’re working on a financial application that administers shares. It happens often that you’re not sure what to call your test classes and test methods but don’t worry about them too much. Those are only names that can be changed very easily. Let’s add our first Test:
[TestFixture]
    public class FinanceTests
    {
        [Test]
        public void SharesTest()
        {

        }
    }
You’ll see that SharesTest sounds extremely general but remember: in the beginning we may not even know exactly what our Domain looks like. We’ll now test the behaviour of a collection of shares. Add the following bit of code to SharesTest:
List<Share> sharesList = new List<Share>();
This won’t compile obviously at first but we can use Visual Studio to create the object for us. Place the cursor on ‘Share’ and press Ctrl +’.’. You’ll see that a small menu pops up underneath ‘Share’. You can select between Generate class and Generate new type. Select Generate new type. Inspect the possible values in each drop-down menu in the Generate New Type window, they should be self-explanatory. Select the following values and press OK:

You’ll see that a file called Share.cs was created in the Domain project. Next add the following to SharesList:
Share shareOne = new Share();
shareOne.Maximum = 100;
shareOne.Minimum = 13;
sharesList.Add(shareOne);
Again, the code won’t compile first. You can follow the same procedure as with the Share class: place the cursor on ‘Maximum’ and press Ctrl + ‘.’. Select ‘Generate property stub’. Go to Share.cs and you’ll see that an Integer property called Maximum has been added. Do the same with ‘Minimum’. At this point your Share class should look like this:
public class Share
    {
        public int Maximum { get; set; }
        public int Minimum { get; set; }
    }
You’ll notice that at this point we only added a single Share to our shares list. That’s OK, we’ll start with the simplest possible case. This is always a good idea in TDD: always start with the simplest case which is easy to test and easy to write an assertion for. Example: if you want to test a Calculator you probably won’t start with e + Pi as the first test case but something simpler such as 2 + 3. When your test is complete for the simple cases then you can move on to the more difficult ones.
Next we would like to do something with this Shares collection. Let’s imagine that we’re writing code to group the elements in the collection in some way. So we may write the following code in SharesTest():
Partitioner partitioner = new Partitioner(1);
            var partition = partitioner.Partition(sharesList);
This is the time to reflect: what name should we give to the class that will group the list elements? What should the method be called? What type of value should it return? I’m a not great fan of the ‘var’ keyword but in this case it comes in handy as I’m not sure what type of object the Partition method should return. The integer we pass in the Partitioner constructor means that we want to group elements by one. Again, we should stop and reflect: does it make sense to allow users to group items by one? Can they pass in 0 or negative values? Or even int.Max? Should we throw an exception then? These are all rules that you will need to consider, possibly with the product owner or the domain expert.
If we allow users to group the items by one then we should probably test for it. Add the following assertion:
Assert.AreEqual(1, partition.Size);
…meaning that if we instruct the Partitioner to create groups of one then the size of the resulting partition should be 1. Now I have also decided that the Partition() method should return a… …Partition! Update the relevant line as follows:
Partition partition = partitioner.Partition(sharesList);
Using the technique we used before create the Partitioner and Partition classes, the Partition method stub and the Size property stub. Don’t worry about the implementations yet. Make sure that you select the Domain project when creating the classes. The Partitioner class should look as follows:
public class Partitioner
    {
        private int p;

        public Partitioner(int p)
        {
            // TODO: Complete member initialization
            this.p = p;
        }

        public Partition Partition(List<Share> sharesList)
        {
            throw new NotImplementedException();
        }
    }
Partition.cs:
public class Partition
    {
        public object Size { get; set; }
    }
Overwrite the type of the Size property to ‘int’.
At this point the projects should compile just fine. Run the test by pressing Ctrl R, A and see what happens. You will of course see that our SharesTest has failed:

We have not implemented the Partition method yet, so we obviously cannot have a passing test.
This is exactly the first thing that we wanted to happen: a failing test.
The Red – Green – Refactor cycle
The Red – Green – Refactor cycle is a fundamental one in TDD. We’re at the Red stage at present as we have a failing test which correspond to Step 1: Create a failing test. You may wonder why this is necessary: a failing test makes sure that our method under test is testable. It is important to see that it can fail. If a method never ever can fail then it is not testable. Therefore make sure that you follow this first step in your test creation. The first step involves other important things we have to consider: name of the classes, name of methods, parameter types, return types, business rules etc. These are all very important considerations that you need to take into during this first step.
Step 2, i.e. Green involves a minimalistic implementation of our method stub(s): write just enough to make the test pass, i.e. replace the red light with green. Do not write the complete implementation of the method just yet, that will happen in different stages.
Step 3 is Refactoring, which is the gradual implementation of the method under test. This is a gradual process where you extend the implementation of the method without changing its external behaviour, i.e. the signature, and run the test over and over again to make sure that the method still fulfills the assertion. Did the change break the tests? Or do the tests still pass? You can come back to your code a year later and still have the tests in place. They will tell you immediately if you’ve broken something.
You may think that all this is only some kind of funny game to produce extremely simple code. We all know that real life code is a lot more complicated: ask a database, run a file search, contact a web service etc. How can those be tested? Is TDD only meant for the easy stuff in memory? No, TDD can be used to test virtually anything – as long as the code is testable. If you follow test first development then testability is more or less guaranteed. There are ways to remove those external dependencies such as Services, Repositories, web service calls etc. and test the REAL purpose of the method. The real purpose of a method is rarely just to open a file – it probably needs to read some data and analyse it.
If, however, you write lengthy implementations at first and then write the tests then testability is at risk. It’s easy to fall into traps that make testability difficult: dependencies, multiple tasks within a method – violating the Single Responsibility Principle, side effects etc. can all inadvertently creep in.
We’ll stop here at the Red phase of the TDD cycle – the next post will look the Green and Refactor.


Cool post. In my opinion the test-first TDD Style is not as effective in compiled languages as compared to dynamic due to the fact the code need to be compiled first – whereas in dynamic languages it is enough to save the file and run the tests instantly.
Thanks for your comments. I’m not familiar with dynamic languages, so I have to trust you on that one. Embracing TDD is beneficial in all programming scenarios – the price of having to compile the code is very low compared to angry customers finding your bugs before you.
If your build times are long that is usually a smell that you aren’t managing your dependencies properly, or that your local build script is doing too much at once. You don’t need a solution with 80 projects in it, you don’t need Code Analysis to run on every single local build, etc. A painful RRR cycle because of 20+ second build times is an opportunity to improve your dependency management and tune up your build.