Saving a text file using a specific encoding in C# .NET

The StreamWriter object constructor lets you indicate the encoding type when writing to a text file. The following method shows how simple it is:

private static void SaveFile(Encoding encoding)
{
	Console.WriteLine("Encoding: {0}", encoding.EncodingName);
	string filename = string.Concat(@"c:\file-", encoding.EncodingName, ".txt");
	StreamWriter streamWriter = new StreamWriter(filename, false, encoding);
	streamWriter.WriteLine("I am feeling great.");
	streamWriter.Close();
}

We saw in this post how to get hold of a specific code page. We also saw that if you only use characters in the ASCII range, i.e. positions 0-127 then most encoding types will handle the string in a uniform way.

Call the above method like this:

SaveFile(Encoding.UTF7);
SaveFile(Encoding.UTF8);
SaveFile(Encoding.Unicode);
SaveFile(Encoding.UTF32);

So we’ll have 4 files at the end each named after the encoding type. Depending on the supported code pages on your PC Notepad may or may not be able to handle the encoding types. Notepad should not have any problem with UTF8 and UTF16. The UTF7 file will probably look OK, whereas UTF32 will most likely look strange. In my case the UTF32 file content looked like this:

I a m f e e l i n g g r e a t .

…i.e. with some bonus white-space in between the characters. Notepad was not able to correctly read UTF32.

The default encoding type is UTF-16 which will suffice in most situations. If you’re unsure then select this code page.

Providing an encoding type which cannot handle certain characters will result in replacement characters to be shown. If we change the string to be saved to “öåä I am feeling great.” and call the SaveFile method like

SaveFile(Encoding.ASCII);

…then you’ll see the following content in Notepad:

??? I am feeling great. ASCII could not handle the Swedish characters öåä and replaced them with question marks.

Read all posts dedicated to file I/O here.

Using Amazon Kinesis with the AWS.NET API Part 5: validation

Introduction

In the previous post we got as far as having a simple but functioning messaging system. The producer and client apps are both console based and the message handler is the ready-to-use Amazon Kinesis. We have a system that we can built upon and scale up as the message load increases. Kinesis streams can be scaled to handle virtually unlimited amounts of messages.

This post on Kinesis will discuss message validation.

You’ll need to handle the incoming messages from the stream. Normally they should follow the specified format, such as JSON or XML with the predefined property names and casing. However, this is not always guaranteed as Kinesis does not itself validate any incoming message. Also, your system might be subject to fake data. So you’ll almost always need to have some message validation in place and log messages that cannot be processed or are somehow invalid.

Open the demo application we’ve been working on so far and let’s get to it.

Validation

We ended up with the following bit of code in AmazonKinesisConsumer:

if (records.Count > 0)
{
	Console.WriteLine("Received {0} records. ", records.Count);
	foreach (Record record in records)
	{
		string json = Encoding.UTF8.GetString(record.Data.ToArray());
		Console.WriteLine("Json string: " + json);
	}
}

We’ll build up the new code step by step and present the new version of the ReadFromStream() method at the end.

Our first task is to check if “json” is in fact valid JSON. There’s no dedicated method for that in JSON.NET so we’ll just see if the string can be parsed into a generic JToken:

string json = Encoding.UTF8.GetString(record.Data.ToArray());
try
{
        JToken token = JContainer.Parse(json);
}
catch (Exception ex)
{
        //simulate logging
	Console.WriteLine("Could not parse the following message, invalid json: {0}", json);
}

Normally every message that cannot be parsed should be logged and analysed. Here we just print the unparseable message to the console. If you’re interested in logging you can check out the posts on this blog here and here.

Next we want to parse the JSON into a WebTransaction object:

try
{
	JToken token = JContainer.Parse(json);
        try
	{
		WebTransaction wt = JsonConvert.DeserializeObject<WebTransaction>(json);
	}
	catch (Exception ex)
	{
		//simulate logging
		Console.WriteLine("Could not parse the following message to a WebTransaction object: {0}", json);
	}
}
catch (Exception ex)
{
	//simulate logging
	Console.WriteLine("Could not parse the following message, invalid json: {0}", json);
}

Next we can perform some validation on the object itself. We’ll make up some arbitrary rules:

  • The web method can only be one of the following: GET, POST, PUT, HEAD, DELETE, OPTIONS, TRACE, CONNECT
  • Acceptable range for response times: 0-30000 ms, probably not wide enough, but it’s OK for now
  • We only accept valid URLs using a validator function I’ve found here. It might not be perfect but at least we can filter out useless inputs like “this is spam” or “you’ve been hacked”

We’ll add the validation rules to WebTransaction.cs of the AmazonKinesisConsumer app:

public class WebTransaction
{
	private string[] _validMethods = { "get", "post", "put", "delete", "head", "options", "trace", "connect" };
	private int _minResponseTimeMs = 0;
	private int _maxResponseTimeMs = 30000;

        public long UtcDateUnixMs { get; set; }
	public string CustomerName { get; set; }
	public string Url { get; set; }
	public string WebMethod { get; set; }
	public int ResponseTimeMs { get; set; }

	public List<string> Validate()
	{
		List<string> brokenRules = new List<string>();
		if (!IsWebMethodValid())
		{
			brokenRules.Add(string.Format("Invalid web method: {0}", WebMethod));
		}
		if (!IsResponseTimeValid())
		{
			brokenRules.Add(string.Format("Response time outside acceptable limits: {0}", ResponseTimeMs));
		}
		if (!IsValidUrl())
		{
			brokenRules.Add(string.Format("Invalid URL: {0}", Url));
		}
		return brokenRules;
	}

	private bool IsWebMethodValid()
	{
		return _validMethods.Contains(WebMethod.ToLower());
	}

	private bool IsResponseTimeValid()
	{
		if (ResponseTimeMs < _minResponseTimeMs
			|| ResponseTimeMs > _maxResponseTimeMs)
		{
			return false;
		}
        	return true;
	}

	private bool IsValidUrl()
	{
		Uri uri;
		string urlToValidate = Url;
		if (!urlToValidate.Contains(Uri.SchemeDelimiter)) urlToValidate = string.Concat(Uri.UriSchemeHttp, Uri.SchemeDelimiter, urlToValidate);
		if (Uri.TryCreate(urlToValidate, UriKind.RelativeOrAbsolute, out uri))
		{
			try
			{
				if (Dns.GetHostAddresses(uri.DnsSafeHost).Length > 0)
				{
					return true;
				}
			}
			catch
			{
				return false;
			}
		}

		return false; 
	}

}

The Validate method will collect all validation errors. IsWebMethodValid() and IsResponseTimeValid() should be quite straightforward. If you don’t understand the IsValidUrl function check out the StackOverflow link referred to above.

We can use the Validate method from within the ReadFromStream() method as follows:

List<WebTransaction> newWebTransactions = new List<WebTransaction>();
foreach (Record record in records)
{
	string json = Encoding.UTF8.GetString(record.Data.ToArray());
	try
	{
        	JToken token = JContainer.Parse(json);
		try
		{									
			WebTransaction wt = JsonConvert.DeserializeObject<WebTransaction>(json);
          		List<string> validationErrors = wt.Validate();
			if (!validationErrors.Any())
			{
				Console.WriteLine("Valid entity: {0}", json);
				newWebTransactions.Add(wt);
			}
			else
			{
				StringBuilder exceptionBuilder = new StringBuilder();
				exceptionBuilder.Append("Invalid WebTransaction object from JSON: ")
				.Append(Environment.NewLine).Append(json)
				.Append(Environment.NewLine).Append("Validation errors: ")
				.Append(Environment.NewLine);
				foreach (string error in validationErrors)
				{
					exceptionBuilder.Append(error).Append(Environment.NewLine);																										
				}
				Console.WriteLine(exceptionBuilder.ToString());
			}									
		}
        	catch (Exception ex)
		{
			//simulate logging
			Console.WriteLine("Could not parse the following message to a WebTransaction object: {0}", json);
		}
	}
	catch (Exception ex)
	{
		//simulate logging
		Console.WriteLine("Could not parse the following message, invalid json: {0}", json);
	}
}

As you can see we’re also collecting all valid WebTransaction objects into a list. That’s a preparation for the next post where we’ll store the valid objects on disk.

Here’s the current version of the ReadFromStream method:

private static void ReadFromStream()
{
	AmazonKinesisConfig config = new AmazonKinesisConfig();
	config.RegionEndpoint = Amazon.RegionEndpoint.EUWest1;
	AmazonKinesisClient kinesisClient = new AmazonKinesisClient(config);
	String kinesisStreamName = ConfigurationManager.AppSettings["KinesisStreamName"];

	DescribeStreamRequest describeRequest = new DescribeStreamRequest();
	describeRequest.StreamName = kinesisStreamName;

	DescribeStreamResponse describeResponse = kinesisClient.DescribeStream(describeRequest);
	List<Shard> shards = describeResponse.StreamDescription.Shards;

	foreach (Shard shard in shards)
	{
		GetShardIteratorRequest iteratorRequest = new GetShardIteratorRequest();
		iteratorRequest.StreamName = kinesisStreamName;
		iteratorRequest.ShardId = shard.ShardId;
		iteratorRequest.ShardIteratorType = ShardIteratorType.TRIM_HORIZON;

		GetShardIteratorResponse iteratorResponse = kinesisClient.GetShardIterator(iteratorRequest);
		string iteratorId = iteratorResponse.ShardIterator;

		while (!string.IsNullOrEmpty(iteratorId))
		{
			GetRecordsRequest getRequest = new GetRecordsRequest();
			getRequest.Limit = 1000;
			getRequest.ShardIterator = iteratorId;

			GetRecordsResponse getResponse = kinesisClient.GetRecords(getRequest);
			string nextIterator = getResponse.NextShardIterator;
			List<Record> records = getResponse.Records;

			if (records.Count > 0)
			{
				Console.WriteLine("Received {0} records. ", records.Count);
				List<WebTransaction> newWebTransactions = new List<WebTransaction>();
				foreach (Record record in records)
				{
					string json = Encoding.UTF8.GetString(record.Data.ToArray());
					try
					{
						JToken token = JContainer.Parse(json);
						try
						{									
							WebTransaction wt = JsonConvert.DeserializeObject<WebTransaction>(json);
							List<string> validationErrors = wt.Validate();
							if (!validationErrors.Any())
							{
								Console.WriteLine("Valid entity: {0}", json);
								newWebTransactions.Add(wt);
							}
							else
							{
								StringBuilder exceptionBuilder = new StringBuilder();
								exceptionBuilder.Append("Invalid WebTransaction object from JSON: ")
									.Append(Environment.NewLine).Append(json)
									.Append(Environment.NewLine).Append("Validation errors: ")
									.Append(Environment.NewLine);
								foreach (string error in validationErrors)
								{
									exceptionBuilder.Append(error).Append(Environment.NewLine);																										
								}
								Console.WriteLine(exceptionBuilder.ToString());
							}									
						}
						catch (Exception ex)
						{
							//simulate logging
							Console.WriteLine("Could not parse the following message to a WebTransaction object: {0}", json);
						}
					}
					catch (Exception ex)
					{
						//simulate logging
						Console.WriteLine("Could not parse the following message, invalid json: {0}", json);
					}
				}
			}

			iteratorId = nextIterator;
		}
	}
}

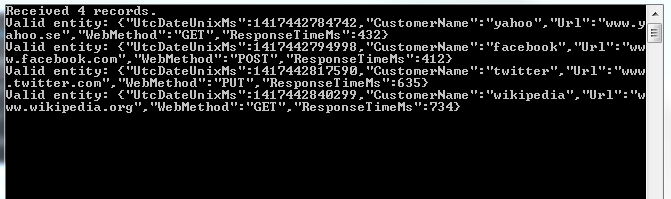
Run the application with F5. This will start the project that is set as the start-up project. You can start the other one using the technique we saw in the previous post: right-click, Debug, Start new instance. You’ll have two console windows running. If you had some messages left in the Kinesis stream then they should be validated now. I can see the following output:

Initial validation messages for Kinesis

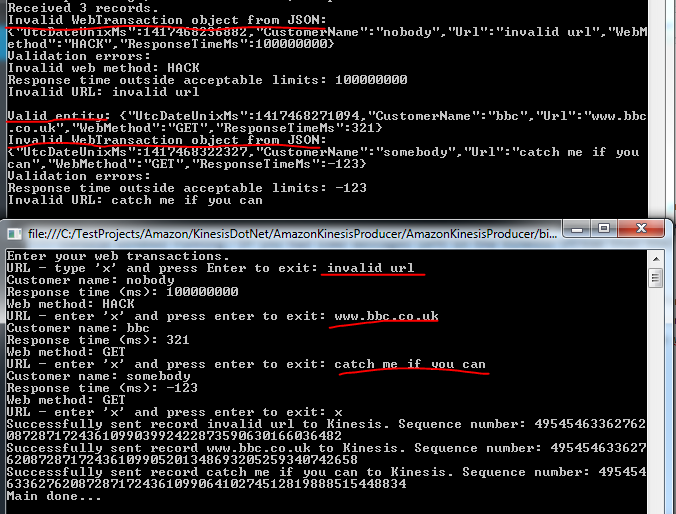
Let’s now send some new messages to Kinesis:

Validation errors from messages to Kinesis

Great, we have some basic validation logic in place.

We’ll discuss storing the messages in the next post which will finish the series on Amazon Kinesis.

View all posts related to Amazon Web Services and Big Data here.

Getting the byte array of a string depending on Encoding in C# .NET

You can take any string in C# and view its byte array data depending on the Encoding type. You can get hold of the encoding type using the Encoding.GetEncoding method. Some frequently used code pages have their short-cuts:

  • Encoding.ASCII
  • Encoding.BigEndianUnicode
  • Encoding.Unicode – this is UTF16
  • Encoding.UTF7
  • Encoding.UTF32
  • Encoding.UTF8

Once you’ve got hold of an encoding you can call its GetBytes method to return the byte array representation of a string. You can use this method whenever another method requires a byte array input instead of a string.

For backward compatibility the positions 0-127 are the same in most encoding types. These cover the standard English alphabet – both lower and upper case -, the numbers, punctuation plus some other characters. So if you only take characters from this range then the byte values in the array will be the same. You can view the ASCII characters here: ASCII character set.

The following function will print the same values for both the ASCII and Chinese encoding types:

string input = "I am feeling great";
byte[] asciiEncoded = Encoding.ASCII.GetBytes(input);
Console.WriteLine("Ascii");
foreach (byte b in asciiEncoded)
{
	Console.WriteLine(b);
}

Encoding chinese = Encoding.GetEncoding("Chinese");
byte[] chineseEncoded = chinese.GetBytes(input);
Console.WriteLine("Chinese");
foreach (byte b in chineseEncoded)
{
	Console.WriteLine(b);
}

If you’re trying to ASCII-encode a Unicode string which contains non-ASCII characters then you’ll get see the ASCII byte value of 63, i.e. ‘?’:

string input = "öåä I am feeling great";
byte[] asciiEncoded = Encoding.ASCII.GetBytes(input);
Console.WriteLine("Ascii");
foreach (byte b in asciiEncoded)
{
	Console.WriteLine(b);
}

The first 3 positions will print 63 as the Swedish ‘öåä’ characters cannot be handled by ASCII. E.g. whenever you visit a website and see question marks and other funny characters instead of proper text then you know that there’s an encoding problem: the page has been encoded with an encoding type that’s not available on the user’s computer when viewed.

View all posts related to Globalization here.

Getting the list of supported Encoding types in .NET

Every text file and string is encoded using one of many encoding standards. Normally .NET will handle encoding automatically but there are times when you need to dig into the internals for encoding and decoding. It’s very simple to retrieve the list of supported encoding types, a.k.a code pages in .NET:

EncodingInfo[] codePages = Encoding.GetEncodings();
foreach (EncodingInfo codePage in codePages)
{
	Console.WriteLine("Code page ID: {0}, IANA name: {1}, human-friendly display name: {2}", codePage.CodePage, codePage.Name, codePage.DisplayName);
}

Example output:

Code page ID: 37, IANA name: IBM037, human-friendly display name: IBM EBCDIC (US-Canada)
Code page ID: 852, IANA name: ibm852, human-friendly display name: Central European (DOS)

View all posts related to Globalization here.

Big Data: using Amazon Kinesis with the AWS.NET API Part 4: reading from the stream

Introduction

In the previous post of this series on Amazon Kinesis we looked at how to publish messages to a Kinesis stream. In this post we’ll see how to extract them. We’ll create a Kinesis Client application.

It’s necessary to extract the messages from the stream as it only stores them for 24 hours. Also, a client application can filter, sort and validate the incoming messages according to some pre-defined rules.

Our demo client will be a completely separate application. We’ll see some duplication of code but that has a good reason. We’ll want to simulate a scenario where the producers are completely different applications, such as a bit of JavaScript on a web page, a Java web service, an iOS app or some other smart device. Our Kinesis producer is good for demo purposes but in reality the producer can be any software that can send HTTP requests. However, if both your producer and client apps are of the same platform then of course go ahead and introduce a common layer in the project.

Open the demo app we’ve been working on and let’s get to it.

The Kinesis client

Add a new C# console application called AmazonKinesisConsumer. Add the same NuGet packages as before:

AWS SDK NuGet package

Json.NET NuGet package

Add a reference to the System.Configuration library already now. Also, add the same configurations to app.config:

<appSettings>
        <add key="AWSProfileName" value="demo-aws-profile"/>
	<add key="KinesisStreamName" value="test-stream"/>
</appSettings>

Insert the same WebTransaction object again:

public class WebTransaction
{
	public long UtcDateUnixMs { get; set; }
	public string CustomerName { get; set; }
	public string Url { get; set; }
	public string WebMethod { get; set; }
	public int ResponseTimeMs { get; set; }
}

We’ll make it easy for us here and re-use the same WebTransaction object as we know that we’ll be able to parse the incoming JSON string. However, as mentioned in the first post of this series, be prepared for different message formats and property names. If you can, always aim for some well accepted standard such as JSON or XML, they are easy to handle in code. E.g. if the incoming JSON has different names – including variations in casing – then you can use the JSON library to match the property names:

public class WebTransaction
{
	[JsonProperty(PropertyName="dateUtc")]
	public long UtcDateUnixMs { get; set; }
	[JsonProperty(PropertyName = "cust")]
	public string CustomerName { get; set; }
	[JsonProperty(PropertyName = "url")]
	public string Url { get; set; }
	[JsonProperty(PropertyName = "method")]
	public string WebMethod { get; set; }
	[JsonProperty(PropertyName = "responseTime")]
	public int ResponseTimeMs { get; set; }
}

In any case you can assume that the messages will come in as strings – or bytes that can be converted to strings to be exact.

Do not assume anything about the ordering of the messages. Messages in Kinesis are handled in parallel and they will be extracted in batches by a Kinesis client. So for best performance and consistency aim for short, independent and self-contained messages. If ordering matters or if the total message is too large for Kinesis then you can send extra properties with the messages such as “Index” and “Total” to indicate the order like “1 of 10”, “2 of 10” etc. so that the client can collect and sort them.

The shard iterator

Insert the following private method to Program.cs:

private static void ReadFromStream()
{
	AmazonKinesisConfig config = new AmazonKinesisConfig();
	config.RegionEndpoint = Amazon.RegionEndpoint.EUWest1;
	AmazonKinesisClient kinesisClient = new AmazonKinesisClient(config);
	String kinesisStreamName = ConfigurationManager.AppSettings["KinesisStreamName"];

	DescribeStreamRequest describeRequest = new DescribeStreamRequest();
	describeRequest.StreamName = kinesisStreamName;

	DescribeStreamResponse describeResponse = kinesisClient.DescribeStream(describeRequest);
	List<Shard> shards = describeResponse.StreamDescription.Shards;

	foreach (Shard shard in shards)
	{
		GetShardIteratorRequest iteratorRequest = new GetShardIteratorRequest();
		iteratorRequest.StreamName = kinesisStreamName;
		iteratorRequest.ShardId = shard.ShardId;
		iteratorRequest.ShardIteratorType = ShardIteratorType.TRIM_HORIZON;

		GetShardIteratorResponse iteratorResponse = kinesisClient.GetShardIterator(iteratorRequest);
		string iteratorId = iteratorResponse.ShardIterator;

		while (!string.IsNullOrEmpty(iteratorId))
		{
			GetRecordsRequest getRequest = new GetRecordsRequest();
			getRequest.Limit = 1000;
			getRequest.ShardIterator = iteratorId;

			GetRecordsResponse getResponse = kinesisClient.GetRecords(getRequest);
			string nextIterator = getResponse.NextShardIterator;
			List<Record> records = getResponse.Records;

			if (records.Count > 0)
			{
				Console.WriteLine("Received {0} records. ", records.Count);
				foreach (Record record in records)
				{
					string json = Encoding.UTF8.GetString(record.Data.ToArray());
					Console.WriteLine("Json string: " + json);
				}
			}
			iteratorId = nextIterator;
		}
	}
}

Let’s see what’s going on here. The first 4 lines are identical to what we had in the Kinesis producer: we simply configure the access to Kinesis. We use the Kinesis client object to describe the Kinesis stream referred to by its name in the DescribeStreamRequest object. We then extract the available shards in the stream.

We then iterate through the shards. For each shard – we have only one – we need to request a shard iterator. A shard iterator will help us iterate through the messages in the shard. We specify where we want to start using the ShardIteratorType enumeration. TRIM_HORIZON means that we want to start with the oldest message first and work our way up from there. This is like a first-in-first-out collection and is probably the most common way to extract the messages. Other enumeration values are the following:

  • AT_SEQUENCE_NUMBER: read from the position indicated by a sequence number
  • AFTER_SEQUENCE_NUMBER: start right after the sequence number
  • LATEST: always read the most recent data in the shard

If you recall from the previous post a sequence number is an ID attached to each message.

Once we get the iterator we extract its ID which is used in the GetRecordsRequest object. Note that we enter a while loop and check if the iterator ID is null or empty. The GetRecordsResponse will also include an iterator ID which is a handle to read any subsequent messages. This will normally be an endless loop allowing us to always listen to messages from the stream. If there are any records returned by the iterator we print the number of records and the pure string data of each record. We expect to see some JSON messages. We don’t yet parse them to our WebTransaction messages, we’ll continue with processing the raw data in the next post.

Call this method from Main:

static void Main(string[] args)
{
	ReadFromStream();

	Console.WriteLine("Main done...");
	Console.ReadKey();
}

Test

Let’s see this in action. Make AmazonKinesisCustomer the start-up project of the solution and start the application. If you followed the previous post of this series within 24 hours of completing this post then you should see the messages you sent to the Kinesis stream before – recall that Kinesis keeps the messages for 24 hours. I can see the following JSON messages:

Messages extracted from Kinesis

Keep the application running. You’ll see that the loop just continues to run and the application doesn’t stop – we’re effectively waiting for new messages from the sream. Back in VS right-click AmazonKinesisProducer, select Debug, Start new instance. You’ll have two console windows up and running:

Kinesis producer and client running in parallel

Enter a couple of new web transactions into the producer and send it to Kinesis. The client should fetch them in a couple of seconds:

New records extracted from Kinesis

Great, we have now a highly efficient cloud-based message handler in form of Amazon Kinesis, a Kinesis client and a Kinesis producer. We’ve also seen that although the stream is located in the cloud, the producers and clients can be virtually any platforms that are able to handle HTTP messages. Therefore don’t get bogged down by the thought that you have to use Amazon components with Kinesis.

In the next post we’ll add some validation to the incoming messages.

View all posts related to Amazon Web Services and Big Data here.

Extracting information from a text using Regex and Match in C# .NET

Occasionally you need to extract some information from a free-text form. Consider the following text:

First name: Elvis
Last name: Presley
Address: 1 Heaven Street
City: Memphis
State: TN
Zip: 12345

Say you need to extract the full name, the address, the city, the state and the zip code into a pipe-delimited string. The following function is one option:

private static string ExtractJist(string freeText)
{
	StringBuilder patternBuilder = new StringBuilder();
	patternBuilder.Append(@"First name: (?<fn>.*$)\n")
		.Append("Last name: (?<ln>.*$)\n")
		.Append("Address: (?<address>.*$)\n")
		.Append("City: (?<city>.*$)\n")
		.Append("State: (?<state>.*$)\n")
		.Append("Zip: (?<zip>.*$)");
	Match match = Regex.Match(freeText, patternBuilder.ToString(), RegexOptions.Multiline | RegexOptions.IgnoreCase);
	string fullname = string.Concat(match.Groups["fn"], " ", match.Groups["ln"]);
	string address = match.Groups["address"].ToString();
	string city = match.Groups["city"].ToString();
	string state = match.Groups["state"].ToString();
	string zip = match.Groups["zip"].ToString();
	return string.Concat(fullname, "|", address, "|", city, "|", state, "|", zip);
}

Call the function as follows:

string source = @"First name: Elvis
Last name: Presley
Address: 1 Heaven Street
City: Memphis
State: TN
Zip: 12345
";
string extracted = ExtractJist(source);

View all posts related to string and text operations here.

Big Data: using Amazon Kinesis with the AWS.NET API Part 3: sending to the stream

Introduction

In the previous post of this series we set up the Kinesis stream, installed the .NET SDK and inserted a very simple domain object into a Kinesis producer console application.

In this post we’ll start posting to our Kinesis stream.

Open the AmazonKinesisProducer demo application and let’s get to it.

Preparations

We cannot just call the services within the AWS SDK without proper authentication. This is an important reference page to handle your credentials in a safe way. We’ll the take the recommended approach and create a profile in the SDK Store and reference it from app.config.

This series is not about AWS authentication so we won’t go into temporary credentials but later on you may be interested in that option too. Since we’re programmers and it takes a single line of code to set up a profile we’ll go with the programmatic options. Add the following line to Main:

Amazon.Util.ProfileManager.RegisterProfile("demo-aws-profile", "your access key id", "your secret access key");

I suggest you remove the code from the application later on in case you want to distribute it. Run the application and it should execute without exceptions. Next open app.config and add the appSettings section with the following elements:

<appSettings>
        <add key="AWSProfileName" value="demo-aws-profile"/>
	<add key="KinesisStreamName" value="test-stream"/>
</appSettings>

Generating web transactions

We’ll create web transaction objects using the console. Add the following private methods to Program.cs:

private static List<WebTransaction> GetTransactions()
{
	List<WebTransaction> webTransactions = new List<WebTransaction>();
	Console.WriteLine("Enter your web transactions. ");
	Console.Write("URL - type 'x' and press Enter to exit: ");
	string url = Console.ReadLine();
	while (url != "x")
	{
		WebTransaction wt = new WebTransaction();
		wt.Url = url;
		wt.UtcDateUnixMs = ConvertToUnixMillis(DateTime.UtcNow);

		Console.Write("Customer name: ");
		string customerName = Console.ReadLine();
		wt.CustomerName = customerName;

		Console.Write("Response time (ms): ");
		int responseTime = Convert.ToInt32(Console.ReadLine());
		wt.ResponseTimeMs = responseTime;

		Console.Write("Web method: ");
		string method = Console.ReadLine();
		wt.WebMethod = method;

		webTransactions.Add(wt);

		Console.Write("URL - enter 'x' and press enter to exit: ");
		url = Console.ReadLine();
	}
	return webTransactions;
}

private static long ConvertToUnixMillis(DateTime dateToConvert)
{
	return Convert.ToInt64(dateToConvert.Subtract(new DateTime(1970,1,1,0,0,0,0)).TotalMilliseconds);
}

GetTransactions() is a simple loop you must have done in your C# course #2 or 3. Note that I haven’t added any validation, such as the feasibility of the web method or the response time. So be gentle and enter “correct” values later on during the tests. ConvertToUnixMillis simply converts a date to a UNIX timestamp in milliseconds. .NET4.5 doesn’t natively support UNIX dates but it’s coming in C# 6.

Sending the transactions to the stream

We’ll send each message one by one in the following method which you can add to Program.cs:

private static void SendWebTransactionsToQueue(List<WebTransaction> transactions)
{
	AmazonKinesisConfig config = new AmazonKinesisConfig();
	config.RegionEndpoint = Amazon.RegionEndpoint.EUWest1;
	AmazonKinesisClient kinesisClient = new AmazonKinesisClient(config);
	String kinesisStreamName = ConfigurationManager.AppSettings["KinesisStreamName"];

	foreach (WebTransaction wt in transactions)
	{
		string dataAsJson = JsonConvert.SerializeObject(wt);
		byte[] dataAsBytes = Encoding.UTF8.GetBytes(dataAsJson);
		using (MemoryStream memoryStream = new MemoryStream(dataAsBytes))
		{
			try
			{						
				PutRecordRequest requestRecord = new PutRecordRequest();
				requestRecord.StreamName = kinesisStreamName;
				requestRecord.PartitionKey = "url-response-times";
				requestRecord.Data = memoryStream;

				PutRecordResponse responseRecord = kinesisClient.PutRecord(requestRecord);
				Console.WriteLine("Successfully sent record {0} to Kinesis. Sequence number: {1}", wt.Url, responseRecord.SequenceNumber);
			}
			catch (Exception ex)
			{
				Console.WriteLine("Failed to send record {0} to Kinesis. Exception: {1}", wt.Url, ex.Message);
			}
		}
	}
}

You’ll need to reference the System.Configuration library to make this work.

We first configure our access to Kinesis using the AmazonKinesisConfig object. We set the region to the one where we set up the stream. In my case it’s eu-west-1, but you may need to provide something else. We also read the stream name from app.config.

Then for each of the WebTransaction objects we go through the following process:

  • Get the JSON representation of the object
  • Convert the JSON to a byte array
  • Put byte array into a MemoryStream
  • We set up the PutRecordRequest object with the stream name, the partition key and the data we want to publish
  • The record is sent to Kinesis using the PutRecord method
  • If it’s successful then we print the sequence number of the message
  • Otherwise we print an exception message

What is a partition key? It is a key to group the data within a stream into shards. And a sequence number? It is a unique ID that each message gets upon insertion into the stream. This page with the key concepts will be a good friend of yours while working with Kinesis.

Test

We can call these functions from Main as follows:

List<WebTransaction> webTransactions = GetTransactions();
SendWebTransactionsToQueue(webTransactions);

Console.WriteLine("Main done...");
Console.ReadKey();

Start the application and create a couple of WebTransaction objects using the console. Then if all goes well you should see a printout similar to the following in the console window:

Messages sent to Kinesis stream console output

Let’s see what the Kinesis dashboard is telling us:

PutRequest count on AWS Kinesis dashboard

The PutRequest graph increased to 5 – and since I then put one more message to the stream the number decreased to 1:

PutRequest count on AWS Kinesis dashboard

In the next post we’ll see how to read the messages from the stream.

View all posts related to Amazon Web Services and Big Data here.

Replacing substrings using Regex in C# .NET: phone number example

In this post we saw an application of Regex and Match to reformat date strings. Let’s check another example: change the following phone number formats…:

  • (xxx)xxx-xxxx: (123)456-7890
  • (xxx) xxx-xxxx: (123) 456-7890
  • xxx-xxx-xxxx: 123-456-7890
  • xxxxxxxxxx: 1234567890

…into (xxx) xxx-xxxx.

Here’s a possible solution:

private static string ReformatPhone(string phone)
{
	Match match = Regex.Match(phone, @"^\(?(\d{3})\)?[\s\-]?(\d{3})\-?(\d{4})$");
	return string.Format("({0}) {1}-{2}", match.Groups[1], match.Groups[2], match.Groups[3]);
}

If you call this function with any of the above 4 examples it will return “(123) 456-7890”.

View all posts related to string and text operations here.

Phone and ZIP format checker examples from C# .NET

It’s a common task to check the validity of an input in any application. Some inputs must follow a specific format, like phone numbers and ZIP codes. Here come two regular expression examples that will help you with that:

private static bool IsValidPhone(string candidate)
{
	return Regex.IsMatch(candidate, @"^\(?\d{3}\)?[\s\-]?\d{3}\-?\d{4}$");
}

The above regular expression will return true for the following formats:

  • (xxx)xxx-xxxx: (123)456-7890
  • (xxx) xxx-xxxx: (123) 456-7890
  • xxx-xxx-xxxx: 123-456-7890
  • xxxxxxxxxx: 1234567890

Let’s now see a possible solution for a US ZIP code:

private static bool IsValidZip(string candidate)
{
	return Regex.IsMatch(candidate, @"^\d{5}(\-\d{4})?$");
}

This function returns true for the following formats:

  • xxxxx-xxxx: 01234-5678
  • xxxxx: 01234

View all posts related to string and text operations here.

Using Amazon Kinesis with the AWS.NET API Part 2: stream, NET SDK and domain setup

Introduction

In the previous post we went through an introduction of Amazon Kinesis. We established that Kinesis is an ideal out-of-the-box starting point for your Big Data analysis needs. It takes a lot of burden off your shoulders regarding scaling, maintenance and redundancy. We also said that Kinesis only provided a 24-hour storage of the messages so we’ll need to build an application, a Kinesis Client, that will ultimately process the messages in some way: filtering, sorting, saving etc.

In this post we’ll create our Kinesis stream and install the AWS SDK.

Creating the stream

Log onto the AWS console and locate the Kinesis service:

Kinesis icon on AWS console

Probably every service you use with AWS has a region that you can select in the top right section of the UI:

Amazon region selector

These regions are significant for the services with a couple of exceptions. E.g. S3, which we’ll discuss in the next series, is global and has less regional significance. In the case of Kinesis when you create a new stream then that stream will be available in the selected region. It doesn’t, however, mean that users cannot send messages to a stream in Ireland from Australia. However, it will take Australian users a bit more time to send messages to this stream than it does for a user in the UK. Also, we’ll see later that the region must be specified in code when configuring the access to AWS otherwise you may be wondering why your stream cannot be located.

You can create a new stream with the Create Stream button:

Create stream button on Amazon Kinesis

Note that Kinesis has at the time of writing this post no free-tier pricing. According to the current pricing table example it costs about $4.22 a day to process 1000 messages per second where each message is 5KB in size. We will only test with some individual messages in this series so the total cost should be minimal.

Enter a stream name and set the number of shards to 1, that will be enough for testing:

Creating a test stream in Kinesis

Press “Create” and you’ll be redirected to the original screen with the list of streams. Your new stream should be in “CREATING” status:

Kinesis stream in creating status

…which will shortly switch to “ACTIVE”.

You can click the name of the stream which will open a screen with a number of performance indicators:

Kinesis stream performance indicators

We haven’t processed any messages yet so there are no put or get requests yet.

That’s it, we have a functioning Kinesis stream up and running. Let’s move on.

Installing the SDK

The Amazon .NET SDK is available through NuGet. Open Visual Studio 2012/2013 and create a new C# console application called AmazonKinesisProducer. The purpose of this application will be to send messages to the stream. In reality the message producer could by any type of application:

  • A website
  • A Windows/Android/iOS app
  • A Windows service
  • A traditional desktop app

…i.e. any application that’s capable of sending HTTP/S PUT requests to a service endpoint. We’ll keep it simple and not waste time with view-related tasks.

Install the following NuGet package:

AWS SDK NuGet package

We’ll also be working with JSON data so let’s also install the popular NewtonSoft Json package as well:

Json.NET NuGet package

Domain

In this section we’ll set up the data structure of the messages we’ll be processing. I’ll reuse a simplified version of the messages we had in a real-life project similar to what we’re going through. We’ll pretend that we’re measuring the total response time of web pages that our customers visit.

A real-life solution would involve a JavaScript solution embedded into the HTML of certain pages. That JavaScript will collect data like “transaction start” and “transaction finish” which make it possible to measure the response time of a web page as it’s experienced by a real end user. The JavaScript will then send the transaction data to a web service as JSON.

In our case of course we’ll not go through all that. We’ll pre-produce our data points using a C# object and JSON.

Insert the following class into the Kinesis producer app:

public class WebTransaction
{
	public long UtcDateUnixMs { get; set; }
	public string CustomerName { get; set; }
	public string Url { get; set; }
	public string WebMethod { get; set; }
	public int ResponseTimeMs { get; set; }
}

Dates are easiest to handle as UNIX timestamps in milliseconds as most systems will be able to handle it. DateTime in .NET4.5 doesn’t have any built-in support for UNIX timestamps but that’s easy to solve. Formatted date strings are more difficult to parse so we won’t go with that. You’ll probably understand the purpose of the other properties.

We’ll start sending message to our stream in the next post.

View all posts related to Amazon Web Services and Big Data here.

Elliot Balynn's Blog

A directory of wonderful thoughts

Software Engineering

Web development

Disparate Opinions

Various tidbits

chsakell's Blog

WEB APPLICATION DEVELOPMENT TUTORIALS WITH OPEN-SOURCE PROJECTS

Once Upon a Camayoc

ARCHIVED: Bite-size insight on Cyber Security for the not too technical.