Using the Redis NoSql database with .NET Part 3: lists in Redis
April 7, 2017 Leave a comment
Introduction
In the previous post we first installed the Redis server as a Windows service. It’s cumbersome having to execute redis-server.exe every time we want to communicate with the database so we’ll have it running as a service. Then we went on to explore the string data type in Redis. String is the most versatile data type since we can store pretty much anything as a string in one way or another: messages like “Hello”, JSON serialised custom objects, base 64 encoded byte arrays for e.g. file content, numbers etc. We looked at a couple of string-related commands like STRLEN or APPEND.
In this post we will first add Redis to the environment variables so that we can reach the executables without navigating to the Redis folder in the command prompt. Then we’ll look at how lists are implemented in Redis.
We’ll start with a side note: the Redis commands are not case sensitive, so GET is the same as get, APPEND is the same as append etc. It is like in SQL where we can write INSERT or insert and the DB engine will understand what we want. I’ll stick to the full-caps notation to differentiate Redis commands from the their arguments and other parts of the blog text.
Adding Redis to the environment variables
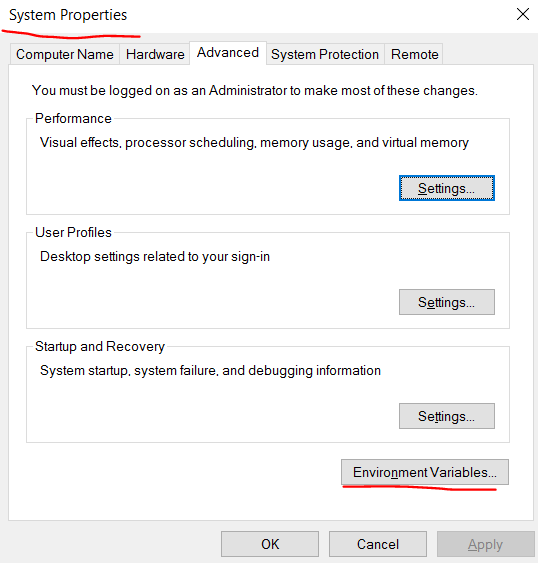
It’s a bit tedious having to navigate to the Redis folder in a command prompt if we want to run the redis-cli executable. We can easily fix that by adding the full path of the folder to the PATH environment variable. Open System Properties and click on the Environment Variables button:
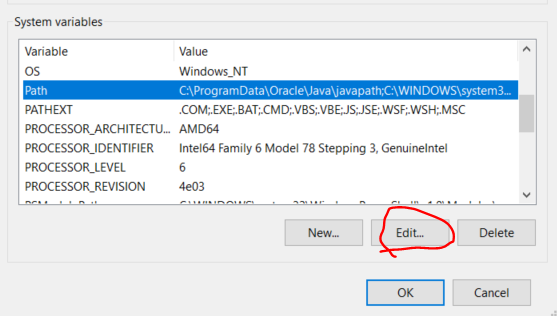
Look for the variable called Path in the System variables list. Click on the Edit button:
I have Windows 10 so the Edit environmental variables looks as follows. Click on Edit and add the full path of the Redis folder in the new slot:

If you have an earlier version of Windows then you have to append the folder path to the existing paths delimited by a semi-colon. Click OK on all the windows opened related to environmental variables.
Now open a new command prompt and type “redis-cli” and that should be enough to start the command line interface to the Redis server.
The List data type
Lists are implemented as linked lists in Redis. This means that each element is linked to the previous and next element. Linked lists are efficient if a new element must be added to the head or tail of the list but not when inserting one somewhere in between by and index. Getting the first and last items in the list is also very quick but retrieving one by an index is relatively slow since the entire list must be traversed to find the correct item. Linked lists are probably best suited for queues and stacks since those collection types require acting on the first or last element of the list. A Redis list has therefore the same characteristics as other linked lists. Nevertheless the Redis list commands provide index based insertions to and extractions from a list but it’s important to be aware of the speed implications.
We’ll create a to-do list. The LPUSH and RPUSH commands put a new element to the head – left push – and the tail – right push – of the list. Let’s try it:
RPUSH todolist “shopping”
RPUSH todolist “sleeping”
RPUSH todolist “watch TV”
LPUSH todolist “breakfast”
LPUSH todolist “wake up”
The CLI will respond with an integer after every command which indicates the size of the list after the insertion.
We can retrieve the items using the LRANGE command which accepts the start and end indexes. The indexes are 0-based like in arrays. We can provide an index which is out of range, Redis will just return the items before that:
LRANGE todolist 0 10
…which gives
1) “wake up”
2) “breakfast”
3) “shopping”
4) “sleeping”
5) “watch TV”
Note that both the start and end indexes are inclusive. So the command…
LRANGE todolist 0 3
…returns 4 elements:
1) “wake up”
2) “breakfast”
3) “shopping”
4) “sleeping”
LRANGE can be called with negatives indexes as well, see further down for some examples.
So we started with “shopping” and appended two more after it with RPUSH. Then we inserted two more to-do items before it using LPUSH. Note that GET doesn’t work on lists:
GET todolist
…gives the following response:
WRONGTYPE Operation against a key holding the wrong kind of value
We can get the size of the list with LLEN:
LLEN todolist
…which responds with “(integer) 5”.
With LINSERT we can insert an item before or after another one in the list:
LINSERT todolist BEFORE “shopping” “wash”
LINSERT todolist AFTER “sleeping” “walk”
Here’s the new list:
1) “wake up”
2) “breakfast”
3) “wash”
4) “shopping”
5) “sleeping”
6) “walk”
7) “watch TV”
We can get an element by an index with LINDEX:
LINDEX todolist 3
…which retrieves “shopping”.
The opposite of RPUSH and LPUSH are RPOP and LPOP which pop an item from the tail or head of the list. Popping means that we delete and item and also return it. So if want to pop an item from the tail, i.e. right, end of the list then we write…:
RPOP todolist
…which returns “watch TV”, and this action item is not part of the list any more:
1) “wake up”
2) “breakfast”
3) “wash”
4) “shopping”
5) “sleeping”
6) “walk”
LPOP does the same to the head of the list:
LPOP todolist
…which returns “wake up” and it is now gone from the list:
1) “breakfast”
2) “wash”
3) “shopping”
4) “sleeping”
5) “walk”
LREM removes a number of located elements from the head of the list. There’s a count and a search argument. There’s no separate RREM command. Instead, the count argument of LREM can be negative which then removes the elements from the tail. Let’s first add some more items to the list:
RPUSH todolist “shopping” “wash” “shopping” “sleeping” “walk” “shopping”
Here’s how to remove the first two occurrences of “shopping”:
LREM todolist 2 “shopping”
LREM returns an integer which indicates the number of items removed, i.e. 2 in the above case. Here’s how to remove the last 5 occurrences of “walk”:
LREM todolist -5 “walk”
…which returns 2 since there are only 2 “walk” items in the entire list.
Let’s revisit LRANGE for a bit. So we currently have the following 7 items in the list:
1) “breakfast”
2) “wash”
3) “sleeping”
4) “wash”
5) “shopping”
6) “sleeping”
7) “shopping”
LRANGE 0 0
…returns the first element:
1) “breakfast”
LRANGE 0 1
…returns the first two elements:
1) “breakfast”
2) “wash”
So think of the integer arguments as the offset start and stop values. So with 0 0 we start with the item 0 and stop with item 0 inclusive, hence the first item as the value from the list.
A negative value for the stop offset will exclude elements from the tail of the list. 0 -2 cuts off the last item:
LRANGE todolist 0 -2
…returns…
1) “breakfast”
2) “wash”
3) “sleeping”
4) “wash”
5) “shopping”
6) “sleeping”
LRANGE todolist -6 3
…returns…
1) “wash”
2) “sleeping”
3) “wash”
That’s enough for now, we’ll continue in the next post.
You can view all posts related to data storage on this blog here.

