Introduction to ASP.NET Core part 22: wiring up EntityFramework Core
March 9, 2017 Leave a comment
Introduction
In the previous post we looked at a new feature in .NET Core called view components. A view component is sort of a mixture between full-blown controllers and partial views. It has its own controller and view but is supposed to be viewed and invoked within a parent view. A view component controller can have its own dependencies injected into it via its constructor just like in the case of “real” controllers. It is a normal C# class which can have its own functions and input parameters. We can implement either the Invoke or InvokeAsync function to return a view depending on whether we want to execute the view component asynchronously or not. The view returned by a view component controller is a cshtml file which will be rendered within a parent view. Thus a view component offers a lot more flexibility than a partial view when breaking out a smaller part of a view.
In this post we’ll start looking at EntityFramework Core which will provide a data store to our application.
Note that this is only a basic introduction to the EntityFramework. We’ll only go through the setup and how to insert and select books in a database. EF is a large topic and it’s been taken up in other series:
- Introduction to EntityFramework 6
- Domain Driven Design long course with EntityFramework as the backing store
Much of that is still applicable and provides more details. Here we’ll concentrate on the basics of EF Core. A more complete documentation is available here.
EntityFramework (EF) Core installation
.NET Core comes with a matching version of EntityFramework called EntityFramework Core for data access.
We briefly mentioned in the beginning of these series that the appsettings.json file comes with a default connection string as follows:
"ConnectionStrings": {
    "DefaultConnection": "Server=(localdb)\\MSSQLLocalDB;Database=_CHANGE_ME;Trusted_Connection=True;MultipleActiveResultSets=true"
  }
We’ll soon see how this is invoked.
We first need to install 2 NuGet packages: the EntityFramework Core library and the EF tools. Add the following entries to the dependencies section of project.json:
"Microsoft.EntityFrameworkCore.SqlServer": "1.1.0",
"Microsoft.EntityFrameworkCore.Tools": {
      "version": "1.0.0-preview2-final",
      "type": "build"
    }
We’ll also need to add te tooling library to the “tools” section just like we did for the tag helper tools. Our tools section looks as follows after adding the EF Core tooling:
"tools": {
    "Microsoft.AspNetCore.Razor.Tools": "1.0.0-preview2-final",
    "Microsoft.AspNetCore.Server.IISIntegration.Tools": "1.0.0-preview2-final",
    "Microsoft.EntityFrameworkCore.Tools": "1.0.0-preview2-final"
  }
Save project.json and Visual Studio will download the required dependencies.
The local database
To keep things simple we’ll use the SQL Server Express LocalDb as the data store. Open the View menu in Visual Studio and click “SQL Server Object Explorer” menu item to view the database explorer. If you see a database node whose name starts with “(localdb)” then you should be fine:

If it’s not visible then you’ll need to install LocalDb from the Visual Studio installation disk.
Right-click that node and select Properties. This will bring up the properties of this database node. One of the most important properties is the connection string:

This is an ideal test database which can be reached using Windows authentication. If you have access to the SQL Server Management Studio then you can access the database from there as well. The server name will be the value of “DataSource” in the connection string, i.e. “(localdb)\MSSQLLocalDB” in probably most cases:

You should then be able to view the database in the Object Explorer:

So it’s possible to query the database in either the SQL Server Object Explorer in Visual Studio or the SQL Management Studio, whichever you prefer. If you right-click the localdb node in the Object Explorer there’s an item called New Query… which has the same role as New Query in the SQL management studio. Both tools provide access to the tables as well which we’ll create later on.
The DB context
We’ll create our database context from scratch using EF data migrations and C# code in Visual Studio. This approach is called code-first: we have no database to begin with but we declare our data entities in code which EF will translate into tables. A central element in EF data access and data migrations is the database context object. The DB context provides a gateway into the data store and makes CRUD operations and other DB-related operations very smooth without having to write plain SQL.
Add the following class to the Repositories folder:
using DotNetCoreBookstore.Domains;
using Microsoft.EntityFrameworkCore;
using System;
using System.Collections.Generic;
using System.Linq;
using System.Threading.Tasks;

namespace DotNetCoreBookstore.Repositories
{
    public class BookStoreDbContext : DbContext
    {
		public BookStoreDbContext(DbContextOptions dbContextOptions) : base(dbContextOptions)
		{
		}

		public DbSet<Book> Books { get; set; }
	}
}
DbContext in Microsoft.EntityFrameworkCore has in the current version only two constructors: an empty one and one that comes with an options object. Here we just pass the options object to the base DbContext object.
A collection of entities in the context is represented by the DbSet object. Currently we only have a single entity, namely Book so that’s the only one we add here as a DbSet. It will be translated into a DB table later on.
Next we need to register BookStoreDbContext object in Startup.cs. We also have to declare that we want to use SQL Server. The idea with this version of MVC is that we’ll be able to work with a range of different database types and now we need to specifically declare in the ConfigureServices function which data store we’ll be working with. SQL Server is just one of the available options.
Recall that we have a reference to the Configuration object in a private getter:
private IConfiguration Configuration { get; }
Add the following line of code to the ConfigureServices method:
services.AddDbContext<BookStoreDbContext>(dbContextOptionsBuilder => dbContextOptionsBuilder.UseSqlServer(Configuration.GetConnectionString("BookStore")));
You’ll need to bring in the Microsoft.EntityFrameworkCore namespace for the UseSqlServer extension method.
The IServiceCollection interface has a generic AddDbContext method which accepts a type variable. The declared type must derive from DbContext so our BookStoreDbContext object fits this requirement. AddDbContext accepts an Action delegate which in turn has a parameter of type DbContextOptionsBuilder. That’s the dbContextOptionsBuilder parameter you see in the lambda expression. DbContextOptionsBuilder has an extension method called UseSqlServer in the Microsoft.EntityFrameworkCore namespace which declares that we want to use SQL Server, just like the method name suggests. UseSqlServer requires a connection string and the IConfiguration interface provides a convenient access to the connection strings via the GetConnectionString function. We just need to provide the name of the connection string. We have no such connection string declared in appsettings.json yet so let’s add it:
"ConnectionStrings": {
    "DefaultConnection": "Server=(localdb)\\MSSQLLocalDB;Database=_CHANGE_ME;Trusted_Connection=True;MultipleActiveResultSets=true",
    "BookStore": "Server=(localdb)\\MSSQLLocalDB;Database=BookStore;Trusted_Connection=True;MultipleActiveResultSets=true"
  }
We can use the DefaultConnection template as the starting point. The only parameter changed is the name of the database to BookStore.
Creating the database
The database creation commands are issued via the NuGet package manager console. Open the Package manager console by selecting View, Other windows, Package manager console. The Add-Migration command is used to create a database for the first time. EF will detect all DB context objects and their connection strings and will attempt to set up the databases. It’s possible to have multiple DB contexts in a project. In that case it’s mandatory to declare the context name in the Add-Migration command. In our case it’s not necessary since EF will only find BookStoreDbContext but we’ll add this option anyway for documentation purposes. Add-Migration requires a name for the operation which I put as “FirstDatabaseCreation” in the following example:
Add-Migration “FirstDatabaseCreation” -Context “DotNetCoreBookstore.Repositories.BookStoreDbContext”
If all goes well then you should see the following message in the package console:
To undo this action, use Remove-Migration.
EF will insert a folder called Migrations and two files within that folder. One whose name starts with a timestamp followed by the name parameter we added to the Add-Migration command and another class that derives from ModelSnapshot. The FirstDatabaseCreation declares in code which tables to set up in the Up function. The Down function is called when calling Remove-Migration in the package manager console should you want to remove the database or one or more of its tables. Also, the table.Column function has a lot of properties that help us set up the columns. “nullable” is only one of those options. Here’s an example to set the max length of the Author column:
Author = table.Column<string>(nullable: false, maxLength: 500)
The MigrationBuilder object provides a lot of functionality to declare tables, columns, indexes, foreign keys, constraints and a whole range of other DB-related items. If you type “migrationBuilder.” within the Up function then IntelliSense will show you the list of options with descriptive function names like CreateIndex or RenameColumn. It also has an Sql function which accepts a plain SQL query to execute.
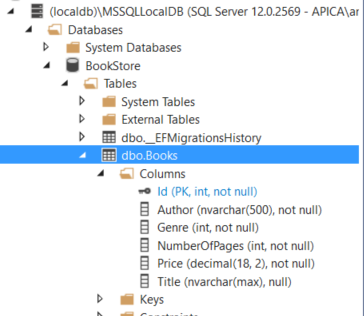
Note how the Id property of the Book entity was translated as the primary key for the Books table. This is due to the convention that if an entity has an Id field of integer then it will be set as the auto-incrementing primary ID field in the database. You’ll also see how the Genre enum was converted into an integer column. That’s probably not too clever and Genre should be converted into a normal object with its own ID and a secondary key relationship with the parent Book entity. We’ll keep it unchanged now as domain modeling is not part of this series.
The database still hasn’t been created. The migrations file will be the basis for that in the next step. All the declarations in the Up method will be transformed into SQL commands by EF.
The last step for creating the database is running the following command in the package manager console:
Update-Database
If all goes well then it will respond with “Done.”. Refresh the SQL Server Object Explorer window and the new database should be there:
We’ll continue in the next post with a matching repository object.
View the list of MVC and Web API related posts here.

