Messaging with RabbitMQ and .NET review part 2: installation and setup
August 3, 2016 4 Comments
Introduction
In the previous post we we went through a general introduction of RabbitMq and its terminology. RabbitMq is a message broker that helps to solve communication between disparate systems in a reliable and maintainable manner. It is a very fast and highly scalable open-source messaging system which by default supports the AMQP messaging protocol. We discussed the key terms exchange, binding, queue, connection and channel. We also listed the 4 exchange types which are direct, header exchange, topic and fan-out.
In this post we’ll install RabbitMq on Windows. I have Windows 10 on my laptop but the RabbitMq installation package should work equally well on other versions of Windows. The most recent version of RabbitMq at this time of writing this post is 3.6.4. There may be a later version by the time you read this.
Installation
Go to the RabbitMq installation page. Click the following Windows installer link:

We’ll first need to install Erlang. Click the following link on the Windows installation page:

This will get you to the Erlang page. Select either the 32 or 64 bit installation package depending on your system…:

This will download an installation package. Go through the installation process accepting the defaults. Then go back to the Windows installation on the RabbitMQ page and click the following link:

Again, go through the installation process and accept the defaults.
RabbitMQ is by default installed into the Program Files folder in a sub-folder called RabbitMQ Server. Open a Windows command prompt and navigate to the following folder:
C:\Program Files\RabbitMQ Server\rabbitmq_server-3.6.4\sbin
If there’s a newer version number then update the folder name in the command prompt accordingly.
Issue the following command:
rabbitmqctl status
You’ll get a series of status messages in JSON format:

The fact that we received all this text confirms that the RabbitMQ server is up and running and can receive messages.
Next enter the following command:
rabbitmq-plugins enable rabbitmq_management
This command will enable the management UI for RabbitMQ for easy administration. The answer should say that a number of plugins have been enabled:

Open a web browser and navigate to the following URL:
This will open the RabbitMQ management login page. The default username and password is “guest”. Click around in the menu a bit. You won’t see much happening yet as there are no queues, no messages, no exchanges etc. Under the Exchanges link you’ll find the 4 exchange types we listed in the introduction. You can add exchanges and queues and other stuff directly here in the GUI but we’ll do that in code instead later on.
We’re done with the RabbitMQ server setup.
There are two things in the management UI that we can take a look at now: users and virtual hosts.
Virtual hosts
A virtual host in RabbitMq is kind of a namespace with which you can isolate groups of exchanges and queues. There can be a virtual host called “accounting” and another called “management”. The exchanges and queues of the accounting virtual host won’t normally have access to those assigned to the management namespace. In other words a virtual host is a container for related resources. Even users can be assigned per virtual host.
Click on the Admin menu item and then select the virtual hosts option:

By default there’s a root namespace called “/” with an admin user called “guest” assigned to it. That’s how we logged in in the first place.
Click on “Add a new virtual host” and name it “accounting”:
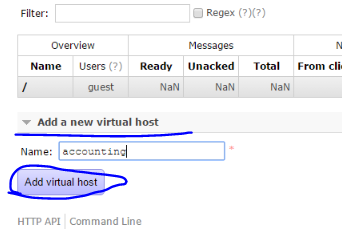
There are no users assigned to it yet. We’ll create a new user in the next section.
Users
Click on the Admin menu item and then select the Users option:

Click on “Add a user” and create a new user called “accountant” with the password “accountant”. I’ll also add the tag “accountancy”:

Click on the name of the new user in the list of users so that we can edit it further. We can in particular set the permissions for this new user:
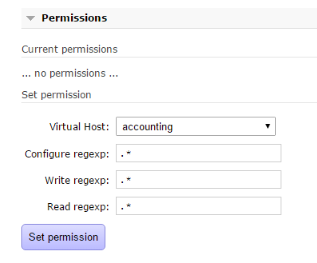
The Virtual Host drop-down list allows us to set which virtual host the new user will have access to. Then come three text fields with regular expressions: configure, write and read. These specify the configure, write and read access level to the resources in the given virtual host for the user. The default value is “.*” which allows access to all exchanges and queues in the virtual host. E.g. the regular expression “^account” means that we give access to all resources whose name starts with “account”. We’ll leave the full access variants untouched for now. Click the Set permission button.
If you’re done creating the new user then log out from the RabbitMq management GUI. Now try to log in with the new user “accountant”. It should fail. The reason is that our tag “accounting” doesn’t follow the set of predefined roles available in RabbitMq. Log in with “guest” and go to the update section for the user “accountant”. Click the “?” link to the right of the Tags field to see which predefined values there are and what roles are attached to them:
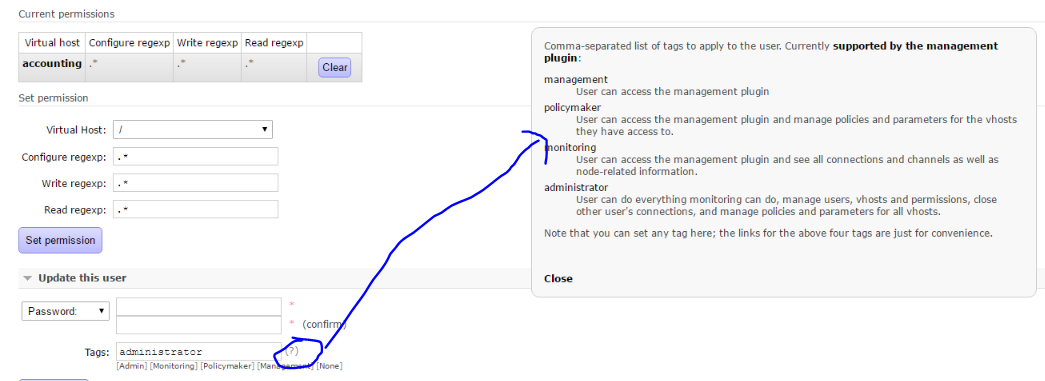
Update the user to have the “administrator” tag. Log out and log in with the “accountant” user. It should work this time. Note that this tag is only necessary for the management UI. If you don’t want the user to be able to log on to the management console then give it a new tag like “accountancy” which has no predefined roles attached.
In the next post we’ll start looking at some C# code.
View the list of posts on Messaging here.


Thanks Andras, very informative
Unfortunately, I can’t get RabbitMQ to work on my Windows 10. When I run rabbitmqctl status, I get the error:
* TCP connection succeeded but Erlang distribution failed
* Authentication failed (rejected by the remote node), please check the Erlang cookie
Googled it and every attempt to fix has failed.
Long time since you posted, but others might end up here from Google.
You (probably) did not run the installer as admin. This leaves the erlang cookie in a wrong folder.
Solution:
1. Uninstall rabbitMQ
2. Re-install RabbitMQ but this time run installer as admin
See https://www.rabbitmq.com/windows-quirks.html for further windows quirks
Hi, I have tried installing on two different windows 10 workstations.
I am using:
otp_win64_20.2.exe
rabbitmq-server-3.7.2.exe
Each time I run on either workstation I get the same error.
I have run each install as the admin.
I see cookies under and they are in sync under c:\users\username, c:\windows, and C:\Windows\System32\config\systemprofile
Please help, I can not understand why this is happening.
C:\Program Files\RabbitMQ Server\rabbitmq_server-3.7.2\sbin>rabbitmqctl status
Status of node rabbit@WHITEKNIGHT-HP …
Error: unable to perform an operation on node ‘rabbit@WHITEKNIGHT-HP’. Please see diagnostics information and suggestions below.
Most common reasons for this are:
* Target node is unreachable (e.g. due to hostname resolution, TCP connection or firewall issues)
* CLI tool fails to authenticate with the server (e.g. due to CLI tool’s Erlang cookie not matching that of the server)
* Target node is not running
In addition to the diagnostics info below:
* See the CLI, clustering and networking guides on http://rabbitmq.com/documentation.html to learn more
* Consult server logs on node rabbit@WHITEKNIGHT-HP
DIAGNOSTICS
===========
attempted to contact: [‘rabbit@WHITEKNIGHT-HP’]
rabbit@WHITEKNIGHT-HP:
* connected to epmd (port 4369) on WHITEKNIGHT-HP
* epmd reports node ‘rabbit’ uses port 25672 for inter-node and CLI tool traffic
* TCP connection succeeded but Erlang distribution failed
* Authentication failed (rejected by the remote node), please check the Erlang cookie
Current node details:
* node name: ‘rabbitmqcli33@WHITEKNIGHT-HP’
* effective user’s home directory: C:\Users\WhiteKnight
* Erlang cookie hash: 0GbRAhLGCw9qS+B89gjBaQ==