Using Amazon RedShift with the AWS .NET API Part 4: code beginnings
March 26, 2015 Leave a comment
Introduction
In the previous post we looked into how to connect to the Amazon RedShift master node using a tool called WorkBenchJ. We also went through some very basic Postgresql statements and tested an equally basic aggregation script.
In this post we’ll install the .NET SDK and start building some test code.
Note that we’ll be concentrating on showing and explaining the technical code examples related to AWS. We’ll ignore software principles like SOLID and layering so that we can stay focused. It’s your responsibility to organise your code properly. There are numerous posts on this blog that take up topics related to software architecture.
Installing the SDK
If you already have the .NET AWS SDK installed then you can ignore the installation bit of this section. You’ll only need to create a new project in Visual Studio.
The Amazon .NET SDK is available through NuGet. Open Visual Studio 2012/2013 and create a new C# console application called RedShiftDemo. The purpose of this application will be to demonstrate the different parts of the SDK around RedShift. In reality the RedShift handler could be any type of application:
- A website
- A Windows/Android/iOS app
- A Windows service
- etc.
…i.e. any application that’s capable of sending HTTP/S requests to a service endpoint and interpret the response. We’ll keep it simple and not waste time with view-related tasks.
Install the following NuGet package:

Preparations
We cannot just call the services within the AWS SDK without proper authentication. This is an important reference page to handle your credentials in a safe way. We’ll the take the recommended approach and create a profile in the SDK Store and reference it from app.config.
This series is not about AWS authentication so we won’t go into temporary credentials but later on you may be interested in that option too. Since we’re programmers and it takes a single line of code to set up a profile we’ll go with the programmatic options. Add the following line to Main:
Amazon.Util.ProfileManager.RegisterProfile("demo-aws-profile", "your access key id", "your secret access key");
I suggest you remove the code from the application later on in case you want to distribute it. Run the application and it should execute without exceptions. Next open app.config and add the appSettings section with the following elements:
<appSettings>
        <add key="AWSProfileName" value="demo-aws-profile"/>
</appSettings>
Declaring the RedShift handle
We’ll put all our test code into a separate class. Insert a cs file called RedShiftDemoService. We’ll need a method to build a handle to the service which is of type IAmazonRedshift:
private IAmazonRedshift GetRedShiftClient()
{
	return new AmazonRedshiftClient(RegionEndpoint.EUWest1);
}
Note that we didn’t need to provide our credentials here. They will be extracted automatically using the profile name in the config file. You may need to adjust the region according to your preferences. This handle provides the entry point into a very long list of operations: get a list of clusters, create a snapshot, modify security settings, add new nodes to the cluster, reboot a cluster, etc. In case you need to carry out something with the cluster then IAmazonRedshift is your best friend. We cannot possibly go through all that in a post. We’ll concentrate on possibly the 3 most important tasks: get a list of clusters, create a new cluster and terminate one.
You may be asking “wait a minute, aren’t we going to execute SQL statements against the cluster?” Yes, but that’s not done through an IAmazonRedshift object. We’ll discuss how it’s done in the next post.
First demo: getting the list of clusters
Let’s first find out what clusters we have in RedShift. This is almost a trivial task:
public void DescribeRedShiftClusters()
{
	using (IAmazonRedshift redshiftClient = GetRedShiftClient())
	{
		DescribeClustersResponse describeClustersResponse = redshiftClient.DescribeClusters();
		List<Cluster> redshiftClusters = describeClustersResponse.Clusters;
		foreach (Cluster cluster in redshiftClusters)
		{
			Console.WriteLine("Cluster id: {0}", cluster.ClusterIdentifier);
			Console.WriteLine("Cluster status: {0}", cluster.ClusterStatus);
			Console.WriteLine("Cluster creation date: {0}", cluster.ClusterCreateTime);
			Console.WriteLine("Cluster DB name: {0}", cluster.DBName);
		}
	}
}
Notice the return type of “DescribeClusters()”, DescribeClustersResponse. Request and Response objects are abound in the Amazon SDK, this is one example. There’s actually an overload of DescribeClusters which accepts a DescribeClustersRequest object. The DescribeClustersResponse object allows you to filter the query. E.g. you can look for a cluster by its ID using the DescribeClustersResponse.ClusterIdentifier property.
Let’s call this from Main:
static void Main(string[] args)
{
	RedShiftDemoService demoService = new RedShiftDemoService();
	demoService.DescribeRedShiftClusters();

	Console.WriteLine("Main done...");
	Console.ReadKey();
}
If you have at least one RedShift cluster in the selected region then the above bit of code will describe some basic cluster characteristics: its ID, the main DB name, the creation date in UTC and the cluster status.
Second demo: start a new cluster
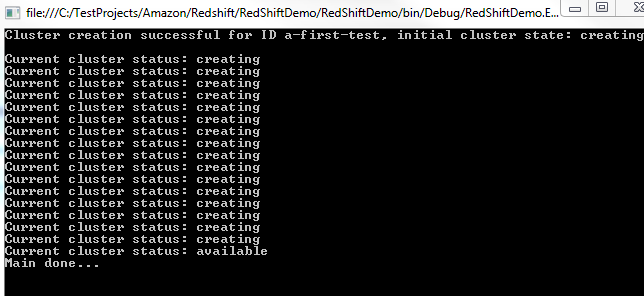
The CreateClusterRequest object is where you declare what type of RedShift cluster you’d like to build. Here’s a code example that you can add to RedShiftDemoService.cs. It sets up a basic cluster similar to the one we created in the GUI before. You’ll recognise the properties of CreateClusterRequest which correspond to the fields in the RedShift GUI such as DB name, master user name or cluster type. We constantly check the cluster after its creation until it has reached state “available”.
static void Main(string[] args)
public void StartNewCluster(string clusterName)
{
	using (IAmazonRedshift redshiftClient = GetRedShiftClient())
	{
		try
		{
			CreateClusterRequest createClusterRequest = new CreateClusterRequest();

			createClusterRequest.ClusterIdentifier = clusterName;
			createClusterRequest.DBName = "urls";
			createClusterRequest.MasterUsername = "your master node username";
			createClusterRequest.MasterUserPassword = "your master node password";
			createClusterRequest.Port = 5439;

			createClusterRequest.NodeType = "dw2.large";
			createClusterRequest.ClusterType = "single-node";

			CreateClusterResponse createClusterResponse = redshiftClient.CreateCluster(createClusterRequest);
			Cluster newCluster = createClusterResponse.Cluster;
			string status = newCluster.ClusterStatus;
			Console.WriteLine("Cluster creation successful for ID {0}, initial cluster state: {1}", clusterName, status);

			while (status != "available")
			{
				DescribeClustersRequest describeClustersRequest = new DescribeClustersRequest() { ClusterIdentifier = newCluster.ClusterIdentifier };
				DescribeClustersResponse describeClustersResponse = redshiftClient.DescribeClusters(describeClustersRequest);
				Cluster firstMatch = describeClustersResponse.Clusters[0];
				status = firstMatch.ClusterStatus;
				Console.WriteLine("Current cluster status: {0}", status);
				Thread.Sleep(5000);
			}
		}
		catch (AmazonRedshiftException e)
		{
			Console.WriteLine("Cluster creation has failed.");
			Console.WriteLine("Amazon error code: {0}",
				string.IsNullOrEmpty(e.ErrorCode) ? "None" : e.ErrorCode);
			Console.WriteLine("Exception message: {0}", e.Message);
		}
	}
}
Call it from Main:
static void Main(string[] args)
{
	RedShiftDemoService demoService = new RedShiftDemoService();
	demoService.StartNewCluster("a-first-test");

	Console.WriteLine("Main done...");
	Console.ReadKey();
}
You’ll see something like this in the console window:
Third demo: terminate a cluster
Cluster termination is also very straightforward using the DeleteClusterRequest object:
public void TerminateCluster(string clusterName)
{
	using (IAmazonRedshift redshiftClient = GetRedShiftClient())
	{
		try
		{
			DeleteClusterRequest deleteClusterRequest = new DeleteClusterRequest() { ClusterIdentifier = clusterName, SkipFinalClusterSnapshot = true };
			DeleteClusterResponse deleteClusterResponse = redshiftClient.DeleteCluster(deleteClusterRequest);
			Cluster deletedCluster = deleteClusterResponse.Cluster;
			Console.WriteLine("Cluster termination successful for cluster {0}, status after termination: {1}", clusterName, deletedCluster.ClusterStatus);
		}
		catch (AmazonRedshiftException e)
		{
			Console.WriteLine("Cluster termination has failed.");
			Console.WriteLine("Amazon error code: {0}",
				string.IsNullOrEmpty(e.ErrorCode) ? "None" : e.ErrorCode);
			Console.WriteLine("Exception message: {0}", e.Message);
		}
	}
}
Call it from Main:
static void Main(string[] args)
{
	RedShiftDemoService demoService = new RedShiftDemoService();
	demoService.TerminateCluster("a-first-test");

	Console.WriteLine("Main done...");
	Console.ReadKey();
}
…and you’ll see that status will be “deleting” after the deletion request has been sent to AWS.

We’ll start connecting to the RedShift cluster through ODBC and C# in the next post.
View all posts related to Amazon Web Services and Big Data here.

