Introduction to Amazon Code Pipeline with Java part 7: the third party action user signup process
May 7, 2016 Leave a comment
Introduction
In the previous post we went through an overview of third party actions in Amazon CodePipeline. They are similar to custom plugins in other CI tools like TeamCity and Jenkins. However, their structure, architecture and deployment are very different. The third party action developer must be aware of the job agent and how it communicates with an Amazon CodePipeline endpoint to pull new jobs and process them in some way. The job agent is the connecting tissue between CodePipeline and your backend services. You can deploy multiple job agents for load balancing.
In this post we’ll continue looking at the communication flow between the third party action and CodePipeline.
The third party signup process
We’ll now look at what happens when a CodePipeline customer selects your custom third party action from the list of available actions:
- The customer is redirected to a website that you created where the they can fill in various fields that will be necessary for the action to be completed
- You are responsible for building this website and you’ll need to submit this link when you apply for AWS to include your action in their list. This web link is called the external configuration URL. In our own case the configuration URL is https://loadtest.apicasystem.com/awscodepipeline/login. The link must be https otherwise it will not be approved by AWS
- This is the link that’s tied to the Connect button we’ve seen before:

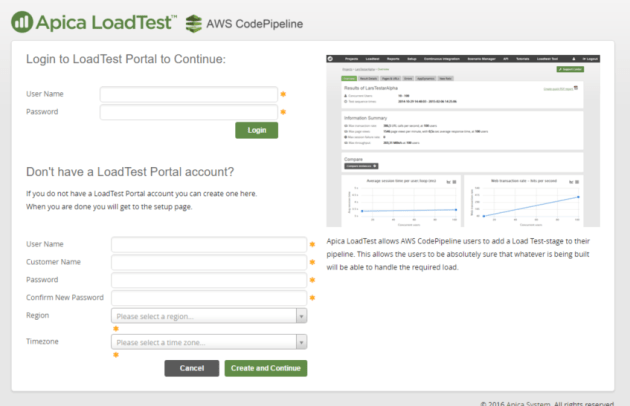
- We’ve also seen an example for this external configuration page, here’s the one for our own:
- An additional information that is sent during this redirect is related to AWS authentication: CP passes along a JSON document with a client ID and a client token. A one-time correlation ID is also sent along which will be important when responding to CP. The JSON document is URL encoded, see more details below
- The client ID is a GUID or UUID like 70837c7e-040f-456d-b06f-6de9eb9ee2a4, the client token can look something like VOxvtAwjhd8HvoXLCKdAFIOSNPOaQkar01SZJCK9fsdfdsfgKW8fVoOKvfrHLtwU4oh2 and the request correlation ID is also a GUID
- You as the third party action developer are responsible for storing these values and map the AWS client to a user in your system. The purpose is to be able to find the user in your data store based on the AWS authentication credentials later when a job is about to be executed. We at Apica store the CodePipeline job details along with the AWS credentials in a dedicated table and link each row to our “normal” User table
- The user will fill in whatever you’ve specified on your external configuration page
- The external configuration page must then have a button to direct the user back to CodePipeline – more details on this further below
- The user has configured your third party action. The pipeline can be executed and your third party action will be part of it in the form of an action within a stage


The signup JSON document
When the user connects to your external configuration site then CP sends a HTTP POST to it with a URL encoded extension. If your external configuration URL is https://www.mysite.com/aws then the web request that reaches your configuration site will have the following format:
https://www.mysite.com/aws/?request=url-encoded-JSON-object
The JSON object contains a number of properties:
- “clientId”: the AWS client ID
- “clientToken”: the AWS client token
- “pipelineContext”: a sub-document which in turn includes 3 properties: the pipeline name “pipelineName”, the stage name “stageName” and the action name “actionName”
- “actionConfiguration”: this will be an empty list the first time a user connects to your website with the connect link. It contains the list of custom properties that are needed for the third party action to execute its tasks. This list is populated when the user wants to update an action. The list can contain a number of key-value pairs with the key being the name of the property and the value the value of the property. In our case the key can be “presetName” which refers to an object in our system and the value will be the name of the preset, such as “standard short test USA”
- “region”: the AWS region like us-west-2 where the pipeline has been set up
- “requestId”: the one-time correlation ID
An example for a populated actionConfiguration property can look like this:
"actionConfiguration": [{
                                                          "key": "LoadtestPresetName",
                                                          "value": "standard short test usa"
                             },
                             {
                                                          "key": "LoadtestScenarioFileName",
                                                          "value": "CLDemo_Start.class"
                             }],
You’ll need to URL decode the request string before you can read these properties.
The sign-up response to AWS CodePipeline
The external configuration page must have a means of directing the user back to the CP page, typically a button. See the “Create and continue” button in the above screenshot.
The confirmation URL for the redirect will be https://console.aws.amazon.com/codepipeline/partner-integration/redirect?response=url-encoded-JSON-object
The URL-encoded JSON input in the response URL must contain the following properties:
- “result”: a string, typically “succeeded”
- “requestId”: the same correlation ID that was sent in the first POST from CP
- “actionConfiguration”: a list of key-value pairs with the configuration details for your third party action. You can see an example above. Each entry must have a “key” and a “value” property. They are parsed in the CP console as follows:
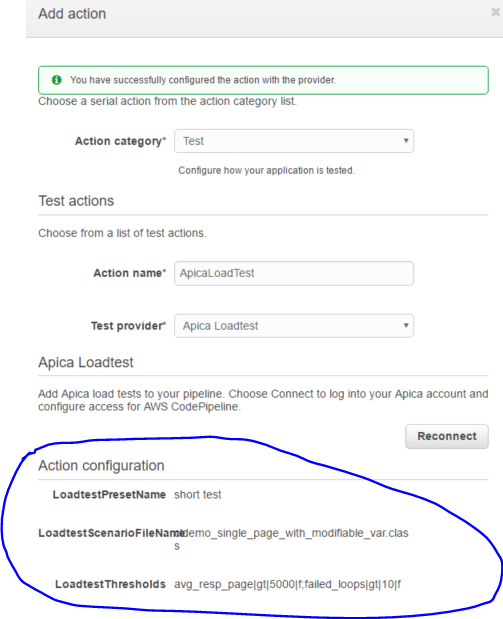

This is the end of the signup process.
In the next post we’ll see in details what happens when your third party action is executed in a pipeline. We’ll turn our attention back to the job agent.
View all posts related to Amazon Web Services and Big Data here.

