RabbitMQ in .NET: data serialisation II
June 9, 2014 Leave a comment
Introduction
In the previous post we discussed the basics of data serialisation in RabbitMQ .NET. We saw how to set the content type and the object type.
This last point is open for further investigation as the object type is a string which gives you a very wide range of possibilities how to define the object type.
In this post we’ll take a closer look at the scenario where the same .NET objects are used in both the sender and receiver applications.
We’ll build on the demo we started in the previous post so have it ready.
.NET objects
If it’s guaranteed that both the Sender and the Receiver are .NET projects then it’s the fully qualified object name will be a good way to denote the object type. We had the following object in the SharedObjects library:
[Serializable]
public class Customer
{
     public string Name { get; set; }
}
Insert another one which has the same structure but a different classname:
[Serializable]
public class NewCustomer
{
	public string Name { get; set; }
}
Add two new Console apps to the Serialisation folder: DotNetObjectSender and DotNetObjectReceiver. Add the following NuGet packages to both:
Add a reference to the SharedObjects library to both console apps.
Let’s set up the queue. Add the following field to CommonService.cs:
public static string DotNetObjectQueueName = "DotNetObjectQueue";
Add the following code to Program.cs Main of the Sender app:
CommonService commonService = new CommonService();
IConnection connection = commonService.GetRabbitMqConnection();
IModel model = connection.CreateModel();
model.QueueDeclare(CommonService.DotNetObjectQueueName, true, false, false, null);
Run DotNetObjectSender so that the queue is created. You can check in the RabbitMq management console if the queue has been set up. Comment out the call to model.QueueDeclare.
We’ll go with JSON serialisation as it is very popular, but XML and binary serialisation are also possible. We saw in the previous post how to serialise and deserialise in those formats if you need them. Add the following method to Program.cs of the Sender and call it from Main:
private static void RunDotNetObjectDemo(IModel model)
{
	Console.WriteLine("Enter customer name. Quit with 'q'.");
	while (true)
	{
		string customerName = Console.ReadLine();
		if (customerName.ToLower() == "q") break;
		Random random = new Random();
		int i = random.Next(0, 2);
		String type = "";
		String jsonified = "";
		if (i == 0)
		{
			Customer customer = new Customer() { Name = customerName };
			jsonified = JsonConvert.SerializeObject(customer);
			type = customer.GetType().AssemblyQualifiedName;
		}
		else
		{
			NewCustomer newCustomer = new NewCustomer() { Name = customerName };
			jsonified = JsonConvert.SerializeObject(newCustomer);
			type = newCustomer.GetType().AssemblyQualifiedName;
		}

		IBasicProperties basicProperties = model.CreateBasicProperties();
		basicProperties.SetPersistent(true);
		basicProperties.ContentType = "application/json";
		basicProperties.Type = type;
		byte[] customerBuffer = Encoding.UTF8.GetBytes(jsonified);
		model.BasicPublish("", CommonService.DotNetObjectQueueName, basicProperties, customerBuffer);
	}
}
All of this should be familiar from the previous discussion. We randomly construct either a Customer or a NewCustomer and set the message type accordingly.
Let’s turn to the Receiver and see how it can read the message. Add the following code to Main in Program.cs:
CommonService commonService = new CommonService();
IConnection connection = commonService.GetRabbitMqConnection();
IModel model = connection.CreateModel();
ReceiveDotNetObjects(model);
…where ReceiveDotNetObjects looks as follows:
private static void ReceiveDotNetObjects(IModel model)
{
	model.BasicQos(0, 1, false);
	QueueingBasicConsumer consumer = new QueueingBasicConsumer(model);
	model.BasicConsume(CommonService.DotNetObjectQueueName, false, consumer);
	while (true)
	{
		BasicDeliverEventArgs deliveryArguments = consumer.Queue.Dequeue() as BasicDeliverEventArgs;
		string objectType = deliveryArguments.BasicProperties.Type;
		Type t = Type.GetType(objectType);
		String jsonified = Encoding.UTF8.GetString(deliveryArguments.Body);
		object rawObject = JsonConvert.DeserializeObject(jsonified, t);
		Console.WriteLine("Object type: {0}", objectType);

		if (rawObject.GetType() == typeof(Customer))
		{
			Customer customer = rawObject as Customer;
			Console.WriteLine("Customer name: {0}", customer.Name);
		}
		else if (rawObject.GetType() == typeof(NewCustomer))
		{
			NewCustomer newCustomer = rawObject as NewCustomer;
			Console.WriteLine("NewCustomer name: {0}", newCustomer.Name);
		}
		model.BasicAck(deliveryArguments.DeliveryTag, false);
	}
}
We extract the fully qualified name of the incoming object from the full assembly name and deserialise it accordingly.
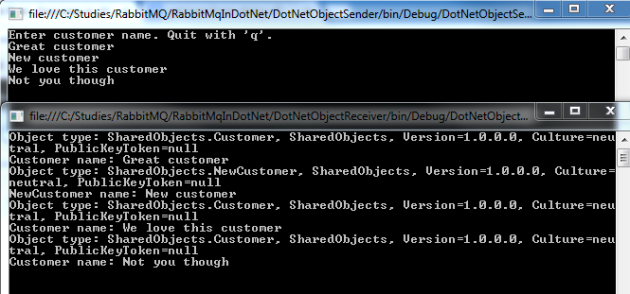
Start the Sender application. The right-click the Receiver project in Visual Studio, Select Debug, Create new instance. You’ll have two console windows up and running. Start sending customer names to the Receiver. You’ll see that the Receiver can handle both Customer and NewCustomer objects:
Read the next part in this series here.
View the list of posts on Messaging here.


