Reading the outcome of parallel loops in .NET C#

The Parallel.For() and Parallel.ForEach() methods both return a ParallelLoopResult object. This object has two properties which you can use to read if Break or Stop have been called:

  • IsCompleted: true if all loop iterations have been completed without calling either Break or Stop
  • LowestBreakIteration: the index of the lowest iteration in which the Break method was called

Example:

ParallelLoopResult parallelLoopResult =
        Parallel.For(0, 10, (int index, ParallelLoopState parallelLoopState) =>
	{
		if (index == 5)
		{
			parallelLoopState.Stop();
		}
	});

Console.WriteLine("IsCompleted: {0}", parallelLoopResult.IsCompleted);
Console.WriteLine("BreakValue: {0}", parallelLoopResult.LowestBreakIteration.HasValue?       parallelLoopResult.LowestBreakIteration.Value
				: -1);

The properties return the following values:

IsCompleted (IC): false
LowestBreakIteration.HasValue (LBI): false

Here come the possible value pairs and their meaning:

  • IC true, LBI false: all iterations were completed without breaking or stopping
  • IC false, LBI false: Stop was called
  • IF false, LBI true: Break was called

View the list of posts on the Task Parallel Library here.

Determine if two sequences are equal with LINQ C#

Say you have two sequences of objects:

string[] bands = { "ACDC", "Queen", "Aerosmith", "Iron Maiden", "Megadeth", "Metallica", "Cream", "Oasis", "Abba", "Blur", "Chic", "Eurythmics", "Genesis", "INXS", "Midnight Oil", "Kent", "Madness", "Manic Street Preachers"							 , "Noir Desir", "The Offspring", "Pink Floyd", "Rammstein", "Red Hot Chili Peppers", "Tears for Fears"						 , "Deep Purple", "KISS"};

string[] bandsTwo = { "ACDC", "Queen", "Aerosmith", "Iron Maiden", "Megadeth", "Metallica", "Cream", "Oasis", "Abba", "Blur", "Chic", "Eurythmics", "Genesis", "INXS", "Midnight Oil", "Kent", "Madness", "Manic Street Preachers"							 , "Noir Desir", "The Offspring", "Pink Floyd", "Rammstein", "Red Hot Chili Peppers", "Tears for Fears"						 , "Deep Purple", "KISS"};

If you’d like to check whether the two sequences include the same elements then you can use the SequenceEquals LINQ operator:

bool equal = bands.SequenceEqual(bandsTwo);
Console.WriteLine(equal);

This approach works fine for objects where a good built-in comparer exists. .NET can compare two strings, two integers etc. and determine whether they are equal. It’s a different story with reference types such as your custom objects:

public class Singer
{
	public int Id { get; set; }
	public string FirstName { get; set; }
	public string LastName { get; set; }
	public int BirthYear { get; set; }
}

IEnumerable<Singer> singers = new List<Singer>() 
			{
				new Singer(){Id = 1, FirstName = "Freddie", LastName = "Mercury", BirthYear=1964}
				, new Singer(){Id = 2, FirstName = "Elvis", LastName = "Presley", BirthYear = 1954}
				, new Singer(){Id = 3, FirstName = "Chuck", LastName = "Berry", BirthYear = 1954}
				, new Singer(){Id = 4, FirstName = "Ray", LastName = "Charles", BirthYear = 1950}
				, new Singer(){Id = 5, FirstName = "David", LastName = "Bowie", BirthYear = 1964}
			};

IEnumerable<Singer> singersTwo = new List<Singer>() 
			{
				new Singer(){Id = 1, FirstName = "Freddie", LastName = "Mercury", BirthYear=1964}
				, new Singer(){Id = 2, FirstName = "Elvis", LastName = "Presley", BirthYear = 1954}
				, new Singer(){Id = 3, FirstName = "Chuck", LastName = "Berry", BirthYear = 1954}
				, new Singer(){Id = 4, FirstName = "Ray", LastName = "Charles", BirthYear = 1950}
				, new Singer(){Id = 5, FirstName = "David", LastName = "Bowie", BirthYear = 1964}
			};

bool singersEqual = singers.SequenceEqual(singersTwo);
Console.WriteLine(singersEqual);

This will yield false as .NET doesn’t automatically know how to compare the Singer objects in a way that makes sense to you. Instead, the comparison will be based on reference equality.

This is where an overloaded version of SequenceEquals enters the scene, one where you can specify your own equality comparer:

public class DefaultSingerComparer : IEqualityComparer<Singer>
{
	public bool Equals(Singer x, Singer y)
	{
		return x.Id == y.Id;
	}

	public int GetHashCode(Singer obj)
	{
		return obj.Id.GetHashCode();
	}
}

So we say that if the singer Ids are equal then the Singer objects are equal:

bool singersEqual = singers.SequenceEqual(singersTwo, new DefaultSingerComparer());
Console.WriteLine(singersEqual);

…which yields true.

You can view all LINQ-related posts on this blog here.

RabbitMQ in .NET: data serialisation II

Introduction

In the previous post we discussed the basics of data serialisation in RabbitMQ .NET. We saw how to set the content type and the object type.

This last point is open for further investigation as the object type is a string which gives you a very wide range of possibilities how to define the object type.

In this post we’ll take a closer look at the scenario where the same .NET objects are used in both the sender and receiver applications.

We’ll build on the demo we started in the previous post so have it ready.

.NET objects

If it’s guaranteed that both the Sender and the Receiver are .NET projects then it’s the fully qualified object name will be a good way to denote the object type. We had the following object in the SharedObjects library:

[Serializable]
public class Customer
{
     public string Name { get; set; }
}

Insert another one which has the same structure but a different classname:

[Serializable]
public class NewCustomer
{
	public string Name { get; set; }
}

Add two new Console apps to the Serialisation folder: DotNetObjectSender and DotNetObjectReceiver. Add the following NuGet packages to both:

RabbitMQ new client package NuGet

Newtonsoft JSON.NET NuGet package

Add a reference to the SharedObjects library to both console apps.

Let’s set up the queue. Add the following field to CommonService.cs:

public static string DotNetObjectQueueName = "DotNetObjectQueue";

Add the following code to Program.cs Main of the Sender app:

CommonService commonService = new CommonService();
IConnection connection = commonService.GetRabbitMqConnection();
IModel model = connection.CreateModel();
model.QueueDeclare(CommonService.DotNetObjectQueueName, true, false, false, null);

Run DotNetObjectSender so that the queue is created. You can check in the RabbitMq management console if the queue has been set up. Comment out the call to model.QueueDeclare.

We’ll go with JSON serialisation as it is very popular, but XML and binary serialisation are also possible. We saw in the previous post how to serialise and deserialise in those formats if you need them. Add the following method to Program.cs of the Sender and call it from Main:

private static void RunDotNetObjectDemo(IModel model)
{
	Console.WriteLine("Enter customer name. Quit with 'q'.");
	while (true)
	{
		string customerName = Console.ReadLine();
		if (customerName.ToLower() == "q") break;
		Random random = new Random();
		int i = random.Next(0, 2);
		String type = "";
		String jsonified = "";
		if (i == 0)
		{
			Customer customer = new Customer() { Name = customerName };
			jsonified = JsonConvert.SerializeObject(customer);
			type = customer.GetType().AssemblyQualifiedName;
		}
		else
		{
			NewCustomer newCustomer = new NewCustomer() { Name = customerName };
			jsonified = JsonConvert.SerializeObject(newCustomer);
			type = newCustomer.GetType().AssemblyQualifiedName;
		}
				
		IBasicProperties basicProperties = model.CreateBasicProperties();
		basicProperties.SetPersistent(true);
		basicProperties.ContentType = "application/json";
		basicProperties.Type = type;
		byte[] customerBuffer = Encoding.UTF8.GetBytes(jsonified);
		model.BasicPublish("", CommonService.DotNetObjectQueueName, basicProperties, customerBuffer);
	}
}

All of this should be familiar from the previous discussion. We randomly construct either a Customer or a NewCustomer and set the message type accordingly.

Let’s turn to the Receiver and see how it can read the message. Add the following code to Main in Program.cs:

CommonService commonService = new CommonService();
IConnection connection = commonService.GetRabbitMqConnection();
IModel model = connection.CreateModel();
ReceiveDotNetObjects(model);

…where ReceiveDotNetObjects looks as follows:

private static void ReceiveDotNetObjects(IModel model)
{
	model.BasicQos(0, 1, false);
	QueueingBasicConsumer consumer = new QueueingBasicConsumer(model);
	model.BasicConsume(CommonService.DotNetObjectQueueName, false, consumer);
	while (true)
	{			
		BasicDeliverEventArgs deliveryArguments = consumer.Queue.Dequeue() as BasicDeliverEventArgs;
		string objectType = deliveryArguments.BasicProperties.Type;
		Type t = Type.GetType(objectType);				
		String jsonified = Encoding.UTF8.GetString(deliveryArguments.Body);
		object rawObject = JsonConvert.DeserializeObject(jsonified, t);
		Console.WriteLine("Object type: {0}", objectType);
								
		if (rawObject.GetType() == typeof(Customer))
		{
			Customer customer = rawObject as Customer;
			Console.WriteLine("Customer name: {0}", customer.Name);
		}
		else if (rawObject.GetType() == typeof(NewCustomer))
		{
			NewCustomer newCustomer = rawObject as NewCustomer;
			Console.WriteLine("NewCustomer name: {0}", newCustomer.Name);
		}
		model.BasicAck(deliveryArguments.DeliveryTag, false);
	}
}

We extract the fully qualified name of the incoming object from the full assembly name and deserialise it accordingly.

Start the Sender application. The right-click the Receiver project in Visual Studio, Select Debug, Create new instance. You’ll have two console windows up and running. Start sending customer names to the Receiver. You’ll see that the Receiver can handle both Customer and NewCustomer objects:

Dot net objects serialised

Read the next part in this series here.

View the list of posts on Messaging here.

Determine if all elements fulfil a condition in a sequence with LINQ C#

Say we have the following string list:

string[] bands = { "ACDC", "Queen", "Aerosmith", "Iron Maiden", "Megadeth", "Metallica", "Cream", "Oasis", "Abba", "Blur", "Chic", "Eurythmics", "Genesis", "INXS", "Midnight Oil", "Kent", "Madness", "Manic Street Preachers"
, "Noir Desir", "The Offspring", "Pink Floyd", "Rammstein", "Red Hot Chili Peppers", "Tears for Fears"
, "Deep Purple", "KISS"};

Say we’d like to determine if all elements in the sequence fulfil a certain condition. Nothing could be easier using the All operator:

bool all = bands.All(b => b.StartsWith("A"));
Console.WriteLine(all);

This yields false as not all band names start with an A. However, their length is certainly longer than 2 characters so the below query returns true:

bool all = bands.All(b => b.Length > 2);
Console.WriteLine(all);

You can view all LINQ-related posts on this blog here.

RabbitMQ in .NET: data serialisation I

Introduction

We went through the basic messaging concepts in RabbitMQ in a previous series. You’ll find the links to all installment on this page. In this new series we’ll continue our discussion of messaging concepts in RabbitMQ. If you’re entirely new to RabbitMq then you should at least skim through the foundations as I won’t provide any detailed description of the code that was covered before.

So far we’ve kept our messages simple in order to concentrate on the key concepts: we only sent simple text messages to RabbitMQ. However, in reality we normally send objects with properties and not only text. The object needs to be serialised into a byte array so that it can be included in the message body. On the receiving end the serialised object needs to be deserialised.

We’re going to look at different ways of achieving this goal.

Most of the posts on RabbitMQ on this blog are based on the work of RabbitMQ guru Michael Stephenson.

Demo: JSON serialisation

I’m using Visual Studio 2012 for this demo but you’ll probably be fine with VS 2010 and VS 2013 as well. If you followed along the original tutorial then you can open that solution. Otherwise create a new blank solution in Visual Studio and insert a solution folder called Serialisation. Add two Console app projects to this folder: SerialisationSender and SerialisationReceiver. Add the following NuGet packages to both:

RabbitMQ new client package NuGet

Newtonsoft JSON.NET NuGet package

Add a class library called SharedObjects and add the same RabbitMq NuGet package to it as above. Insert an object called Customer:

public class Customer
{
     public string Name { get; set; }
}

Set a reference to this class library from both the Sender and the Receiver console apps. Insert another class called CommonService to the class library:

public class CommonService
{
	private string _hostName = "localhost";
	private string _userName = "guest";
	private string _password = "guest";

	public static string SerialisationQueueName = "SerialisationDemoQueue";

	public IConnection GetRabbitMqConnection()
	{
		ConnectionFactory connectionFactory = new ConnectionFactory();
		connectionFactory.HostName = _hostName;
		connectionFactory.UserName = _userName;
		connectionFactory.Password = _password;

		return connectionFactory.CreateConnection();
	}
}

Next we’ll set up the queue for this demo. Add the following code to Program.cs in the Sender app:

static void Main(string[] args)
{
	CommonService commonService = new CommonService();
	IConnection connection = commonService.GetRabbitMqConnection();
	IModel model = connection.CreateModel();
	SetupSerialisationMessageQueue(model);
}

private static void SetupSerialisationMessageQueue(IModel model)
{
	model.QueueDeclare(CommonService.SerialisationQueueName, true, false, false, null);
}

Run the Sender app and check in the RabbitMQ management console that the queue has been created. Comment out the call to SetupSerialisationMessageQueue in Main. Insert the following method to the Sender:

private static void RunSerialisationDemo(IModel model)
{
	Console.WriteLine("Enter customer name. Quit with 'q'.");
	while (true)
	{
		string customerName = Console.ReadLine();
		if (customerName.ToLower() == "q") break;
		Customer customer = new Customer() { Name = customerName };
		IBasicProperties basicProperties = model.CreateBasicProperties();
		basicProperties.SetPersistent(true);
		String jsonified = JsonConvert.SerializeObject(customer);
		byte[] customerBuffer = Encoding.UTF8.GetBytes(jsonified);
		model.BasicPublish("", CommonService.SerialisationQueueName, basicProperties, customerBuffer);
	}
}

There’s not much magic going on: we enter the customer name, construct the Customer object, build a JSON object out of it, get the byte array out of the JSON string and send it to the message queue. Add a call to this method from Main:

RunSerialisationDemo(model);

In the SerialisationReceiver add the following code to Program.cs:

static void Main(string[] args)
{
	CommonService commonService = new CommonService();
	IConnection connection = commonService.GetRabbitMqConnection();
	IModel model = connection.CreateModel();
	ReceiveSerialisationMessages(model);
}

private static void ReceiveSerialisationMessages(IModel model)
{
	model.BasicQos(0, 1, false);
	QueueingBasicConsumer consumer = new QueueingBasicConsumer(model);
	model.BasicConsume(CommonService.SerialisationQueueName, false, consumer);
	while (true)
	{
		BasicDeliverEventArgs deliveryArguments = consumer.Queue.Dequeue() as BasicDeliverEventArgs;
		String jsonified = Encoding.UTF8.GetString(deliveryArguments.Body);
		Customer customer = JsonConvert.DeserializeObject<Customer>(jsonified);
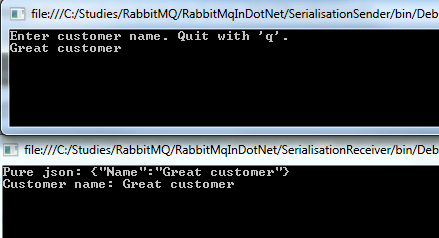
		Console.WriteLine("Pure json: {0}", jsonified);
		Console.WriteLine("Customer name: {0}", customer.Name);
		model.BasicAck(deliveryArguments.DeliveryTag, false);
	}
}

This bit of code should look very familiar to you from the foundations course: we’re listening to a specific queue and extract any incoming messages. The only new bit is that we deserialise the JSON string into a Customer object.

The demo is ready to run. Start the Sender app. Then right-click the Receiver project, select Debug, Start new Instance. You’ll have two console window up and running. Start sending customer names to the Receiver from the Sender:

Serialised message output

The same technique works for more complicated objects with multiple properties and other objects as properties.

Setting the content type

JSON is not the only message type we can send. The other two common message formats are XML and binary. No matter how you format your message, it will need to be sent to the message queue as a byte array. We’ve already seen how to serialise a JSON message. For XML you can use the following method:

private byte[] SerialiseIntoXml(Customer customer)
{
	MemoryStream memoryStream = new MemoryStream();
	XmlSerializer xmlSerialiser = new XmlSerializer(customer.GetType());
	xmlSerialiser.Serialize(memoryStream, customer);
	memoryStream.Flush();
	memoryStream.Seek(0, SeekOrigin.Begin);
        return memoryStream.GetBuffer();
}

…and to get the Customer object from a binary format you can use the following method:

private byte[] SerialiseIntoBinary(Customer customer)
{
	MemoryStream memoryStream = new MemoryStream();
	BinaryFormatter binaryFormatter = new BinaryFormatter();
	binaryFormatter.Serialize(memoryStream, customer);
	memoryStream.Flush();
	memoryStream.Seek(0, SeekOrigin.Begin);
	return memoryStream.GetBuffer();
}

Note that the Customer object must be serialisable for these to work:

[Serializable]
public class Customer
{
      public string Name { get; set; }
}

So now we can serialise our message in 3 different ways. It now makes sense to denote the content type of the message. The IBasicProperties interface has a property called ContentType where you can set the MIME type using the well-known values below:

  • JSON: application/json
  • XML: text/xml
  • Binary: application/octet-stream

Example:

[Serializable]
IBasicProperties basicProperties = model.CreateBasicProperties();
basicProperties.SetPersistent(true);
basicProperties.ContentType = "application/json";

The properties are sent along in the BasicPublish method so the MIME type is preserved.

On the client side you can read the MIME type as follows:

BasicDeliverEventArgs deliveryArguments = consumer.Queue.Dequeue() as BasicDeliverEventArgs;
string contentType = deliveryArguments.BasicProperties.ContentType;

Also, the client will need to deserialise the message. We’ve already seen how to do that in the case of the JSON format. For XML you can have the following helper method:

private Customer DeserialiseFromXml(byte[] messageBody)
{
	MemoryStream memoryStream = new MemoryStream();
	memoryStream.Write(messageBody, 0, messageBody.Length);
	memoryStream.Seek(0, SeekOrigin.Begin);
	XmlSerializer xmlSerialiser = new XmlSerializer(typeof(Customer));
	return xmlSerialiser.Deserialize(memoryStream) as Customer;
}

…and for the binary format you use something like this:

private Customer DeserialiseFromBinary(byte[] messageBody)
{
	MemoryStream memoryStream = new MemoryStream();
	memoryStream.Write(messageBody, 0, messageBody.Length);
	memoryStream.Seek(0, SeekOrigin.Begin);
	BinaryFormatter binaryFormatter = new BinaryFormatter();
	return binaryFormatter.Deserialize(memoryStream) as Customer;
}

Note that the Customer object must be shared between Sender and the Receiver for binary serialisation to work.

Denoting the type of the message

It can happen that the Receiver doesn’t know in advance what type of message is coming, i.e. if it’s a Customer, an Order, a Product etc.

You can solve this issue using the Type property of the IBasicProperties object when sending the message from the Sender. It is a string property:

IBasicProperties basicProperties = model.CreateBasicProperties();
basicProperties.SetPersistent(true);
basicProperties.ContentType = "application/json";
basicProperties.Type = "Customer";

And then you can read the type in the Receiver as follows:

BasicDeliverEventArgs deliveryArguments = consumer.Queue.Dequeue() as BasicDeliverEventArgs;
string contentType = deliveryArguments.BasicProperties.ContentType;
string objectType = deliveryArguments.BasicProperties.Type;

You are free to set the value of the Type property. You can do it in a simple way like above, but the Receiver will need to know those values. In the world of open APIs and automatic documentation generators this shouldn’t be a serious obstacle. Other solutions:

  • Fully qualified name, including the namespace, such as “SharedObjects.Customer”. This is easy to retrieve with the typeof keyword: typeof(Customer).ToString(). This approach is mostly viable within the .NET world, where both the Sender and the Receiver can work with .NET objects
  • Canonical messages where the object type is described using XSD along with the root element. This approach works best if interoperability between disparate systems is a must

We’ll look at the first option in the next post.

View the list of posts on Messaging here.

Determine if a sequence contains a certain element with LINQ C#

Say we have the following string list:

string[] bands = { "ACDC", "Queen", "Aerosmith", "Iron Maiden", "Megadeth", "Metallica", "Cream", "Oasis", "Abba", "Blur", "Chic", "Eurythmics", "Genesis", "INXS", "Midnight Oil", "Kent", "Madness", "Manic Street Preachers"
, "Noir Desir", "The Offspring", "Pink Floyd", "Rammstein", "Red Hot Chili Peppers", "Tears for Fears"
, "Deep Purple", "KISS"};

If you’d like to check if a certain string element is present in the sequence then you can use the Contains operator in LINQ:

bool contains = bands.Contains("Queen");
Console.WriteLine(contains);

This yields true as you might expect.

This was a straightforward case as .NET has a good built-in implementation of string equality. It works just as well with primitive types like int or long. .NET can determine if two integers are equal so the default version of Contains is sufficient.

It is different with your custom objects, such as this one:

public class Singer
{
	public int Id { get; set; }
	public string FirstName { get; set; }
	public string LastName { get; set; }
	public int BirthYear { get; set; }
}

Consider the following list:

IEnumerable<Singer> singers = new List<Singer>() 
			{
				new Singer(){Id = 1, FirstName = "Freddie", LastName = "Mercury", BirthYear=1964}
				, new Singer(){Id = 2, FirstName = "Elvis", LastName = "Presley", BirthYear = 1954}
				, new Singer(){Id = 3, FirstName = "Chuck", LastName = "Berry", BirthYear = 1954}
				, new Singer(){Id = 4, FirstName = "Ray", LastName = "Charles", BirthYear = 1950}
				, new Singer(){Id = 5, FirstName = "David", LastName = "Bowie", BirthYear = 1964}
			};

…and the following code:

Singer s = new Singer() { Id = 2, FirstName = "Elvis", LastName = "Presley", BirthYear = 1954 };
bool containsSinger = singers.Contains(s);
Console.WriteLine(containsSinger);

This will of course yield false as equality is based on references and there’s no element in the sequence with the same reference as “s”. In this case we can use the overloaded version of Contains where you can supply an equality comparer:

public class DefaultSingerComparer : IEqualityComparer<Singer>
{
	public bool Equals(Singer x, Singer y)
	{
		return x.Id == y.Id;
	}

	public int GetHashCode(Singer obj)
	{
		return obj.Id.GetHashCode();
	}
}

So equality is based on the ID. We can rewrite our query as follows:

Singer s = new Singer() { Id = 2, FirstName = "Elvis", LastName = "Presley", BirthYear = 1954 };
bool containsSinger = singers.Contains(s, new DefaultSingerComparer());
Console.WriteLine(containsSinger);

…which yields true.

You can view all LINQ-related posts on this blog here.

Reversing a sequence using the Reverse operator in .NET LINQ

Reversing the order of a sequence with LINQ is extremely simple: just use the Reverse() operator.

Example data structure:

string[] bands = { "ACDC", "Queen", "Aerosmith", "Iron Maiden", "Megadeth", "Metallica", "Cream", "Oasis", "Abba", "Blur", "Chic", "Eurythmics", "Genesis", "INXS", "Midnight Oil", "Kent", "Madness", "Manic Street Preachers"						 , "Noir Desir", "The Offspring", "Pink Floyd", "Rammstein", "Red Hot Chili Peppers", "Tears for Fears"						 , "Deep Purple", "KISS"};

You can use the Reverse operator as follows:

IEnumerable<string> bandsReversed = bands.Reverse();
foreach (string item in bandsReversed)
{
	Console.WriteLine(item);
}

…which will print the above array in reverse order, i.e. starting with KISS and finishing with ACDC.

You can view all LINQ-related posts on this blog here.

Introduction to WebSockets with SignalR in .NET Part 6: the basics of publishing to groups

Introduction

So far in this series on SignalR we’ve published all messages to all connected users. The goal of this post is to show how you can direct messages to groups of people. It is based on a request of a commenter on part 5. You can think of groups as chat rooms in a chat application. Only members of the chat room should see messages directed at that room. All other rooms should remain oblivious of those messages.

We’ll build upon the SignalR demo app we’ve been working on in this series. So have it open in Visual Studio. We’ll simulate the following scenario:

  • When a client connects for the first time they are assigned a random age between 6 and 100 inclusive
  • The client joins a “chat room” based on this age by calling a function in ResultsHub
  • When the client sends a message then only those already in the chat room will be notified

The real-life version would of course involve some sign-up page where the user can define which room to join or what their age is. You can also store those users if the chat application is closed to unanonymous users. However, all that would involve too much extra infrastructure irrelevant to the main goals.

Joining a group

We first need to assign an age to the client when they navigate to the Home page. Locate HomeController.cs. The Index action currently only returns a View. Extend it as follows:

public ActionResult Index()
{
	Random random = new Random();
	int next = random.Next(6, 101);
	ViewBag.Age = next;
        return View();
}

Normally you’d pass the age into the View in a view-model object but ViewBag will do just fine. In Index.cshtml add the following markup just below the Register message header:

<div>
    Your randomised age is <span id="ageSpan">@ViewBag.Age</span>
</div>

Now we want to call a specific Hub function as soon as the connection with the hub has been set up. The server side function will put the user in the appropriate chat room based on their age. Insert the following code into results.js just below the call to hub.start():

$.connection.hub.start().done(function ()
{        
        var age = $("#ageSpan").html();
        resultsHub.server.joinAppropriateRoom(age);
});  

When the start() function has successfully returned we’ll read the age from the span element and run a method called joinAppropriateRoom in ResultsHub. Open ResultsHub.cs and define the function and some private helpers as follows:

public void JoinAppropriateRoom(int age)
{
	string roomName = FindRoomName(age);
	string connectionId = Context.ConnectionId;
	JoinRoom(connectionId, roomName);
	string completeMessage = string.Concat("Connection ", connectionId, " has joined the room called ", roomName);
	Clients.All.registerMessage(completeMessage);
}

private Task JoinRoom(string connectionId, string roomName)
{			
	return Groups.Add(connectionId, roomName);
}	

private string FindRoomName(int age)
{
	string roomName = "Default";
	if (age < 18)
	{
		roomName = "The young ones";
	}
	else if (age < 65)
	{
		roomName = "Still working";
	}
	else
	{
		roomName = "Old age pensioners";
	}
	return roomName;
}

We’ll first find the appropriate room for the user based on the age. We’ve defined 3 broad groups: youngsters, employed and old age pensioners. We extract the connection ID and put it into the correct room. Note that we didn’t need to define a group beforehand. It will be set up automatically as soon as the first member is added to it. We then also notify every client that there’s a new member.

While we’re at it let’s define the function that will be called by the client to register the message together with their age. The age is again needed to locate the correct group. Add the following method to ResultsHub.cs:

public void DispatchMessage(string message, int age)
{			
	string roomName = FindRoomName(age);			
	string completeMessage = string.Concat(Context.ConnectionId
		, " has registered the following message: ", message, ". Their age is ", age, ". ");
	Clients.Group(roomName).registerMessage(completeMessage);
}

We again find the correct group, construct a message and send out the message to everyone in that group.

There’s one last change before we can test this. Locate the newMessage function definition of the messageModel prototype in results.js. It currently calls the simpler sendMessage function of ResultsHub. Comment out that call. Update the function definition as follows:

newMessage: function () {
            var age = $("#ageSpan").html();
            //resultsHub.server.sendMessage(this.registeredMessage());
            resultsHub.server.dispatchMessage(this.registeredMessage(), age);
            this.registeredMessage("");
        },
.
.
.

Run the application. The first client should see that they have joined some room based on their age. In my case it looks as follows:

First client joining a group

Open some more browser windows with the same URL and all of them should be assigned an age and a group. The very first client should see them all. In my test I got the following participants:

First client sees all subsequent chat participants

I started up 6 clients: 3 old age pensioners, 2 youngsters and 1 still working. It’s not easy to copy all windows so that we can see everything but here are the 6 windows:

All clients joining some group and conversing

The top left window was the very first client, a 77-year-old who joined the pensioners’ room. The one below that is a 65-year-old pensioner. Under that we have a 24-year-old worker. Then on the right hand side from top to bottom we have a 15-year-old, a 90-year-old and finally a 6-year-old client. Then the 65-year-old client sent a message which only the other pensioners have receiver. Check the last message in each window: the clients of 24, 6 and 15 years of age cannot see the message. Then the 6-year-old kid sent a message. This time only the 2 youngsters were sent the message. You’ll see that the 24-year old worker has not received any of the messages.

We’ve seen a way how you can direct messages based on group membership. You can define the names of the rooms in advance, e.g. in a database, so that your users can pick one upon joining your chat application. Then instead of sending in their age they can send the name of the room which to join. However, if you’re targeting specific users without them being aware of these groups you’ll need to collect the criteria from them based on which you can decide where to put them. In the above example the only criteria was their age. In other case it can be a more elaborate list of conditions.

View the list of posts on Messaging here.

Creating a grouped join on two sequences using the LINQ GroupJoin operator

The GroupJoin operator is very similar to the Join operator. I won’t repeat the things we discussed there, so I recommend you read that post first if you’re not familiar with that operator.

With GroupJoin we can not only join elements in two sequences but group them at the same time.

GroupJoin has the same signature as Join with one exception. The result selector in Join has the following type:

Func<TOuter, TInner, TResult>

…whereas the result selector in GroupJoin looks as follows:

Func<TOuter, IEnumerable<TInner>, TResult>

We have the following sample data structure:

public class Singer
{
	public int Id { get; set; }
	public string FirstName { get; set; }
	public string LastName { get; set; }
}

public class Concert
{
	public int SingerId { get; set; }
	public int ConcertCount { get; set; }
	public int Year { get; set; }
}

public static IEnumerable<Singer> GetSingers()
{
	return new List<Singer>() 
	{
		new Singer(){Id = 1, FirstName = "Freddie", LastName = "Mercury"} 
		, new Singer(){Id = 2, FirstName = "Elvis", LastName = "Presley"}
		, new Singer(){Id = 3, FirstName = "Chuck", LastName = "Berry"}
		, new Singer(){Id = 4, FirstName = "Ray", LastName = "Charles"}
		, new Singer(){Id = 5, FirstName = "David", LastName = "Bowie"}
	};
}

public static IEnumerable<Concert> GetConcerts()
{
	return new List<Concert>()
	{
		new Concert(){SingerId = 1, ConcertCount = 53, Year = 1979}
		, new Concert(){SingerId = 1, ConcertCount = 74, Year = 1980}
		, new Concert(){SingerId = 1, ConcertCount = 38, Year = 1981}
		, new Concert(){SingerId = 2, ConcertCount = 43, Year = 1970}
		, new Concert(){SingerId = 2, ConcertCount = 64, Year = 1968}
		, new Concert(){SingerId = 3, ConcertCount = 32, Year = 1960}
		, new Concert(){SingerId = 3, ConcertCount = 51, Year = 1961}
		, new Concert(){SingerId = 3, ConcertCount = 95, Year = 1962}
		, new Concert(){SingerId = 4, ConcertCount = 42, Year = 1950}
		, new Concert(){SingerId = 4, ConcertCount = 12, Year = 1951}
		, new Concert(){SingerId = 5, ConcertCount = 53, Year = 1983}
	};
}

In the example on Join we joined the single elements in the singers list with the concert list based on the singer ids. We will do the same here but at the same time we want to read the total number of concerts for each singer. The following query will do just that:

IEnumerable<Singer> singers = DemoCollections.GetSingers();
IEnumerable<Concert> concerts = DemoCollections.GetConcerts();

var singerConcerts = singers.GroupJoin(concerts, s => s.Id, c => c.SingerId, (s, co) => new
{
	Id = s.Id
	, SingerName = string.Concat(s.FirstName, " ", s.LastName)
	, ConcertCount = co.Sum(c => c.ConcertCount)
});

foreach (var res in singerConcerts)
{
	Console.WriteLine(string.Concat(res.Id, ": ", res.SingerName, ", ", res.ConcertCount));
}

GroupJoin operator output

Each type in the lambda expressions will be inferred by the compiler:

  • ‘s’ is of type Singer for the outer selector
  • ‘c’ is of type Concert for the inner selector
  • ‘co’ is type IEnumerable of Concert which will be used for the grouping function, Sum in this case

Just like the Join operator, GroupJoin can also accept an IEqualityComparer of TKey in case the comparison key requires some special treatment. In the above example only integers are compared so there’s no need for anything extra.

You can view all LINQ-related posts on this blog here.

Introduction to WebSockets with SignalR in .NET Part 5: dependency injection in Hub

Introduction

We’ve now gone through the basics of SignalR. We’ve looked at a messaging project and a primitive, but working stock ticker. Actually most of the work is put on the client in form of JavaScript code. The WebSockets specific server side code is not too complex and follows standard C# coding syntax.

However, the relative server side simplicity doesn’t mean that our code shouldn’t follow good software engineering principles. I mean principles such as SOLID, with special subjective weight given to my favourite, the letter ‘D‘.

You’ll recall from the previous post that the stock prices were retrieved from a concrete StockService class, an instance of which was created within the body of StartStockMonitoring(). The goal now is to clean up that code so that the stock prices are retrieved from an interface instead of a concrete class. The interface should then be a parameter of the ResultsHub constructor.

We’ll use StructureMap to inject the dependency into ResultsHub.cs.

Demo

I’ll use two sources from StackOverflow to solve the problem:

Let’s start by creating the abstraction. Add the following interface to the Stocks folder:

public interface IStockService
{
	dynamic GetStockPrices();
}

Then modify the StockService declaration so that it implements the abstraction:

public class StockService : IStockService

Change the ResultsHub constructor to accept the interface dependency:

private readonly IStockService _stockService;

public ResultsHub(IStockService stockService)
{
	if (stockService == null) throw new ArgumentNullException("StockService");
	_stockService = stockService;
	StartStockMonitoring();
}

Make sure you refer to the private field in the Task body of StartStockMonitoring:

Task stockMonitoringTask = Task.Factory.StartNew(async () =>
				{					
					while(true)
					{
						dynamic stockPriceCollection = _stockService.GetStockPrices();
						Clients.All.newStockPrices(stockPriceCollection);
						await Task.Delay(5000);
					}
				}, TaskCreationOptions.LongRunning);

Next, create an interface for ResultsHub in the Stocks folder:

public interface IResultsHub
{
	void Hello();
	void SendMessage(String message);
}

…and have ResultsHub implement it:

public class ResultsHub : Hub, IResultsHub

Next import the StructureMap NuGet package:

StructureMap NuGet package

We’ll need a custom HubActivator to find the implementation of IResultsHub through StructureMap. Add the following class to the solution:

public class HubActivator : IHubActivator
{
	private readonly IContainer container;

	public HubActivator(IContainer container)
	{
		this.container = container;
	}

	public IHub Create(HubDescriptor descriptor)
	{
		return (IHub)container.GetInstance(descriptor.HubType);
	}
}

IContainer is located in the StructureMap namespace.

Next insert the following class that will initialise the StructureMap container:

public static class IoC
{
	public static IContainer Initialise()
	{
		ObjectFactory.Initialize(x =>
			{
				x.Scan(scan =>
					{
						scan.AssemblyContainingType<IResultsHub>();
						scan.WithDefaultConventions();
					});
			});
		return ObjectFactory.Container;
	}
}

The last step is to register our hub activator when the application starts. Add the following code to Application_Start() in Global.asax.cs:

IContainer container = IoC.Initialise();
GlobalHost.DependencyResolver.Register(typeof(IHubActivator), () => new HubActivator(container));

That’s it actually. Set a breakpoint within the ResultsHub constructor and start the application. If all goes well then code execution should stop at the breakpoint. Inspect the incoming stockService parameter. If it’s null then something’s gone wrong but it shouldn’t be. Let the code execution continue and you’ll see that it works as before except that we’ve come a good step closer to loosely coupled code.

Read the finishing post in this series here.

View the list of posts on Messaging here.

Elliot Balynn's Blog

A directory of wonderful thoughts

Software Engineering

Web development

Disparate Opinions

Various tidbits

chsakell's Blog

WEB APPLICATION DEVELOPMENT TUTORIALS WITH OPEN-SOURCE PROJECTS

Once Upon a Camayoc

ARCHIVED: Bite-size insight on Cyber Security for the not too technical.