How to send emails in .NET part 2: the MailAddress object

In the previous post on this topic we saw how to send a plain text email with the MailMessage and SmtpClient objects.

You can refine the From and To fields of the message using the MailAddress object. You can specify the email address, a display name and an encoding. Specifying an encoding is seldom necessary.

So if you’d like to joke with your colleagues then this is one option:

MailAddress from = new MailAddress("andras.nemes@company.com", "Your boss");
MailAddress to = new MailAddress("john.smith@company.com");
string subject = "You are fired.";
string plainTextBody = "See you in hell.";
MailMessage mailMessage = new MailMessage(from, to);
mailMessage.Subject = subject;
mailMessage.Body = plainTextBody;

string smtpServer = "mail.company.com";
SmtpClient client = new SmtpClient(smtpServer);
client.Send(mailMessage);

The recipient will see an email similar to the following:

Changing display name of sender

Of course they will eventually see the actual email address of the sender but they might get scared at first.

Read all posts related to emailing in .NET here.

How to send emails in .NET part 1: basics of MailMessage

We’ll look at techniques around sending emails in .NET in this series of short posts.

If your single aim is to send a plain text email with no attachments then it’s very simple. The System.Net.Mail package includes most objects you’ll need for emailing but the following 2 are probably the most important:

  • MailMessage
  • SmtpClient

You use the MailMessage object to construct the message. Example:

string from = "andras.nemes@company.com";
string to = "john.smith@company.com";
string subject = "This is the subject";
string plainTextBody = "This is a great message.";
MailMessage mailMessage = new MailMessage(from, to, subject, plainTextBody);

The fields, like “from” and “to” are probably easy to understand.

For sending the message you’ll need a valid SMTP server which is needed for the SmtpClient object:

string smtpServer = "mail.company.com";
SmtpClient client = new SmtpClient(smtpServer);
client.Send(mailMessage);

This will send the email in a sequential manner, i.e. Send blocks the code until it returns.

SmtpClient.Send has an overload which enables you to bypass the creation of MailMessage entirely:

client.Send(from, to, subject, plainTextBody);

The MailMessage object internally validates the email address so you don’t need to worry about some magic regex string. E.g. the following will throw a FormatException:

MailMessage mm = new MailMessage("helloFrom", "helloTo");

That’s it for starters. We’ll look at emailing in a lot more depth in the upcoming parts.

Read all posts related to emailing in .NET here.

MongoDB in .NET part 7: deleting documents

Introduction

In the previous post in this series we looked at how to update documents. So we now know how to insert, save and modify documents. We also need to be able to remove documents.

Remove and RemoveAll

Removing a document can be performed using the Remove method of IMongoCollection which has similar overloads to Update and returns a WriteConcernResult. However, while Update updates a single document by default even if there are multiple matching ones, Remove removes all matching documents. Most often we’ll remove a single document which matches an ID query but we can certainly construct an IMongoQuery which matches multiple documents. However, even if multiple documents are removed, the group of remove operations are not treated as a transaction. Each removal is a distinct operation.

You can supply a WriteConcern parameter which has the same purpose as in the case of Save and Update. You can also provide a RemoveFlags parameter which has 2 values: None and Single. With Single you can indicate that you only want to remove a single document if the query matches 2 or more documents. “None” simply means no flags which is the default value.

RemoveAll removes all documents in a collection while leaving indexes and metadata intact. There’s also a Drop method which is faster then RemoveAll but removes indexes and metadata too. If you need to remove the entire collection quickly then use the Drop method.

There’s also an atomic version called FindAndRemove which works in much the same way as FindAndUpdate we saw in the previous part.

Demo

We’ll extend the demo application we’ve been working on so far so have it ready in Visual Studio. This will be really simple actually. The Index.cshtml file of Cars already prepared a link for the Delete operation:

@Html.ActionLink("Delete", "Delete", new { id=item.Id })

We don’t yet have a Delete action so let’s add it to the CarsController:

public ActionResult Delete(string id)
{
	CarRentalContext.Cars.Remove(Query.EQ("_id", ObjectId.Parse(id)));
	return RedirectToAction("Index");
}

As you type Cars.Remove you’ll see the overloads of Remove where you can specify the parameters mentioned above. Run the application, navigate to /cars and press the Delete link on one of the items. The item should be removed from the list of items.

In the next part we’ll look more into MongoDb queries.

View the posts related to data storage here.

Finding the user’s current region using RegionInfo in .NET C#

The CultureInfo object helps a lot in finding information about the user’s current culture. However, on occasion it may not be enough and you need to find out more about that user’s regional characteristics. You can easily retrieve a RegionInfo object from CultureInfo which will hold information about a particular country or region.

You can find the current region in two ways from CultureInfo:

CultureInfo cultureInfo = Thread.CurrentThread.CurrentCulture;
RegionInfo regionInfo = new RegionInfo(cultureInfo.LCID);
// or 
regionInfo = new RegionInfo(cultureInfo.Name);

string englishName = regionInfo.EnglishName;
string currencySymbol = regionInfo.CurrencySymbol;
string currencyEnglishName = regionInfo.CurrencyEnglishName;
string currencyLocalName = regionInfo.CurrencyNativeName;

My computer is set to use Swedish-Sweden as the specific culture so I get the following values from top to bottom:

  • Sweden
  • kr
  • Swedish krona
  • Svensk krona

If I change the current culture to my home country, i.e. Hungary…

CultureInfo hungaryCulture = new CultureInfo("hu-HU");
Thread.CurrentThread.CurrentCulture = hungaryCulture;
regionInfo = new RegionInfo(hungaryCulture.LCID);
englishName = regionInfo.EnglishName;
currencySymbol = regionInfo.CurrencySymbol;
currencyEnglishName = regionInfo.CurrencyEnglishName;
currencyLocalName = regionInfo.CurrencyNativeName;

…then the values are of course adjusted accordingly:

  • Hungary
  • Ft
  • Hungarian Forint
  • forint

Read all posts related to Globalisation in .NET here.

MongoDB in .NET part 6: updating documents

Introduction

In the previous part of this series we looked at write concerns, write acknowledgements and replacing documents with the Save method. We said that Save() works as an Insert if the document ID is not found. If the ID exists then the whole document is replaced with a new one.

The Update method

It is possible to update an existing document without replacing it using the Update method of MongoCollection. The Update method can be finetuned using its overloaded versions. The Save() method sends a completely new document to the Mongo server for replacement. The Update method instead sends an update document to the server containing one or more modification instructions. Update is used by the Save method behind the scenes. Our Save method in CarsController…

CarRentalContext.Cars.Save(modifiedCar);	

…can be mimicked by Update as follows:

CarRentalContext.Cars.Update(Query.EQ("_id", ObjectId.Parse(updateCarViewModel.Id)), Update.Replace(modifiedCar), UpdateFlags.Upsert);	

“Update” is a builder which helps build Update instructions – update documents – to the Mongo server. Notice the “Replace” update instruction which – as you may have guessed – will replace any existing document with a matching ID with the new one. Then we have the UpdateFlag where we specify an Upsert operation which we are familiar with by now. Skipping this flag would mean that a document is only updated if it exists by the given ID.

The Update builder contains a lot of operators. The operators return an IMongoUpdate object which represents a modification document and can be used in the Update method as a parameter. Just type “Update.” in Visual Studio and IntelliSense will show you about 20 different ones. Examples:

  • Inc: increments a numeric field – int, double, long – by a specified value
  • Rename: change the name of a field, e.g. from “Make” to “Type” in our Car domain object
  • Set: change the value of a field or insert it if it doesn’t exist, e.g. change 12 to 15 of the field DailyRentalFee
  • Unset: remove a field
  • Push: an array operation which allows us to append a value to an array
  • PopFirst and PopLast: removes the first or the last element of an array
  • Pull: remove specific elements from an array
  • AddToSet: add item to an array if it doesn’t exist

Some array operators have versions with “Each” in the method name. They allow to pass in several values e.g. in the AddToSetEach method. These operators are all fluent ones, i.e. you can chain them together to create a composite IMongoUpdate document.

“Update” is not the only way to build update documents. The following statements are all equivalent:

Update.Set("price", 1);
new UpdateBuilder().Set("price", 1);
Update<Car>.Set(c => c.DailyRentalFee, 2);
new UpdateBuilder<Car>().Set(c => c.DailyRentalFee, 3);

You will probably want to use the strongly typed versions to avoid hard coded string values.

So if you want to specifically update the rental fee of a Car object you can write as follows:

CarRentalContext.Cars.Update(Query.EQ("_id", ObjectId.Parse(updateCarViewModel.Id)), Update<Car>.Set(c => c.DailyRentalFee, 12));

By default the Update method will only update the first document that matches the query. If you want all documents to be updated that match the query then the Multi flag must be given. To change the fee of all Ford cars you can write as follows:

CarRentalContext.Cars.Update(Query.EQ("Make", "Ford"), Update<Car>.Set(c => c.DailyRentalFee, 2), UpdateFlags.Multi);

How to update then?

We’ve now seen two ways of updating a document: Save and Update. Here are some considerations:

  • Save is much more compact: you type less, it’s easier to test, is more robust than the Update equivalent
  • Update results in a more procedural style of code whereas Save is more OOP
  • Replacing a document has more overhead than modifying it, so Update performs better. The Save method fetches a document, modifies it and puts it in place of the original
  • While the Save method performs these steps we might run into concurrency issues. To exclude the possibility of data corruption during an update you may want to go for atomic updates, e.g. the FindAndModify method
  • Update allows for some very fine-grained modifications. They can be very useful in a data migration scenario, especially the Multi updates

We mentioned the FindAndModify atomic method above. It returns a FindAndModifyResult and accepts a FindAndModifyArgs object. Example:

FindAndModifyArgs args = new FindAndModifyArgs()
{
	Query = Query.EQ("_id", ObjectId.Parse(updateCarViewModel.Id))
	,Update = Update<Car>.Set(c => c.DailyRentalFee, 3)
	,Upsert = false
	,SortBy = SortBy<Car>.Ascending(c => c.Id)
	,VersionReturned = FindAndModifyDocumentVersion.Original
};
FindAndModifyResult res = CarRentalContext.Cars.FindAndModify(args);

You’ll recognise the Query, Upsert and Update properties. FindAndModify always modifies a single document. If there are more matching documents then the SortBy property can be used to determine which document will be updated: first or last. In the above example we’re querying on the ID field so this shouldn’t be an issue. The FindAndModifyResult return object includes a ModifiedDocument property of type BsonDocument. It represents the modified document but the exact representation depends on the VersionReturned argument. If it’s set to “Original” then ModifiedDocument will show the document before the modification. If it’s set to “Modified” then the modified document will be returned. The point is that if you run the Update method then and then query for the same document then someone else might have modified the same document. With FindAndModify you can avoid this as it can return the document in the way that you have modified it. The BsonDocument can be deserialised with the GetModifiedDocumentAs method of the FindAndModifyResult object.

Miscellaneous

  • A document is limited to 16MB – this can hold a very large domain. However, always consider how large your domain can grow especially with nested arrays
  • Atomic updates to documents are atomic per document. If you batch update several documents then each document will be updated atomically one by one but the whole operation is not atomic, i.e. we have no transactions
  • There’s no built-in mechanism to check for concurrent access to a document. The EntityFramework object context ensures that each operation is carried out in a thread-safe manner. There’s no equivalent of this context object in MongoDb so it’s possible that while you’re updating a document someone else deletes it. Or you change the rental fee to 2 and someone else updates it to 3 at the same time. The update to be processed last will win. However, this is nothing new – we could easily fill a whole textbook with concurrency issues in databases

In the next post we’ll look at how to delete documents.

View the posts related to data storage here.

Using DateTimeFormatInfo to localise date and time in .NET C#

Every programmer loves working with dates and time, right? Whether or not you like it it is inevitable to show the dates in a format that the viewer understands. You should not show dates presented according to the US format in Japan and vice versa.

The DateTimeFormatInfo class includes a range of useful properties to localise date and time. The entry point to the DateTimeFormatInfo class is CultureInfo. E.g. if you’d like to format a date according to various cultures – Swedish, Hungarian and German – then you can do it as follows:

CultureInfo swedishCulture = new CultureInfo("sv-SE");
DateTimeFormatInfo swedishDateFormat = swedishCulture.DateTimeFormat;

CultureInfo hungarianCulture = new CultureInfo("hu-HU");
DateTimeFormatInfo hungarianDateFormat = hungarianCulture.DateTimeFormat;

CultureInfo germanCulture = new CultureInfo("de-DE");
DateTimeFormatInfo germanDateFormat = germanCulture.DateTimeFormat;
			
DateTime utcNow = DateTime.UtcNow;

string formattedDateSweden = utcNow.ToString(swedishDateFormat.FullDateTimePattern);
string formattedDateHungary = utcNow.ToString(hungarianDateFormat.FullDateTimePattern);
string formattedDateGermany = utcNow.ToString(germanDateFormat.FullDateTimePattern);

…which yields the following formatted dates:

  • den 12 juni 2014 20:08:30
  • 2014. június 12. 20:08:30
  • Donnerstag, 12. Juni 2014 20:08:30

DateTimeFormatInfo includes patterns for other types of date representations, such as MonthDayPattern, LongDatePattern etc.

You can also get the names of the days and months:

string[] swedishDays = swedishDateFormat.DayNames;
string[] germanDays = germanDateFormat.DayNames;
string[] hungarianDays = hungarianDateFormat.DayNames;

string[] swedishMonths = swedishDateFormat.MonthNames;
string[] hungarianMonths = hungarianDateFormat.MonthNames;
string[] germanMonths = germanDateFormat.MonthNames;

You can do a lot more with DateTimeFormatInfo:

  • The Calendar associated with the culture
  • The date separator
  • Abbreviated month and day names
  • First day of the week

…and more. I encourage you to inspect the available properties of the DateTimeFormatInfo object with IntelliSense in Visual Studio.

Read all posts related to Globalisation in .NET here.

Comparing strings using the CompareInfo class in .NET C#

It’s important to be aware of the cultural settings in a globalised application when comparing strings. The CompareInfo class and the CompareOptions enumeration provide a useful way to compare strings based on specific cultures.

One way to get hold of the CompareInfo class belonging to a specific culture is through the CultureInfo class:

CultureInfo swedishCulture = new CultureInfo("sv-SE");
CompareInfo swedishCompareInfo = swedishCulture.CompareInfo;

CultureInfo hungarianCulture = new CultureInfo("hu-HU");
CompareInfo hungarianCompareInfo = hungarianCulture.CompareInfo;

CultureInfo germanCulture = new CultureInfo("de-DE");
CompareInfo germanCompareInfo = germanCulture.CompareInfo;

The CompareInfo object has a Compare method which returns 0 if the strings are equal, -1 if the first string is less than the second and 1 if the opposite is the case. The following comparison of two German strings returns -1 as by default the comparison is case-sensitive:

int comparison = germanCompareInfo.Compare("mädchen", "Mädchen");

This is where the CompareOptions enumeration proves useful. Here are the possible values:

  • IgnoreCase: make the comparison case-insensitive
  • IgnoreNonSpace: ignore diacritics, or officially non-spacing combining characters in Unicode. Example: “Madchen” will be equal to “Mädchen” with this flag
  • IgnoreSymbols: ignore symbols, like white-space, #, $, % etc. “Mädch$en” and “M#ädchen” will be considered equal with this flag
  • IgnoreKana and IgnoreWidth: concern mostly the Japanese language
  • None: the default value if the basic overload of Compare is called
  • Ordinal: quick but culture-insensitive comparison based on the Unicode value of each character
  • OrdinalIgnoreCase: same as Ordinal but the comparison is also case-insensitive
  • StringSort: use a sort algorithm where non-alphanumeric symbols, such as ‘-‘ come before the alphanumeric characters

Read all posts related to Globalisation in .NET here.

MongoDB in .NET part 5: WriteConcerns and replacing documents

Introduction

In the previous part of this series we successfully inserted a new Car object in our database. We also managed to read all items from the database and show them in a table. We’ll continue looking at MongoDb operations.

We’ll keep working on the same demo as before so have it ready in Visual Studio.

WriteConcern

Recall that we inserted a new Car object via the MongoDb Insert method of the MongoCollection object. It returns a WriteConcernResult object that we haven’t bothered with. In the Create action method of the CarsController controller modify…

CarRentalContext.Cars.Insert(car);

…to…

WriteConcernResult writeResult = CarRentalContext.Cars.Insert(car);
bool ok = writeResult.Ok;

Insert a breakpoint within the action method, start the app, navigate to /cars/create and insert a new Car object. When the code execution stops inspect the “ok” boolean value in Visual Studio. It should be true, meaning that the write operation has succeeded. We could read this result because by default the driver will wait for an acknowledgement if some CRUD operation is carried out through the MongoClient object. There’s one more level to enhance durability – you can wait for a journal commit acknowledgement from the database. You can achieve this by either extending the connection string to…

mongodb://localhost/?journal=true

…or in code as follows:

String mongoHost = ConfigurationManager.ConnectionStrings["CarRentalConnectionString"].ConnectionString;
MongoClientSettings settings =
	MongoClientSettings.FromUrl(new MongoUrl(mongoHost));	
settings.WriteConcern.Journal = true;
_mongoClient = new MongoClient(settings);

The WriteConcern property has at least one more important property you should know about: W. That’s right, a property called W. It is of type WValue and is represented by an integer. Say you have a cluster of MongoDb databases – a replica set – with one primary server for writes and 1 or more secondary servers for reads. The write operation will be propagated to all secondary servers in a matter of milliseconds. This is what you often see in real life database environments to enhance durability and data availability – if one server dies then you still have at least one more for reads and writes. The property W indicates the number of nodes in the cluster that must acknowledge the write – or update – operation. A similar mechanism from SQL Server is AlwaysOn. WriteConcern currently has 4 predefined values:

settings.WriteConcern = WriteConcern.W1;
settings.WriteConcern = WriteConcern.W2;
settings.WriteConcern = WriteConcern.W3;
settings.WriteConcern = WriteConcern.W4;

W1 means at least 1 node has to acknowledge the modification. You understand the rest. There is a special property where the majority of the nodes must acknowledge the operation:

settings.WriteConcern = WriteConcern.WMajority;

There’s another special value if you want to skip write acknowledgements altogether:

settings.WriteConcern = WriteConcern.Unacknowledged;

Update the CarRentalContext constructor to the following:

String mongoHost = ConfigurationManager.ConnectionStrings["CarRentalConnectionString"].ConnectionString;
MongoClientSettings settings =
MongoClientSettings.FromUrl(new MongoUrl(mongoHost));
settings.WriteConcern = WriteConcern.Unacknowledged;
_mongoClient = new MongoClient(settings);			
_mongoServer = _mongoClient.GetServer();			
_mongoDatabase = _mongoServer.GetDatabase(ConfigurationManager.AppSettings["CarRentalDatabaseName"]);

Run the app and try to enter a new car. Press Create and then you should get a null pointer exception here:

bool ok = writeResult.Ok;

The writeResult object will be null as we didn’t want any acknowledgement. This is called fire-and-forget.

Why would you want to relax the acknowledgment mechanism? I can give you an example from my work. In one of our projects we monitor some real-time performance statistics during load testing of a web site and show it in various graphs. The process is very “insert” intensive with lots of inserts during the test. We don’t really care if a couple of data points are lost here and there as there are always new ones coming in. So to save time and get better performance we relax all types of write acknowledgment. Also, the stats are only interesting during the live testing so we’re not much concerned with durability either. You can even set the acknowledgement policy on the level of the operation, e.g.:

CarRentalContext.Cars.Insert(car, WriteConcern.Unacknowledged);

…or on the collection level:

public MongoCollection<Car> Cars
{
	get
	{
		return CarRentalDatabase.GetCollection<Car>("cars", WriteConcern.W1);
	}
}

However, for most types of data in a database you’ll want to turn on write acknowledgments. Change the CarRentalContext to the default write concern:

public CarRentalContext()
{
	String mongoHost = ConfigurationManager.ConnectionStrings["CarRentalConnectionString"].ConnectionString;
	MongoClientSettings settings =
		MongoClientSettings.FromUrl(new MongoUrl(mongoHost));			
	_mongoClient = new MongoClient(settings);			
	_mongoServer = _mongoClient.GetServer();			
	_mongoDatabase = _mongoServer.GetDatabase(ConfigurationManager.AppSettings["CarRentalDatabaseName"]);
}

Updates

Updates can be performed in 2 ways:

  • Replace an existing document with a new one
  • Modify an existing document without removing it

The Save() method will replace an existing document. Save() can also act as an Insert method: if there’s no document with the specified ID or no ID is provided at all then Save will create a new document. This is known as an upsert, i.e. update or insert. Save() returns a WriteConcernResult like Insert. There’s also another method called Update which Save calls upon internally. However, Save is more concise and saves you some typing.

The View for /cars created a table for us to show the cars. It has also prepared some links to update a record – check the Edit link. Don’t click on it yet as have no action method or controller for it.

In CarsController add the following Edit stub:

[HttpGet]
public ActionResult Edit(string id)
{

}

We’ll need to find the car with the selected ID and retrieve it from the database. To find an object by id you can use the FindOneById method on the collection like this:

[HttpGet]
public ActionResult Edit(string id)
{
      Car car = CarRentalContext.Cars.FindOneById(new ObjectId(id));
}

You can build very sophisticated search criteria using the IMongoQuery builder. We can write the above query as follows:

IMongoQuery findByIdQuery = Query.EQ("_id", new ObjectId(id));
Car car = CarRentalContext.Cars.FindOne(findByIdQuery);

Query is used to build IMongoQuery objects. Just type “Query.” in VS and you’ll see lots of familiar properties such as “EQ” for equal, GT – greater than, LT – less than – and lots more. Whenever you need build a query to the Find or FindOne methods you’ll use the Query object. In case you need to specify a range of criteria you can combine them with And or Or:

Query.And(Query.EQ("someProperty", propertyValue), Query.EQ("otherProperty", otherValue));

Let’s continue. We’ll need a View for the Edit action and a corresponding view-model. Add a class called UpdateCarViewModel to the ViewModels folder:

public class UpdateCarViewModel
{
	[Editable(false)]
	public string Id { get; set; }
	[Required]
	[Display(Name = "Type of car")]
	public string Make { get; set; }
	[Required]
	[Display(Name = "Number of doors")]
	[Range(2, 6)]
	public int NumberOfDoors { get; set; }
	[Required]
	[Display(Name = "Daily rental fee")]
	public decimal DailyRentalFee { get; set; }
	[Required]
	[Display(Name = "List of allowed countries delimited with ';'")]
	public string DelimitedListOfCountries { get; set; }
}

It’s almost the same as the InsertCarViewModel, we could probably do with some subclassing, but it’s fine as it is for the demo. We’ll need the ID so that the Save method can locate the correct document. Next we’ll need to convert a Car object into an UpdateCarViewModel object. Insert the following extension method to DomainExtensions.cs:

public static UpdateCarViewModel ConvertToUpdateViewModel(this Car carDomain)
{
	UpdateCarViewModel updateVm = new UpdateCarViewModel()
	{
		Id = carDomain.Id
		, DailyRentalFee = carDomain.DailyRentalFee
		, Make = carDomain.Make
		, NumberOfDoors = carDomain.NumberOfDoors
	};

	if (carDomain.CountriesAllowedIn != null && carDomain.CountriesAllowedIn.Count() > 0)
	{
		StringBuilder sb = new StringBuilder();
		for (int i = 0; i < carDomain.CountriesAllowedIn.Count(); i++)
		{
			sb.Append(carDomain.CountriesAllowedIn.ElementAt(i));
			if (i < carDomain.CountriesAllowedIn.Count() - 1)
			{
				sb.Append(";");
			}
		}
		updateVm.DelimitedListOfCountries = sb.ToString();
	}

	return updateVm;
}

Back in CarsController modify the Edit GET method as follows:

[HttpGet]
public ActionResult Edit(string id)
{
	Car car = CarRentalContext.Cars.FindOneById(new ObjectId(id));
	return View(car.ConvertToUpdateViewModel());
}

Right-click “Edit”, select Add View:

Adding Edit template to Car object

Again, VS will create a basic Edit template for the selected item. Let’s check if it works so far. Run the application, navigate to /cars and click on the Edit link for one of the Car objects. This should open the following Edit form:

Edit Car template populated

Now we need to write the POST Edit action to complete the loop. Add the following stub to the CarsController:

[HttpPost]
public ActionResult Edit(UpdateCarViewModel updateCarViewModel)
{

}

We’ll need another extension method to convert an UpdateCarViewModel back to a Car. Add the following to DomainExtensions:

public static Car ConvertToDomain(this UpdateCarViewModel updateCarViewModel)
{
	Car car = new Car()
	{
		Id = updateCarViewModel.Id
		, DailyRentalFee = updateCarViewModel.DailyRentalFee
		, Make = updateCarViewModel.Make
		, NumberOfDoors = updateCarViewModel.NumberOfDoors
	};
	string[] countries = updateCarViewModel.DelimitedListOfCountries.Split(new char[] { ';' }, StringSplitOptions.RemoveEmptyEntries);
	car.CountriesAllowedIn = countries.ToList();
	return car;
}

Again, we’ll need the Id so that the Save function can find the document to be modified. Here’s the final version of the POST Edit method:

[HttpPost]
public ActionResult Edit(UpdateCarViewModel updateCarViewModel)
{
	if (ModelState.IsValid)
	{
		Car modifiedCar = updateCarViewModel.ConvertToDomain();
		CarRentalContext.Cars.Save(modifiedCar);
		return RedirectToAction("Index");
	}
	return View(updateCarViewModel);
}

We didn’t have to look up the Car object in the database – the Save method will check the ID for us. Run the application, update an existing Car and save it. If all works fine then you’ll be redirected to the Index page with the updated value in the list of Cars.

In the next post we’ll look at updates a bit closer.

View the posts related to data storage here.

Finding the current culture settings using the CultureInfo class in .NET C#

Finding the the culture settings – the locale – of a thread is straightforward in .NET:

CultureInfo cultureInfo = Thread.CurrentThread.CurrentCulture;

We extract the current culture from the current thread. The CultureInfo class holds a number of properties to extract information from it. Examples:

string cultureName = cultureInfo.Name;
string cultureDisplayName = cultureInfo.DisplayName;
string nativeName = cultureInfo.NativeName;
string englishName = cultureInfo.EnglishName;
string cultureAbbreviation = cultureInfo.TwoLetterISOLanguageName;

As my computer is set to run with Swedish settings I got the following values from top to bottom:

  • sv-SE
  • Swedish (Sweden)
  • svenska (Sverige)
  • Swedish (Sweden)
  • sv

Cultures are represented by the following format:

  • Neutral culture, “sv” in the above case, is the ISO language name which is tied to the language
  • Specific culture, “SE” in the above case, denotes the geographical location of the culture
  • The two elements are connected with a hyphen “-“, i.e. “sv-SE” in the above example

Specific culture is the most precise description of the user’s locale. It not only designates the language but the region as well. E.g. Swedish is spoken in Finland as well so the neutral culture “sv” is not enough to locate the user. There’s a specific “sv-FI” format for that. This aspect becomes a lot more important with broadly used languages such as French or English. French spoken in France is different from French spoken in Canada. Therefore we need to use fr-FR and fr-CA for the purpose of formatting and proper localisation.

Besides neutral and specific cultures there’s a third type of culture called invariant culture. This is not tied to any specific culture but is closest to English. It may be tempting to use this culture for other purposes such as date and time comparisons but you’ll most likely get false results in a globalised, culture aware application.

The current culture is used for formatting purposes behind the scenes:

decimal price = 10.43M;
string formattedDecimalDefault = price.ToString("C");

I got “10,43 kr” where ‘kr’ denotes the currency in Sweden, i.e. Swedish krona.

You can also set the current culture of the thread:

CultureInfo usCulture = new CultureInfo("en-US");
Thread.CurrentThread.CurrentCulture = usCulture;
string formattedPriceUs = price.ToString("C");

This immediately yields “$10.43”.

The invariant culture is denoted by an empty string:

CultureInfo invariantCulture = new CultureInfo("");
Thread.CurrentThread.CurrentCulture = invariantCulture;
string formattedPriceUs = price.ToString("C");

Neutral cultures are denoted by the ISO language names, e.g.:

CultureInfo englishCulture = new CultureInfo("en");
Thread.CurrentThread.CurrentCulture = englishCulture;
string formattedPriceUs = price.ToString("C");

Which will format the price according to the en-US specific culture.

As you typed “Thread.CurrentThread.” in the editor you may have noticed the CurrentUICulture property. That also returns a CultureInfo object. As the name suggests, it denotes the culture used to show prices, dates, time etc. in the application UI. CurrentCulture and CurrentUICulture will most often be the same, but be aware that they can be different. You might perform calculations in a culture but show the results in another one. Also, you can always manipulate the CurrentCulture of the thread during an application’s lifetime. However, you can only set the current UI culture at the application’s start up.

Read all posts related to Globalisation in .NET here.

MongoDB in .NET part 4: the POCO model, insertions, indexes and capped collections

Introduction

We saw the basics of POCO documents in the previous post of this series. In this part we’ll build up our model with POCOs.

Open the demo application CarRentalWeb we started out with and let’s get to work!

Our model

Add a new folder to the solution called Domain. In that folder insert a class called Car:

public class Car
{
        [BsonRepresentation(MongoDB.Bson.BsonType.ObjectId)]
	public string Id { get; set; }
	public string Make { get; set; }
	[BsonRepresentation(MongoDB.Bson.BsonType.Double)]
	public decimal DailyRentalFee { get; set; }
	public int NumberOfDoors { get; set; }
	public List<string> CountriesAllowedIn { get; set; }
}

You’ll recognise the BsonRepresentationAttribute from the previous post. You may be wondering why we have public string Id with the BsonRepresentation attribute. We saw in the previous post that Mongo stores the id field – called “_id” – in its own ObjectId format. We could simply write…

public ObjectId Id { get; set; }

…but ObjectId might cause problems with data binding elsewhere in the application as it is not a native .NET object. So we choose its nearest .NET approximation which is a string.

While we’re on this topic the above object definition may not even be considered strictly POCO anymore. It contains attributes that belong to a technology that a true domain object should not care about. These attributes have to do with data persistence and domain objects should have no knowledge of how they are represented in the data store. If you’re not sure what I mean I recommend that you go through the series on Domain Driven Design to learn how to separate domain and persistence models to keep the domain models strictly POCO. At the same time you may be fine with decorating your domain objects like that but it’s your decision.

However, this series is about MongoDb, not DDD, so we’ll allow for such deviations. You can then organise your objects the way you want in your project.

Inserting cars

As we said before a Mongo collection is a group of related documents. It is similar to a table in a relational database. Mongo collections are represented by the MongoCollection object in the C# driver and can be accessed via the MongoDatabase object. In our CarRentalContext context class we built such an object in the class constructor.

Add a new folder to the solution called ViewModels. ViewModels here are not the same as the behaviour-rich objects in MVVM. Instead they are simple DTOs – data transfer objects – to represent the “View” part of our models in MVC. Essentially they will be bound to the elements of the form where we insert new cars. Add the following class to the ViewModels folder:

public class InsertCarViewModel
{
	[Required]
	[Display(Name = "Type of car")]
	public string Make { get; set; }
	[Required]
	[Display(Name = "Number of doors")]
	[Range(2,6)]
	public int NumberOfDoors { get; set; }
	[Required]
	[Display(Name = "Daily rental fee")]
	public decimal DailyRentalFee { get; set; }
	[Required]
	[Display(Name = "List of allowed countries delimited with ';'")]
	public string DelimitedListOfCountries { get; set; }
}

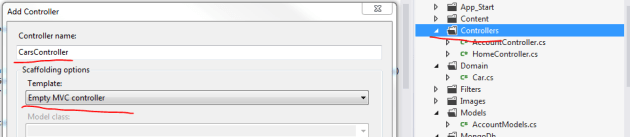
This prepares some basic validation and display values using standard MVC annotations. Let’s prepare the Cars controller. Add a new empty MVC controller like this…:

Add cars controller in Visual Studio

Insert a Create action method like this:

[HttpGet]
public ActionResult Create()
{
	return View();
}

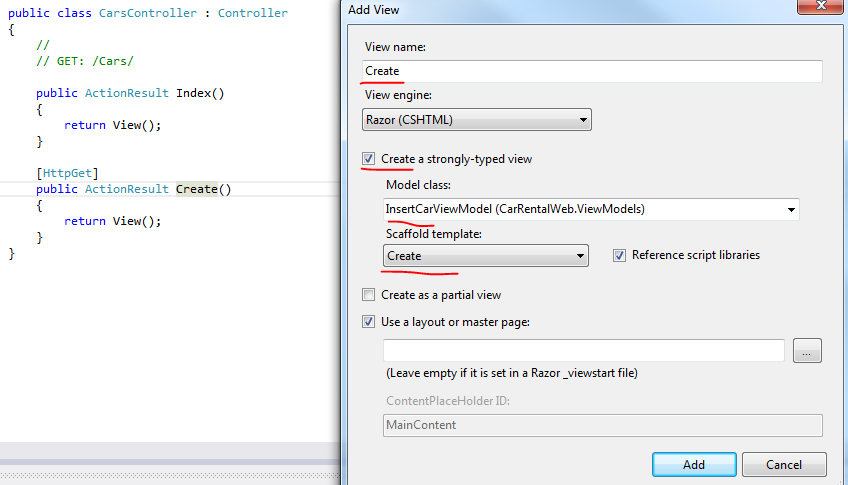
Right-click “Create” and select “Add View”. Fill in the form like this:

Create GET Create template for Car view model

In case the Model class list doesn’t show the InsertCarViewModel then close the window and build the project. Click OK and you’ll be presented an out-of-the box Create view. Start the application and navigate to /cars/create. You should see a simple form:

GET Create form to insert new cars

The VS 2013 equivalent will have a different style but that’s not important. When we press the Edit button the POST Create action will be called. Let’s insert it into the CarsController:

[HttpPost]
public ActionResult Create(InsertCarViewModel insertCarViewModel)
{
	if (ModelState.IsValid)
	{
	}
	return View(insertCarViewModel);
}

It’s not doing anything yet. We want to test if the incoming InsertCarViewModel object is correctly populated. Insert a breakpoint at the if statement. Start the application, navigate to /cars/create, fill in some valid values and press create. Code execution will stop at the breakpoint. Inspect the insertCarViewModel in VS – you’ll see that all properties have been populated correctly. We’ll stay on the same page after the Create method returns. The next step is to actually insert this record into MongoDb.

We’ll need to convert the viewmodel to its proper domain representation. We’ll use an extension method to do that. Insert a class called DomainExtensions in the Domain folder. Change the namespace to CarRentalWeb. Declare the class as static and insert the following static method in it:

namespace CarRentalWeb
{
	public static class DomainExtensions
	{
		public static Car ConvertToDomain(this InsertCarViewModel insertCarViewModel)
		{
			Car car = new Car()
			{
				DailyRentalFee = insertCarViewModel.DailyRentalFee
				, Make = insertCarViewModel.Make
				, NumberOfDoors = insertCarViewModel.NumberOfDoors
			};
			string[] countries = insertCarViewModel.DelimitedListOfCountries.Split(new char[] { ';' }, StringSplitOptions.RemoveEmptyEntries);
			car.CountriesAllowedIn = countries.ToList();
			return car;
		}
	}
}

Back in Create(InsertCarViewModel insertCarViewModel) call this extension method as follows:

if (ModelState.IsValid)
{
	Car car = insertCarViewModel.ConvertToDomain();
}

We’ll need access to the database context in this controller – and most likely in all our controllers. Add a new class called BaseController to the Controllers folder. Select the “class” template, not the New Controller options.

public class BaseController : Controller
{
	private CarRentalContext _carRentalContext;

	public BaseController()
	{
		_carRentalContext = new CarRentalContext();
	}

	public CarRentalContext CarRentalContext
	{
		get
		{
			return _carRentalContext;
		}
	}
}

Change the declaration of CarsController to inherit from the BaseController:

public class CarsController : BaseController

Next we’ll extend the CarRentalContext class to return a mongo collection that holds the Cars objects. Open CarRentalContext.cs and add the following getter:

public MongoCollection<Car> Cars
{
	get
	{
		return CarRentalDatabase.GetCollection<Car>("cars");
	}
}

The MongoCollection class has an overloaded version where you can specify the type of objects stored in the collection. The MongoDatabase object is used to get hold of a collection of a specific type. We need to specify the name of the collection – “cars” – which is an arbitrary string that you can specify, it could as well be “MickeyMouse”, but you probably prefer something descriptive. The type specification will help the serialisation mechanism to convert to and from Car and its BSON representation.

Back in CarsController.Create we’ll use the simplest approach to insert a new document. Add the following line after the conversion from the view model:

CarRentalContext.Cars.Insert(car);
return RedirectToAction("Index");

That’s as simple as it gets. We’ll come back to the Insert method in the next post as it returns a WriteConcern object which deserves more attention. We can ignore it for the time being.

After an insertion we’d like to return to the Index page which lists all the Car objects in a table, which is why we have the RedirectToAction call. The CarsController already has an Index method which returns a View(). Let’s tie the View to an IEnumerable of Car view-model objects. We don’t have those yet so add a new class called CarViewModel to the ViewModels folder:

public class CarViewModel
{	
        [Display(Name = "ID")]
	public string Id { get; set; }
	public string Make { get; set; }
	[Display(Name = "Rental fee per day")]
	public decimal DailyRentalFee { get; set; }
	[Display(Name = "Number of doors")]
	public int NumberOfDoors { get; set; }
	[Display(Name = "Allowed countries")]
	public string CountriesAllowedIn { get; set; }
}

We’ll need to convert the Car objects from the database into the CarViewModel representations. Add the following extension methods to DomainExtensions.cs.:

public static IEnumerable<CarViewModel> ConvertAllToViewModels(this IEnumerable<Car> carDomains)
{
	foreach (Car car in carDomains)
	{
		yield return car.ConvertToViewModel();
	}
}

public static CarViewModel ConvertToViewModel(this Car carDomain)
{
	CarViewModel carViewModel = new CarViewModel()
	{
		Id = carDomain.Id
		, DailyRentalFee = carDomain.DailyRentalFee
		, Make = carDomain.Make
		, NumberOfDoors = carDomain.NumberOfDoors
	};

	if (carDomain.CountriesAllowedIn != null && carDomain.CountriesAllowedIn.Count() > 0)
	{
		StringBuilder sb = new StringBuilder();
		for (int i = 0; i < carDomain.CountriesAllowedIn.Count(); i++)
		{
			sb.Append(carDomain.CountriesAllowedIn.ElementAt(i));
			if (i < carDomain.CountriesAllowedIn.Count() - 1)
			{
				sb.Append(",");
			}
		}
		carViewModel.CountriesAllowedIn = sb.ToString();
	}
        return carViewModel;
}

The CarsController Index action will need to fetch all the car objects, convert them to view models and show them to the viewer. Compile the solution and right-click “Index”. Select Add View…:

Add view to list all car objects

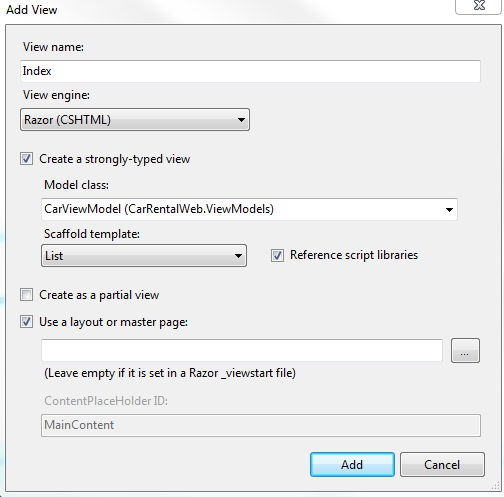
This will give you a basic template to show all items in the sequence in a table.

We can use the FindAll method of MongoCollection to retrieve all items without any search parameters:

public ActionResult Index()
{
	List<Car> carsInDb = CarRentalContext.Cars.FindAll().ToList();
        return View(carsInDb.ConvertAllToViewModels());
}

We should be good to go. Start the application, navigate to /cars/create. Fill in the form with valid data, e.g.:

Create car form values example

If everything’s OK then you’ll see the new Car object listed in its CarViewModel representation on the Index page:

Car created and index page shown

That wasn’t too difficult, right? We didn’t even need to create a database or collection. They were both created for us upon the first insert.

Indexes

You’ll probably know that it’s important to set an index on fields that often figure in searches. Here’s how you can set a composite index on the Car object on the Make and NumberOfDoors properties – which probably doesn’t make sense, this is only example code:

IndexKeysBuilder<Car> carIndexBuilder = IndexKeys<Car>.Ascending(c => c.Make, c => c.NumberOfDoors);
IndexOptionsBuilder<Car> carIndexOptions = IndexOptions<Car>.SetName("Car_CompositeIndex").SetTimeToLive(new TimeSpan(2, 0, 0, 0));
CarRentalContext.Cars.EnsureIndex(carIndexBuilder, carIndexOptions);

With SetTimeToLive you can set an expiry date on a collection.

You can drop an Index by its name as follows:

CarRentalContext.Cars.DropIndexByName("Car_CompositeIndex");

Capped collections

A capped collection is a collection which is not allowed to grow beyond a specific size in bytes. If the maximum size is reached then the elements will be dropped starting from the first element in a FIFO fashion. Here’s how you can set the cap to 50MB:

CollectionOptionsBuilder optionsBuilder = new CollectionOptionsBuilder();
optionsBuilder.SetCapped(true);
optionsBuilder.SetMaxSize(52428800);
CarRentalContext.CarRentalDatabase.CreateCollection("NewCollection", optionsBuilder);

Read the next part of the series here.

View the posts related to data storage here.

Elliot Balynn's Blog

A directory of wonderful thoughts

Software Engineering

Web development

Disparate Opinions

Various tidbits

chsakell's Blog

WEB APPLICATION DEVELOPMENT TUTORIALS WITH OPEN-SOURCE PROJECTS

Once Upon a Camayoc

ARCHIVED: Bite-size insight on Cyber Security for the not too technical.