How to send emails in .NET part 8: adding images to HTML contents

In this and this post we saw how to the build a HTML message and style it up. Let’s now see how to add images, such as a company logo or a photo.

The standard img tag is used to fulfil this need but in a special way. In standard HTML you can use the src attribute to refer to a file on the local drive or on another server, like http://mysite.com/images/hello.jpg. Pointing to a local file in an email is of course futile as you never know what’s on the recipient’s local machine. Referring to external files in HTML emails is problematic. They will be ignored by many email clients. At best the recipient will need to confirm that the images can be downloaded upon opening the email.

Instead the image will need to be added to the MailMessage object as a LinkedResource in an AlternateView. The LinkedResource must be assigned a unique content ID – unique among all linked resources in the message. You’ll need to refer to this content ID in the src attribute of the img tag in the HTML email body.

Consider the following example:

string from = "andras.nemes@company.com";
string to = "john.smith@company.com";
string subject = "Testing html body with image";
string htmlBody = @"
<html lang=""en"">	
	<body>
		<p>This is an image</p>
		<img src=""cid:WinLogo"" />
	</body>
</html>
";
AlternateView alternateViewHtml = AlternateView.CreateAlternateViewFromString(htmlBody, Encoding.UTF8, MediaTypeNames.Text.Html);
LinkedResource windowsLogo = new LinkedResource(@"c:\windows_logo.png", MediaTypeNames.Image.Jpeg);
windowsLogo.ContentId = "WinLogo";
alternateViewHtml.LinkedResources.Add(windowsLogo);
			
string plainTextVersionBody = "You should see a Windows logo here.";
AlternateView alternateViewText = AlternateView.CreateAlternateViewFromString(plainTextVersionBody, Encoding.UTF8, MediaTypeNames.Text.Plain);
			
MailMessage mailMessage = new MailMessage(from, to, subject, htmlBody);
mailMessage.AlternateViews.Add(alternateViewHtml);
mailMessage.AlternateViews.Add(alternateViewText);
string smtpServer = "mail.company.com";
SmtpClient client = new SmtpClient(smtpServer);
client.Send(mailMessage);

Note the following:

  • We create two alternate views: one HTML and one simple text. This is to ensure that the user will see at least a plain text version if the mail client cannot render HTML
  • The content ID of the LinkedResource is set to “WinLogo”
  • The same ID is referred to trough the src attribute om the image tag. Note the “cid:” bit within the contents of the src attribute.

The above code generates the following email in my Outlook client:

Simple HTML body in email with embedded picture

Read all posts related to emailing in .NET here.

How to send emails in .NET part 7: adding style to HTML contents

In this post we saw how to build a simple HTML email with no styling. It looked a bit bleak so we’ll “dress it up” a little.

You cannot simply add a reference to an external CSS file like you would on a normal HTML web page. External references are ignored in the email body as they can can contain malicious material and code.

You can place CSS code directly in the HTML code in the following ways:

  • Using the style tag within the head section
  • Using the style attribute on individual elements
  • Using old-style attributes, such as cellspacing, border, width etc. on individual elements

All of these should be familiar from general web UI programming. Here’s an example of an embedded style tag in the head section:

string from = "andras.nemes@company.com";
string to = "john.smith@company.com";
string subject = "Testing html body";
string htmlBody = @"
<html lang=""en"">
	<head>	
		<meta content=""text/html; charset=utf-8"" http-equiv=""Content-Type"">
		<title>
			Upcoming topics
		</title>
		<style type=""text/css"">
			HTML{background-color: #e8e8e8;}
			.courses-table{font-size: 12px; padding: 3px; border-collapse: collapse; border-spacing: 0;}
			.courses-table .description{color: #505050;}
			.courses-table td{border: 1px solid #D1D1D1; background-color: #F3F3F3; padding: 0 10px;}
			.courses-table th{border: 1px solid #424242; color: #FFFFFF;text-align: left; padding: 0 10px;}
			.green{background-color: #6B9852;}
		</style>
	</head>
	<body>
		<table class=""courses-table"">
			<thead>
				<tr>
					<th class=""green"">Topic</th>
					<th class=""green"">Est. # of posts</th>
				</tr>
			</thead>
			<tbody>
				<tr>
					<td class=""description"">Using a Windows service in your project</td>
					<td>5</td>
				</tr>
				<tr>
					<td class=""description"">More RabbitMQ in .NET</td>
					<td>5</td>
				</tr>
			</tbody>
		</table>
	</body>
</html>
";
MailMessage mailMessage = new MailMessage(from, to, subject, htmlBody);
mailMessage.IsBodyHtml = true;
string smtpServer = "mail.company.com";
SmtpClient client = new SmtpClient(smtpServer);
client.Send(mailMessage);

The above message is rendered as follows in my MS outlook client:

Styled HTML body in email

It’s still not very corporate looking but now you at least know how to add styles to a HTML message in .NET.

Keep in mind that email clients are not as up-to-date with CSS code as modern web browsers, so not everything will work in an email.

Read all posts related to emailing in .NET here.

Externalising dependencies with Dependency Injection in .NET part 1: setup

Introduction

Earlier on this blog we talked a lot about concepts like SOLID, patterns and layered software architecture using Domain Driven Design.

This new series of 10 posts will draw a lot on those ideas. Here are the main goals:

  • Show how hard dependencies of an object can be made external by hiding them behind abstractions
  • Show the reasons why you should care about those dependencies
  • Build a common infrastructure layer that you can use in your own projects

What is an infrastructure layer? We saw an example of that in this post. It is a special layer in the software architecture that holds the code which is common to all other layers in the project. This is a collection of cross-cutting concerns, like caching, security, emailing, logging etc. Logging is seldom part of any company domain but you may want to log trace messages from the “main” layers of the project: the service, the UI and the repository layer. It’s not too clever to replicate the logging code in each layer. Instead, break it out to a separate infrastructure layer which is typically a C# library project.

Furthermore, it’s possible that you’ll want to follow the same logging technique and strategy across all projects of your company. Then you can have one central infrastructure layer which all projects refer to from within Visual Studio. Then if the developers decide to change the logging, caching or other strategy then it will change across all projects by modifying this one central infrastructure layer.

In this post we’ll set up a very simple starting point that lays the foundations for the upcoming parts in the series.

Starting point

Open Visual Studio 2012/2013 and create a new Blank Solution, call it CommonInfrastructureDemo. Add a new Console Application to it called MyCompany.ProductConsole. Add 3 new folders to the ProductConsole app called Domains, Services, Repositories.

Normally we’d put these elements into separate C# libraries but it’s not the main focus of this series. If you’re interested in layered software architecture then you can find a proposed way of achieving it in the DDD series referred to above.

We’ll have only one domain: Product. Add a C# class called Product to the Domains folder:

public class Product
{
	public int Id { get; set; }
	public string Name { get; set; }
	public int OnStock { get; set; }
}

Also, add the following repository interface to the Domains folder:

public interface IProductRepository
{
	Product FindBy(int id);
}

Add the following implementation of the repository to the Repositories folder:

public class ProductRepository : IProductRepository
{
	public Product FindBy(int id)
	{
		return (from p in AllProducts() where p.Id == id select p).FirstOrDefault();
	}

	private IEnumerable<Product> AllProducts()
	{
		return new List<Product>()
		{
			new Product(){Id = 1, Name = "Chair", OnStock = 10}
			, new Product(){Id = 2, Name = "Desk", OnStock = 20}
			, new Product(){Id = 3, Name = "Cupboard", OnStock = 15}
		};
	}
}

There’s nothing really magical here I guess.

Normally the ultimate consumer layer, such as an MVC or Web API layer with a number of controllers, will not talk directly to the repositories. It will only consult the services for any data retrieval. Add the following interface to the Services folder:

public interface IProductService
{
	GetProductResponse GetProduct(GetProductRequest getProductRequest);
}

…where GetProductResponse and GetProductRequest also reside in the Services folder and look as follows:

public class GetProductRequest
{
	public int Id { get; set; }
}

public class GetProductResponse
{
	public bool Success { get; set; }
	public string Exception { get; set; }
	public Product Product { get; set; }
}

The implementation of IProductService will need an IProductRepository. We’ll let this dependency to be injected into the product service using constructor injection. Insert the following ProductService class into the Services folder:

public class ProductService : IProductService
{
	private readonly IProductRepository _productRepository;

	public ProductService(IProductRepository productRepository)
	{
		if (productRepository == null) throw new ArgumentNullException("ProductRepository");
		_productRepository = productRepository;
	}

	public GetProductResponse GetProduct(GetProductRequest getProductRequest)
	{
		GetProductResponse response = new GetProductResponse();
		try
		{
			Product p = _productRepository.FindBy(getProductRequest.Id);
			response.Product = p;
			if (p != null)
			{
				response.Success = true;
			}
			else
			{
				response.Exception = "No such product.";
			}
		}
		catch (Exception ex)
		{
			response.Exception = ex.Message;
		}
		return response;
	}
}

In the implemented GetProduct method we ask the repository to return a Product. If none’s found or if the operation throws an exception then we let the Success property be false and populate the exception message accordingly.

We can now tie together all elements in the consumer, i.e. the Main method. We won’t employ any Inversion of Control containers to inject our dependencies so that we don’t get distracted by technical details. Instead we’ll do it the old way, i.e. by poor man’s dependency injection. We define the concrete implementations in Main ourselves. However, it’s an acceptable solution as this definition happens right at the entry point of the application. If you don’t know what I mean I suggest you go through the series on SOLID referred to above with special attention to the letter ‘D‘.

With the above remarks in mind add the following code into Main in Program.cs:

static void Main(string[] args)
{
	IProductService productService = new ProductService(new ProductRepository());
	GetProductResponse getProductResponse = productService.GetProduct(new GetProductRequest() { Id = 2 });
	if (getProductResponse.Success)
	{
		Console.WriteLine(string.Concat("Product name: ", getProductResponse.Product.Name));
	}
	else
	{
		Console.WriteLine(getProductResponse.Exception);
	}

	Console.ReadKey();
}

Run the app and you’ll see that the Console prints “Desk” for us. Test the code with Id = 4 and you’ll see the appropriate exception message: “No such product”.

This finishes the project setup phase. In the next post we’ll start discussing the true purpose of this series with a look at caching in the service layer.

View the list of posts on Architecture and Patterns here.

How to send emails in .NET part 6: HTML contents basics

In previous posts regarding emails – see the link below – we looked at how to send plain text emails. However, professional company emails, such as user sign-up confirmations, have almost exclusively HTML body formats for styling and layout.

Let’s start with the basics and send out a HTML-based email with no styling. You can freely add HTML tags to the body of the email and set the IsBodyHtml property as true:

string from = "andras.nemes@company.com";
string to = "john.smith@company.com";
string subject = "Testing html body";
string htmlBody = @"
<html lang=""en"">
	<head>	
		<meta content=""text/html; charset=utf-8"" http-equiv=""Content-Type"">
		<title>
			Upcoming topics
		</title>
	</head>
	<body>
		<table>
			<thead>
				<tr>
					<th>Topic</th>
					<th>Est. # of posts</th>
				</tr>
			</thead>
			<tbody>
				<tr>
					  <td>Using a Windows service in your project</td>
					  <td>5</td>
				  </tr>
				  <tr>
					  <td>More RabbitMQ in .NET</td>
					  <td>5</td>
				  </tr>
			</tbody>
		</table>
	</body>
</html>
";
MailMessage mailMessage = new MailMessage(from, to, subject, htmlBody);
mailMessage.IsBodyHtml = true;
string smtpServer = "mail.company.com";
SmtpClient client = new SmtpClient(smtpServer);
client.Send(mailMessage);

The email client will then render the HTML as best as it can. You cannot however just send any HTML that you may be used to from web programming. Most email clients will ignore external files, like JS, images, CSS files etc. Also, inline JavaScript code won’t be executed.

The above message was rendered in my MS Outlook client as follows:

Simple HTML body in email

Read all posts related to emailing in .NET here.

MongoDB in .NET part 10: other file operations

Introduction

In the previous post on MongoDb we talked about inserting files to GridFS and linking them to a Car object. In this post we’ll look at how to read, delete and update a file.

We’ll build on the CarRental demo project we’ve been working on, so have it ready in Visual Studio.

Reading a file

The primary way of reading a file with the C# driver of MongoDb is the Download method of MongoGridFS and its numerous overloads. With Download you can extract the contents of a file to a stream or to the local file system. With the MongoGridFS.Open method you can put the contents of a file to a Stream but you can only locate the file by file name. There are also the MongoGridFS.Find methods – Find, FindOne, FindAll, FindOneById which allows you to find metadata on a file and indirectly open the contents of the file through the MongoGridFSFileInfo object that the Find methods return. MongoGridFSFileInfo has methods to open a file: Open, OpenRead and OpenText. The Find method lets you search for a specific file using an IMongoQuery object. These Find methods are very much the same as what we saw in the post on querying documents.

Deleting and updating a file

Deletes and updates are handled under the same section as there’s no separate update method. An update means first removing a file and then inserting a new one instead.

Demo

Let’s show the image associated with the Car object on Image.cshtml if one exists. We’ll need a helper method on the CarViewModel object to determine whether it has an image. Add the following property to CarViewModel.cs:

public bool HasImage
{
	get
	{
		return !string.IsNullOrEmpty(ImageId);
	}
}

We’ll retrieve the Image from a controller action. Add a new Controller to the Controllers folder called ImagesController. Select the Empty MVC Controller template type. Make it derive from BaseController and insert an Image action method:

public class ImagesController : BaseController
{        
        public ActionResult Image(string imageId)
        {
		MongoGridFSFileInfo imageFileInfo = CarRentalContext.CarRentalDatabase.GridFS.FindOneById(new ObjectId(imageId));
		return File(imageFileInfo.OpenRead(), imageFileInfo.ContentType);
        }
}

The last missing piece is to extend Image.cshtml to show the image. Add the following markup just below the closing brace of the Html.BeginForm statement:

@if (Model.HasImage)
{
	<img src="@Url.Action("Image", "Images", new { imageId = @Model.ImageId})" />
}

Run the application, navigate to /cars and click on the Image link of a Car which has a valid image file. If everything’s gone fine then you should see the associated image:

Show car image from GridFS

In case you’re wondering: that’s right, I uploaded the Windows logo from the background of my computer as the car image. It doesn’t make any difference what image you’ve associated with the Car, the main thing is that it’s shown correctly.

Deleting and updating a file

As hinted above, there’s no separate update function for files. Therefore files are updated in two steps: delete the existing one and insert a new one instead. We’ve already seen how to insert a file and link it to an object, so we only need to consider deletions in this section.

Deletions are performed with the Delete function and its overloads: delete by a query, delete by file name and delete by id. You can also delete a file by its MongoGridFSFileInfo wrapper, an instance of which we’ve seen above.

If you use the Delete(IMongoQuery) overload then all files will be deleted one by one that match the search criteria, i.e. the matching files are not deleted in an atomic operation.

We’ll extend our demo app as follows: when an image is uploaded then we check if the Car already has one. If so, then the image is replaced. Otherwise we’ll upload the file like we saw in the previous post.

Insert the following method to CarsController:

private void DeleteCarImage(Car car)
{
	CarRentalContext.CarRentalDatabase.GridFS.DeleteById(car.ImageId);
	car.ImageId = string.Empty;
	CarRentalContext.Cars.Save(car);
}

We first delete the image by its ID. Then we need to set the ImageID property of the car to an empty string as there’s no automatic mechanism that can determine that the image of a Car has been deleted and update the ImageId property. Lastly we save the Car object.

We can call this function in an extended version of POST Image:

[HttpPost]
public ActionResult Image(string id, HttpPostedFileBase file)
{
	Car car = CarRentalContext.Cars.FindOneById(new ObjectId(id));
	if (!string.IsNullOrEmpty(car.ImageId))
	{
		DeleteCarImage(car);
	}
	AttachImageToCar(file, car);
	return RedirectToAction("Index");
}

That’s it. Run the app as usual and try to replace an image attached to a Car, it should go fine.

Other interesting operations

The MongoGridFS and MongoGridFSFileInfo objects have a MoveTo function. They don’t actually move anything, they set the file name metadata field to a different value. If you want to duplicate a file, then call the CopyTo method that’s available on each object.

You can also modify the metadata of a file through the SetMetada method of MongoGridFS.

The end

This was the last post in the series on MongoDb in .NET. There’s of course loads more to look at but we’d need a book to cover all aspects. However, this should be enough for you to start coding and explore MongoDb in further detail on your own.

View the posts related to data storage here.

How to send emails in .NET part 5: attachments

Adding an attachment to a MailMessage object can be as simple as inserting an Attachment object to the Attachments collection:

string from = "andras.nemes@company.com";
string to = "john.smith@company.com";
string subject = "Testing email attachment";
string plainTextBody = "This is a great message.";
MailMessage mailMessage = new MailMessage(from, to, subject, plainTextBody);

mailMessage.Attachments.Add(new Attachment(@"C:\logfile.txt"));

string smtpServer = "mail.apicasystem.com";
SmtpClient client = new SmtpClient(smtpServer);
client.Send(mailMessage);

You can also specify the MIME type – Multipurpose Internet Mail Extensions – using the MediaTypeNames enumeration. E.g. you can add an attachment as a Stream in the following way:

Stream attachmentStream = new FileStream(@"C:\logfile.txt", FileMode.Open, FileAccess.Read);
mailMessage.Attachments.Add(new Attachment(attachmentStream, "recent_log.txt", MediaTypeNames.Text.Plain));

Note that you can specify a different file name in the Attachment constructor. It can differ from the name of the original source. You can even change its extension if you want, such as “myfile.html”. If you’re not sure of the MIME type you can use MediaTypeNames.Application.Octet which indicates a binary file.

Read all posts related to emailing in .NET here.

How to send emails in .NET part 4: other features of the MailMessage object

We looked at the MailMessage object in various posts here, here and here. Let’s look at some less frequently used features of this object.

Notification options

You can instruct the SMTP server to send a notification to the From address depending on the status of the message. The available statuses are stored in the DeliveryNotificationOptions enumeration:

  • Never: don’t send any notification regardless of what happens with the message
  • Delay: send notification in case of a delay in the delivery
  • None: the default value, let the SMPT server decide whether to send any notification
  • OnFailure: send notification if failed
  • OnSuccess: send notification if delivery succeeded

You can also chain the options as follows:

string from = "andras.nemes@company.com";
string to = "john.smith@company.com";
string subject = "Testing notification options-";
string plainTextBody = "This is a great message.";
MailMessage mailMessage = new MailMessage(from, to, subject, plainTextBody);
mailMessage.DeliveryNotificationOptions = DeliveryNotificationOptions.OnSuccess | DeliveryNotificationOptions.OnFailure;

Note, however, that the SMTP server may refuse to send any notification to the From address depending on its settings. So setting this property is more of a wish, unless you directly control the email server settings.

Different ReplyTo

You can change the ReplyTo address(es) of the email using the ReplyToList object of type MailMessageCollection. The effect will be that when the recipient presses Reply in her email client the To field will be populated with this modified ReplyTo address:

mailMessage.ReplyToList.Add(new MailAddress("info@company.com"));

So in case you’d like the recipient send the response to an address different from the “From” email then use this option.

Priority

Would you like to send you email with an exclamation mark so that the recipient knows that it is super-urgent? Use the Priority enumeration: High, Low or Normal, which is the default:

mailMessage.Priority = MailPriority.High;

Read all posts related to emailing in .NET here.

MongoDB in .NET part 9: storing files

Introduction

In the previous post we looked at a couple of query techniques in the MongoDb C# driver. Before that in this series we saw how to store, update, delete and query “usual” objects like Car. Storing files, such as a PDF or Word file, on the other hand is a different matter. They take up a lot of space in the data store and require special data types to store the bytes.

In this post we’ll look at how files can be stored in MongoDb using its GridFS technology. GridFS stores files in MongoDb documents just like normal objects. However, it stores the file contents in chunks of 256KB. Each chunk is stored in a MongoDb document. Recall that a single MongoDocument can store 16MB of data. Below 16MB you can still opt for storing the byte array contents of a file in a single MongoDb document but for consistency you probably should store all your files in GridFS. GridFS also stores the file metadata in a separate MongoDocument with appropriate links to the constituent chunks.

GridFS is similar to a file system such as the Windows file directory. However, it is independent of the platform it’s running on, i.e. GridFS is not constrained by any limitations of the file system of the OS.

Also, as each chunk is stored in a MongoDb document, GridFS prepares the way for content replication in a Replica Set scenario.

Atomic operations are not available for files in GridFS. You cannot locate and update a file in a single step. Also, the only way to update a file is by replacing an existing one. You cannot send an Update document to the Mongo server to update a small part of a file. So GridFS is probably a good option for files that don’t change too often.

GridFS in the C# driver

GridFS is represented by the GridFS property of MongoDatabase. The GridFS instance with the default settings can be reached in our demo CarRental demo as follows:

MongoGridFS gridFsDefault = CarRentalContext.CarRentalDatabase.GridFS;

You can use the GetGridFS method of MongoDatabase to override the default settings:

MongoGridFSSettings gridFsSettings = new MongoGridFSSettings();
gridFsSettings.ChunkSize = 1024;
MongoGridFS gridFsCustom = CarRentalContext.CarRentalDatabase.GetGridFS(gridFsSettings);

The files can be retrieved using the Files property of MongoGridFS. By default it returns a collection of BsonDocuments but it can be serialised into MongoGridFSFileInfo objects. They allow us to easily extract the metadata about a file in an object oriented way: file name, size in bytes, date uploaded, content type etc. As the files stored in GridFS are independent of the local file system many of these properties can be provided by the user, such as the file name or a list of aliases.

If you ever wish to view individual chunks of a file then you can retrieve them using the Chunks property:

MongoCollection<BsonDocument> chunks = gridFsDefault.Chunks;

These cannot be serialised into any strongly types object yet. Each BsonDocument has a files_id field by which you can identify the chunks belonging to a single file. You can get the file id from the MongoGridFSFileInfo object. You can put the chunks into the right order using the numeric ‘n’ field which denotes the place of a chunk in the sequence. The binary data can be extracted using the ‘data’ field.

We can upload files using one of the overloaded Upload functions of MongoGridFS. One such overload allows us to specify a Stream, a remote file name – to change the file name representation in the metadata – and a MongoGridFSCreateOptions object. This last parameter will let us further define the options for uploading a single file: a list of aliases, chunk size, content type, custom metadata, upload date and an id. The Upload function returns a MongoGridFSFileInfo object.

Another way to upload files is to use the Create and CreateText methods of MongoDatabase.

Demo

We’ll extend our CarRental demo. The first goal is to be able to upload an image linked to a Car. Locate Index.cshtml in the Views/Cars folder. It contains a set of links for each Car entry: Edit, Details and Delete. Add the Image action link to that list:

<td>
        @Html.ActionLink("Edit", "Edit", new { id=item.Id }) |
        @Html.ActionLink("Details", "Details", new { id=item.Id }) |
        @Html.ActionLink("Delete", "Delete", new { id=item.Id }) |
       	@Html.ActionLink("Image", "Image", new { id=item.Id })
</td>

Add the following method to CarsController.cs:

public ActionResult Image(string id)
{
	Car car = CarRentalContext.Cars.FindOneById(new ObjectId(id));
	return View(car.ConvertToViewModel());
}

Right-click “Image” and select Add View…:

Add car rental image view

You’ll get an empty cshtml file. We’ll fill it out in a little bit. We’ll certainly need a POST action in CarsController that accepts the posted file and the Car id. Also, we’ll need a property on the Car object to store the image id. OK, let’s start from the bottom. Add the following property to Car:

public string ImageId { get; set; }

Add it to CarViewModel.cs as well:

[Display(Name = "Image ID")]
public string ImageId { get; set; }

We won’t yet see the image itself until the next post so we’ll only show the image id first. Locate ConvertToViewModel in DomainExtensions.cs and add the new property to the conversion:

CarViewModel carViewModel = new CarViewModel()
{
	Id = carDomain.Id
	, DailyRentalFee = carDomain.DailyRentalFee
	, Make = carDomain.Make
	, NumberOfDoors = carDomain.NumberOfDoors
	, ImageId = carDomain.ImageId
};

In Views/Cars/Index.cshtml we’ll extend the table to view the image IDs:

...
<th>
	@Html.DisplayNameFor(model => model.ImageId)
</th>
...

<td>
	@Html.DisplayFor(modelItem => item.ImageId)
</td>

...

Run the application to test if it’s still working. The image IDs will be empty of course in the Cars table. Click the Image link to see if it leads us to the empty Image view.

In CarsController add the following private method:

private void AttachImageToCar(HttpPostedFileBase file, Car car)
{
	ObjectId imageId = ObjectId.GenerateNewId();
	car.ImageId = imageId.ToString();
	CarRentalContext.Cars.Save(car);
	MongoGridFSCreateOptions createOptions = new MongoGridFSCreateOptions()
	{
		Id = imageId
		, ContentType = file.ContentType
	};
	CarRentalContext.CarRentalDatabase.GridFS.Upload(file.InputStream, file.FileName, createOptions);
}

We construct a new object id and set it as the ImageId property of the Car object. We then call the Save function to update the Car in the database. Then we use an overload of the Upload function to upload the file to GridFS. Note how we got hold of the default GridFS instance through the GridFS property. As we specify the ID and the content type ourselves we can use the MongoGridFSCreateOptions to convey the values. Call this function from the following POST method in CarsController:

[HttpPost]
public ActionResult Image(string id, HttpPostedFileBase file)
{
	Car car = CarRentalContext.Cars.FindOneById(new ObjectId(id));
	AttachImageToCar(file, car);
	return RedirectToAction("Index");
}

We can now fill in Image.cshtml:

@model CarRentalWeb.ViewModels.CarViewModel

@{
    ViewBag.Title = "Image";
}

<h2>Car image</h2>

@using (Html.BeginForm(null, null, FormMethod.Post, new { enctype = "multipart/form-data" }))
{
	@Html.AntiForgeryToken()

	<div>
        
		<div>
			<label>Make: </label>
			<div>
				@Model.Make
			</div>
		</div>
		
		<div>
			<label>Image: </label>
			<div>
				<input type="file" id="file" name="file"/>
			</div>
		</div>

		<div>
			<div>
				<input type="submit" value="Save"/>
			</div>
		</div>
	</div>
}

<div>
	@Html.ActionLink("Back to Cars", "Index")
</div>

Specifying multipart form data in “enctype = multipart/form-data” will enable us to post the entire form data along with the posted file. Run the application, navigate to /cars, link on the Image link on one of the cars and post an image file. We haven’t included any user input checks but in a real application we would validate the user input. For now just make sure that you post an image file: jpg, jpeg, png, gif etc. We’ll show the file in the next post. Don’t worry if you don’t have images showing cars, that’s not the point.

If everything goes well then the Cars table should show the image IDs:

Image IDs shown in the Cars table

In the next post, which will be the last in this series on MongoDb, we’ll show and update the image.

View the posts related to data storage here.

How to send emails in .NET part 3: multiple recipients, CC and BCC

In this post we looked at how to send a plain text email. Let’s see how we can refine the recipient list of the email message.

The MailMessage object has a To property of type MailAddressCollection. You can add MailAddress objects to this collection if you’d like to send the message to multiple recipients:

MailMessage mailMessage = new MailMessage();
mailMessage.To.Add(new MailAddress("xxx.yyy@yyy.com"));
mailMessage.To.Add(new MailAddress("zzz.nnn@fff.com"));
mailMessage.To.Add(new MailAddress("ttt.ddd@jjj.com"));
mailMessage.Subject = "subject";
mailMessage.Body = "body";

Similarly, the MailMessage object has a CC and Bcc property of type MailAddressCollection to hold the carbon copy and blind carbon copy recipients of the message. You can add MailAddress objects to those properties the same way as above:

mailMessage.CC.Add(new MailAddress("ggg@hhh.com"));
mailMessage.Bcc.Add(new MailAddress("lll@kkk.com"));

You can also specify a list of email addresses in a comma-separated string instead of adding MailAddress objects one by one:

mailMessage.To.Add("x@y.com,z@n.com,elvis@presley.com");

Read all posts related to emailing in .NET here.

MongoDB in .NET part 8: queries

Introduction

So far in this series we’ve gone through the most important database operations in MongoDb .NET: create, update and delete which was the topic of the previous post. We’ve also seen some query examples such as finding an element by ID.

In this post we’ll look more closely at querying in MongoDb .NET. The C# driver provides the following ways of querying documents:

  • The various Find methods of MongoCollection where you supply a Mongo query
  • LINQ: the current version of the C# driver supports LINQ queries
  • Aggregation: querying in a functional style

We’ll be working on the same demo web app as before in this series so have it open in Visual Studio.

The Find methods

We’ve already seen FindOneById when locating a single Car object:

Car car = CarRentalContext.Cars.FindOneById(new ObjectId(id));

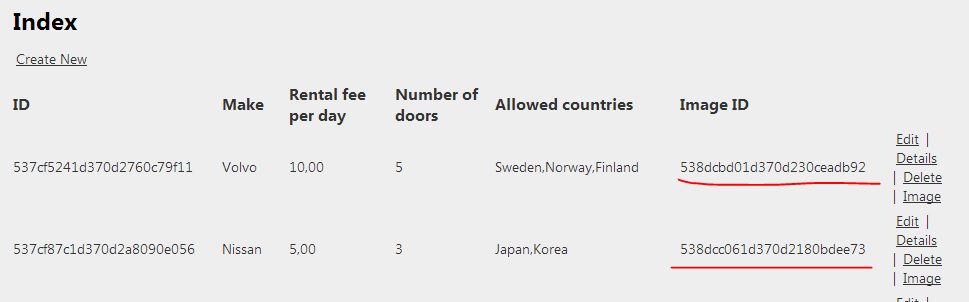
We can use the same method to complete the Cars view. Run the web app and navigate to /cars. For each record in the cars list there are 3 links: Edit, Details, Delete. We’ve implemented the Edit and Delete functions but not the Details yet. Let’s do it.

Add the following action methid on CarsController:

public ActionResult Details(string id)
{
	Car car = CarRentalContext.Cars.FindOneById(new ObjectId(id));
	return View(car.ConvertToViewModel());
}

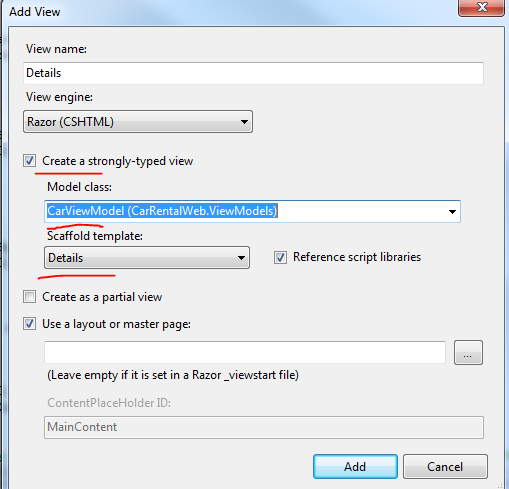
Right-click “Details” and select Add View. Add the following View:

Add Details view for Car object

This will give you a simple table showing the details of the selected Car:

Car details show in Details view

The generic FindOneById method internally calls the FindOneByIdAs method which converts a document into an object. In case you need to convert a document into another object type then you can do it like this:

Customer customer = CarRentalContext.Cars.FindOneByIdAs<Customer>(new ObjectId("dfsdfs"));

This example is a bit stupid, I know, but you get the idea. You can use this method to construct different views of the same domain depending on the rights of the logged on user: FullCar, PartialCar, MinimalCar etc. The properties of each domain version will make sure that only the relevant fields are extracted from the document to construct the object:

LimitedCar limitedCar = CarRentalContext.Cars.FindOneByIdAs<LimitedCar>(new ObjectId("dfsdfs"));

There are other versions of the Find method that each return the first matching document:

  • FindOne(): finds the very first element in the collection
  • FindOne(IMongoQuery query): we’ve seen examples of how to construct an IMongoQuery. The Query object can be used to build query documents

Example: say you want to find the first Car whose rental costs less than or equal to 5:

IMongoQuery query = Query<Car>.LTE(c => c.DailyRentalFee, 5);
Car firstCheapCar = CarRentalContext.Cars.FindOne(query);

You can further refine your search in some overloads of the Find method where you can pass in a FindOneArgs object:

FindOneArgs findOneArgs = new FindOneArgs()
{
	Query = Query<Customer>.NE(c => c.Name, "samsung")
	, ReadPreference = new ReadPreference(ReadPreferenceMode.SecondaryPreferred)
};
Customer cust = CarRentalContext.Cars.FindOneAs<Customer>(findOneArgs);

Here we want to find the first customer whose name is NOT Samsung and we want to read from a secondary replica set member.

I encourage you to the explore the operators available on the Query object. Just type “Query.” or its generic counterpart in VisualStudio and IntelliSense will give you a long list of available options to build your query. There are so many that it’s not possible to cover them all in a single blog post. Keep in mind that you can always chain your queries with the And, Or and Not operators.

You can of course also locate several documents:

  • FindAll(): retrieves all documents in the collection
  • Find(IMongoQuery query): retrieves all documents matching the query

These two methods return a MongoCursor of type T. This object can be enumerated. Say you want to find all cars which have more than 3 doors:

IMongoQuery doorQuery = Query<Car>.GT(c => c.NumberOfDoors, 3);
MongoCursor<Car> bigCars = CarRentalContext.Cars.Find(doorQuery);

MongoCursor implements IEnumerable so you can perform the usual IEnumerable operations on it. E.g. the cursor can be enumerated:

foreach (Car c in bigCars)
{
     //do something
}

…or can also be turned into a List of cars:

List<Car> carsList = bigCars.ToList();

Like in the case of deferred operations in LINQ, the MongoDb Find query is not executed until you call an action on the cursor which enumerates it, such as iterating it or calling ToList.

Before the cursor is enumerated you can set extra options specific to MongoCursor, i.e. which are not part of IEnumerable. E.g. you can set the sort order as follows:

MongoCursor<Car> bigCars = CarRentalContext.Cars.Find(doorQuery);
IMongoSortBy sortByCars = SortBy<Car>.Descending(c => c.DailyRentalFee);
bigCars.SetSortOrder(sortByCars);
foreach (Car c in bigCars)
{
}

MongoCursor has a number of useful methods like that which all start with “Set”:

  • For pagination you can use the SetLimit(int limit) function in conjunction with SetSkip(int i). They behave like the Skip and Take LINQ operators
  • With SetFields you can provide the names of the fields to be returned in case you need to increase the performance. This has an effect similar to a limited SQL query: SELECT name, id FROM …

In case you want to know the number of matching documents without enumerating the cursor there’s the Count method:

MongoCursor<Car> bigCars = CarRentalContext.Cars.Find(doorQuery);
long howMany = bigCars.Count();

Let’s test the sorting method. In CarsController.Index we currently have the following contents:

public ActionResult Index()
{
	List<Car> carsInDb = CarRentalContext.Cars.FindAll().ToList();
        return View(carsInDb.ConvertAllToViewModels());
}

Change it to this so that we show the cars in a descending order by make:

public ActionResult Index()
{
	MongoCursor<Car> carsInDbCursor = CarRentalContext.Cars.FindAll();
        IMongoSortBy sortByCars = SortBy<Car>.Descending(c => c.Make);
	carsInDbCursor.SetSortOrder(sortByCars);
	return View(carsInDbCursor.ConvertAllToViewModels());
}

Run the app and you’ll see that the cars are indeed sorted according to the sort criteria. One thing to keep in mind is that the cursor is frozen as soon as the enumeration in begins by whatever enumeration operator. E.g. you cannot change the ordering of the cursor within a foreach loop.

LINQ

The MongoCollection object provides an AsQueryable extension method which is the starting point of building LINQ expressions:

MongoCursor<Car> carsInDbCursor = CarRentalContext.Cars.FindAll();
IEnumerable<Car> cars = carsInDbCursor.AsQueryable().Where(c => c.NumberOfDoors > 3);

Note that the Linq extensions in the MongoDb driver are evolving continuously. Not every query is possible to build by Linq that are found in the Query builder. In case you’re trying to run an unsupported Linq operator you’ll get an exception. You can read more about LINQ support in the driver here.

Aggregations

The aggregation mechanism in MongoDb provides not only search functions such as FindOne, FindAll etc. It also allows us to perform projections, groupings and summaries on documents to build a set of transformed documents.

You can combine transformation steps in a pipeline to build the final transformed document.

The entry point into creating aggregations is the Aggregate method of MongoCollection. The Aggregate method has a couple of overloads but the most flexible one accepts an AggregateArgs object. It returns an IEnumerable of BsonDocuments which is understandable. The transformed document is very unlikely to look like the original one so it cannot easily be deserialised into a domain object.

Taking the Car domain object we’ve been working with in this series we can have the following AggregateArgs to build a transformation pipeline:

AggregateArgs aggregateArgs = new AggregateArgs()
{
	Pipeline = new[]
	{
		new BsonDocument("$match", Query<Car>.LTE(c => c.DailyRentalFee, 10).ToBsonDocument())
		, new BsonDocument("$match", Query<Car>.GTE(c => c.DailyRentalFee, 3).ToBsonDocument())
		, new BsonDocument("$sort", new BsonDocument("DailyRentalFee", 1))
	}
};
IEnumerable<BsonDocument> documents = CarRentalContext.Cars.Aggregate(aggregateArgs);

This is a simple query but it’s a good starting point. We want to find the cars whose rental fee lies between 3 and 10 and then sort the documents by the rental fee in ascending order. For descending order use -1. This is also a good example to show that the transformation pipeline can be extended as much as you want in the BsonDocument array.

Aggregations can become quite involved. You’ll find lots of great examples on this website.

In the next post we’ll look at storing files in MongoDb.

View the posts related to data storage here.

Elliot Balynn's Blog

A directory of wonderful thoughts

Software Engineering

Web development

Disparate Opinions

Various tidbits

chsakell's Blog

WEB APPLICATION DEVELOPMENT TUTORIALS WITH OPEN-SOURCE PROJECTS

Once Upon a Camayoc

ARCHIVED: Bite-size insight on Cyber Security for the not too technical.