Web farms in .NET and IIS using Web Farm Framework 2.2 part 1: how to set up a web farm using WFF
July 4, 2013 16 Comments
So far in the series on web farms we’ve looked at two concrete solutions for load balancing: Network Load Balancing and Application Request Routing. Both are software based solutions that are relatively easy to use and get started with. However, there’s still a certain amount of manual work you need to perform: add new servers, install applications, install load balancers etc.
There are frameworks out there that can take the burden of manual installations and settings off of your shoulder. However, they can be quite complex with a steep learning curve. Also, as there is much automation involved it’s important to understand them inside out.
Microsoft provides two frameworks as mentioned in the first part of the series on web farms: the Web Farm Framework (WFF) and Windows Azure Services. As the title of this post suggests we’ll look at WFF a bit more closely. The latest version is WFF2.2 at the time of writing this post.
Note: if you are completely new to web farms in IIS and .NET then start here. Some concepts may be difficult to understand if you lack the basics.
General
WFF is a module add-on to IIS. WFF uses the Web Deploy module to update products and applications. Here you’ll find the homepage of WFF2.0 but we’ll concentrate on WFF2.2 which is the most up-to-date version at the time of writing this post. Some of the more interesting features include the following:
- Server provisioning: often called elastic scale, WFF keeps track of all product installations on the server so that you can provision new servers any time with almost no effort. The process takes a server with only the operating system installed and WFF brings it up to the same status as the existing web servers
- Application provisioning: WFF can perform application installations in each machine in the web farm one by one. It takes the server out of rotation, installs the components, brings the server back online, and then continues with the next server. It’s possible to roll out applications using Web Platform Installer or Web Deploy
- Content provisioning: WFF also manages application content provisioning and updates
- Load balancing support: WFF has built-in support for Application Request Routing (ARR) and third party load balancers so it can manage servers and sites for you
- Log consolidation and statistics: WFF offers status and trace logs from all servers in the web farm
- Extensibility: WFF is highly configurable and allows you to integrate your own applications and processes into WFF
- API: WFF can be accessed programmatically using the Microsoft.Web.Farm namespace. It can also be managed through PowerShell commands.
It’s important to stress that WFF is not a load balancer in itself but works in unison with load balancers. The default load balancer that WFF works with is ARR.
The disadvantage of WFF is that it introduces an extra point of failure: it depends on a single controller node. If that fails then WFF will be unable to monitor or manage the server farm until it is back online again. If you make a change to your primary server then that change won’t be propagated to the secondary servers. Your web farm will still continue to work, i.e. your clients will still get web responses from your website but WFF will not be able to synchronise between your server farm machines to keep them up to date. This shortcoming may be corrected in a future version. Read on to find out the role of each server type in a WFF setup.
The starting point
The plan is to start the investigation from scratch. I now have 4 clean machines at my disposal to test WFF: one controller machine, one primary server and two secondary servers. Every machine has Windows Server 2008 R2 and IIS7.5 installed and they all have a 64-bit architecture. There’s no website deployed on any of them yet. All machines sit within the same network so that they can communicate with each other. Don’t make your life harder by putting one machine in the cloud and the other in the local network of your company. Make the start as easy as possible.
The roles of each machine are as follows:
- Controller: the WFF controller server which is the controller of the web farm. This is the only machine that needs to have WFF installed. It monitors the status of the web farm machines, provides synchronisation, provisions applications, etc., it is a real workhorse
- Primary server: this is the blueprint machine for all web farm machines. The changes made on this machine will be propagated to the secondary servers.
- Secondary servers: the “slaves” of the primary server. They will be updated according to the changes on the primary server.
The secondary servers must be of the same architecture as the primary server, i.e. either 32 or 64 bit. You must have an administrator account to the machines.
Setting up the controller
So now I’ve logged on to the controller machine. Installing WFF is at present not as straightforward as I initially thought. I expected that the latest Web Platform Installer, which is in version 4.5 at this date, will be enough to be able to select WFF and install it with all the dependencies. However, WPI 4.5 won’t have that product listed at all.
Instead you’ll need to install v3 of the web platform installer available here. Install it and then download v2.2 of WFF from here. Select the correct package depending on the architecture on the next screen:

When the installation starts you may be greeted with the following message:

DON’T go to the link shown on the little popup. It will lead you to the Web Deploy v3 download page. It will also update your freshly acquired WPI v3 to v4.5, arghh! As it turns out we’ll need Web Deploy 2 instead.
You can download Web Deploy 2.0 from this link. Select the correct package according to the architecture of the machine and step through the very simple installer.
So now you should have the following platforms available among the applications on the controller machine:

Now go back to the WFF 2.2 download page and try to install WFF again. Hopefully you’ll get the same message as me:

Yaaay! I don’t really understand why this process is so cumbersome. It’s as if Microsoft want to hide this product. If you happen to know the reason then feel free to comment.
The controller machine will have the main instance of WFF in the network. WFF will install a WFF agent on the web farm machines.
Setting up the secondary servers
As mentioned above you should have an admin account to the servers. This account will be used when we create the web farm in a later step. We also need to make a couple of exceptions in the firewall. Open the Control Panel and select the System and Security group:
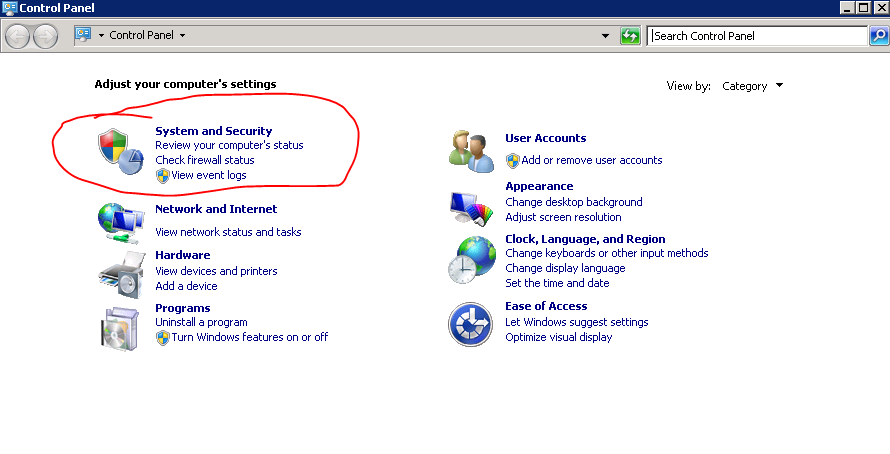
Then select the option marked below:

You’ll need to open up 3 channels. They are Core networking, File and printer sharing and Remote administration:

Do this on all secondary servers in the web farm.
Create a server farm
These steps should be performed on the controller server where we installed WFF 2.2. Open up the IIS manager and you should see a new node called Server Farms:

Right-click that node and select Create Server Farm… This will open the Create Server Farm window. The first step is to give the web farm some name and provide the administrator account. Don’t worry too much about the name, you can always change it later. Make sure to select the Provision server farm option:
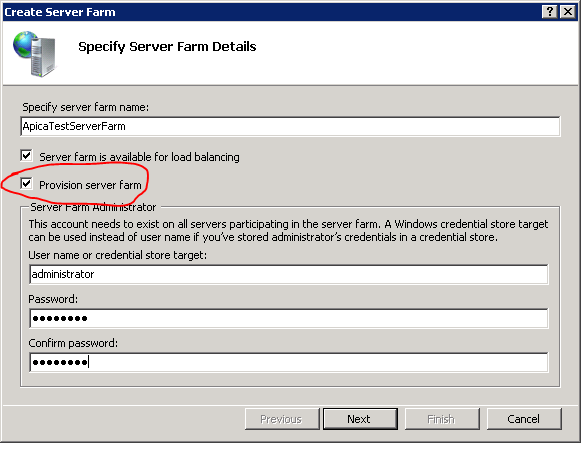
The Server farm is available for load balancing option will set up Application Request Routing (ARR) as the load balancer. Uncheck this textbox if you have a different load balancing option in place.
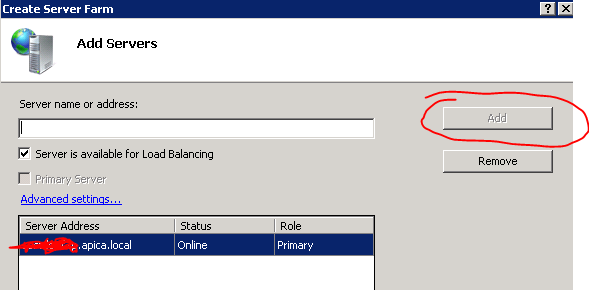
Click next to go to the Add Servers window. Here you can add all the servers participating in the server farm. I’ll first add the primary server so I enter the primary server machine name, check the “Primary Server” checkbox and click add. When you click add then the wizard will attempt to connect to the server using the admin account you’ve provided. Upon successful setup the primary server should be added to the list of servers:
Then add the secondary servers the same way. If there’s a communication error then you’ll see an error message: maybe the machine name is not spelled correctly, or there’s a firewall problem. At the end of the process I have 3 machines: 1 primary and 2 secondary:
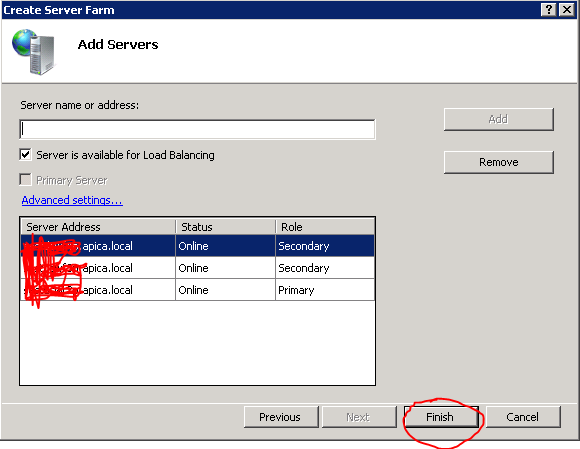
Click finish and there you are, you’ve just set up a web farm using WFF! Open the Server Farms node and you’ll see the farm you’ve just created.
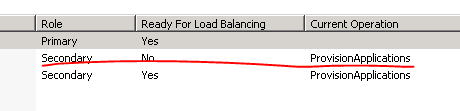
There are a couple of things going on right after the setup process. WFF will install the WFF agents on the primary and secondary servers and it will also synchronise all content, applications, configurations etc. between the primary and secondary servers. Select the Servers node under the farm you’ve just created. This will open up the Servers section in the middle of the screen. At first you may see No under Ready for load balancing:
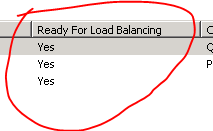
Here it already says yes as I forgot to save the picture just after the farm creation, but it should say no at first. Look at the bottom half of the screen. You will see that WFF starts the synchornisation process right away:
After a couple of minutes the ‘no’ should go over to a ‘yes’.
Testing the primary server sync
Let’s now test if an application is copied from the primary server to the secondary ones. Log onto the primary server and download WPI v3 like we did above. Using Web PI install Url Rewrite 2.0. Go back to the controller machine and watch the status of each web farm member. You’ll see that each is temporarily removed from the network while updating the member machine:
The machine is brought back online and then it’s the second machine’s turn to be updated. I’ll now log onto the secondary machines to see if the update really happened, and it actually did:

So far so good!
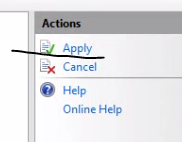
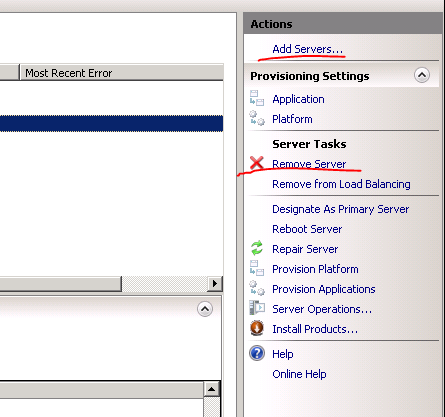
Adding and removing servers are straightforward operations. Just select the following links in the Actions pane on the right:
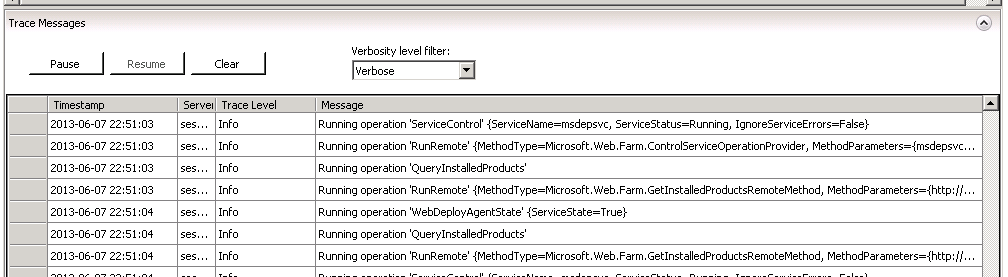
You can see the WFF trace messages in the bottom half of the screen. I believe it’s quite straightforward what you can do here: pause, resume, clear and filter the messages. A maximum of 1000 messages are saved in the trace queue. When this size has been reached the message at the top of the queue is removed in favour of the most recent message. Check out the column headers of the trace messages, they are easy to understand.