Exception handling in the .NET Task Parallel Library with C#: using Handle()

In this post we saw how to catch unhandled exceptions thrown by tasks. Recall that the AggregateException object has a list of inner exceptions thrown by the tasks that are waited on.

You may want to handle each type of exception in a different way. There may be types of exception that you can handle locally and some other unexpected ones that should be propagated further up the stack trace. The AggregateException object has a Handle() method where you can specify the action taken depending on the type of the inner exception. The function should return true if the exception can be dealt with locally and false if it should be propagated upwards.

Construct two tasks using the cancellation token in the first one:

CancellationTokenSource cancellationTokenSource = new CancellationTokenSource();
CancellationToken cancellationToken = cancellationTokenSource.Token;

Task firstTask = Task.Factory.StartNew(() =>
{
	cancellationToken.WaitHandle.WaitOne(-1);
	throw new OperationCanceledException(cancellationToken);
}, cancellationToken);

Task secondTask = Task.Factory.StartNew(() =>
{
	throw new NullReferenceException();
});

The effect of WaitHandle.WaitOne(-1) is to wait forever until the token has been cancelled.

Cancel the token which will interrupt the first task:

cancellationTokenSource.Cancel();

Wait for the tasks, catch the AggregateException and call its Handle method:

try
{
	Task.WaitAll(firstTask, secondTask);
}
catch (AggregateException ex)
{
	ex.Handle((innerException) =>
	{
		if (innerException is OperationCanceledException)
		{
			return true;
		}
		else
		{
			return false;
		}
	}
}

We declare that OperationCanceledException is an expected type and can be dealt with locally. All other types should be re-thrown.

If you run the above code in a console app make sure to run it without debugging (Ctrl + F5), otherwise the code execution will unnecessarily stop when the OperationCanceledException is thrown in the first task.

You’ll see that the NullReferenceException is re-thrown as we return false for all types except for the OperationCanceledException type. Test returning true instead: the exception will be “swallowed” within the Handle method.

View the list of posts on the Task Parallel Library here.

Exception handling in the .NET Task Parallel Library with C#: the basics

Handling exceptions in threading is essential. Unhandled exceptions can cause your application to exit in an unexpected and unpredictable way.

If a task throws an exception that’s not caught within the task body then the exception remains hidden at first. It bubbles up again when a trigger method is called, such as Task.Wait, Task.WaitAll, etc. The exception will then be wrapped in an AggregateException object which has an InnerException property. This inner exception will hold the actual type of exception thrown by the tasks that are waited on.

Construct and start the tasks:

Task firstTask = Task.Factory.StartNew(() =>
{
	ArgumentNullException exception = new ArgumentNullException();
	exception.Source = "First task";
	throw exception;
});
Task secondTask = Task.Factory.StartNew(() =>
{
	throw new ArgumentException();
});
Task thirdTask = Task.Factory.StartNew(() =>
{
	Console.WriteLine("Hello from the third task.");
});

Wait for all the tasks, catch the aggregate exception and analyse its inner exceptions:

try
{
	Task.WaitAll(firstTask, secondTask, thirdTask);
}
catch (AggregateException ex)
{
	foreach (Exception inner in ex.InnerExceptions)
	{
		Console.WriteLine("Exception type {0} from {1}",
			inner.GetType(), inner.Source);
	}
}

Note: if you run the above code in Debug mode in a console application then the execution will stop at each exception thrown. To simulate what’s going to happen in a deployed application make sure you run the code without debugging (Ctlr + F5).

View the list of posts on the Task Parallel Library here.

Introduction to OAuth2 part 6: issues

Introduction

OAuth2 is abound in the world of mobile applications, but it has drawn some criticism as well regarding its usefulness and security. A lot of it originates from Eran Hammer who originally led the specification committee of OAuth2.

Specification too wide

The OAuth2 specs started out as a protocol called Web Authorization Protocol. A protocol is a strict set of rules and definitions. All organisations that adhere to a protocol will be interoperable with each other. As OAuth2 was gaining ground more and more companies wanted to take part in the discussions and have their say. As you may certainly know as the number of participants around a topic grows the more difficult it will be to reach an agreement with a concise set of rules. Instead all parties enforced their own little modifications and company-specific enhancements and alternatives. After a while OAuth2 could not be regarded as a protocol anymore as it became too generic.

At that point the protocol was renamed the OAuth2 Authorization Framework. In effect it was a framework of protocol subsets. You can make a quick search in the specification document here. Search for the words ‘may’ and ‘should’. At the time of writing this post they appeared 69 and 75 times respectively: ‘The client should avoid’, ‘authorization server may establish’ etc. Those verbs only denote the possibility of an action, not that it is obligatory, i.e. ‘must’ be implemented. The specification document simply lacks a clear guidance as to how to implement OAuth2 properly. The implementation will depend on the specific scenario you’re working on: the type of the device, type of auth server, absence/presence of a dedicated auth server, communication types etc. So in practice you will have a number of different implementations of the OAuth2 Framework where each implementation can be regarded as an OAuth2 protocol specific to a certain environment.

Bearer tokens

You’ve seen the token type ‘bearer’ in a number of posts of this series. Why is it called ‘bearer’ anyway? It denotes any party who is in possession of the token, i.e. it is the bearer of the token. Anyone who holds the token can use it the same way as any other party also in possession of the token can. It is not required that a bearer produce any – cryptographic – proof that it is the legitimate holder of the token. We saw in this post how this “feature” can be used to hijack a token and impersonate you in another, unsuspecting application.

If you’ve gone through the series on Claims and SAML tokens then you’ll recall that a SAML token must have a signature to verify its authenticity. Therefore a stolen SAML token cannot be used to make other requests on your behalf.

The lack of signatures in bearer tokens means that the only way to protect the token is to use SSL. Programming against SSL might not be the favourite way to spend time for software developers as SSL is riddled with certificate and other validation errors. So they may look for ways to simply ignore SSL errors. This can lead to some half-implemented SSL where the validation errors are ignored: a man-in-the-middle can reroute your HTTP request and attach a false certificate.

Also, SSL may not be implemented in the entire communication chain. It can be decrypted to perform caching and optimisation at the backend server where someone within the receiving company’s intranet can access your token, password, name, email etc.

A more secure version of OAuth2 tokens are MAC tokens. You can read about them here:

Security

The consent screens of companies like Facebook, Google or Twitter can give the everyday user a false sense of security. They are all well-established and generally trusted companies so a web view with the Google logo must be extra safe and reliable, right? An unknown third party application can easily become a trusted app if the user sees that it’s possible to log in with Twitter and Facebook. However, there’s nothing stopping the developer of the app to create a consent screen identical to that of the well-known auth providers. This technique is often used in spoofing attacks to steal your bank account credentials: instead of http://www.mytrustedbank.com/login.aspx you’re directed to http://www.mytrustedbank1.com/login.aspx and the reader may never see the ‘1’ in the URL or give it any importance. The same technique can be used to spoof the consent screens.

However, there’s still a good point in having those consent screens. The developer doesn’t need to worry about storing passwords and usernames securely and the client can still click ‘refuse’ if something looks fishy.

Let’s look at something different: issues with the authorisation endpoint URL.

Recall the following sections in the GET request to the authorisation endpoint of the auth server:

redirect_uri=http://www.mysite/callback&scope=resource&response_type=code

As these sections are part of the URI an attacker can catch your request and start manipulating the string. The redirect_uri can be modified to let the auth server send the token to someone else’s server and get hold of a token meant for you. The scope parameter can be modified to grant access to resources – even extended resources – to the attacker. The response type can also be changed from ‘code’ to ‘token’ to get hold of the token immediately.

This is a point to take care of if you’re planning to build your own OAuth2 authorisation endpoint. You must make sure that the incoming request is validated thoroughly. One way to mitigate the risks is that when the client signs up with your auth server then you register the list of valid redirect URI:s as well and try to limit that list to just one URI. The token then cannot be sent to any arbitrary callback address. The same is true for the other elements in the query string: register all valid scopes and resources for all new clients.

If you manage to hold the range of possible values in the query string to 1 per client then your auth server can even ignore the incoming values in the URI and instead use the registered ones in the database.

Among the resources below you’ll find a couple of very specific examples on how the Facebook OAuth2 implementation was successfully hacked.

Resources

Here’s a couple of articles from Eran Hammmer criticising OAuth2. You may or may not agree with him but you can assume that he is extremely knowledgeable on this topic. Read through the articles and make sure you understand his arguments:

Here are a couple of documents around OAuth2 that were not included in the Framework document mentioned above. If you wish to do any serious work in OAuth2 then you should be familiar with these as well:

There’s a web page which lists a whole range of specs around OAuth2, like JWT tokens, authorisation grants, dynamic client registration, and a whole range of things that could easily fill this blog with posts for the rest of the year: Web Authorization Protocol (oauth)

An excellent overview: How to Think About OAuth

Regarding security around OAuth2 and the possibilities for attacks you can consult the following pages:

Read the next part in this series here.

You can view the list of posts on Security and Cryptography here.

Share data between Tasks using locks in .NET C# in separate regions

In the this post we saw how to use the ‘lock’ keyword to restrict access to a single critical region. You can reuse the same lock object to synchronise access to the shared variable in separate regions. The modified version of the code in the referenced post looks as follows with two critical regions:

BankAccount account = new BankAccount();

List<Task> incrementTasks = new List<Task>();
List<Task> decrementTasks = new List<Task>();

object lockObject = new object();

for (int i = 0; i < 5; i++)
{
	incrementTasks.Add(Task.Factory.StartNew(() =>
	{
		for (int j = 0; j < 1000; j++)
		{
			lock (lockObject)
			{
				account.Balance++;
			}
		}
	}));
}

for (int i = 0; i < 5; i++)
{
	decrementTasks.Add(Task.Factory.StartNew(() =>
	{
		for (int j = 0; j < 1000; j++)
		{
			lock (lockObject)
			{
				account.Balance--;
			}
		}
	}));
}

Task.WaitAll(incrementTasks.ToArray());
Task.WaitAll(decrementTasks.ToArray());

Console.WriteLine(string.Concat( "Expected value: 0, actual value: ", account.Balance));

We have two sets of tasks: one that increases the balance and another that reduces it. By reusing the same lock object in both cases we can ensure that it’s always at most one task that has access to the shared variable.

View the list of posts on the Task Parallel Library here.

Introduction to OAuth2 part 7: OpenID Connect basics

Introduction

OpenID is a specification that is built on OAuth2. OpenID reuses ideas from the OAuth2 specs like the query strings and token formats, but it specialises in authentication. There are a couple of issues with OAuth2 authentication that OpenID Connect aims to resolve.

OAuth2 authentication issues

According to the specifications OAuth2 is meant for authorisation and not authentication. If you followed along the posts in this series then you know how OAuth2 works, how the client gets a token with limited rights from an auth server, so it’s an example of delegated authorisation using the consent screens. The 3rd party application will then have access to a limited set of features: read but not write tweets on Twitter, view but not add contacts on Facebook etc. Authentication is only the first part of the picture when you fill in your username and password on the consent screen. The auth server then hands out the limited set of rights which forms the authorisation part of the chain.

However, there are cases where the application doesn’t need those rights at all. Instead all it needs is to have an authenticated user. Think of the following scenarios:

  • The app doesn’t have any dedicated user store with the username and password safely tucked away – it is convenient to rely on a trusted service to provide authentication
  • The app needs to know who the user is to make adjustments to the UI – if you log on with Twitter then show Twitter-related links etc.
  • The app needs to limit access to certain features depending on the auth provider, where the features are not directly linked to the type of provider – e.g. give free access to a photo viewer for Twitter users but make it a paid feature for Facebook users, i.e. the photo-viewing feature is unrelated to Twitter or Facebook

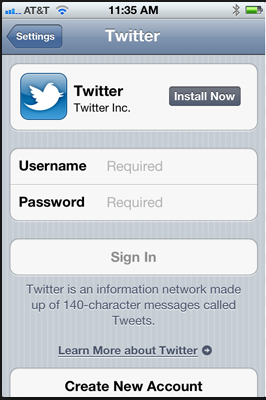
If you see the well known “Sign in with Facebook/Twitter/Google/etc” where the application itself has nothing to do with those providers then it can be a sign that those applications use OAuth2 in a way that goes against the specifications.

Another example is using Azure Mobile Services where you can limit the CRUD operations in your backend SQL tables to authorised users. The mobile app can use the most common auth providers to authenticate the user and get hold of an auth ticket, it is built into the Azure SDK. The application however may or may not use the limited features provided by the token and what the user has given his/her consent to.

If you recall from the previous parts then the client may contact the auth server with a URL similar to this in the implicit flow:

GET /authorize?client_id=mymobileapp&redirect_uri=http://www.myapp.com&scope=signin&response_type=token&state=123

The application wants to authenticate the user and thus contacts the auth server with some special scope. The scope is called “signin” which can be an agreed-upon value so that the auth server knows that this is only about authentication and not authorisation. The application is asking for a User Info Endpoint which holds the user’s name, email address etc. If the app manages to get hold of this endpoint then it can safely assume that the user is authenticated and the auth server replies with an access token.

Consider the following problem: you have a malicious app which requires you to sign in with one of the well known auth providers. People usually trust those buttons that say “Log in with Facebook/Twitter/etc” and they happily provide their username and password in the consent screen. The malicious application will receive an auth token to your User Info Endpoint. The app now has access to a token – in fact it steals the token – that can be used to impersonate you in another – legitimate – application. The malicious app swaps some access token in the legitimate application with your token. Your token has been used to impersonate you in another application that you might not even know of. The legitimate application only sees a trusted User Info Endpoint token from a trusted auth provider and it has no way to determine whether it was the user who has just typed in their credentials in a consent screen.

Resources

You’ll find more detailed accounts on the problems with OAuth2 authentication under the following links:

OpenID connect

As stated above OpenID Connect is built on top of OAuth2 and aims to rectify its shortcomings regarding authentication. When the biggest auth providers saw the issues with OAuth2 being used as a purely authentication platform then they started to add specific steps to recheck the User Info Endpoint token. This led to compatibility issues between them as these actions were not co-ordinated. OpenID Connect brings these provider-specific platforms to the same level so that the developers don’t need to tweak their code depending on the auth provider.

OpenID uses two code flows that we saw before: Authorization code flow and Implicit flow. There’s a new token type though called the ID Token. Actually, the concept of User Info Endpoint arose when the OpenID Connect specs were formalised. The specs also add other things that are not found at all in the OAuth2 framework, such as session management, i.e. how to log out users.

Authorization code flow with OpenID connect

The following actors are the same as we saw before in OAuth2:

  • The client app, i.e. the user agent
  • The identity provider, such as Twitter or Google
  • The auth server with the auth endpoint
  • The token endpoint which provides the auth token
  • The identity provider: Google, Twitter, Facebook etc.

The client first sends a GET request to the auth endpoint. The request may take the following form:

/authorize?client_id=mymobileapp&redirect_uri=https://mymobileapp/cb&scope=openid%20profile&response_type=code&state=123

This is basically the same as before – keep in mind that most of the OAuth2 specs are reused in OpenID. The major “invention” here is that OpenID related requests must be identified in the scope parameter where its value will start with “openid”. After the “openid” string you can attach other specifiers such as “profile”, “email” etc. to further specify what claims the application needs. “Profile” provides what it implies: first and last name, email address and the like. The following values are applicable along with the claims they provide:

  • profile: name, family name, given name, middle name, nickname, preferred username, picture, website, gender, birthdate, timezone info, locale, the date when the profile was updated
  • email: email and verified email
  • address: address
  • phone: phone number and verified phone number
  • offline_access: this is a request for a refresh token

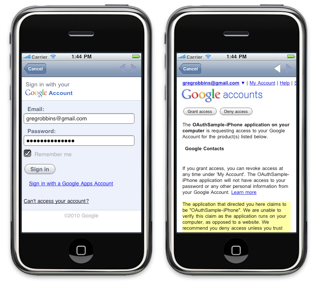
The next step is the consent screen provided by the appropriate Identity provider. The user types in their username and password as usual. The consent screen may be specific for the purposes of authentication. Instead of saying “this app will have access to your tweets” it may state that “this app will have access to your Twitter profile” which is an even more limited set of rights compared to the pure OAuth2 variant. If you click “yes” then the auth code is sent back to the client:

GET /the_callback_url?code=abc&state=123

The code is used to retrieve the token from the token endpoint using a POST request:

POST /token

…with the auth header Authorization: Basic client_id:client_pw and also sends the following parameters:

grant_type=authorization_code&authorization_code=abc&redirect_uri=https://mymobileapp/cb

The token endpoint responds with a JSON similar to this one:

{
"access_token" : "abc"
, "id_token": "xyz"
, "expires_in": "3600"
, "token_type": "Bearer"
, "refresh_token" : "mno"
}

…which is very similar to the token we saw in the OAuth2 flow. The new element is the ID token which was missing from the OAuth2 token. The ID token contains a set of JWT formatted claims about the authentication event:

  • Issuer (‘iss’): where the token has originated from, i.e. if it comes from the same ID provider the user has just consulted
  • Subject (‘sub’): identifies the user
  • Audience (‘aud’): identifies which client the token is for. It must be the same client that initiated the request. The client can use this claim to verify if the token was meant for itself. This feature was missing from the OAuth2 type of log in
  • Expiration (‘exp’): how long the token is valid

The ID token is signed and it must be validated by the client. Upon validation success the application will know that the response from the token endpoint was meant for it.

This is the value added by OpenID on top of OAuth2 to provide authentication. We no longer accept just any token and assume that authentication must have succeeded. With the ID token we can validate the token on the client side. The above scenario with the impersonation cannot happen as the legitimate app can validate the incoming token.

If the username is all the application needs to know to function then we’re basically done. The username is available in the subject claim. Otherwise yet another GET request is made from the client to the User Info Endpoint:

GET /userinfo

…with the auth header Authorization: Bearer access_token

The access token is used to retrieve more info about the user from the User Info Endpoint. The User Info Endpoint sends back the claims in JSON format similar to this one:

{
"sub" : "56346552345"
, "name": "John Smith"
, "email": "john@smith.com"
}

You can view the list of posts on Security and Cryptography here.

Thread safe collections in .NET: ConcurrentQueue

Concurrent collections in .NET work very much like their single-thread counterparts with the difference that they are thread safe. These collections can be used in scenarios where you need to share a collection between Tasks. They are typed and use a lightweight synchronisation mechanism to ensure that they are safe and fast to use in parallel programming.

Concurrent queues

If you don’t know what Queues are then you can read about them here. The Queue of T generic collection has a thread-safe counterpart called ConcurrentQueue. Important methods:

  • Enqueue(T element): adds an item of type T to the collection
  • TryPeek(out T): tries to retrieve the next element from the collection without removing it. The value is set to the out parameter if the method succeeds. Otherwise it returns false.
  • TryDequeue(out T): tries to get the first element. It removes the item from the collection and sets the out parameter to the retrieved element. Otherwise the method returns false

The ‘try’ bit in the method names implies that your code needs to prepare for the event where the element could not be retrieved. If multiple threads retrieve elements from the same queue you cannot be sure what’s in there when a specific thread tries to read from it.

Example

Declare and fill a concurrent queue:

ConcurrentQueue<int> concurrentQueue = new ConcurrentQueue<int>();

for (int i = 0; i < 5000; i++)
{
	concurrentQueue.Enqueue(i);
}

We’ll want to get the items from this collection and check if all of them have been retrieved using a counter. The counter will also be shared among the threads using the ‘lock’ technique we saw in this post – or actually something that is similar to the ‘lock’ keyword: the Interlocked class. Interlocked has an Increment method which accepts a ref int parameter. It will increment the incoming integer in an atomic operation.

int itemCount = 0;

Task[] queueTasks = new Task[20];
for (int i = 0; i < queueTasks.Length; i++)
{
	queueTasks[i] = Task.Factory.StartNew(() =>
	{
		while (concurrentQueue.Count > 0)
		{
			int currentElement;
			bool success = concurrentQueue.TryDequeue(out currentElement);
			if (success)
			{
				Interlocked.Increment(ref itemCount);
			}
		}
	});
}

The while loop will ensure that we’ll try to dequeue the items as long as there’s something left in the collection.

Wait for the tasks and print the number of items processed – the counter should have the same value as the number of items in the queue:

Task.WaitAll(queueTasks);
Console.WriteLine("Counter: {0}", itemCount);

View the list of posts on the Task Parallel Library here.

Suspending a Task using Thread.Sleep in .NET C#

You may want to put a Task to sleep for some time. You might want to check the state of an object before continuing. The Task continues after the sleep time.

One way to solve this is using the classic Thread.Sleep method since the Task library uses .NET threading support in the background.

First construct your cancellation token:

CancellationTokenSource cancellationTokenSource = new CancellationTokenSource();
CancellationToken cancellationToken = cancellationTokenSource.Token;

Use this token in the constructor of the task:

Task task = Task.Factory.StartNew(() =>
{
	for (int i = 0; i < 100000; i++)
	{
		Thread.Sleep(10000);
		Console.WriteLine(i);
		cancellationToken.ThrowIfCancellationRequested();
	}
}, cancellationToken);

Note the Sleep method where we suspend the Task for 10 seconds.

You can use the cancellation token to interrupt the task:

cancellationTokenSource.Cancel();

In the previous post we discussed how to suspend a task using the WaitOne method of the cancellation token. The main difference between WaitOne and Sleep is that Sleep will block even if the task is cancelled whereas WaitOne will exit if the cancellation come before the sleep time is over.

View the list of posts on the Task Parallel Library here.

Introduction to OAuth2 part 5: the resource owner and client flow

Introduction

The previous two posts introduced the code and implicit flows in OAuth2. We’ll now look at the two remaining flows of the OAuth specifications:

  • Resource owner flow
  • Client flow

Resource owner credentials flow

This particular flow is mostly suited for trusted applications. The scenario is similar to what we saw before. A client software installed on a device needs access to a protected resource. We saw earlier how the user had to give consent to the application to collect some limited amount resources before the application could go on with its job.

In this flow this step is missing. It is the client application itself that collects the credentials from the user. Here the application is trusted so the user can enter the username and password without having to go through the consent screen step, where the consent screen comes from the login GUI of the auth server. The user must be able to trust the application and the manufacturer of the application to enter his or her username and password.

A good example is the Twitter app whose login page looks as follows on an iPhone:

Twitter login iOs

There must be sufficient trust towards an application like that. Twitter has a good brand name and good marketing so it’s reasonable to trust an official application that they have endorsed. You can expect that your Twitter credentials won’t be misused otherwise that trust will be broken.

The client app then sends a POST request directly to the auth server. The URI requesting the auth token may look similar to the following:

/token?grant_type=password&amp;scope=the_protected_resource&user_name=username&password=password

The request header will also include a basic auth header with the credentials in order to authenticate with the auth server:

Authorization: Basic clientId:clientPassword

Upon successful authorisation the application receives the usual auth token we saw before, e.g.:

{
"access_token": "somecode",
"expires_in": "expiry time in seconds",
"token_type": "Bearer",
"refresh_token": "somecode"
}

A good practice is that a trusted application collects the password the very first time it is used and it is then forgotten after collecting the auth token from the auth server. The access and refresh tokens are saved on the device but not the password.

The application can then access the protected resource with the auth token:

GET /resourceUri

…with the following header:

Authorization: Bearer access_token

The token can be refreshed with the refresh token once it has expired.

Client credentials flow

This flow is most applicable in machine-to-machine or service-to-service communication. The client sends a POST request to the token endpoint of the auth server:

/token?grant_type=client_credentials&;scope=protected_resource

A Basic auth header will be inserted into the request:

Authorization: Basic (clientId:clientSecret)

The client authenticates itself without involving the resource owner in the flow. The resulting token won’t be associated with any particular user. The client won’t carry out actions on behalf of the user but in its own right.

Read the next part in this series here.

You can view the list of posts on Security and Cryptography here.

Suspending a Task using a CancellationToken in .NET C#

You may want to put a Task to sleep for some time. You might want to check the state of an object before continuing. The Task continues after the sleep time.

One way to solve this is using the WaitOne method of the WaitHandle property of the CancellationToken object.

Construct the CancellationToken object as follows:

CancellationTokenSource cancellationTokenSource = new CancellationTokenSource();
CancellationToken cancellationToken = cancellationTokenSource.Token;

The WaitOne() method without parameters suspends the Task execution until the Cancel() method of the CancellationToken object has been called. It has two overloads where you can specify some time: the amount of time to wait in milliseconds or some TimeSpan. The task suspension lasts until the sleep time is over OR the Cancel() method on the cancellation token has been called, whichever happens first. The WaitOne method also has a boolean return value where ‘true’ means that the Task has been cancelled and false means the the allotted sleep time was over.

You can use the cancellation token and the WaitOne method as follows:

Task task = Task.Factory.StartNew(() =>
{
	for (int i = 0; i < 1000000; i++)
	{
		bool cancelled = cancellationToken.WaitHandle.WaitOne(10000);
		Console.WriteLine("Value {0}. Cancelled? {1}", i, cancelled);
		if (cancelled)
		{
			throw new OperationCanceledException(cancellationToken);
		}
	}
}, cancellationToken);

You can cancel the task as follows:

cancellationTokenSource.Cancel();

View the list of posts on the Task Parallel Library here.

Introduction to OAuth2 part 4: the implicit flow

Introduction

We looked at the code flow of OAuth2 in the previous part of this series. We’ll continue by looking at the so-called implicit flow.

The implicit flow is mostly used for clients that run locally on a device, such as an app written for iOS or Windows 8. It is also applicable for packaged software that runs within a user agent on a client device. These act like local clients but they are not written as true native software.

We have to solve the same problem as before: the local application wants to access a protected resource on behalf of the resource owner who is not willing to provide the password. There are a lot of applications that use your data from Twitter, Facebook, LinkedIn, blog platforms etc. The majority of them do not originate from the respective companies but were written by third-party app developers. You as a Facebook user may not be happy to provide your password to those apps due to security concerns.

The solution is similar to what we saw in the case of the code flow: you won’t give your password to the native application but to the auth server. The client app will then retrieve an access token from the auth server which it can use to access the resource.

You’ll see that the implicit flow is really nothing else but a simplified version of the code flow.

Details

First the app will need to contact the auth server of the service the client app is using as the authentication platform. You’ve probably seen options like “sign in with your facebook/google/twitter/etc. account” in some application on iPhone/Android/WindowsPhone. The application must be able to show the login page of the service. The GET request sent to the auth server looks very much like the one we saw previously:

GET /authorize?client_id=mygreatwindows8app&scope=resource&redirect_uri=http://www.mysite.com/redirect&response_type=token&state=some_id

The only difference is response_type=token, the other elements should look familiar. The native application won’t get an access code from the auth server but the token directly. Remember that in the code flow the requesting page had to do some background task where it asked for the token using the code it got from the auth server. This extra step is missing here in the implicit flow.

The native app must be prepared for showing the login page of the auth server. Example: Azure Mobile Services allows a mobile app to register with Microsoft, Facebook, Google and Twitter. So if you write an application and want to let Azure handle the backend service and notifications for you then you can register your app with those services and you can offer your users to log in with the account they wish. The following is the top part of the Azure sign-up page – the full page is too long, but you get the idea:

OAuth signup page on Azure Mobile Services

The application will then need to show the correct login page and consent screen of the selected provider. Here’s an example for the Google login on iOS:

Google login on iOS

This login page can be either shown in a popup window or as an embedded screen within the app, that’s only an implementation detail.

If you give your consent to share your data with the app then the auth server will respond with a GET request to the callback. The request will contain the token details as query parameters in the URL. Example:

GET /redirect#access_token=some_code&expires_in=300&state=same_as_in_the_original_request

Note the ‘#’, it’s not a typo. We won’t use a callback ‘?’ but a callback hash in this case. The callback is hash fragment encoded. The idea with this is that the query parameters won’t be sent to any server, they will be hidden and won’t show up in the referrer URL. Everything after the hash is only meant for the immediate recipient, it won’t be propagated further on. Otherwise the token could leak to a third party.

The token is anyhow exposed to the native app and the browser where the login page is shown. The client app won’t authenticate with the auth server, unlike in the code flow, so usually refresh tokens are not an option. If the client app had to authenticate with the auth server then the client credentials would need to be stored on the device, which is not ideal from a security point of view. Keep in mind that the user won’t have full control over the application, so saving the full credentials locally is normally not a good idea.

The application can now request the protected resource using the token. Usually the token is put into the auth header of the request to the resource server as type ‘Bearer’:

Authorization: Bearer ‘the access token’

We said that refresh tokens are normally not provided in the standard way of implementing the flow. However, this doesn’t mean that there are no workarounds out there. E.g. Google uses a hidden iframe with a cookie to avoid showing the consent screen again and again. The lifetime of the cookie will then be longer than that of the token and the user will have to log in again after 2-3 weeks.

Read the next part in this series here.

You can view the list of posts on Security and Cryptography here.

Elliot Balynn's Blog

A directory of wonderful thoughts

Software Engineering

Web development

Disparate Opinions

Various tidbits

chsakell's Blog

WEB APPLICATION DEVELOPMENT TUTORIALS WITH OPEN-SOURCE PROJECTS

Once Upon a Camayoc

ARCHIVED: Bite-size insight on Cyber Security for the not too technical.