Introduction to Amazon Code Pipeline with Java part 5: architecture key terms
April 30, 2016 Leave a comment
Introduction
In the previous post we looked at some key differences between TeamCity/Jenkins and AWS CodePipeline. There are a number of aspects where these CI tools differ such as the installation, the deployment and custom build runner development.
In this post we’ll start looking at the CP architecture. We’ll concentrate on the key terms to begin with.
Pipeline
First of all what is a pipeline in “Code Pipeline”? A pipeline describes a chain of steps that describes how a piece of software goes through the release process. E.g. we start with a build, then run unit tests, then deploy the application and then run integration and/or load tests on the deployed app. This is an example of a pipeline. This piece of software is called an artifact. An artifact can also be the file that is ready to be deployed, e.g. a .war file to be deployed on Tomcat. The compiled .war file is artifact that will be consumed by the deployment step. These various forms of the artifact are called revisions.
A pipeline can be triggered manually by clicking the blue “Release change” button above a pipeline. Most often a pipeline will start with a source control stage where a new version of a software is detected by CP which then triggers the pipeline. E.g. if you check in your changes into GitHub then CP will be able to see that there’s a new version of the monitored software. This is no different from how we can set up CI projects in TeamCity and Jenkins and other CI tools.
Now let’s look at the constituents of a pipeline.
Stages
Each pipeline consists of two or more stages. The outer containers in the below pipeline are the stages, i.e. the ones that are called Source and Apica_loadtest:
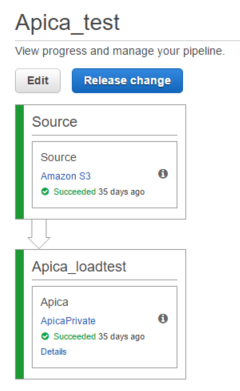
The stage names are unique within a pipeline. A single stage can only process one artifact at a time and must finish its task with the artifact before it can act on the next artifact.
Actions
Each stage consists of one or more actions. An action represents a task performed on an artifact. Each stage has one action in the above screenshot shown within the outer stage containers. A stage is considered complete when all the actions within it have completed their tasks. The pipeline execution can then move onto the next stage. This “move” is called a transition. The workflow can proceed from one action to another only if the action has finished its task without a failure.
Transitioning
Transitions are represented by the arrows that connect two stages. They simply show the order in which the stages will be executed. We can disable a transition by clicking on an array and providing a messages explaining why the transition was disabled. Disabling a transition can be a way to enforce manual intervention. E.g. you may want to prepare all the stages and actions up until the deployment stage but then proceed with the deployment later on at a certain time by enabling the transition manually. The pipeline process can transition from one stage to another if preceding stage has completed all its actions without any failure.
We’ll continue this discussion in the next post.
View all posts related to Amazon Web Services and Big Data here.

