Using Amazon RedShift with the AWS .NET API Part 2: MPP definition and first cluster
March 19, 2015 5 Comments
Introduction
In the previous post we went through Amazon RedShift at an introductory level. In general we can say that it is a highly efficient data storage and data mining tool especially suited for Big Data scenarios. However, it also comes with serious limitations regarding the available Postgresql language features.
In this post we’ll first summarise an important term in conjunction with RedShift: MPP. We’ll then go on and create our first database in the RedShift GUI.
Redshift as an MPP database
MPP stands for “massively parallel processing” and RedShift is an example of an MPP database. Although RedShift is a tabular database like e.g. MS SQL or Oracle, it was especially engineered towards query efficiency and fast calculations over large data sets. We can say that RedShift is a transition between distributed computing engines with loosely structured data sources such as Hadoop and traditional SQL databases with a large set of features.
Like we saw in the series on Elastic MapReduce distributed systems have a master node and one or more slave nodes or data nodes. RedShift follows a similar architecture so we’ll be talking about clusters again, not a single database server. You can read more about the RedShift architecture on its homepage and on Wikipedia here and here. There’s no point in regurgitating all that in this post. In summary, however, we can say the following about MPP systems:
- The main interface for communication between the user and the MPP system is the master node
- The master node doesn’t store any data but rather creates a query plan for queries and keeps track of where the data records the stored, i.e. on which data node, usually using a hashtable.
- Each data node is an independent system with no connection to other nodes. Therefore they don’t share any data between them. The full data set is distributed across the data nodes. You may be able to configure how to distribute the records across the data nodes but the default usually follows a round-robin mode. The first record in a data set to be inserted is saved on Node A, the second on Node B, the third on Node C, the fourth on Node A again, assuming we have three data nodes. The data set will be evenly distributed across the data nodes this way. An additional benefit is that as each data node only holds a portion of the full set the queries will run a lot faster as they only need to go through a subset of data.
- If the query needs to be executed across more than one data node – e.g. if you’re not just searching by ID – then the query is split into multiple subqueries by the master node and each subquery is executed in parallel on each data node which again hold only a subset of the full data set. The partial results of the subqueries will be joined before being returned to the user. So with complex queries the full data set may be scanned but they will still run a lot faster than a single query which scans the entire data set, like in the case of traditional databases. As the data nodes do not share any infrastructure you don’t need to worry about data contention either.
- You can add as many data nodes as you wish to the system making it highly scalable. You can linearly scale up your data nodes by adding data node servers to the system that follow the same specifications regarding disk size, RAM and CPU. As a result the data set will be even more thinly distributed across the nodes and the queries will run faster. It will obviously be more expensive as you’ll have to pay for that extra node but it may be worth the investment, that depends on your scenario.
- Each ingredient in an MPP system is a separate and independent physical element
Enough of the talk, let’s see some action.
A RedShift database
Log onto the AWS console at https://aws.amazon.com/ and select the RedShift menu point:

Probably every service you use with AWS has a region that you can select in the top right section of the UI:

Note that in your case a different region might be pre-selected so don’t get confused by the fact that it says “Singapore” in the above screenshot. Click the down-pointing arrow to view all the available regions. These regions are significant for all services with a couple of exceptions. E.g. S3, which we discussed in this series, is global and has less regional significance. In the case of RedShift when you create a new database cluster then that cluster will be available in the selected region. It doesn’t, however, mean that users cannot access the cluster located in Ireland from Australia. However, it will take Australian users a bit more time to complete the database operations than it does for a user in the UK. Also, we’ll see later that the region must be specified in code when configuring the access to AWS otherwise you may be wondering why your cluster cannot be located. Therefore I recommend you select the region nearest to your physical location. I’ll go with EU Ireland.
If this is the first time you use RedShift then you’ll probably see the below button to create your first cluster:
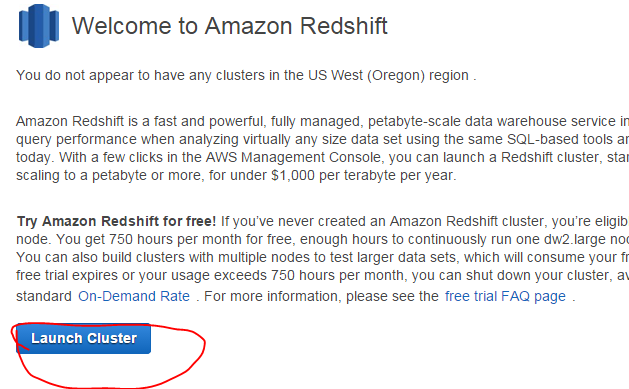
Click that button and you’ll come to the first set of options:
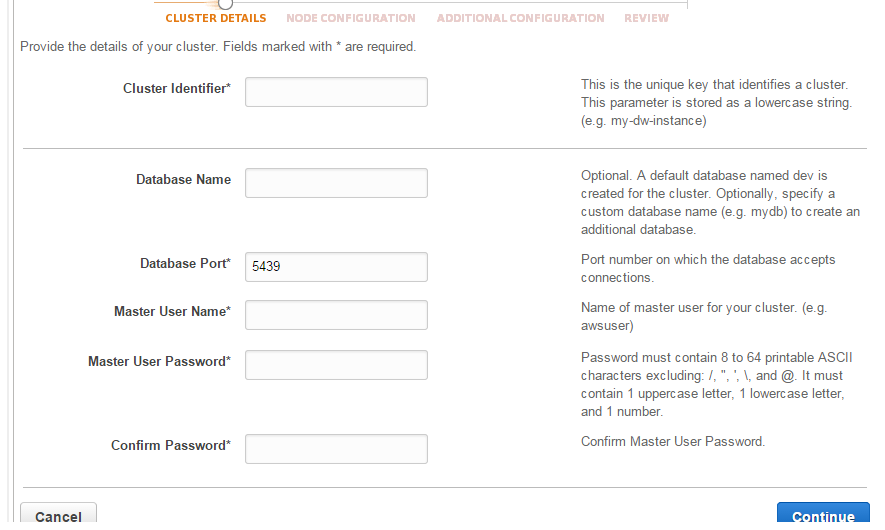
Enter a name for the cluster identifier like “a-test-cluster”, “urls” for the database name and enter a username and password for the master node. Click Continue. The next screen will allow you to set the size for the cluster. We’ll be happy with the default values for evaluation purposes, i.e. we’ll have a single compute node in the cluster. Click Continue. The next screen will let you set further options like database encryption, networking, security and alarms. Select “no” for the basic CloudWatch alarm, our test usage will definitely not take up any significant resources. Click Continue to review the selections and the expected cost per hour and node. If you’re ready then click Launch Cluster. The cluster will be in creating status at first:

…and after a short while it will be “available”:

Click the arrow to the left of the cluster ID to view the cluster details:
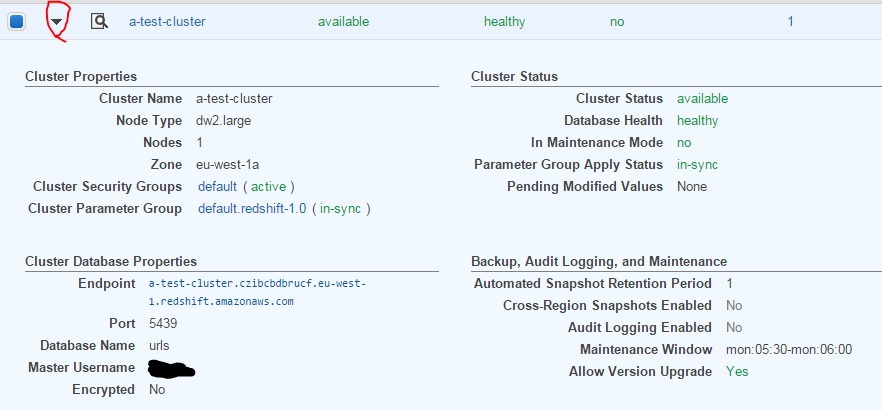
You can click on the cluster name to view even more details, modify the cluster and create a backup:

That’s it, your MPP database cluster is up and running and is ready to accept queries.
We’ll access the master node in the next post and start writing some basic Postgresql commands.
View all posts related to Amazon Web Services and Big Data here.


Reblogged this on Brian By Experience.
these posts do me a great favor. Thanks!
I’m glad you find them useful. //Andras
Hello, thanks for these series. I have a question: can the above cluster creation and other tooling Redshift tasks be accomplished using C#.NET? I know they can all be done using Redshift CLI and also by Java and Python and C++. But I would like to do these using C#.NET from Windows (and even from .NET Core on Linux). Is this possible and supported?? THANKS.
Hi Yuri, sure, RedShift has a .NET client library. Read the rest of the series on RedShift and you’ll see many examples. //Andras