Using Amazon Elastic MapReduce with the AWS.NET API Part 3: starting and logging into a cluster
February 23, 2015 1 Comment
Introduction
In the previous post we went through the long GUI in EMR which allows you to provide the settings of the Hadoop cluster. We didn’t actually start any machines, we’ll do that here.
In this post we’ll also log into the master node of the cluster and try a couple of Hive statements.
Starting a cluster
Navigate to the Create Cluster dialog in Amazon EMR. Let’s provide the following options for our first cluster:
- Cluster name: First cluster
- Termination protection: Yes
- Logging: disabled, we won’t look at the logs for now
- Tags: add “Environment” and “Alpha” as key and value
- Software configuration: leave the default options
- File system configuration: leave it untouched
- Hardware configuration: leave all options as they are
- Security and access: select the EC2 key-pair you created in the previous post, leave the rest as it is
- Bootstrap actions: none
- Steps: leave it untouched, we won’t give the cluster any aggregation job to do
We’re good to go, press Create cluster. You’ll be redirected to the monitoring screen which shows the status of the cluster:

You can also look at the instances being initialised directly in EC2. If you check out the instances list you’ll see the master node – already initialised when I took the screenshot:
![]()
…and here’s one of the slave nodes in the start-up phase:
![]()
It’s strange that the machines have no display names but that’s easy to change. Hover over the name property of the machine and you’ll see a pencil icon appear to the right. Click on it and you’ll be able to provide a name:

Let’s check the status back in the EMR status screen. It takes 5-7 minutes to start the cluster but eventually it should reach the “waiting” status:

Further down on the screen you’ll be able to check out the steps that were carried out on the cluster. In our case we didn’t add any steps of our own only the default installation steps were performed:

In the top section of the screen you’ll see the public DNS of the master node:

To the right of the DNS name you’ll see a link with “SSH” as the link text. Click on it and you’ll find the instructions how to log onto the master node using Putty. This page contains more detailed information about connecting to the master node. Follow the instructions and if everything goes fine then you should enter the master node:

As noted before in this series Hadoop is almost exclusively deployed on Linux so it’s no surprise AWS EMR also prepared a Linux master node for us. It has all the resources available to start working with our Hadoop cluster: Hadoop itself, Hive, Pig and Hue, of which we’ll be looking at Hive.
That’s all it took to start up a Hadoop cluster in Amazon. Of course the hard work of getting to know these tools is just starting but the setup phase went quite quickly. You’ll probably understand the value of such a service as you’ll be able to concentrate on the “real” problems and jump over the preparation phase. E.g. this page lists all the steps required to install Hive on Hadoop. That’s all been taken care of by EMR, you can start typing Hive and/or Pig as soon as the cluster is available.
Type “hive” in the command prompt which should open the Hive CLI:

We’ll explore a couple of Hive statements in this series but we’ll only scratch the surface of what’s available as we’ll jump over to .NET soon. This page gives you a lot of details on the Hive syntax. It looks very much like normal SQL so it should be very easy to follow for most of you. Keep in mind that Hive is running on Java in the background. Hive aggregation statements are often translated into Java MapReduce statements behind the scenes. This is also manifested by the compulsory ‘;’ at the end of each statement. If you enter a statement without the delimiter the Hive CLI will not carry it out but simply jump to the next line waiting for the semi-colon when you press Enter. We’ll see some examples later.
Let’s just try a couple of statements:
show databases;
…which should return “default”, and…
show tables;
…which gives sample_07 and sample_08 which have been installed by Amazon for testing. They are both located in the default database on HDFS.
Enter…
use default;
…and then…
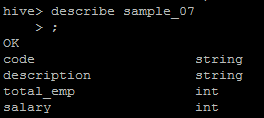
describe sample_07;
You’ll see that sample_07 consists of 4 columns:
You can get more information about the tables and databases as follows:
describe extended sample_07;
describe formatted sample_07;
These show the same details but “formatted” is much more easier to read. You’ll see at least one interesting bit: Table Type is MANAGED_TABLE. This means that the table resides on HDFS – i.e. the Hadoop Distributed File System – directly and if you drop the table then all the table data will be deleted as well with all indexes etc. On the contrary it’s possible to have EXTERNAL tables with Hadoop where the data resides somewhere else and Hadoop only has a reference to it. If you run a “drop database” command against an external database then the data won’t be deleted.
We’ll see an example of an external database in the next post when we start working with data stored in Amazon S3.
This is enough for now. You can close the SSH session.
Let’s terminate the cluster. Click “Terminate” on the EMR cluster details page:

You’ll see that Termination protection is on so you’ll need to change it first:

Remove termination protection and press “Terminate”. The cluster will be terminating for some minutes. The progress is also visible in the instance list of EC2:
![]()
We’ll look at more Hive commands in the next post.
View all posts related to Amazon Web Services and Big Data here.


Reblogged this on SutoCom Solutions.