A model SOA application in .NET Part 6: the client proxy
January 2, 2014 2 Comments
Introduction
In the previous post we got as far as creating a service layer. Now it’s time to build a client proxy on that, i.e. a layer that the external clients of the service can send their requests to. We’ll use the the Web API technology to build this layer. If you’ve read through the other software architecture series on this blog you’ll see that Web API is very dear to me as it’s very simple to set up and use.
The client proxy
In this section I’ll refer a lot to this post in the series on the DDD skeleton project. Make sure you get familiar with it as it contains a lot of information that’s relevant to this post. In that post I show you how to add a web API project and transform it so that it only contains the web service relevant parts. We don’t want to deal with views, JS files, images etc. in a web service project. I also go through the basics of how to install and use the IoC called StructureMap in an MVC-based project. It will be responsible for resolving dependencies such as the ones in this constructor:
public ProductService(IMessageRepositoryFactory messageRepositoryFactory, IProductRepositoryFactory productRepositoryFactory)
Add a new MVC4 web application called SoaIntroNet.WebProxy to the solution. Make sure to select the Web API template in the MVC4 Project Template window. Add a reference to all other layers – this is necessary for the StructureMap IoC container as we’ll see in a bit.
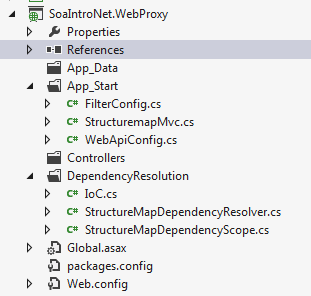
Next get rid of the standard MVC4 web application components. Again, consult the above link to see how it can be done. Install StructureMap from NuGet. You should have the following simplified structure of the web client project:
Add the following section to the Register method of WebApiConfig.cs in the App_Start folder to make sure that we respond with JSON:
var json = config.Formatters.JsonFormatter;
json.SerializerSettings.PreserveReferencesHandling = Newtonsoft.Json.PreserveReferencesHandling.Objects;
config.Formatters.Remove(config.Formatters.XmlFormatter);
In the same method you’ll see that the API calls are routed to api/controller/id by default. Remove the ‘api’ bit as follows:
config.Routes.MapHttpRoute(
	name: "DefaultApi",
	routeTemplate: "{controller}/{id}",
	defaults: new { id = RouteParameter.Optional }
	);
Add a folder called Helpers to the web layer. Add the following two classes with extension methods:
public static class ExceptionDictionary
{
	public static HttpStatusCode ConvertToHttpStatusCode(this Exception exception)
	{
		Dictionary<Type, HttpStatusCode> dict = GetExceptionDictionary();
		if (dict.ContainsKey(exception.GetType()))
		{
			return dict[exception.GetType()];
		}
		return dict[typeof(Exception)];
	}

	private static Dictionary<Type, HttpStatusCode> GetExceptionDictionary()
	{
		Dictionary<Type, HttpStatusCode> dict = new Dictionary<Type, HttpStatusCode>();
		dict[typeof(ResourceNotFoundException)] = HttpStatusCode.NotFound;
                dict[typeof(LimitedAvailabilityException)] = HttpStatusCode.InternalServerError;
		dict[typeof(Exception)] = HttpStatusCode.InternalServerError;
		return dict;
	}
}
public static class HttpResponseBuilder
{
	public static HttpResponseMessage BuildResponse(this HttpRequestMessage requestMessage, ServiceResponseBase baseResponse)
	{
		HttpStatusCode statusCode = HttpStatusCode.OK;
		if (baseResponse.Exception != null)
		{
			statusCode = baseResponse.Exception.ConvertToHttpStatusCode();
			HttpResponseMessage message = new HttpResponseMessage(statusCode);
			message.Content = new StringContent(baseResponse.Exception.Message);
			throw new HttpResponseException(message);
		}
		return requestMessage.CreateResponse<ServiceResponseBase>(statusCode, baseResponse);
	}
}
Set the namespace of both classes to SoaIntroNet.WebProxy so that they are available from everywhere in the Web project without having to set using statements.
Add a new Web API controller in the Controllers folder. Name it ReservationController and make sure to select the Empty Api controller template in the Add Controller window. You’ll see that the controller derives from ApiController. The controller will need the services of the IProductService interface so add the following private field and controller:
private readonly IProductService _productService;

public ReservationController(IProductService productService)
{
	if (productService == null) throw new ArgumentNullException("IProductService");
	_productService = productService;
}
If you are familiar with the SOLID principles then you’ll understand why it’s important to inject an abstract dependency through the constructor this way. If not, then start here.
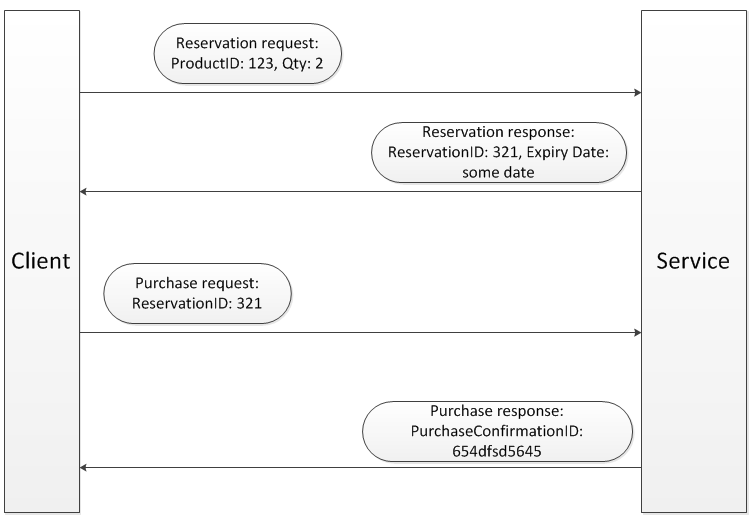
The client will need to send a POST request with the parameters needed to build a ReserveProductRequest object. This is as simple as inserting a Post() method in the controller which accepts a ReserveProductRequest object. The implementation is equally simple: we delegate the actual work to the product service:
ServiceResponseBase response = _productService.ReserveProduct(reserveProductRequest);
return Request.BuildResponse(response);
Insert another controller in the Controllers folder called PurchaseController. It too will depend on the product service so insert the following private field and constructor:
private readonly IProductService _productService;

public PurchaseController(IProductService productService)
{
	if (productService == null) throw new ArgumentNullException("IProductService");
	_productService = productService;
}
The product purchase will also be a POST operation:
public HttpResponseMessage Post(PurchaseProductRequest purchaseProductRequest)
{
	purchaseProductRequest.CorrelationId = purchaseProductRequest.ReservationId;
	ServiceResponseBase response = _productService.PurchaseProduct(purchaseProductRequest);
	return Request.BuildResponse(response);
}
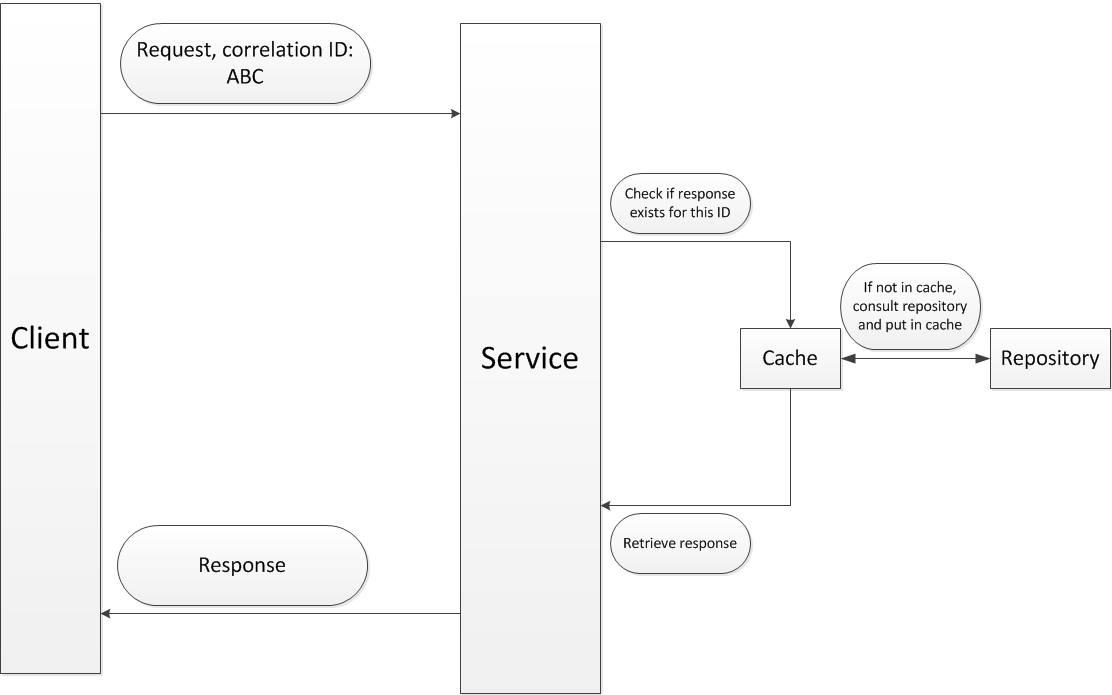
The only major difference between the the two Post method structures is that here we set the correlation ID ourselves. It is set to the reservation ID which is unique and it makes sense to use as the message correlation ID to check if we have fulfilled the request. Otherwise the client could provide just any correlation ID so we cannot trust that input.
Finally we need to instruct StructureMap to fetch the correct dependencies. Locate IoC.cs in the DependencyResolution folder. Make sure it looks as follows:
public static IContainer Initialize()
{
	ObjectFactory.Initialize(x =>
				{
					x.Scan(scan =>
							{
								scan.TheCallingAssembly();
								scan.AssemblyContainingType<IProductService>();
								scan.AssemblyContainingType<IMessageRepository>();
								scan.WithDefaultConventions();
							});
					x.For<IMessageRepositoryFactory>().Use<LazySingletonMessageRepositoryFactory>();
					x.For<IProductRepositoryFactory>().Use<LazySingletonProductRepositoryFactory>();
				});
	ObjectFactory.AssertConfigurationIsValid();
	return ObjectFactory.Container;
}
We tell IoC where to look for concrete implementations and which concrete types to take in those cases where the standard ‘I’ naming convention doesn’t apply: (I)Service => Service. For more details consult the post I hinted at in the beginning of this post.
This actually completes the client proxy layer. In the next post we’ll test the proxy by building a console application client.
View the list of posts on Architecture and Patterns here.