Thread safe collections in .NET: ConcurrentStack

Concurrent collections in .NET work very much like their single-thread counterparts with the difference that they are thread safe. These collections can be used in scenarios where you need to share a collection between Tasks. They are typed and use a lightweight synchronisation mechanism to ensure that they are safe and fast to use in parallel programming.

Concurrent stacks

If you don’t know what Stacks are then you can read about them here. The Stack of T generic collection has a thread-safe counterpart called ConcurrentStack. Important methods:

  • Push(T element): adds an item of type T to the collection
  • PushRange(T[] elements) and PushRange(T[] elements, int, int): same as Push but is used for adding an array of items to the collection
  • TryPeek(out T): tries to retrieve the next element from the collection without removing it. The value is set to the out parameter if the method succeeds. Otherwise it returns false.
  • TryPop(out T): tries to get the first element. It removes the item from the collection and sets the out parameter to the retrieved element. Otherwise the method returns false
  • TryPopRange(out T[] elements) and TryPopRange(out T[], int, int): same as TryPop but is used for arrays

The ‘try’ bit in the method names imply that your code needs to prepare for the event where the element could not be retrieved. If multiple threads retrieve elements from the same stack you cannot be sure what’s in there when a specific thread tries to read from it.

Example

Declare and fill a concurrent stack:

ConcurrentStack<int> concurrentStack = new ConcurrentStack<int>();

for (int i = 0; i < 5000; i++)
{
	concurrentStack.Push(i);
}

Next we’ll try to pop every item from the stack. The stack will be accessed by several tasks at the same time. The counter variable – which is also shared – will be used to check if all items have been retrieved.

int counter = 0;

Task[] stackTasks = new Task[10];
for (int i = 0; i < stackTasks.Length; i++)
{
	stackTasks[i] = Task.Factory.StartNew(() =>
	{
		while (concurrentStack.Count > 0)
		{
			int currentElement;
			bool success = concurrentStack.TryPop(out currentElement);
			if (success)
			{
				Interlocked.Increment(ref counter);
			}
		}
	});
}

The while loop will ensure that we’ll try to pop the items as long as there’s something left in the collection.

Wait for the tasks and print the number of items processed – the counter should have the same value as the number of items in the stack:

Task.WaitAll(stackTasks);
Console.WriteLine("Counter: {0}", counter);

View the list of posts on the Task Parallel Library here.

.NET Developers’ user guide for troubleshooting networking problems Part 2

We’ll continue our discussion on basic networking we started in the previous post.

IP routing

We’ll start off by looking at how traffic is routed from one network to another. Look at the following diagram:

Ip routing high level

We’ll talk about subnets in a little while: it’s a collection of computers that can talk to each other without needing to go through a router. A router connects different subnets – it routes traffic between different subnets. So if a computer within subnet A wants to talk to a computer on subnet B or on subnet C then traffic will pass through one or more routers. Let’s look at a couple of tools where we can watch this IP routing.

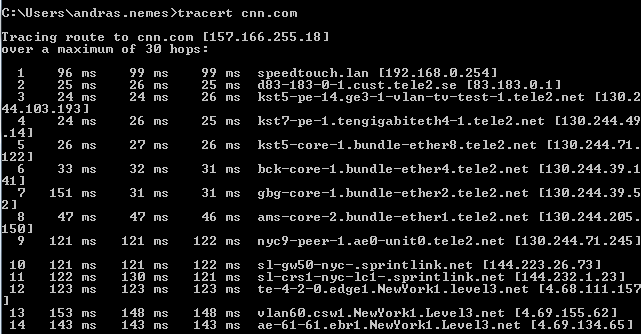
We’ll check out tracert – trace route – first which is a command line tool. Open up a command prompt and type tracert cnn.com:

Tracert cnn.com

The list is a lot longer, I didn’t copy the entire output. The list shows you the routing trace, i.e. the series of routers this traffic has to pass through in order to reach cnn.com. It takes measurements to see how long each hop takes.

Note that the values you see on your machine will almost certainly look different – the routing depends on your location in the world. It would be strange for you to have the same route as me if you are located in the US whereas I’m in Sweden.

The topmost entry is typically your local router connected to your modem. Then it goes on to the routers of my ISP which is Tele2 etc. You can then even read the geographic location of some of those routers: New York, Washington, Atlanta. The trace shows all the hops the traffic needs to pass from your computer to the cnn.com web server. The second column of millisecond values shows how long each hop took. In case of routing issues these values may be very large or you may even see a timeout.

If you identify a bad link in this chain then you’ll most likely have no control over it, you’ll just have to accept the news, but it can be good to be aware of the problems. The hops will take of course more time if you want to reach a server in the US from Europe. So if you have your business in the US and expect traffic from Europe then it can be a good idea to place a couple of web servers on the East Coast of the US so that these hops take shorter.

There’s another tool called pathping which has a similar purpose but gives you a more robust report. Type pathping cnn.com in the command window. The tool will output the same routing chain as tracert but will also perform a series of tests on these links over a long period of time. It will hit every link 100 times and output some statistics. You will see something like ‘Computing statistics for 400 seconds…’ in the command prompt meaning that it will take 400 seconds to calculate the statistics. The stats may look as follows:

Pathping output

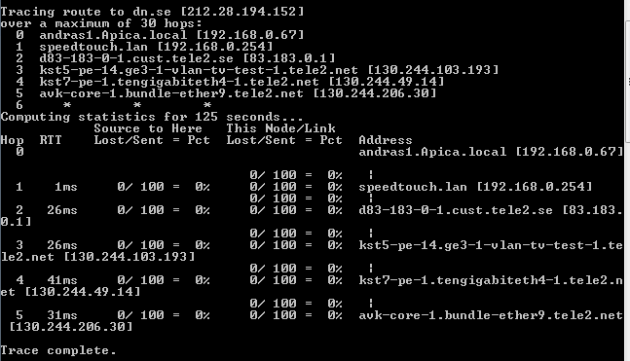
What’s new is the lost/sent packet ratio: in the above case there were no packets lost whatsoever. This is what we should see in a healthy connection state.

Subnets

So routers direct traffic between subnets but what are subnets? The subnet is defined by a combination of the IP address and the subnet mask. Example:

IP: 193.169.115.230
Subnet mask: 255.255.255.000

The subnet mask has the same format as an IP address, i.e. it consists of 4 octets. The first 3 octets of the subnet mask have 8 bits turned on. 255 is written as 11111111 in binary notation, i.e. 8 bits. The last octet is turned off. The octets where the bits are turned on represent the network or the subnet. Where the bits are off, that represents a specific node on the subnet. In the above example the last octet of the IP address, i.e. 230 represents a specific node in the network denoted by 193.169.115. If the subnet mask is 255.255.000.000 then the the specific node is 115.230 within the subnet 193.169.

The subnet mask can be further broken down into 4*8 = 32 bits: 255 = 11111111 in the binary system as mentioned above, so the subnet example can also be written as 11111111.11111111.11111111.00000000. Therefore we have 24 bits turned on and 8 bits turned off. We can say that the subnet can have an IP range of 193.169.115.000 to 193.169.115.255. We can denote the same thing as 193.169.115.000/24 or 193.169.115.000/255.255.255.000. You can have a single 0 in place of the triple 0’s: 255.255.255.0.

Therefore if a computer with IP of 193.169.115.124 wants to communicate with another computer with IP 193.169.115.236 then the communication is direct, i.e. not routed through a router as both computers a located within the same subnet. If the other computer lies outside of that range then it will need to go through its default router. You can see how this changes if the subnet mask is 255.255.0.0 instead, i.e. 1111111.11111111.00000000.00000000. Then the IP range of this subnet becomes 193.169.0.0 to 193.169.255.255.

The subnet mask can vary and not always look that pretty: 255.255.254.0 i.e. 11111111.11111111.11111110.00000000. So we have 8 bits on, then 8 bits on then 7 bits on and 0 bits on. This is a 23 bit subnet which changes the IP range to 193.169.115.0 to 193.169.116.255. So you would normally think that the ranges are parts of different subnets, but you have to look at the subnet mask to be able to tell for sure.

Another example: with a subnet mask of 255.255.255.240 we have 28 bit subnet, i.e. 11111111.11111111.11111111.11110000. This is saying that we’ve broken down a ‘clean’ subnet into smaller pieces. The IP range will then span between 193.169.115.124 and 193.169.115.139. This is an extremely small subnet.

Route tables

How does the computer determine how to reach other subnets? This is where route tables enter the picture. Open a command prompt and enter the route PRINT command:

Route print command

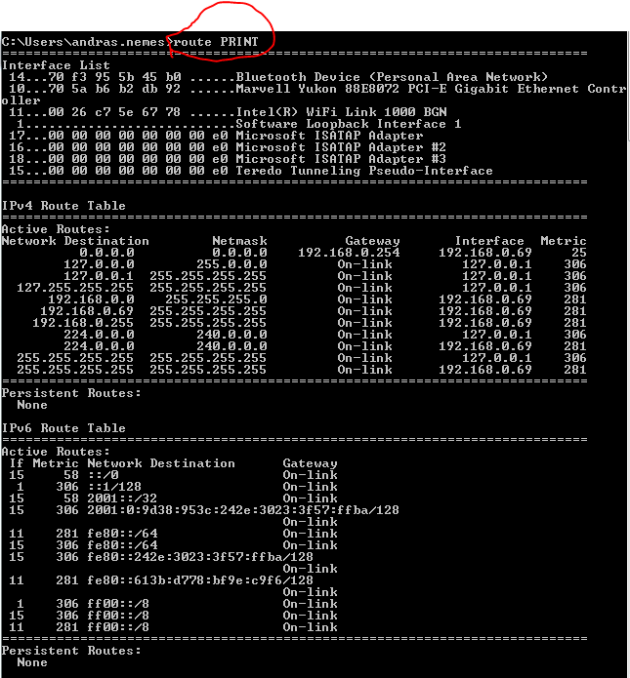
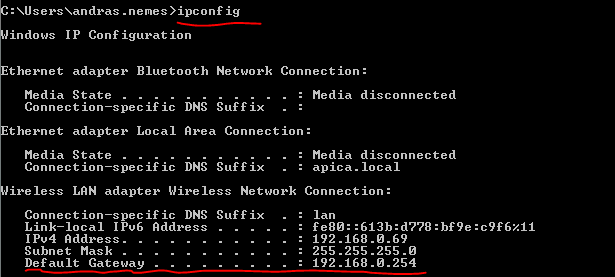
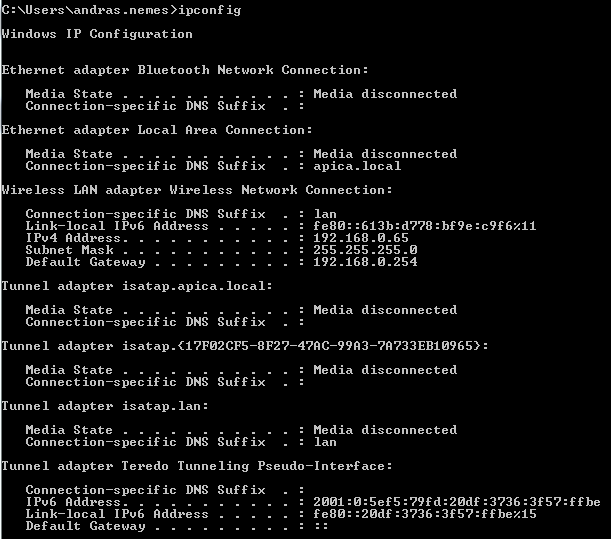
Locate the first entry in the IPv4 route table with a network destination and subnet mask of 0.0.0.0 which means any IP address. The gateway the traffic needs to go through will be 192.168.0.254 on the interface 192.168.0.69 which is my current private IP address. The last value is the metric where the lowest value has priority so the gateway with the lowest metric will be the default one. The ‘on-link’ values are special: they denote your own computer so there’s no need for routing in those cases. E.g. all 127.x.x.x addresses point to your local machine, i.e. the localhost. Your computer will know the Gateway through the IP configuration:

IPConfig default gateway

Any traffic that’s destined to another network goes through this default gateway.

Network address translation (NAT)

You may have spotted the term ‘private IP’ in the previous section. There are 3 network ranges that are for private use only in IPv4: they cannot be routed to in the public internet. You typically get one public IP address from your Internet Service Provider but you can have several machines online at home: your PC, your desktop, your phone and possibly others. They each will use a private IP. IPconfig returned my private IP address under ‘IPv4 Address’.

A mechanism called Network address translation takes these private private IPs as they leave my home and converts them into the external public IP. It also translates the incoming public IP to the correct private IP address.

As private IPs are not reachable from the Internet it’s obvious that if you want to host a site available on the public Internet then you need a public IP address. You can actually host your website on your desktop at home by declaring that all traffic to your public IP address on port 80 – which standard HTTP traffic goes through – be routed to one specific private IP, in this case the private IP of your desktop. So you cannot direct port 80 traffic to more than one private IP.

The following ranges are for private use only:

  • 10.0.0.0 with a subnet mask of 255.0.0.0
  • 172.16.0.0 with a subnet mask of 255.240.0.0
  • 192.168.0.0 with a subnet mask of 255.255.0.0

You’ll recognise that the private IP I mentioned above fits in the the last range. The value you see in ipconfig on your machine will most certainly fit in one of these ranges.’

Ports

Ports are used to connect to a process on the server side by some protocol. The process will be listening to incoming messages on a certain port. HTTP websites listen to port 80 and HTTPS websites on port 443 by default. Many message-based products will listen on some default port: Apache Tomcat on port 8080, MongoDb on 27017, SQL server on 1433. The most common transport layer protocol is TCP which stands for Translation Control Protocol. Almost all web traffic – HTTP, mail – runs on TCP.

The sender, i.e. the client computer, wants to establish a session with the receiver, i.e. the server. The receiver will establish that session and declare that it’s ready to accept data. The client will then send one or more data sets. The server then sends a messaging confirming which messages it received. It’s possible that one or more data sets the client sends out is lost. In that case after a timeout period the lost data set will be resent. The server will confirm in case it received that message. The sender will know that the receiver has received the entire data pack:

Tcp diagram

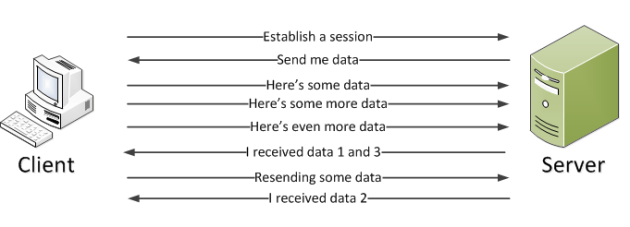
The messaging process is managed by the networking stack. You don’t need to prepare anything extra in your application on the server side to accommodate the process.

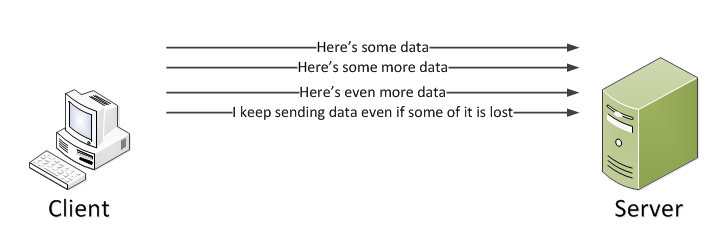
TCP is not the only transport protocol type: UDP or User Datagram Protocol is another example. In UDP the sender doesn’t establish a session first. Instead, it starts sending data right away. Here there’s no built-in mechanism to resend lost data packets. So if some data set is lost then it cannot be resent:

UPD

UDP can be a good choice if losing some data packets is acceptable, e.g. in the case of video conferencing. If let’s say the 5th second of the video is lost and the participants keep talking then in the case of TCP the 5th second would be resent interrupting the flow of the video. Also, there’s no session involved in UDP meaning it has a lower overhead. However, in most messaging scenarios on the internet we do care about data and we need all data in order to process the requests. In that case TCP is the preferred choice.

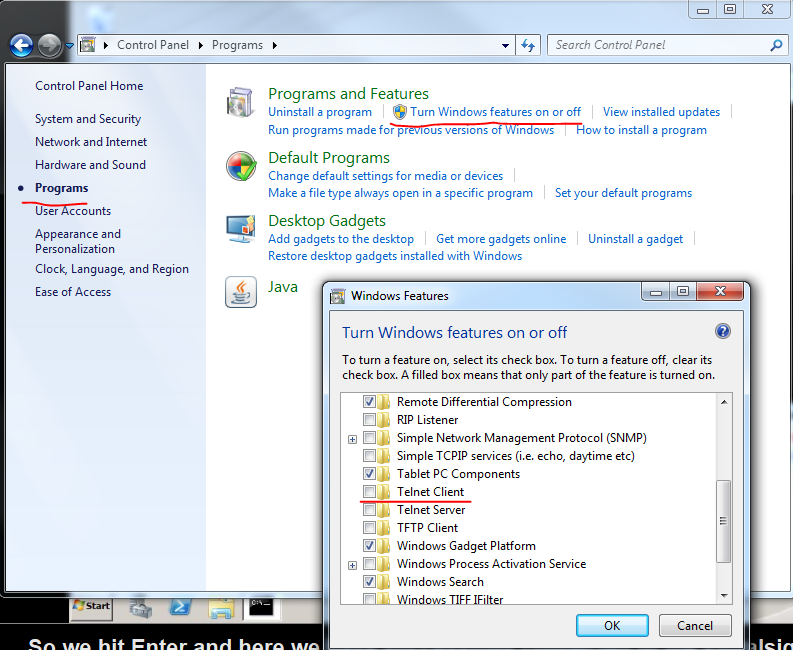
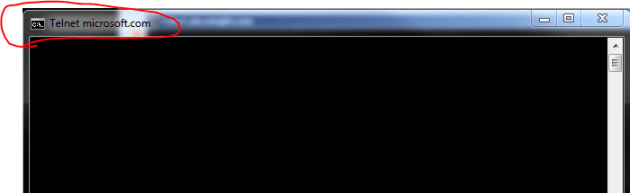
You can test port connectivity using the command line using the telnet command. You can only test the TCP protocol this way. With UDP we simply send data and hope that it arrives. With the telnet command you can establish a session and send the commands to the receiving application, much like a web browser would do. Open a command prompt and type ‘telnet microsoft.com 80’: we want to connect to the process microsoft.com on port 80 which is the standard port for HTTP traffic. In case the command prompt is complaining about telnet not being an available command you need to turn on that feature:

Turn on telnet client

The command prompt should go all black upon a successful session setup:

Telnet microsoft.com

The microsoft.com server assumes that it has established a session with a browser and is ready to accept data. We could send HTTP GET requests to the server and expect some answer in return. Press Ctrl+C and enter to exit and you’ll see that the server has sent a 400 Bad Request:

Telnet HTTP bad request

The server didn’t understand what we wanted so it returned a HTTP 400. It even sent back some HTML that a web browser can render. We have successfully connected to an IIS process!

Now try to connect to port 81: type telnet microsoft.com 81 in the command prompt. There’s probably no process listening on port 81 on that web server but let’s see what happens:

Telnet connect timeout

The networking stack of the operating system is trying to establish a connection by sending out a session request to port 81 on microsoft.com. It’s possible that there’s some process listening on this port but the firewall is not letting through the request. Eventually we get the timeout message as seen above.

It’s not only HTTP websites that you can connect to of course using telnet but any type of process listening on some port. If you know that there’s an SQL server process on computer Machine01 then you could connect to that process and issue SQL commands by typing ‘telnet Machine01 1433’, where 1433 is the standard port SQL servers is expecting commands on.

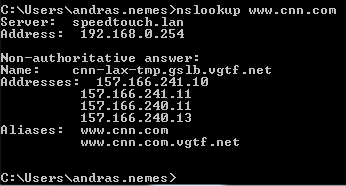
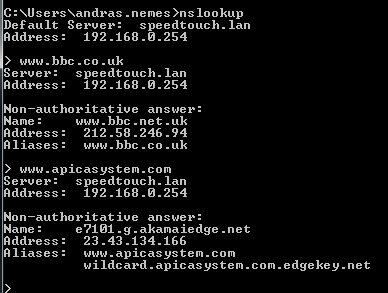
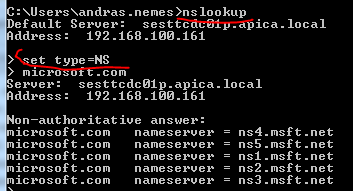
Let’s now see how a mail server process responds. Let’s find the mail server name of gmail.com using nslookup:

NSlookup Gmail

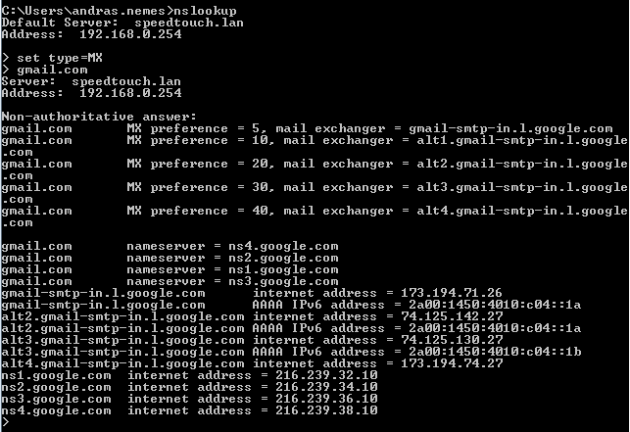
Let’s try the one with the lowest preference value: gmail-smtp-in.l.google.com. SMTP mail traffic normally listens on port 25, so let’s issue the following telnet command: telnet gmail-smtp-in.l.google.com 25. If you successfully connect to the mail server then you should get a banner that says something like ‘220 mx.google.com ESMTP xxxx.79’. You can then send emailing commands to that port if you want to. You can quit the process by typing ‘quit’.

So you can use telnet if you know the port number to connect to. If you’re not sure then you can port scan the server using the the free nmap utility available here. Download the appropriate Windows installer and install the tool. Then you can issue the ‘nmap -v [machinename]’ command for a verbose port scan. The tool will try to connect to various TCP ports and list the ones where it was able to get through.

If you want to see which ports your computer is listening on then issue the ‘netstat -ano’ command:

netstat ano

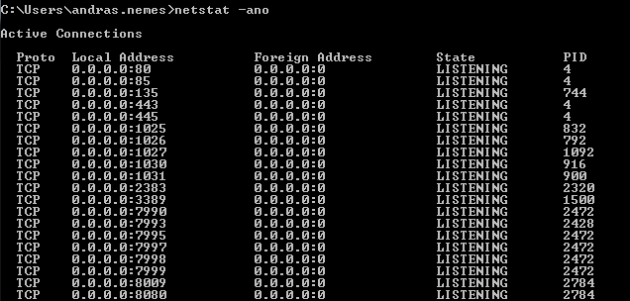
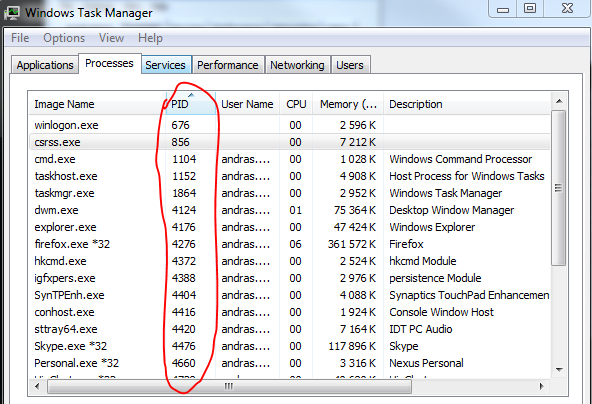
The image shows only an extract of the full list of processes. 0.0.0.0 means that it’s going to listen on every IP address that’s available on the localhost. The port numbers are appended to the IP, e.g. :80, :443 etc. You’ll see the PID column on the right hand side. This shows the ID of the process or application that’s communicating with the process on that port. Open the task manager and add the PID column to the window:

Add process ID to task manager

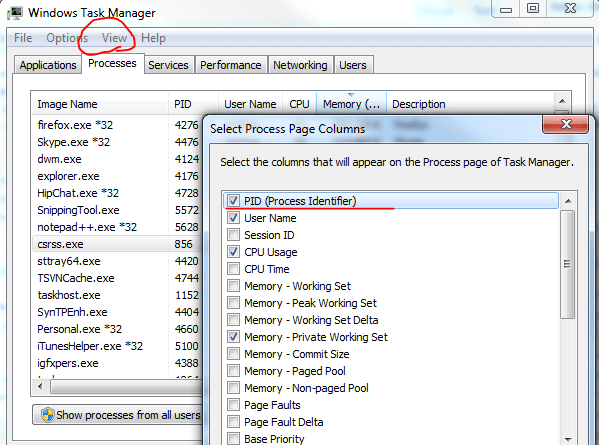
You can then try and locate the process with some ID:

Task Manager with PID

This is helpful if you want to find a specific process using a port. Also, it helps finding conflicts when 2 or more processes are trying to listen on the same port.

Efficient linked lists in .NET

Sometimes you need a collection that’s modified a lot: you insert, update and remove items. A List of T is then inefficient as it needs to constantly rearrange all other items. The LinkedList class might be a better candidate.

A linked list is a doubly-linked list. Each item has a Next and Previous pointer to look at which element comes right before and after a particular object in the list. A linked list is very efficient at inserting and deleting items in particular.

Initialisation:

LinkedList<int> intList = new LinkedList<int>();

There are multiple ways to add a new item: AddAfter, AddBefore, AddFirst, AddLast.

Adding a new item on the top of the list:

intList.AddFirst(2);

Putting 3 ahead of 2:

intList.AddFirst(3);

It’s not possible to directly pull out an item with an indexer, such as [2].

You can, however, iterate through the collection:

foreach (var i in intList)
{
}

You can get a reference of the first item with the First property:

LinkedListNode<int> firstItem = intList.First;

You can then insert an item after that:

intList.AddAfter(first, 5);

This will add 5 in between 3 and 2.

Inserting before the first item is equally easy:

intList.AddBefore(first, 5);

You can get to the last item… can you guess how? Through the Last property.

The First and Last properties do not return an int, or the type that you provided in place of T. It returns a LinkedListNode of type T, which is int in this case. This object has a Previous and Next properties:

LinkedListNode<int> firstItem = intList.First;
firstItem.Previous;
firstItem.Next;

It also has a Value property which returns the actual value of the LinkedListNode object.

Another way of iterating through the list is the following:

LinkedListNode<int> item = intList.First;
while (item != null)
{
    int val = item.Value;
    item = item.Next;
}

Removing items can be done with methods such as RemoveLast(), RemoveFirst(), Remove(item).

.NET Developers’ user guide for troubleshooting networking problems Part 1

Introduction

As a programmer I normally don’t need to deal with hard-core networking issues in my job. The company I work at has a group of well-trained network engineers that fix network related problems for developers. However, I sometimes have the need to check some more basic things within networking to debug my code. Also, it can be beneficial to be able to follow along when network engineers discuss subnets, DNS records, ports and the like.

This is exactly the goal of this series: to help developers get to grips with the most basic concepts within networking. You certainly won’t become a professional networking engineer but you may not need that either.

Note: I did all demos on a Windows 7 machine. Other versions of Windows may output the values in a different format.

A network request

What happens when you enter a URL in your browser and press enter?

Networking diagram

The client wants to view http://www.bbc.co.uk to read the news so she enters that URL in the browser. The URL must then be converted into an IP address by the client computer therefore it needs to find out the IP address of http://www.bbc.co.uk. It performs this task by a service called DNS or Domain Naming System.

So it consults its configured DNS servers for the IP address of bbc.co.uk. The DNS server looks up the IP address and sends it back to the client. The client can now go out to the Internet through its switch and router and reach the data centre where the server is located. It will then pass through a firewall and switches to finally arrive at the web server. In the web server it enters the networking stack of the operating system, usually followed by a host based firewall and at last it reaches the process that’s the actual web server.

The data is then sent back to the client in the form of HTML, JSON, XML or whatever the format of the web application and it is rendered on the client machine.

The IP address

Each node in the network has an IP address, which is analogous to the unique address of your home. The postman needs to find you somehow so he will read the address on the letter and deliver it to your letterbox.

An IPv4 address is made up of 4 octets separated by a period similar to the following: 83.183.46.130.

Then we have the subnet mask which defines which part of the IP address is the subnet and which part is the specific node on that network. A subnet mask may look as follows: 255.255.255.0. We’ll look at subnets in a future post but for the time being it’s enough to know that if you try to reach an IP address which is not part of your subnet then it has to go through the default gateway. The default gateway can have an address such as 192.168.0.254.

Then we have the DNS servers that the client computer will use to turn names into IP addresses. Their IP typically looks like 75.75.75.75 or 75.75.75.76.

It’s easy to check your own IP configuration. Open a command prompt and run the ‘ipconfig’ command. The no-args version of the command will show your basic network configuration:

ip config no args

You will see the IPv4 address, the subnet mask and the default gateway. If you run the command ‘ipconfig -all’ then you’ll get a lot more information. You’ll see your host name at the top of the output. You’ll also find the DNS server somewhere in the middle. Your computer is configured to point to that DNS server to translate http://www.bbc.co.uk into numbers. Also, you’ll see something called the DHCP server. The DHCP server, which stands for Dynamic Host Configuration Protocol, is where your computer obtains the IP configuration.

So when a machine comes online and needs an IP configuration then it sends out a message asking for one. The DHCP server will catch that message and will respond with an IP address, a subnet mask, a default gateway and one or more DNS servers. The client machine will then take that information to configure itself and respond to the DHCP server saying that it will use that address. The DHCP server will then know that this IP is in use and will not hand it out to any other online machine for a specified period of time:

ObtainingAnAddressFromDHCP

Starting with Windows 2000 if the client is unable to get hold of an IP address then eventually it will give itself an address in the 169.254 address range which is a range owned by Microsoft. The client will eventually send out a message saying “I’m using 169.254.x.x”. This scenario occurs extremely rarely but if you see that your computer is struggling to get an IP and gets an IP in this range then it’s telling you that something is wrong and you’re not getting a response from the DHCP server.

What’s IPv6?

The current IP version is use is version 4, or IPv4. With the format mentioned above, i.e. 4 octets we get 2^32 – 2 raised to the power of 32 – different addresses. That’s quite a large number but is definitely finite and we’re soon reaching its upper limit.

IPv6 has been developed to extend the number of possible variations to 2^128 which is so large that we’ll enough left for all visiting extraterrestrials in the year of 10000.

Now IPv4 and IPv6 are running parallel. That’s why the ipconfig command gave you both and IPv4 and an IPv6 address. The ultimate goal is to only go forward with IPv6 sometime in the future.

You’ll see that the format of IPv6 is very different from IPv4. Example: 2001:0:5ef5:79fd:20df:3736:3f57:ffbe. As a developer you need to be aware of the differences if you need to log or validate an IP address or your app needs to show the new format on the screen.

DNS

So how is the name resolved that you enter in the URL text box of your web browser? As we mentioned above the client is configured to point to an initial DNS server. Say that it’s configured to contact nameserverA.isp.com. Therefore the client is going to ask this DNS server to resolve a URL and get the IP address belonging to that URL. The first DNS server probably won’t have this record so it sends a request to the root name servers: do you know where I can find this URL? The root name servers only contain the name server locations for the top level domains: .info, .com, .uk etc. and it’s the only thing it knows. So the root NS responds the first name server, like “no, I only know about top level domains but you can ask the .com name server because I know it has more information.” So nameserverA.isp.com asks the .com name server. The .com name server will have information about where to find the IP addresses of all .com URLs so it tells nameserverA.isp.com to go and ask the cnn.com name server. The cnn.com name server will have all the information about the cnn.com namespace and responds with the IP address.

DNS name resolution

The image is a bit messy so make sure you follow all the arrows based on the description. As you see the configured name server nameserverA.isp.com has a central role in the quest for finding the IP address. It takes a couple of stops before the final answer has been found.

NsLookup

You can use the command line tool called NsLookup to perform DNS queries. Let’s try to look up the IP address of cnn.com:

NsLookup cnn.com

Alternatively you can just type ‘nslookup’, press enter and then you can perform multiple queries:

NsLookup multiple queries

You’ll see that cnn.com returned more than one IP address. It means that we can reach cnn.com using several different IP addresses. Try http://www.microsoft.com and you’ll see that it’s been aliased to akadns.net, which are Akamai addresses. Akamai is a Content Delivery Network solution for faster downloads: Akamai homepage.

When you’re done using nslookup in the multiple query mode you can just type exit to come back to the ‘normal’ command prompt mode. In case you want to change the DNS server for your lookup query then enter the multiple query mode again by typing ‘nslookup’ and run the command ‘server [ip of the dns server you want to ask]’, e.g. server 123.456.678.43 and then ask for http://www.microsoft.com to see if you get the same IP address as in the case of the default DNS server.

The DNS records are cached for a certain period of time in the name servers to speed up the queries. Even your local machine caches this information. In your command window type ping the following 3 URLs using the ping command:

ping http://www.cnn.com
ping http://www.bbc.co.uk
ping http://www.microsoft.com

Then enter the following command: ipconfig /displaydns. This will bring up a list of all records cached on your local machine including the ones you have just pinged:

Ip config display DNS

Check out the Time to Live value. The record microsoft.com is cached for about 3500 seconds on my local machine. Wait a little bit and enter the ipconfig /displaydns command again. You should see that the Time to Live value should decrease. It will eventually reach 0 when the record is cleared from the cache.

Be aware of this caching feature as if you change a DNS record it will take some time to propagate it around the internet. Initially the old record will be returned from the DNS server as it is still in the cache.

Caching also means that if you ask for microsoft.com in your browser multiple times then there’s no need to go through the same name server lookup process over and over again. The immediate name server configured for your computer will have it in its cache and will be able to respond immediately with the correct IP address.

Override DNS in the local host file

It’s possible to override the DNS values on your local machine. This is done in the host file. On Windows machines it is usually located in the C:\Windows\System32\drivers\etc folder. The file is called hosts and you can open and edit it like a normal text file. You can add your ip-name pairs to the file using the following format:

Host file

So the format is: the ip address followed by a tab and then the name. You can even enter localhost IPs where localhost is always 127.0.0.1. You can add multiple names for the same IP as follows:

Host file with multiple names

You can enter the same made up values that I have and save the file. Go back to the command window and type ipconfig /displaydns again. Saving the hosts file will automatically clear the local cache which will be populated with the values in the host file. You should see the values you have just entered in the host file in the command window output. Run a ping command against one of the custom values in the host file, such as ping mysite.com and you’ll see that it will try to reach the IP that you specified. As that IP probably doesn’t exist it will just show a couple of Request timed out values.

Why would you modify the host file? If you migrate a website from one IP address to another, then you probably want to test the new environment in your browser, right? As the URL of the website doesn’t change then it will lead to the old IP address that exists in the name servers. You can then deploy the website to the new environment, override the host file and enter the URL again. You will then be directed to the IP you have specified in the host file. This is a very convenient solution for testing purposes: your clients will not see your beta site as they will still be directed to the old IP. Then when you’re done testing you can propagate the new IP value across the Internet.

Record types

When you type nslookup microsoft.com in the command prompt then it will provide you with one or more records of type A: an A record. An A record turns a name into an IP address. It is the default type of record that nslookup returns. There are other types of records and you can let nslookup return them as well. Run the nslookup command without specifying the name to enter the multiple query mode.

To query name server records you can set the type as follows:

NsLookup name server record

Here you see the name servers that are responsible for the microsoft.com namespace. Here we see 5 name servers. In the name resolution process your computer will pick one of those at random.

You can query mail exchange records (MX) but setting the type as follows:

set type=MX

Then query microsoft.com will give you something like this:

NsLookup mail exchange

If you send an email to Microsoft then you’ll send it to the microsoft-com.mail.protection.outlook.com mail server. That’s who will accept mail for the microsoft.com namespace. It’s possible that there are multiple mail servers in which case the preference parameter tells me in which order I should try to send the email.

Another record type is CNAME which stands for ‘canonical name’, it’s sort of an alias:

set type=CNAME

Then test microsoft.com. You’ll see no CNAME for that:

NSLookup no CNAME

The reason is that we cannot have a CNAME for the root of the domain. However, try http://www.microsoft.com, you’ll get a CNAME:

NsLookup with cname

http://www.microsoft.com is aliased to an Akamai address. This means that when you type http://www.microsoft.com in your web browser and get the IP address for it from the name server lookup then you will be directed to a server owned by the Akamai network.

The last record type to look at is the quad A, or AAAA record type. This is an IPv6 version of an A record so this turns the name into an IPv6 address. If you set the type to CNAME in the command prompt and query a name then you’ll get the AAAA records as well:

AAAA records

This is the case on with Windows 7. If you don’t see this output then test setting the type to AAAA first:

set type=AAAA

and then query a name.

These are the most common record types out there.

Using HashSet in .NET to allow unique values only

Hashsets allow you to add unique values into a collection. So if you have a rule that no two identical objects are added to a collection then a Set is a good choice.

Initialisation:

HashSet<int> integerSet = new HashSet<int>();

Add new items:

integerSet.Add(2);
integerSet.Add(3);

There’s no direct access available with an index parameter, like [2]. There’s no particular order to the items inserted to a Set. You’ll never know where the items end up and which one is the first in the list.

You can simply iterate through the values like this:

foreach (int value in integerSet)
{
}

If you try to add an integer that already exists then it will ignored. The Add method has a boolean return value. It will return false if the item you’re trying to add already exists in the collection and true otherwise.

You can easily build the intersection of two sets:

HashSet<int> integerSet1 = new HashSet<int>(){1, 2, 3};
HashSet<int> integerSet2 = new HashSet<int>(){2, 3, 4};

integerSet1.IntersectWith(integerSet2);

This operation will only keep those items in integerSet1 that were available in both sets, i.e. the intersection of the two sets: 2 and 3.

Building a union is equally easy:

integerSet1.UnionWith(integerSet2);

…resulting in integerSet1 = 1,2,3,4.

SymmetricExceptWith returns those items that are found in set 1 and set 2 but not both:

integerSet1.SymmetricExceptWith(integerSet2);

Result: 1,4.

If you want to store objects, such as Customer, Product, etc. then you need to take some extra care. Sets have no idea when two object are considered equal. By default the following operation will add both objects:

HashSet<Product> productSet = new HashSet<Product>();
productSet.Add(new Product() { Name = "A" });

These are two different objects, they point to two different locations in the memory heap.

One way to solve this is that object will implement the IEquatable interface and override the GetHashCode method:

public class Product : IEquatable<Product>
{
	public string Name { get; set; }

	public override int GetHashCode()
	{
		return Name.GetHashCode();
	}

	public bool Equals(Product other)
	{
		return this.Name.Equals(other.Name);
	}
}

This will prevent adding two equal objects to be added to the Set – provided that they should be considered equal of course.

LIFO data collection in .NET: Stack of T

If you need a data collection in .NET where you are forced to handle the objects in a last-in-first-out manner then you can use the Stack of T object: the last object added will be the first to come out. A typical scenario is a deck of cards: you pick the first card from the top, i.e. the one that was added last.

To initialise:

Stack&lt;Card&gt; stackOfCards = new Stack&lt;Card&gt;();

To add items:

stackOfCards.Push(new Card(ace));
stackOfCards.Push(new Card(ten));

To get the most recently added object from the stack:

Card next = stackOfCards.Pop();

The Pop() method will also remove the item from the collection. So the next time you call Pop() you’ll get the item added before the most recently added one.

Just like with a Queue of T you cannot directly reference an object in the stack collection by some index, e.g. [3].

The Peek() method will let you view the next item on the stack but it won’t be removed from the collection:

Card next = stackOfCards.Peek();

You can test for the absence of an item with Contains:

bool contains = stackOfCards.Contains(ace);

If you absolutely need to access the items directly then convert the stack into an array:

Card[] cardArray = stackOfCards.AsArray();

This will copy the items in the stack but leave the stack itself intact.

A model SOA application in .NET Part 7: testing the client proxy

Introduction

In the previous post we finished building a thin but functional SOA web service. Now it’s time to test it. We could build just any type of consumer that’s capable of issuing HTTP requests to a service but we’ll stick to a simple Console app. The goal is to test the SOA service and not to win the next CSS contest.

The tester

Open the SOA application we’ve been working on. Set the WebProxy layer as the start up project and then press F5. Without setting the start up URL in Properties/Web you’ll most likely get a funny looking error page from IIS that says you are not authorised to view the contents of the directory. That’s fine. Extend the URI in the browser as follows:

http://localhost:xxxx/reservation

Refresh the browser and you should get a JSON message saying that there is no GET method for that resource. That’s also fine as we only implemented a POST method. The same is true for the purchase controller:

http://localhost:xxxx/purchase

Open another Visual Studio instance and create a new Console application called SoaTester. Import the Json.NET package through NuGet. Add assembly references to System.Net and System.Net.Http. Add the following private variables to Program.cs:

private static Uri _productReservationServiceUri = new Uri("http://localhost:49679/reservation");
private static Uri _productPurchaseServiceUri = new Uri("http://localhost:49679/purchase");

Recall that the Post methods require Request objects to function correctly. The easiest way to ensure that we don’t need to deal with JSON formatting and serialisation issues we can just copy the Request objects we already have the SoaIntroNet.Service layer. Insert the following two objects into the console app:

public class ReserveProductRequest
{
	public string ProductId { get; set; }
	public int ProductQuantity { get; set; }
}
public class PurchaseProductRequest
{
	public string ReservationId { get; set; }
	public string ProductId { get; set; }
}

Note that we dropped the correlation ID property from the purchase request. It’s irrelevant for the actual user and is set within the Purchase.Post() action anyway before the purchase request is passed to the Service layer.

We’ll need to read the JSON responses as well so insert the following three objects in the console app. They will all look familiar:

public abstract class ServiceResponseBase
{
	public ServiceResponseBase()
	{
		this.Exception = null;
	}

	public Exception Exception { get; set; }
}
public class PurchaseProductResponse : ServiceResponseBase
{
	public string PurchaseId { get; set; }
	public string ProductName { get; set; }
	public string ProductId { get; set; }
	public int ProductQuantity { get; set; }
}
public class ProductReservationResponse : ServiceResponseBase
{
	public string ReservationId { get; set; }
	public DateTime Expiration { get; set; }
	public string ProductId { get; set; }
	public string ProductName { get; set; }
	public int ProductQuantity { get; set; }
}

We’ll first call the Reservation operation. The below method calls the product reservation URI and returns a product reservation response:

private static ProductReservationResponse ReserveProduct(ReserveProductRequest request)
{
	ProductReservationResponse response = new ProductReservationResponse();
	try
	{
		HttpRequestMessage requestMessage = new HttpRequestMessage(HttpMethod.Post, _productReservationServiceUri);
		requestMessage.Headers.ExpectContinue = false;
		String jsonArguments = JsonConvert.SerializeObject(request);
		requestMessage.Content = new StringContent(jsonArguments, Encoding.UTF8, "application/json");
		HttpClient httpClient = new HttpClient();
		httpClient.Timeout = new TimeSpan(0, 10, 0);
		Task<HttpResponseMessage> httpRequest = httpClient.SendAsync(requestMessage,
			HttpCompletionOption.ResponseContentRead, CancellationToken.None);
		HttpResponseMessage httpResponse = httpRequest.Result;
		HttpStatusCode statusCode = httpResponse.StatusCode;
        	HttpContent responseContent = httpResponse.Content;
		Task<String> stringContentsTask = responseContent.ReadAsStringAsync();
		String stringContents = stringContentsTask.Result;
		if (statusCode == HttpStatusCode.OK && responseContent != null)
		{					
			response = JsonConvert.DeserializeObject<ProductReservationResponse>(stringContents);
		}
		else
		{
			response.Exception = new Exception(stringContents);
		}
	}
	catch (Exception ex)
	{
		response.Exception = ex;
	}
	return response;
}

We send a HTTP request to the service and read off the response. We use Json.NET to serialise and deserialise the objects. We set the HttpClient timeout to 10 minutes to make sure we don’t get any timeout exceptions as we are testing the SOA application.

The below bit of code calls this method from Main:

ReserveProductRequest reservationRequest = new ReserveProductRequest();
reservationRequest.ProductId = "13a35876-ccf1-468a-88b1-0acc04422243";
reservationRequest.ProductQuantity = 10;
ProductReservationResponse reservationResponse = ReserveProduct(reservationRequest);

Console.WriteLine("Reservation response received.");
Console.WriteLine(string.Concat("Reservation success: ", (reservationResponse.Exception == null)));
if (reservationResponse.Exception == null)
{
	Console.WriteLine("Reservation id: " + reservationResponse.ReservationId);
}
else
{
	Console.WriteLine(reservationResponse.Exception.Message);
}

Console.ReadKey();

Recall that we inserted a product with that ID in the in-memory database in the post discussing the repository layer.

Set two breakpoints in the SOA app: one within the ReservationController constructor and another within the ReservationController.Post method. Start the console application. You should see that the code execution stops within the controller constructor. Check the status of the incoming productService parameter. It is not null so StructureMap correctly resolved this dependency. The next stop is at the second breakpoint. Check the status of the reserveProductRequest parameter. It is not null and has been correctly populated by Web API and the Json serialiser. From this point on I encourage you to step through the execution by pressing F11 to see how each method is called. At the end the product should be reserved and a product reservation message will be sent back to the client. Back in the client the ProductReservationResponse object is populated by Json.NET based on the string contents from the web service. The results are then printed on the console window.

You can test the service response in the following way:

  • Send a non-existing product id
  • Send a malformatted GUID as the product id
  • Send a quantity higher than the original allocation, e.g. 10000

You’ll get the correct error messages in all three cases.

It’s now time to purchase the product. The below method will send the purchase request to the web service:

private static PurchaseProductResponse PurchaseProduct(PurchaseProductRequest request)
{
	PurchaseProductResponse response = new PurchaseProductResponse();
	try
	{
		HttpRequestMessage requestMessage = new HttpRequestMessage(HttpMethod.Post, _productPurchaseServiceUri);
		requestMessage.Headers.ExpectContinue = false;
		String jsonArguments = JsonConvert.SerializeObject(request);
		requestMessage.Content = new StringContent(jsonArguments, Encoding.UTF8, "application/json");
		HttpClient httpClient = new HttpClient();
		httpClient.Timeout = new TimeSpan(0, 10, 0);
		Task<HttpResponseMessage> httpRequest = httpClient.SendAsync(requestMessage,
			HttpCompletionOption.ResponseContentRead, CancellationToken.None);
		HttpResponseMessage httpResponse = httpRequest.Result;
		HttpStatusCode statusCode = httpResponse.StatusCode;
		HttpContent responseContent = httpResponse.Content;
		Task<String> stringContentsTask = responseContent.ReadAsStringAsync();
		String stringContents = stringContentsTask.Result;
		if (statusCode == HttpStatusCode.OK && responseContent != null)
		{
			response = JsonConvert.DeserializeObject<PurchaseProductResponse>(stringContents);
		}
		else
		{
			response.Exception = new Exception(stringContents);
		}
	}
	catch (Exception ex)
	{
		response.Exception = ex;
	}
	return response;
}

I realise that this is almost identical to PurchaseProduct and a single method probably would have sufficed – you can do this improvement as homework.

Below the code line…

Console.WriteLine("Reservation id: " + reservationResponse.ReservationId);

…add the following bit to complete the loop:

PurchaseProductRequest purchaseRequest = new PurchaseProductRequest();
purchaseRequest.ProductId = reservationResponse.ProductId;
purchaseRequest.ReservationId = reservationResponse.ReservationId;
PurchaseProductResponse purchaseResponse = PurchaseProduct(purchaseRequest);
if (purchaseResponse.Exception == null)
{
	Console.WriteLine("Purchase confirmation id: " + purchaseResponse.PurchaseId);
}
else
{
	Console.WriteLine(purchaseResponse.Exception.Message);
}

So we purchase the reserved product immediately after receiving the reservation response. Run the tester object without any break points. You should see the purchase ID in the console window.

You can test the SOA app in the following way:

  • Set a breakpoint in the Purchase controller and step through the code slowly with F11 – make sure that the purchase expiry time of 1 minute is reached
  • Alternatively use Thread.Sleep() in the tester app before the call to the Purchase controller
  • Modify the reservation id to some non-existent GUID
  • Set the reservation id to a malformed GUID

You will get the correct exception messages in all cases from the SOA app.

That’s all folks about SOA basics in this series. I hope you have learned a lot of new concepts.

View the list of posts on Architecture and Patterns here.

A model SOA application in .NET Part 6: the client proxy

Introduction

In the previous post we got as far as creating a service layer. Now it’s time to build a client proxy on that, i.e. a layer that the external clients of the service can send their requests to. We’ll use the the Web API technology to build this layer. If you’ve read through the other software architecture series on this blog you’ll see that Web API is very dear to me as it’s very simple to set up and use.

The client proxy

In this section I’ll refer a lot to this post in the series on the DDD skeleton project. Make sure you get familiar with it as it contains a lot of information that’s relevant to this post. In that post I show you how to add a web API project and transform it so that it only contains the web service relevant parts. We don’t want to deal with views, JS files, images etc. in a web service project. I also go through the basics of how to install and use the IoC called StructureMap in an MVC-based project. It will be responsible for resolving dependencies such as the ones in this constructor:

public ProductService(IMessageRepositoryFactory messageRepositoryFactory, IProductRepositoryFactory              productRepositoryFactory)

Add a new MVC4 web application called SoaIntroNet.WebProxy to the solution. Make sure to select the Web API template in the MVC4 Project Template window. Add a reference to all other layers – this is necessary for the StructureMap IoC container as we’ll see in a bit.

Next get rid of the standard MVC4 web application components. Again, consult the above link to see how it can be done. Install StructureMap from NuGet. You should have the following simplified structure of the web client project:

Web project structure after changes

Add the following section to the Register method of WebApiConfig.cs in the App_Start folder to make sure that we respond with JSON:

var json = config.Formatters.JsonFormatter;
json.SerializerSettings.PreserveReferencesHandling = Newtonsoft.Json.PreserveReferencesHandling.Objects;			
config.Formatters.Remove(config.Formatters.XmlFormatter);

In the same method you’ll see that the API calls are routed to api/controller/id by default. Remove the ‘api’ bit as follows:

config.Routes.MapHttpRoute(
	name: "DefaultApi",
	routeTemplate: "{controller}/{id}",
	defaults: new { id = RouteParameter.Optional }
	);	

Add a folder called Helpers to the web layer. Add the following two classes with extension methods:

public static class ExceptionDictionary
{
	public static HttpStatusCode ConvertToHttpStatusCode(this Exception exception)
	{
		Dictionary<Type, HttpStatusCode> dict = GetExceptionDictionary();
		if (dict.ContainsKey(exception.GetType()))
		{
			return dict[exception.GetType()];
		}
		return dict[typeof(Exception)];
	}

	private static Dictionary<Type, HttpStatusCode> GetExceptionDictionary()
	{
		Dictionary<Type, HttpStatusCode> dict = new Dictionary<Type, HttpStatusCode>();
		dict[typeof(ResourceNotFoundException)] = HttpStatusCode.NotFound;
                dict[typeof(LimitedAvailabilityException)] = HttpStatusCode.InternalServerError;
		dict[typeof(Exception)] = HttpStatusCode.InternalServerError;
		return dict;
	}
}	
public static class HttpResponseBuilder
{	
	public static HttpResponseMessage BuildResponse(this HttpRequestMessage requestMessage, ServiceResponseBase baseResponse)
	{
		HttpStatusCode statusCode = HttpStatusCode.OK;
		if (baseResponse.Exception != null)
		{
			statusCode = baseResponse.Exception.ConvertToHttpStatusCode();
			HttpResponseMessage message = new HttpResponseMessage(statusCode);
			message.Content = new StringContent(baseResponse.Exception.Message);
			throw new HttpResponseException(message);
		}
		return requestMessage.CreateResponse<ServiceResponseBase>(statusCode, baseResponse);
	}
}

Set the namespace of both classes to SoaIntroNet.WebProxy so that they are available from everywhere in the Web project without having to set using statements.

Add a new Web API controller in the Controllers folder. Name it ReservationController and make sure to select the Empty Api controller template in the Add Controller window. You’ll see that the controller derives from ApiController. The controller will need the services of the IProductService interface so add the following private field and controller:

private readonly IProductService _productService;

public ReservationController(IProductService productService)
{
	if (productService == null) throw new ArgumentNullException("IProductService");
	_productService = productService;
}

If you are familiar with the SOLID principles then you’ll understand why it’s important to inject an abstract dependency through the constructor this way. If not, then start here.

The client will need to send a POST request with the parameters needed to build a ReserveProductRequest object. This is as simple as inserting a Post() method in the controller which accepts a ReserveProductRequest object. The implementation is equally simple: we delegate the actual work to the product service:

ServiceResponseBase response = _productService.ReserveProduct(reserveProductRequest);
return Request.BuildResponse(response);

Insert another controller in the Controllers folder called PurchaseController. It too will depend on the product service so insert the following private field and constructor:

private readonly IProductService _productService;

public PurchaseController(IProductService productService)
{
	if (productService == null) throw new ArgumentNullException("IProductService");
	_productService = productService;
}

The product purchase will also be a POST operation:

public HttpResponseMessage Post(PurchaseProductRequest purchaseProductRequest)
{
	purchaseProductRequest.CorrelationId = purchaseProductRequest.ReservationId;
	ServiceResponseBase response = _productService.PurchaseProduct(purchaseProductRequest);
	return Request.BuildResponse(response);
}

The only major difference between the the two Post method structures is that here we set the correlation ID ourselves. It is set to the reservation ID which is unique and it makes sense to use as the message correlation ID to check if we have fulfilled the request. Otherwise the client could provide just any correlation ID so we cannot trust that input.

Finally we need to instruct StructureMap to fetch the correct dependencies. Locate IoC.cs in the DependencyResolution folder. Make sure it looks as follows:

public static IContainer Initialize()
{
	ObjectFactory.Initialize(x =>
				{
					x.Scan(scan =>
							{
								scan.TheCallingAssembly();
								scan.AssemblyContainingType<IProductService>();
								scan.AssemblyContainingType<IMessageRepository>();
								scan.WithDefaultConventions();
							});
					x.For<IMessageRepositoryFactory>().Use<LazySingletonMessageRepositoryFactory>();
					x.For<IProductRepositoryFactory>().Use<LazySingletonProductRepositoryFactory>();
				});
	ObjectFactory.AssertConfigurationIsValid();
	return ObjectFactory.Container;
}

We tell IoC where to look for concrete implementations and which concrete types to take in those cases where the standard ‘I’ naming convention doesn’t apply: (I)Service => Service. For more details consult the post I hinted at in the beginning of this post.

This actually completes the client proxy layer. In the next post we’ll test the proxy by building a console application client.

View the list of posts on Architecture and Patterns here.

7 ways to start a Task in .NET C#

New threads can be started using the Task Programming Library in .NET in – at last – 5 different ways.

You’ll first need to add the following using statement:

using System.Threading.Tasks;

The most direct way

Task.Factory.StartNew(() => {Console.WriteLine("Hello Task library!"); });

Using Action

Task task = new Task(new Action(PrintMessage));
task.Start();

…where PrintMessage is a method:

private void PrintMessage()
{
    Console.WriteLine("Hello Task library!");
}

Using a delegate

Task task = new Task(delegate { PrintMessage(); });
task.Start();

Lambda and named method

Task task = new Task( () => PrintMessage() );
task.Start();

Lambda and anonymous method

Task task = new Task( () => { PrintMessage(); } );
task.Start();

Using Task.Run in .NET4.5

public async Task DoWork()
{
	await Task.Run(() => PrintMessage());
}

Using Task.FromResult in .NET4.5 to return a result from a Task

public async Task DoWork()
{
	int res = await Task.FromResult<int>(GetSum(4, 5));	
}

private int GetSum(int a, int b)
{
	return a + b;
}

You cannot start a task that has already completed. If you need to run the same task you’ll need to initialise it again.

View the list of posts on the Task Parallel Library here.

A model SOA application in .NET Part 5: the service layer continued

Introduction

In the previous post we started implementing the IProductService interface. We got as far as declaring a couple of private fields and a constructor. Here we’ll implement the ReserveProduct and PurchaseProduct methods.

The concrete service continued

Open the project we’ve been working on in this series and locate ProductService.cs. The implemented ReserveProduct method looks as follows:

public ProductReservationResponse ReserveProduct(ReserveProductRequest productReservationRequest)
{
	ProductReservationResponse reserveProductResponse = new ProductReservationResponse();
	try
	{
		Product product = _productRepository.FindBy(Guid.Parse(productReservationRequest.ProductId));
		if (product != null)
		{
			ProductReservation productReservation = null;
			if (product.CanReserveProduct(productReservationRequest.ProductQuantity))
			{
				productReservation = product.Reserve(productReservationRequest.ProductQuantity);
				_productRepository.Save(product);
				reserveProductResponse.ProductId = productReservation.Product.ID.ToString();
				reserveProductResponse.Expiration = productReservation.Expiry;
				reserveProductResponse.ProductName = productReservation.Product.Name;
				reserveProductResponse.ProductQuantity = productReservation.Quantity;
				reserveProductResponse.ReservationId = productReservation.Id.ToString();
			}
			else
			{
				int availableAllocation = product.Available();
				reserveProductResponse.Exception = new LimitedAvailabilityException(string.Concat(&quot;There are only &quot;, availableAllocation, &quot; pieces of this product left.&quot;));
			}
		}
		else
		{
			throw new ResourceNotFoundException(string.Concat(&quot;No product with id &quot;, productReservationRequest.ProductId, &quot;, was found.&quot;));
		}
	}
	catch (Exception ex)
	{
		reserveProductResponse.Exception = ex;
	}
	return reserveProductResponse;
}

First we let the product repository locate the requested product for us. If it doesn’t exist then we throw an exception with an appropriate message. We check using the CanReserveProduct method whether there are enough products left. If not then we let the client know in an exception message. Otherwise we reserve the product, save the current reservation status and populate the reservation response using the product reservation returned by the Save method. We wrap the entire code in a try-catch block to make sure that we catch any exception thrown during the process.

Here’s the implemented PurchaseProduct method:

public PurchaseProductResponse PurchaseProduct(PurchaseProductRequest productPurchaseRequest)
{
	PurchaseProductResponse purchaseProductResponse = new PurchaseProductResponse();
	try
	{
		if (_messageRepository.IsUniqueRequest(productPurchaseRequest.CorrelationId))
		{					
			Product product = _productRepository.FindBy(Guid.Parse(productPurchaseRequest.ProductId));
			if (product != null)
			{
				ProductPurchase productPurchase = null;
				if (product.ReservationIdValid(Guid.Parse(productPurchaseRequest.ReservationId)))
				{
					productPurchase = product.ConfirmPurchaseWith(Guid.Parse(productPurchaseRequest.ReservationId));
					_productRepository.Save(product);
					purchaseProductResponse.ProductId = productPurchase.Product.ID.ToString();
					purchaseProductResponse.PurchaseId = productPurchase.Id.ToString();
					purchaseProductResponse.ProductQuantity = productPurchase.ProductQuantity;
					purchaseProductResponse.ProductName = productPurchase.Product.Name;
				}
				else
				{
					throw new ResourceNotFoundException(string.Concat(&quot;Invalid or expired reservation id: &quot;, productPurchaseRequest.ReservationId));
				}
				_messageRepository.SaveResponse&lt;PurchaseProductResponse&gt;(productPurchaseRequest.CorrelationId, purchaseProductResponse);
			}
			else
			{
				throw new ResourceNotFoundException(string.Concat(&quot;No product with id &quot;, productPurchaseRequest.ProductId, &quot;, was found.&quot;));
			}
		}
		else
		{
			purchaseProductResponse = _messageRepository.RetrieveResponseFor&lt;PurchaseProductResponse&gt;(productPurchaseRequest.CorrelationId);
		}
	}
	catch (Exception ex)
	{
		purchaseProductResponse.Exception = ex;
	}
	return purchaseProductResponse;
}

If you recall from the first part of this series we talked about the Idempotent pattern. The IsUniqueRequest is an application of the pattern. We check in the message repository if a message with that correlation ID has been processed before. If yes, then we return the response stored in the repository to avoid making the same purchase again. This is not the only possible solution of the pattern, but only one of the viable ones. Probably the domain layer could have a similar logic as well, but I think this is more robust.

If this is a new request then we locate the product just like in the ReserveProduct method and throw an exception if the product is not found. If the product exists then we need to check if the reservation can be made using the reservation ID of the incoming message. If not, then the reservation either doesn’t exist or has expired and a corresponding exception is thrown. Otherwise we confirm the purchase, save the product and dress up the product purchase response using the product purchase object returned by the ConfirmPurchaseWith method. Just like above, we wrap the code within a try-catch block.

This completes the service layer of the SOA project. We’ll look at the web client in the next post. The web client will be a web service client based on the Web API technology so that we don’t need to waste time and energy on presentation stuff such as HTML and CSS.

View the list of posts on Architecture and Patterns here.

Elliot Balynn's Blog

A directory of wonderful thoughts

Software Engineering

Web development

Disparate Opinions

Various tidbits

chsakell's Blog

WEB APPLICATION DEVELOPMENT TUTORIALS WITH OPEN-SOURCE PROJECTS

Once Upon a Camayoc

ARCHIVED: Bite-size insight on Cyber Security for the not too technical.