Messaging with RabbitMQ and .NET C# part 4: routing and topics

Introduction

In this post we’ll continue our discussion of the message exchange via RabbitMQ. In particular we’ll investigate the following topics:

  • Routing
  • Topics

We’ll continue building on the demo solution we’ve been working on, so open it already now in Visual Studio. Also, log onto the RabbitMQ management UI on http://localhost:15672/

Most of the posts on RabbitMQ on this blog are based on the work of RabbitMQ guru Michael Stephenson.

Routing

Here the client sends a message to an exchange and attaches a routing key to it. The message is sent to all queues with the matching routing key. Each queue has a receiver attached which will process the message. We’ll initiate a dedicated message exchange and not use the default one. Note that a queue can be dedicated to one or more routing keys.

As usual we’ll set up the queues and exchanges first. Add the following code to AmqpMessagingService.cs:

public void SetUpExchangeAndQueuesForRoutingDemo(IModel model)
{
	model.ExchangeDeclare(_routingKeyExchange, ExchangeType.Direct, true);
	model.QueueDeclare(_routingKeyQueueOne, true, false, false, null);
	model.QueueDeclare(_routingKeyQueueTwo, true, false, false, null);
	model.QueueBind(_routingKeyQueueOne, _routingKeyExchange, "cars");
	model.QueueBind(_routingKeyQueueTwo, _routingKeyExchange, "trucks");
}

…with the following private variables:

private string _routingKeyExchange = "RoutingKeyExchange";
private string _routingKeyQueueOne = "RoutingKeyQueueOne";
private string _routingKeyQueueTwo = "RoutingKeyQueueTwo";

If you’d like to bind queue 1 and the routing exchange with multiple routing keys then you can call the QueueBind multiple times:

model.QueueBind(_routingKeyQueueTwo, _routingKeyExchange, "trucks");
model.QueueBind(_routingKeyQueueTwo, _routingKeyExchange, "donkeys");
model.QueueBind(_routingKeyQueueTwo, _routingKeyExchange, "mules");

You’ll recognise this code from earlier posts on RabbitMQ: we set up an exchange of type Direct, two queues and bind them using the routing keys of cars and trucks.

Insert a new Console app, call it RoutingSender. Add the usual references: RabbitMQ NuGet, RabbitMqService. Insert the following code to Main:

AmqpMessagingService messagingService = new AmqpMessagingService();
IConnection connection = messagingService.GetRabbitMqConnection();
IModel model = connection.CreateModel();
messagingService.SetUpExchangeAndQueuesForRoutingDemo(model);

Set RoutingSender as the start up project and run the application. Check in the RabbitMQ console that the exchange and queues have been set up correctly. Comment out the call to messagingService.SetUpExchangeAndQueuesForRoutingDemo.

Insert the following method to Program.cs which will extract the routing key and the message from the console entry:

private static void RunRoutingDemo(IModel model, AmqpMessagingService messagingService)
{
	Console.WriteLine("Enter your message as follows: the routing key, followed by a semicolon, and then the message. Quit with 'q'.");
	while (true)
	{
		string fullEntry = Console.ReadLine();
		string[] parts = fullEntry.Split(new char[] { ';' }, StringSplitOptions.RemoveEmptyEntries);
		string key = parts[0];
		string message = parts[1];
		if (message.ToLower() == "q") break;
		messagingService.SendRoutingMessage(message, key, model);
	}
}

Add a call to this method from Main:

RunRoutingDemo(model, messagingService);

…where SendRoutingMessage in AmqpMessagingService looks as follows:

public void SendRoutingMessage(string message, string routingKey, IModel model)
{
	IBasicProperties basicProperties = model.CreateBasicProperties();
	basicProperties.SetPersistent(_durable);
	byte[] messageBytes = Encoding.UTF8.GetBytes(message);
	model.BasicPublish(_routingKeyExchange, routingKey, basicProperties, messageBytes);
}

As you see we follow the same pattern as before: we publish to an exchange and provide the routing key, the basic properties and the message body as the arguments.

In preparation for the two receivers add the following methods to AmqpMessagingService:

public void ReceiveRoutingMessageReceiverOne(IModel model)
{
	model.BasicQos(0, 1, false);
	Subscription subscription = new Subscription(model, _routingKeyQueueOne, false);
	while (true)
	{
		BasicDeliverEventArgs deliveryArguments = subscription.Next();
		String message = Encoding.UTF8.GetString(deliveryArguments.Body);
		Console.WriteLine("Message from queue: {0}", message);
		subscription.Ack(deliveryArguments);
	}
}

public void ReceiveRoutingMessageReceiverTwo(IModel model)
{
	model.BasicQos(0, 1, false);
	Subscription subscription = new Subscription(model, _routingKeyQueueTwo, false);
	while (true)
	{
		BasicDeliverEventArgs deliveryArguments = subscription.Next();
		String message = Encoding.UTF8.GetString(deliveryArguments.Body);
		Console.WriteLine("Message from queue: {0}", message);
		subscription.Ack(deliveryArguments);
	}
}

Look through the Publish/Subscribe MEP in the third part of this series if you’re not sure what this code means.

Next add two new Console applications to the solution: RoutingReceiverOne and RoutingReceiverTwo. Add the usual references to both: RabbitMQ NuGet, RabbitMqService. Add the following code to RoutingReceiverOne.Main:

AmqpMessagingService messagingService = new AmqpMessagingService();
IConnection connection = messagingService.GetRabbitMqConnection();
IModel model = connection.CreateModel();
messagingService.ReceiveRoutingMessageReceiverOne(model);

…and the following to RoutingReceiverTwo.Main:

AmqpMessagingService messagingService = new AmqpMessagingService();
IConnection connection = messagingService.GetRabbitMqConnection();
IModel model = connection.CreateModel();
messagingService.ReceiveRoutingMessageReceiverTwo(model);

Follow these steps to run the demo:

  1. Make sure RoutingSender is the start up project and then start the application
  2. Start RoutingReceiverOne by right-clicking it in VS, Debug, Start new instance
  3. Start RoutingReceiverTwo the same way
  4. Now you should have 3 console screens up and running

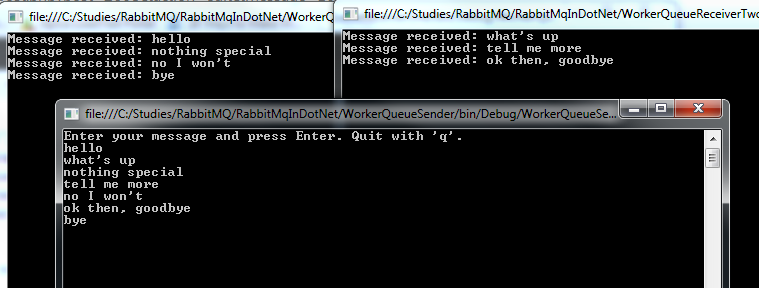
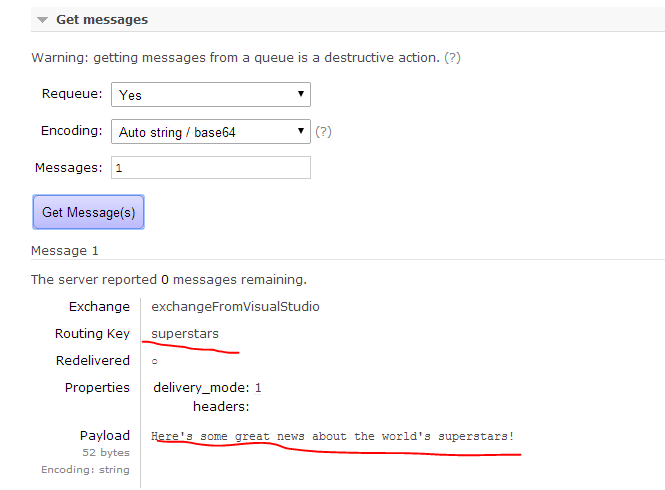
Start sending messages from the sender. Make sure you use the ‘;’ delimiter to indicate the routing key and the message. The messages should be routed correctly:

Routing MEP with RabbitMQ

This wasn’t too difficult, right? Messages with no matching routing key will be discarded by RabbitMQ.

Topics

The Topic MEP is similar to Routing. The sender sends a message to an exchange with a routing key attached. The message will be forwarded to queues with a matching expression. The routing key can include special characters:

  • ‘*’ to replace one word
  • ‘#’ to replace 0 or more words

The purpose of this pattern is that the receiver can specify a pattern, sort of like a regular expression, as the routing key it is interested in: #world#, cars* etc. Then the sender sends a message with a routing key “world news” and then another one with a routing key “the end of the world” and the queue will receive both messages. If there are no queues with a matching routing key pattern then the message is discarded.

Let’s set up the exchange and the queues. In this demo we’ll have three queues listening on 3 different routing key patterns. Add the following 4 private fields to AmqpMessagingService.cs:

private string _topicsExchange = "TopicsExchange";
private string _topicsQueueOne = "TopicsQueueOne";
private string _topicsQueueTwo = "TopicsQueueTwo";
private string _topicsQueueThree = "TopicsQueueThree";

Insert the following method that will set up the exchange and the queues:

public void SetUpExchangeAndQueuesForTopicsDemo(IModel model)
{
	model.ExchangeDeclare(_topicsExchange, ExchangeType.Topic, true);
	model.QueueDeclare(_topicsQueueOne, true, false, false, null);
	model.QueueDeclare(_topicsQueueTwo, true, false, false, null);
	model.QueueDeclare(_topicsQueueThree, true, false, false, null);
	model.QueueBind(_topicsQueueOne, _topicsExchange, "*.world.*");
	model.QueueBind(_topicsQueueTwo, _topicsExchange, "#.world.#");
	model.QueueBind(_topicsQueueThree, _topicsExchange, "#.world");
}

You can set up multiple bindings with different keywords as I showed above. This technique allows for some very refined searches among the routing keys.

We’ll investigate how those different wildcard characters behave differently.

Insert a new Console application called TopicsSender. Add references to RabbitMQ NuGet and RabbitMqService. The following code in Main will call SetUpExchangeAndQueuesForTopicsDemo:

AmqpMessagingService messagingService = new AmqpMessagingService();
IConnection connection = messagingService.GetRabbitMqConnection();
IModel model = connection.CreateModel();
messagingService.SetUpExchangeAndQueuesForTopicsDemo(model);

Set TopicsSender as the start up project and run the application. Check in the RabbitMQ management UI that all queues, the exchange and the bindings have been set up properly. Comment out the call to messagingService.SetUpExchangeAndQueuesForTopicsDemo. Instead add a call to the following private method:

private static void RunTopicsDemo(IModel model, AmqpMessagingService messagingService)
{
	Console.WriteLine("Enter your message as follows: the routing key, followed by a semicolon, and then the message. Quit with 'q'.");
	while (true)
	{
		string fullEntry = Console.ReadLine();
		string[] parts = fullEntry.Split(new char[] { ';' }, StringSplitOptions.RemoveEmptyEntries);
		string key = parts[0];
		string message = parts[1];
		if (message.ToLower() == "q") break;
		messagingService.SendTopicsMessage(message, key, model);
	}
}

…where SendTopicsMessage looks like this in AmqpMessagingService.cs:

public void SendTopicsMessage(string message, string routingKey, IModel model)
{
	IBasicProperties basicProperties = model.CreateBasicProperties();
	basicProperties.SetPersistent(_durable);
	byte[] messageBytes = Encoding.UTF8.GetBytes(message);
	model.BasicPublish(_topicsExchange, routingKey, basicProperties, messageBytes);
}

Let’s set up the missing pieces. We’re now so knowledgeable on RabbitMQ in .NET that this part almost feels boring, right? Insert 3 new Console apps: TopicsReceiverOne, TopicsReceiverTwo, TopicsReceiverThree. Add references to the RabbitMQ NuGet package and the RabbitMqService library to all three. Add the following methods to AmqpMessagingService.cs which will handle the reception of the messages for each receiver:

public void ReceiveTopicMessageReceiverOne(IModel model)
{
	model.BasicQos(0, 1, false);
	Subscription subscription = new Subscription(model, _topicsQueueOne, false);
	while (true)
	{
		BasicDeliverEventArgs deliveryArguments = subscription.Next();
		String message = Encoding.UTF8.GetString(deliveryArguments.Body);
		Console.WriteLine("Message from queue: {0}", message);
		subscription.Ack(deliveryArguments);
	}
}

public void ReceiveTopicMessageReceiverTwo(IModel model)
{
	model.BasicQos(0, 1, false);
	Subscription subscription = new Subscription(model, _topicsQueueTwo, false);
	while (true)
	{
		BasicDeliverEventArgs deliveryArguments = subscription.Next();
		String message = Encoding.UTF8.GetString(deliveryArguments.Body);
		Console.WriteLine("Message from queue: {0}", message);
		subscription.Ack(deliveryArguments);
	}
}

public void ReceiveTopicMessageReceiverThree(IModel model)
{
	model.BasicQos(0, 1, false);
	Subscription subscription = new Subscription(model, _topicsQueueThree, false);
	while (true)
	{
		BasicDeliverEventArgs deliveryArguments = subscription.Next();
		String message = Encoding.UTF8.GetString(deliveryArguments.Body);
		Console.WriteLine("Message from queue: {0}", message);
		subscription.Ack(deliveryArguments);
	}
}

All that should look familiar by now, so I won’t go into any details. In TopicsReceiverOne.Main add the following:

AmqpMessagingService messagingService = new AmqpMessagingService();
IConnection connection = messagingService.GetRabbitMqConnection();
IModel model = connection.CreateModel();
messagingService.ReceiveTopicMessageReceiverOne(model);

…in TopicsReceiverTwo.Main…:

AmqpMessagingService messagingService = new AmqpMessagingService();
IConnection connection = messagingService.GetRabbitMqConnection();
IModel model = connection.CreateModel();
messagingService.ReceiveTopicMessageReceiverTwo(model);

…and in TopicsReceiverThree.Main…:

AmqpMessagingService messagingService = new AmqpMessagingService();
IConnection connection = messagingService.GetRabbitMqConnection();
IModel model = connection.CreateModel();
messagingService.ReceiveTopicMessageReceiverThree(model);

To run the demo:

  1. Make sure that TopicsSender is the start up project and start the application
  2. Run the 3 topic receivers following the same technique as above (Debug, Run new instance)
  3. You should have 4 console windows up and running on your screen

Start sending messages to RabbitMQ. Take care when typing the routing key and the message. Delimit the routing key sections with a ‘.’:
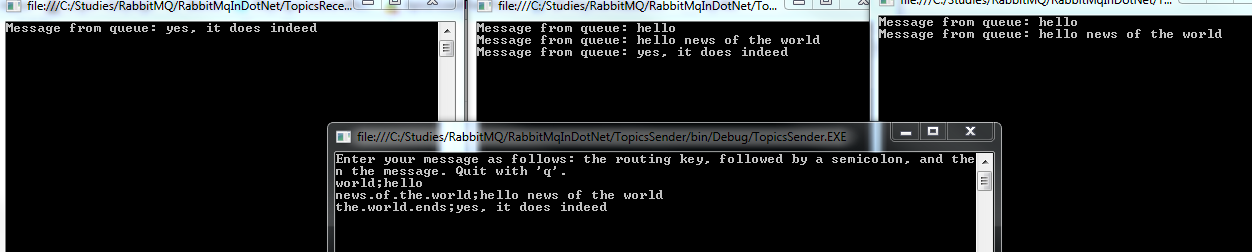
Topics MEP console

Explanation:

  • ‘world’: received by receiver 2 and 3 as the topic routing keys #.world and #.world.# match it. Topic key *.world.* is no match as the ‘*’ replaces one word
  • ‘news.of.the.world’: same as above
  • ‘the.world.ends’: matches receiver 1 and 2, but not 3 as there’s a word after ‘world.’ in the routing key

It can be a bit confusing with the topic keys and matches at first but the Topics pattern is not much different from the routing one.

Read the next part of this series here.

View the list of posts on Messaging here.

Deferred execution in parallel LINQ in .NET C#

If you are familiar with LINQ then you are probably aware of the notion of deferred execution: queries are not carried out until they are needed. This is not different in parallel LINQ either. Let’s see an example:

Set up a data source:

int[] integerArray = new int[100];
for (int i = 0; i < integerArray.Length; i++)
{
	integerArray[i] = i;
}

Define a parallel query:

IEnumerable<double> results =
	integerArray.AsParallel().Select(item =>
	{
		return Math.Sqrt(item);
	});

The query has not been carried out at this point. It is carried out when the following foreach loop starts:

double sum = 0;
foreach (double result in results)
{
	sum += result;
}
Console.WriteLine("Total {0}", sum);

You can force query execution with the same extension methods as in “normal” LINQ, such as ToList, ToArray etc.:

IEnumerable<double> results =
	integerArray.AsParallel().Select(item =>
	{
		return Math.Sqrt(item);
	}).ToList();

In this case the query is executed as soon as it has been defined.

View the list of posts on the Task Parallel Library here.

Handling exceptions in parallel LINQ in .NET C#

We saw in this and this post how to handle exceptions that Tasks throw. It is not much different in parallel LINQ: the exception will be wrapped in an AggregateException.

The exception will be throw when the query is executed. So defining a parallel query will not throw an exception even if you explicitly throw one within the query. If you force the execution of the query with extension methods such as ToList, ToArray, ForAll etc., then the exception will be thrown immediately. Let’s see an example.

Define the data source:

int[] integerArray = new int[100];
for (int i = 0; i < integerArray.Length; i++)
{
	integerArray[i] = i;
}

Define the query:

IEnumerable<double> query =
	integerArray.AsParallel()
	.Select(item =>
	{
		if (item == 50)
		{
			throw new Exception();
		}
		return Math.Sqrt(item);
	});

Go through the results and handle the exception:

try
{
	foreach (double item in query)
	{
		Console.WriteLine("Result {0}", item);
	}
}
catch (AggregateException aggregateException)
{
	aggregateException.Handle(exception =>
	{
		Console.WriteLine("Handled exception of type: {0}",
			exception.GetType());
		return true;
	});
}

Run the code with Crtl+F5. You’ll see that the exception is thrown when the items are processed and then it’s handled. Items that were processed when the exception was thrown will complete so don’t assume that the parallel loop is interrupted at that moment.

View the list of posts on the Task Parallel Library here.

Messaging with RabbitMQ and .NET C# part 3: message exchange patterns

Introduction

In this part of the series we’ll look at 4 basic message exchange patterns (MEP):

  • One way
  • Worker queues
  • Publish/Subscribe
  • Remote Procedure Call (RPC)

Most of the posts on RabbitMQ on this blog are based on the work of RabbitMQ guru Michael Stephenson.

For the demos you can start a new Visual Studio solution or re-use the one we’ve been working on so that you have all code references in one place.

A general note: we’ll write a lot of example code in this post. We’ll be concentrating on writing code that works and will not follow any software design principles such as SOLID or DRY. That would only slow us down in a large topic like this. Use the link provided to improve the library as you wish.

One way messaging

This is the simplest MEP: a message is sent to the broker which is then processed by the receiver.

Open the RabbitMQ management UI at http://localhost:15672/ and have it ready throughout the demo. Fire up Visual Studio and either open the same solution as before or create a new blank one. Add a C# class library called RabbitMqService. Add the NuGet RabbitMQ package to it as we did in the first part of this series. Add new class called AmqpMessagingService. Add the following private fields:

private string _hostName = "localhost";
private string _userName = "guest";
private string _password = "guest";
private string _exchangeName = "";
private string _oneWayMessageQueueName = "OneWayMessageQueue";
private bool _durable = true;

Add the following method to create a connection to the RabbitMQ server:

public IConnection GetRabbitMqConnection()
{
	ConnectionFactory connectionFactory = new ConnectionFactory();
	connectionFactory.HostName = _hostName;
	connectionFactory.UserName = _userName;
	connectionFactory.Password = _password;

	return connectionFactory.CreateConnection();
}

This method will set up the queue we’ll use for the one way message demo:

public void SetUpQueueForOneWayMessageDemo(IModel model)
{
	model.QueueDeclare(_oneWayMessageQueueName, _durable, false, false, null);
}

Next add a new Console application to the solution called OneWayMessageSender. Add the RabbitMQ NuGet package there as well and also add a reference to the RabbitMqService library. Insert the following code to Main and run the Sender app:

AmqpMessagingService messagingService = new AmqpMessagingService();
IConnection connection = messagingService.GetRabbitMqConnection();
IModel model = connection.CreateModel();
messagingService.SetUpQueueForOneWayMessageDemo(model);

Check in the RabbitMQ console that the queue called “OneWayMessageQueue” has been set up. Comment out the call to…

messagingService.SetUpQueueForOneWayMessageDemo(model);

Add the following code to send a single message to the queue in AmqpMessagingService.cs:

public void SendOneWayMessage(string message, IModel model)
{
	IBasicProperties basicProperties = model.CreateBasicProperties();
	basicProperties.SetPersistent(_durable);
	byte[] messageBytes = Encoding.UTF8.GetBytes(message);
	model.BasicPublish(_exchangeName, _oneWayMessageQueueName, basicProperties, messageBytes);
}

This code should be familiar from the previous part. Add the following method to Program.cs in the Sender application:

private static void RunOneWayMessageDemo(IModel model, AmqpMessagingService messagingService)
{
	Console.WriteLine("Enter your message and press Enter. Quit with 'q'.");
	while (true)
	{
		string message = Console.ReadLine();
		if (message.ToLower() == "q") break;

		messagingService.SendOneWayMessage(message, model);
	}
}

We send the message entered by the Sender to the appropriate queue.

Add a call to this method in Main:

RunOneWayMessageDemo(model, messagingService);

Console.ReadKey();

Create another Console application called OneWayMessageReceiver to the solution. Add the NuGet RabbitMQ package to it. Add a project reference to RabbitMqService. Insert the following code to Main:

AmqpMessagingService messagingService = new AmqpMessagingService();
IConnection connection = messagingService.GetRabbitMqConnection();
IModel model = connection.CreateModel();
messagingService.ReceiveOneWayMessages(model);

The first three lines of code should be familiar. ReceiveOneWayMessages has the following implementation in AmqpMessagingService:

public void ReceiveOneWayMessages(IModel model)
{
	model.BasicQos(0, 1, false); //basic quality of service
	QueueingBasicConsumer consumer = new QueueingBasicConsumer(model);
	model.BasicConsume(_oneWayMessageQueueName, false, consumer);
	while (true)
	{
		BasicDeliverEventArgs deliveryArguments = consumer.Queue.Dequeue() as BasicDeliverEventArgs;
		String message = Encoding.UTF8.GetString(deliveryArguments.Body);
		Console.WriteLine("Message received: {0}", message);
		model.BasicAck(deliveryArguments.DeliveryTag, false);
	}
}

BasicQos means basic quality of service. The parameters mean that we require one message at a time and we don’t want to process any additional messages until this one has been processed. You can use these parameters to receive messages in batches.

QueueingBasicConsumer is built into RabbitMQ and is used to consume messages from a specified queue. We use the IModel’s BasicConsume method to consume messages and specify the queue name and the consumer. With ‘false’ we also indicate that we don’t want to auto-acknowledge the messages. Then in the loop we constantly pull message from the queue and acknowledge them with BasicAck. The Queue.Dequeue() method will block the thread until a message has been delivered into the queue. We extract the message byte array from the BasicDeliverEventArgs object. The acknowledgement will release the message from the queue and will allow us to receive the next message.

Let’s see if this works. Set the Receiver as the start up project and start the application. The Receiver app will start. Then in VS right-click the Sender application, click Debug, Start new instance. Enter a message in the Sender windows and press Enter. If everything works fine then the message should show up in the Receiver window:

One way message in console

Send a couple more messages to confirm that the setup works. Set a breakpoint within the while-loop of ReceiveOneWayMessages. You’ll see that execution will stop at…

BasicDeliverEventArgs deliveryArguments = consumer.Queue.Dequeue() as BasicDeliverEventArgs;

…and will only continue if there’s a message in the queue. In other words the loop won’t just continue asking for new data all the time.

Worker queues

In this MEP a message is sent by the sender. There will be many listeners waiting for messages from the same queue. However, those listeners compete to receive the message and only one of them will receive it. The purpose is that if an application is expecting to receive a large load of messages then it can create different threads/processes to process those messages. The benefit is better scalability. For the demo we’ll set up a sender and two receivers.

Add the following private field to AmqpMessagingService:

private string _workerQueueDemoQueueName = "WorkerQueueDemoQueue";

…and the following method to create the queue for this sample:

public void SetUpQueueForWorkerQueueDemo(IModel model)
{
	model.QueueDeclare(_workerQueueDemoQueueName, _durable, false, false, null);
}

Add a new console application to the solution called WorkerQueueSender. Add the RabbitMQ NuGet package and a reference to the RabbitMqService library. Insert the following code in Main to set up the queue:

AmqpMessagingService messagingService = new AmqpMessagingService();
IConnection connection = messagingService.GetRabbitMqConnection();
IModel model = connection.CreateModel();
messagingService.SetUpQueueForWorkerQueueDemo(model);

Set WorkerQueueSender as the startup project and run the application. Check the RabbitMQ UI that the queue has been set up. Comment out the call to SetUpQueueForWorkerQueueDemo in Main.

Add the following method in AmqpMessagingService:

public void SendMessageToWorkerQueue(string message, IModel model)
{
	IBasicProperties basicProperties = model.CreateBasicProperties();
	basicProperties.SetPersistent(_durable);
	byte[] messageBytes = Encoding.UTF8.GetBytes(message);
	model.BasicPublish(_exchangeName, _workerQueueDemoQueueName, basicProperties, messageBytes);
}

…and the one below to receive messages from the worker queue:

public void ReceiveWorkerQueueMessages(IModel model)
{
	model.BasicQos(0, 1, false); //basic quality of service
	QueueingBasicConsumer consumer = new QueueingBasicConsumer(model);
	model.BasicConsume(_workerQueueDemoQueueName, false, consumer);
	while (true)
	{
		BasicDeliverEventArgs deliveryArguments = consumer.Queue.Dequeue() as BasicDeliverEventArgs;
		String message = Encoding.UTF8.GetString(deliveryArguments.Body);
		Console.WriteLine("Message received: {0}", message);
		model.BasicAck(deliveryArguments.DeliveryTag, false);
	}
}

It is identical to ReceiveOneWayMessages except for the queue name.

Back in WorkerQueueSender.Program.cs add the following method and add a call to it from Main:

private static void RunWorkerQueueMessageDemo(IModel model, AmqpMessagingService messagingService)
{
	Console.WriteLine("Enter your message and press Enter. Quit with 'q'.");
	while (true)
	{
		string message = Console.ReadLine();
		if (message.ToLower() == "q") break;
		messagingService.SendMessageToWorkerQueue(message, model);
	}
}

As you see it is identical to what we had in the previous demo. We’ll create two Receivers and they will be identical to the receiver we had in the previous demo. Add two new Console apps: WorkerQueueReceiverOne and WorkerQueueReceiverTwo. In both projects do the following:

  • Add RabbitMQ package through NuGet
  • Add a library reference to RabbitMqService
  • Add the following code to Program.cs.Main:
AmqpMessagingService messagingService = new AmqpMessagingService();
IConnection connection = messagingService.GetRabbitMqConnection();
IModel model = connection.CreateModel();
messagingService.ReceiveWorkerQueueMessages(model);

Follow these steps to start the demo:

  1. Set WorkerQueueSender as the startup project
  2. Start the application
  3. Right-click WorkerQueueReceiverOne, Debug, Start new instance
  4. Do the same for WorkerQueueReceiverTwo

You should have 3 console windows up and running on your screen. Start sending messages in the Sender window. You should see that messages will alternate between receiver one and two:

Worker queue console

You should never see that the same message is delivered to both receivers.

The Worker Queue MEP can be implemented with very little extra effort compared to the One Way Message MEP. This MEP helps you create a horizontally scalable server where multiple receivers are set up to collect the incoming messages.

Publish/Subscribe

In this MEP a message is sent to an exchange and the exchange distributes the message to all queues bound to it. Each queue will have its listener to process the message. If you recall the different exchange types then this sounds like the Fan-out type. We’ll set up a dedicated exchange for this, i.e. not use the default one in RabbitMQ.

Enter the following private fields in AmqpMessagingService.cs:

private string _publishSubscribeExchangeName = "PublishSubscribeExchange";
private string _publishSubscribeQueueOne = "PublishSubscribeQueueOne";
private string _publishSubscribeQueueTwo = "PublishSubscribeQueueTwo";

…and the following method where we set up the exchange, 2 queues and bind both queues to the exchange:

public void SetUpExchangeAndQueuesForDemo(IModel model)
{
	model.ExchangeDeclare(_publishSubscribeExchangeName, ExchangeType.Fanout, true);
	model.QueueDeclare(_publishSubscribeQueueOne, true, false, false, null);
	model.QueueDeclare(_publishSubscribeQueueTwo, true, false, false, null);
	model.QueueBind(_publishSubscribeQueueOne, _publishSubscribeExchangeName, "");
	model.QueueBind(_publishSubscribeQueueTwo, _publishSubscribeExchangeName, "");
}

Consult the first part in this series if don’t recall what these methods do.

Add a new Console project to the solution called PublishSubscribeSender. Perform the usual actions:

  • Add RabbitMQ via NuGet
  • Add a reference to RabbitMqService

In Main insert the following code to set up the necessary infrastructure:

static void Main(string[] args)
{
	AmqpMessagingService messagingService = new AmqpMessagingService();
	IConnection connection = messagingService.GetRabbitMqConnection();
	IModel model = connection.CreateModel();
	messagingService.SetUpExchangeAndQueuesForDemo(model);
}

Set PublishSubscribeSender as the startup application and then run it. Check in the RabbitMQ UI whether the exchange and the two queues have been created and if the bindings are OK. Then comment out the call to messagingService.SetUpExchangeAndQueuesForDemo. Add the following method to start sending messages:

private static void RunPublishSubscribeMessageDemo(IModel model, AmqpMessagingService messagingService)
{
	Console.WriteLine("Enter your message and press Enter. Quit with 'q'.");
	while (true)
	{
		string message = Console.ReadLine();
		if (message.ToLower() == "q") break;

		messagingService.SendMessageToPublishSubscribeQueues(message, model);
	}
}

As you see it’s not much different from what we had in the previous demos. SendMessageToPublishSubscribeQueues looks like this in AmqpMessagingService:

public void SendMessageToPublishSubscribeQueue(string message, IModel model)
{
	IBasicProperties basicProperties = model.CreateBasicProperties();
	basicProperties.SetPersistent(_durable);
	byte[] messageBytes = Encoding.UTF8.GetBytes(message);
	model.BasicPublish(_publishSubscribeExchangeName, "", basicProperties, messageBytes);
}

We’re sending the message to the designated exchange with no routing key specified.

Add two new Console applications: PublishSubscribeReceiverOne and PublishSubscribeReceiverTwo. Apply the following to both:

  • Add RabbitMQ via NuGet
  • Add a reference to RabbitMqService

In PublishSubscribeReceiverOne.Program.cs.Main add the following code:

AmqpMessagingService messagingService = new AmqpMessagingService();
IConnection connection = messagingService.GetRabbitMqConnection();
IModel model = connection.CreateModel();
messagingService.ReceivePublishSubscribeMessageReceiverOne(model);

In PublishSubscribeReceiverTwo.Program.cs.Main add the following code:

AmqpMessagingService messagingService = new AmqpMessagingService();
IConnection connection = messagingService.GetRabbitMqConnection();
IModel model = connection.CreateModel();
messagingService.ReceivePublishSubscribeMessageReceiverTwo(model);

…where ReceivePublishSubscribeMessageReceiverOne and ReceivePublishSubscribeMessageReceiverTwo look like this in AmqpMessagingService:

public void ReceivePublishSubscribeMessageReceiverOne(IModel model)
{
	model.BasicQos(0, 1, false);
	Subscription subscription = new Subscription(model, _publishSubscribeQueueOne, false);
	while (true)
	{
		BasicDeliverEventArgs deliveryArguments = subscription.Next();
		String message = Encoding.UTF8.GetString(deliveryArguments.Body);
		Console.WriteLine("Message from queue: {0}", message);
		subscription.Ack(deliveryArguments);
	}
}

public void ReceivePublishSubscribeMessageReceiverTwo(IModel model)
{
	model.BasicQos(0, 1, false);
	Subscription subscription = new Subscription(model, _publishSubscribeQueueTwo, false);
	while (true)
	{
		BasicDeliverEventArgs deliveryArguments = subscription.Next();
		String message = Encoding.UTF8.GetString(deliveryArguments.Body);
		Console.WriteLine("Message from queue: {0}", message);
		subscription.Ack(deliveryArguments);
	}
}

As you see there’s not much difference compared to how the Receiver extracted the messages before. The subscription model is represented by the Subscription object in RabbitMQ .NET. The BasicDeliverEventArgs object is returned by the Next() method of the subscription. We then show the message and acknowledge it.

To run this demo:

  1. Run PublishSubscribeSender
  2. Start a new instance of PublishSubscribeReceiverOne the way we did above with WorkerQueueReceiverOne
  3. Start a new instance of PublishSubscribeReceiverTwo the way we did above with WorkerQueueReceiverTwo
  4. You should have three black console screens up and running

Start sending messages on the Sender window. The message should appear on both receivers:

Publish/message MEP console

The receivers are listening on two different queues hence they are not competing with each other like in the Worker Queue MEP.

Remote Procedure Call (RPC)

RPC is slightly different from the above three MEPs in that there’s a response queue involved. The sender will first start listening on a response queue before sending any message. It then sends a message to a destination queue via the default exchange where the message includes a property indicating the response queue. The response queue will be dynamically created by the sender. The receiver processes the message and responds using the response queue extracted from the message. The sender then processes the response.

Add the following method to AmqpMessagingService.cs that sets up the queue for this demo:

public void SetUpQueueForRpcDemo(IModel model)
{
	model.QueueDeclare(_rpcQueueName, _durable, false, false, null);
}

…where _rpcQueueName is a new private field:

private string _rpcQueueName = "RpcQueue";

Add a new Console app called RpcSender. Add the usual references: RabbitMQ NuGet, RabbitMqService. Insert the following code to Main to set up the queue:

AmqpMessagingService messagingService = new AmqpMessagingService();
IConnection connection = messagingService.GetRabbitMqConnection();
IModel model = connection.CreateModel();
messagingService.SetUpQueueForRpcDemo(model);

Set RpcSender as the startup project and run the application. Check in the RabbitMQ management UI that the queue has been set up. Comment out the call to messagingService.SetUpQueueForRpcDemo(model). This queue will be used as the default queue by the sender to send messages. The response queue will be dynamically set up.

Insert the following method to RpcSender.Program.cs to start sending messages:

private static void RunRpcMessageDemo(IModel model, AmqpMessagingService messagingService)
{
	Console.WriteLine("Enter your message and press Enter. Quit with 'q'.");
	while (true)
	{
		string message = Console.ReadLine();
		if (message.ToLower() == "q") break;
		String response = messagingService.SendRpcMessageToQueue(message, model, TimeSpan.FromMinutes(1));
		Console.WriteLine("Response: {0}", response);
	}
}

This setup is very similar to what we’ve seen up to this point. Note, however, that the SendRpcMessageToQueue method returns a string, which will be the response from the Receiver. We also specify a timeout parameter for the response to arrive.

Declare a new method in AmqpMessagingService:

public string SendRpcMessageToQueue(string message, IModel model, TimeSpan timeout)
{

}

The sender in this case will also need to listen to messages so it will need a QueueingBasicConsumer object we saw before. Also, the response queue will be set up dynamically. The QueueDeclare() method without any parameter will create a temporary response queue. The name of the temporary queue will be randomly generated, e.g. “amq.gen-3tj4jtzMauwolYqc7CUj9g”. While you’re running the demo in a bit you can check the list of queues in the RabbitMQ management UI. The temporary queue will be available as long as the Sender is running. After that it will be removed automatically. Insert the following code to SendRpcMessageToQueue:

if (string.IsNullOrEmpty(_responseQueue))
{
	_responseQueue = model.QueueDeclare().QueueName;
}

if (_rpcConsumer == null)
{
	_rpcConsumer = new QueueingBasicConsumer(model);
	model.BasicConsume(_responseQueue, true, _rpcConsumer);
}

…where _rpcConsumer and _responseQueue are private variables:

private QueueingBasicConsumer _rpcConsumer;
private string _responseQueue;

The sender will listen on that temporary response queue. Append the following code to SendRpcMessageToQueue:

string correlationId = Guid.NewGuid().ToString();

IBasicProperties basicProperties = model.CreateBasicProperties();
basicProperties.ReplyTo = _responseQueue;
basicProperties.CorrelationId = correlationId;

byte[] messageBytes = Encoding.UTF8.GetBytes(message);
model.BasicPublish("", _rpcQueueName, basicProperties, messageBytes);

DateTime timeoutDate = DateTime.UtcNow + timeout;
while (DateTime.UtcNow <= timeoutDate)
{
	BasicDeliverEventArgs deliveryArguments = (BasicDeliverEventArgs)_rpcConsumer.Queue.Dequeue();
	if (deliveryArguments.BasicProperties != null
	&& deliveryArguments.BasicProperties.CorrelationId == correlationId)
	{
		string response = Encoding.UTF8.GetString(deliveryArguments.Body);
        	return response;
	}
}
throw new TimeoutException("No response before the timeout period.");

We create a message correlation ID to be able to match the sender’s message to the response from the receiver. If the receiver is responding to another message then it will be ignored. We then set up the IBasicProperties object and specify the temporary queue name to reply to and the correlation ID. Next we publish the message using BasicPublish like before.

Then we enter something that only receivers have done up to now: listen. The sender will listen for the duration of the timeout date. When a response comes then the correlation IDs must be compared. If there’s a match then the response is returned. Otherwise it’s ignored. If there’s no response before the timeout then an exception is thrown.

Let’s look at the receiver now. Add a new Console application called RpcReceiver, add RabbitMQ and RabbitMqService to the reference list. Insert the following code to Main:

AmqpMessagingService messagingService = new AmqpMessagingService();
IConnection connection = messagingService.GetRabbitMqConnection();
IModel model = connection.CreateModel();
messagingService.ReceiveRpcMessage(model);

…where ReceiveRpcMessage in AmqpMessagingService looks like this in AmqpMessagingService:

public void ReceiveRpcMessage(IModel model)
{
	model.BasicQos(0, 1, false);
	QueueingBasicConsumer consumer = new QueueingBasicConsumer(model);
	model.BasicConsume(_rpcQueueName, false, consumer);

	while (true)
	{
		BasicDeliverEventArgs deliveryArguments = consumer.Queue.Dequeue() as BasicDeliverEventArgs;
		string message = Encoding.UTF8.GetString(deliveryArguments.Body);
		Console.WriteLine("Message: {0} ; {1}", message, " Enter your response: ");
		string response = Console.ReadLine();
		IBasicProperties replyBasicProperties = model.CreateBasicProperties();
		replyBasicProperties.CorrelationId = deliveryArguments.BasicProperties.CorrelationId;
		byte[] responseBytes = Encoding.UTF8.GetBytes(response);
		model.BasicPublish("", deliveryArguments.BasicProperties.ReplyTo, replyBasicProperties, responseBytes);
                model.BasicAck(deliveryArguments.DeliveryTag, false);
	}
}

Most of this code looks familiar by now I hope. We extend the “normal” receiving logic with the ability to send a response. We extract the correlation ID from the sender’s message so that our response will have the same ID. We send the response to the ReplyTo queue which was also extracted from the sender’s message. We finally acknowledge the reception of the message from the sender.

Let’s run this:

  1. Make sure that RpcSender is the startup project and run the application
  2. Start RpcReceiver the same way as before (Run new instance)
  3. You should have 2 console screens up and running

Send a message from the sender to the receiver. Then send a response. It looks like a very primitive chat application:

RPC console

I hope you agree that it wasn’t too difficult to implement these 4 basic message exchange patterns.

Read the next part in this series here.

View the list of posts on Messaging here.

Cancelling a Task with a composite cancellation token in .NET C#

You cannot directly interrupt a Task in .NET while it’s running. You can do it indirectly through the CancellationTokenSource object. This object has a CancellationToken property which must be passed into the constructor of the Task:

CancellationTokenSource cancellationTokenSource	= new CancellationTokenSource();
CancellationToken cancellationToken = cancellationTokenSource.Token;

You can create a composite token that consists of several other tokens. The Task will then be cancelled if any of the underlying tokens has been cancelled. Here’s how you create a composite token:

CancellationTokenSource cancellationTokenSourceOne = new CancellationTokenSource();
CancellationTokenSource cancellationTokenSourceTwo = new CancellationTokenSource();
CancellationTokenSource cancellationTokenSourceThree = new CancellationTokenSource();
CancellationTokenSource compositeTokenSource = CancellationTokenSource.CreateLinkedTokenSource(cancellationTokenSourceOne.Token, cancellationTokenSourceTwo.Token, cancellationTokenSourceThree.Token);

Use this composite in the constructor of the Task:

Task task = Task.Factory.StartNew(() =>
{
	for (int i = 0; i < 100000; i++)
	{
		if (token.IsCancellationRequested)
	        {
		       Console.WriteLine("Task cancellation requested");
		       throw new OperationCanceledException(token);
	        }
        	else
        	{
         		Console.WriteLine(i);
        	}	 
	}
}, compositeTokenSource.Token);

You can cancel the task by calling the Cancel() method of any of the tokens in the composite:


cancellationTokenSourceTwo.Cancel();

Note that this method only signals the wish to cancel a task. .NET will not actively interrupt the task, you’ll have to monitor the status through the IsCancellationRequested property. It is your responsibility to stop the task. In this example we throw an OperationCanceledException which is a must in order to correctly acknowledge the cancellation. If you forget this step then the task status will not be set correctly. Once the task has been requested the stop it cannot be restarted.

If that’s all you want to do, i.e. throw an OperationCanceledException, then there’s a shorter version:

cancellationToken.ThrowIfCancellationRequested();

This will perform the cancellation check and throw the exception in one step. The loop can thus be simplified as follows:

Task task = Task.Factory.StartNew(() =>
{
	for (int i = 0; i < 100000; i++)
	{
		//shorthand
        	compositeTokenSource.ThrowIfCancellationRequested();
		Console.WriteLine(i);
	}
}, compositeTokenSource);

View the list of posts on the Task Parallel Library here.

Messaging with RabbitMQ and .NET C# part 2: persistence

Introduction

In the previous part of this tutorial we looked at the basics of messaging. We also set up RabbitMQ on Windows and looked at a couple of C# code examples.

We’ll continue where we left off so have the RabbitMQ manager UI and the sample .NET console app ready.

Most of the posts on RabbitMQ on this blog are based on the work of RabbitMQ guru Michael Stephenson.

Sending a message in code

Let’s first put the code that creates the IConnection into another class. Add a new class called RabbitMqService:

public class RabbitMqService
{
	public IConnection GetRabbitMqConnection()
	{
		ConnectionFactory connectionFactory = new ConnectionFactory();
		connectionFactory.HostName = "localhost";
		connectionFactory.UserName = "guest";
		connectionFactory.Password = "guest";

		return connectionFactory.CreateConnection();
	}
}

Put the following lines of code…

model.QueueDeclare("queueFromVisualStudio", true, false, false, null);
model.ExchangeDeclare("exchangeFromVisualStudio", ExchangeType.Topic);
model.QueueBind("queueFromVisualStudio", "exchangeFromVisualStudio", "superstars");

…into a private method for later reference…:

private static void SetupInitialTopicQueue(IModel model)
{
	model.QueueDeclare("queueFromVisualStudio", true, false, false, null);
	model.ExchangeDeclare("exchangeFromVisualStudio", ExchangeType.Topic);
	model.QueueBind("queueFromVisualStudio", "exchangeFromVisualStudio", "superstars");
}

…so now we have the following code in Program.cs:

static void Main(string[] args)
{
	RabbitMqService rabbitMqService = new RabbitMqService();
	IConnection connection = rabbitMqService.GetRabbitMqConnection();
	IModel model = connection.CreateModel();
}

private static void SetupInitialTopicQueue(IModel model)
{
	model.QueueDeclare("queueFromVisualStudio", true, false, false, null);
	model.ExchangeDeclare("exchangeFromVisualStudio", ExchangeType.Topic);
	model.QueueBind("queueFromVisualStudio", "exchangeFromVisualStudio", "superstars");
}

In Main we’ll create some properties and we’ll set the message persistence to non-persistent – see below for details:

IBasicProperties basicProperties = model.CreateBasicProperties();
basicProperties.SetPersistent(false);

We need to send our message in byte array format:

byte[] payload = Encoding.UTF8.GetBytes("This is a message from Visual Studio");

We then construct the address for the exchange we created in the previous part:

PublicationAddress address = new PublicationAddress(ExchangeType.Topic, "exchangeFromVisualStudio", "superstars");

Finally we send the message:

model.BasicPublish(address, basicProperties, payload);

Run the application. Go to the RabbitMQ management UI, navigate to queueFromVisualStudio and you should be able to extract the message:

Message from Visual Studio to queue

Queue and exchange persistence

There are two types of queues and exchanges from a persistence point of view:

  • Durable: messages are saved to disk so they are available even after a server restart. There’s some overhead incurred while reading and saving messages
  • Non-durable: messages are persisted in memory. They disappear after a server restart but offer a faster service

Keep these advantages and disadvantages in mind when you’re deciding which persistence strategy to go for. Recall that we set persistence to non-durable for the message in the previous section. For a quick server restart open the Services console and restart the Windows service called RabbitMQ:

RabbitMQ restart

Go back to the RabbitMQ managenment UI on http://localhost:15672/ If you were logged on before then you have probably been logged out. Navigate to queueFromVisualStudio, check the available messages and you’ll see that there’s none. The queue is still available as we set it to durable in code:

model.QueueDeclare("queueFromVisualStudio", true, false, false, null);

The second parameter ‘true’ means that the queue itself is durable. Had we set this to false, we would have lost the queue as well in the server restart. The exchange “exchangeFromVisualStudio” itself was non-durable so it was lost. Remember the following exchange creation code:

model.ExchangeDeclare("exchangeFromVisualStudio", ExchangeType.Topic);

We haven’t specified the durable property so it was set to false by default. The ExchangeDeclare method has an overload which allows us to declare a durable exchange:

model.ExchangeDeclare("exchangeFromVisualStudio", ExchangeType.Topic, true);

Also, recall that we created an exchange called newexchange through the UI in the previous post and it was set to durable in the available options. That’s the reason why it is still available in the list of exchanges but exchangeFromVisualStudio isn’t:

Durable exchange available

Add a private method to set up durable components:

private static void SetupDurableElements(IModel model)
{
	model.QueueDeclare("DurableQueue", true, false, false, null);
	model.ExchangeDeclare("DurableExchange", ExchangeType.Topic, true);
	model.QueueBind("DurableQueue", "DurableExchange", "durable");
}

Call this method from Main after…

IModel model = connection.CreateModel();

Comment out the rest of the code in Main or put it in another method for later reference. Now we have a durable exchange and a durable queue. Let’s send a message to it:

private static void SendDurableMessageToDurableQueue(IModel model)
{
        IBasicProperties basicProperties = model.CreateBasicProperties();
	basicProperties.SetPersistent(true);
	byte[] payload = Encoding.UTF8.GetBytes("This is a persistent message from Visual Studio");
	PublicationAddress address = new PublicationAddress(ExchangeType.Topic, "DurableExchange", "durable");

	model.BasicPublish(address, basicProperties, payload);
}

Call this method from Main and then check in the management UI that the message has been delivered. Restart the RabbitMQ server and the message should still be available:

Durable message still available

Therefore we can set the persistence property on three levels:

  • Queue
  • Exchange
  • Message

Before I forget: you can specify an empty string as the exchange name as follows.

model.BasicPublish("", "key", basicProperties, payload);

The empty string will be translated into the default exchange:

Default exchange

In the next part of the series we’ll be looking at messaging patterns.

View the list of posts on Messaging here.

How to cancel parallel loops in .NET C#

Cancelling parallel loops in C# is similar to cancelling “normal” tasks. You will need to supply a ParallelOptions object to the parallel loop assigning a cancellation token to its CancellationToken property. If you don’t know these objects then make sure to check out the following posts:

When you cancel the cancellation token then no new iterations will be started in a parallel loop. However, those already running will finish. Parallel.For and Parallel.ForEach will then throw an OperationCanceledException.

Declare the cancellation token:

CancellationTokenSource cancellationTokenSource = new CancellationTokenSource();

Create a Task that will cancel the token after 5 seconds:

Task.Factory.StartNew(() =>
{
	Thread.Sleep(5000);
	cancellationTokenSource.Cancel();
	Console.WriteLine("Token cancelled");
});

Define the parallel loop options and assign the cancellation token:

ParallelOptions parallelLoopOptions =
	new ParallelOptions()
	{
		CancellationToken = cancellationTokenSource.Token
	};

Perform some loop that is guaranteed to take more than 5 seconds:

try
{				
	Parallel.For(0, Int64.MaxValue, parallelLoopOptions, index =>
	{
		double result = Math.Pow(index, 3);
		Console.WriteLine("Index {0}, result {1}", index, result);
		Thread.Sleep(100);
	});
}
catch (OperationCanceledException)
{
	Console.WriteLine("Cancellation exception caught!");
}

Run the code and you’ll see that the parallel loop will likely run for slightly more than 5 seconds which is because loops running when the cancellation token is cancelled will be allowed to complete.

View the list of posts on the Task Parallel Library here.

Breaking parallel loops in .NET C# using the Break method

It’s not uncommon to break the execution of a for/foreach loop using the ‘break’ keyword. A for loop can look through a list of integers and if the loop body finds some matching value then the loop can be exited. It’s another discussion that ‘while’ and ‘do until’ loops might be a better alternative, but there you go.

You cannot simply break out from a parallel loop using the break keyword. However, we can achieve the effect with the ParallelLoopState class. In this post we looked at using the Stop method of the ParallelLoopState class. Here we’ll look at a slightly different method of the same class: Break(). Let’s say we have the following integer array…:

List<int> integers = new List<int>();

for (int i = 0; i <= 100; i++)
{
	integers.Add(i);
}

…and we want to break the loop as soon as we’ve found a number higher than 50. Both Parallel.For() and Parallel.ForEach() accepts an Action of T parameter as we saw before. This Action object has an overloaded version: Action of T and ParallelLoopState. The loop state is created automatically by the Parallel class. The loop state object has a Break method which stops the loop execution. To be more precise: if Break is called in the 5th iteration, then only those iterations will be started afterwards that are required to process items 1-4. Other iterations may have been started by the scheduler of course and they will run complete. So it is guaranteed that at least the first five items will be processed. Break() can even be called multiple times if the processing of multiple items results in breaking the code. In the below example if n separate threads are started with an integer higher than 50 then Break will be called n times:

Parallel.ForEach(integers, (int item, ParallelLoopState state) =>
{
	if (item > 50)
	{
		Console.WriteLine("Higher than 50: {0}, exiting loop.", item);
		state.Break();
	}
	else
	{
		Console.WriteLine("Less than 50: {0}", item);
	}
});

If Break is called more than once then the lowest item will be taken as a boundary by the Parallel class. If Break is called at items 5, 10 and 15 then all iterations required to process items 1-5 will be completed.

View the list of posts on the Task Parallel Library here.

Messaging with RabbitMQ and .NET C# part 1: foundations and setup

Introduction

Messaging is a technique to solve communication between disparate systems in a reliable and maintainable manner. You can have various platforms that need to communicate with each other: a Windows service, a Java servlet based web service, an MVC web application etc. Messaging aims to integrate these systems so that they can exchange information in a decoupled fashion.

A message bus is probably the most important component in a messaging infrastructure. It is the mechanism that co-ordinates sending and receiving messages in a message queue.

There have been numerous ways to solve messaging in the past: Java Messaging Service, MSMQ, IBM MQ, but they never really became widespread. Messaging systems based on those technologies were complex, expensive, difficult to connect to and in general difficult to work with. Also, they didn’t follow any particular messaging standard; each vendor had their own standards that the customers had to adhere to.

RabbitMQ is a high availability messaging framework which implements the Advanced Message Queue Protocol (AMQP). AMQP is an open standard wire level protocol similar to HTTP. It is also independent of any particular vendor. Here are some key concepts of AMQP:

  • Message broker: the messaging server which applications connect to
  • Exchange: there will be a number of exchanges on the broker which are message routers. A client submits a message to an exchange which will be routed to one or more queues
  • Queue: a store for messages which normally implements the first-in-first-out pattern
  • Binding: a rule that connects the exchange to a queue. The rule also determines which queue the message will be routed to

There are 4 different exchange types:

  • Direct: a client sends a message to a queue for a particular recipient
  • Fan-out: a message is sent to an exchange. The message is then sent to a number of queues which could be bound to that exchange
  • Topic: a message is sent to a number of queues based on some rules
  • Headers: the message headers are inspected and the message is routed based on those headers

RabbitMQ is not the only product that implements AMQP: Windows Azure Service Bus, Apache ActiveMQ, StormMQ are some of the other examples. RabbitMQ and the Azure Service Bus are probably enough for most .NET developers. Note that there are different versions of the protocol and some of these products support them to a various degree.

Installation

RabbitMQ is based on Erlang. There are client libraries for a number of frameworks such as .NET, Java, Ruby etc. We’ll of course be looking at the .NET variant. I’m going to run the installation on Windows 7. By the time you read this post the exact versions of Erlang and RabbitMQ server may be different. Hopefully there won’t be any breaking changes and you’ll be able to complete this tutorial.

Open a web browser and navigate to the RabbitMQ home page. We’ll need to install Erlang first. Click Installation:

Installation link RabbitMQ

…then Windows…:

Windows installation link RabbitMQ

Look for the following link:

Server installation link

This will get you to the Erlang page. Select either the 32 or 64 bit installation package depending on your system…:

Erlang download

This will download an installation package. Go through the installation process accepting the defaults. Then go back to the Windows installation page on the RabbitMQ page and click the following link:

Windows RabbitMQ installer package

Again, go through the installation process and accept the defaults.

RabbitMQ is now available among the installed applications:

RabbitMQ in startup menu

Run the top item, i.e. the RabbitMQ command prompt. Issue the following command:

rabbitmqctl status

You’ll get a series of status messages in JSON format:

RabbitMQ status messages

The fact that we received all this text confirms that the RabbitMQ server is up and running and can receive messages.

Next enter the following command:

rabbitmq-plugins enable rabbitmq_management

This command will enable the management UI for RabbitMQ for easy administration. The answer should say that a number of plugins have been enabled:

RabbitMQ plugins enabled

As the message says we’ll need to restart the server. The following command will stop the server:

rabbitmqctl stop

…and the following will start it:

rabbitmq-service start

In case the command prompt is complaining that the access was denied then you’ll need to run the command prompt as an administrator: right-click, and Run As Administrator from the context menu.

Open a web browser and navigate to the following URL:

http://localhost:15672/

This will open the RabbitMQ management login page. The default username and password is ‘guest’. Click around in the menu a bit. You won’t see much happening yet as there are no queues, no messages, no exchanges etc. Under the Exchanges link you’ll find the 4 exchange types we listed in the introduction.

We’re done with the RabbitMQ server setup.

RabbitMQ in .NET

There are two sets of API to interact with RabbitMQ in .NET: the general .NET library and WCF specific bindings. This binding allows the programmer to interact with the RabbitMQ service as if it were a WCF service.

Open Visual Studio 2012/2013 and create a new Console application. Import the following NuGet package:

RabbitMQ client NuGet

Add the following using statement to Program.cs:

using RabbitMQ.Client;

Let’s create a connection to the RabbitMQ server in Main. The ConnectionFactory object will help build an IConnection:

ConnectionFactory connectionFactory = new ConnectionFactory();
connectionFactory.HostName = "localhost";
connectionFactory.UserName = "guest";
connectionFactory.Password = "guest";

IConnection connection = connectionFactory.CreateConnection();

An IModel represents a channel to the AMQP server:

IModel model = connection.CreateModel();			

From IModel we can access methods to send and receive messages and much more. As we have no channels yet there’s no point in trying to run the available methods on IModel. Let’s return to RabbitMQ and create some queues!

Back in RabbitMQ

There are a couple of ways to create queues and exchanges in RabbitMQ:

  • During run-time: directly in code
  • After deploy: through the administration UI or PowerShell

We’ll look at creating queues and exchanges in the UI and in code. I’ll skip PowerShell as I’m not a big fan of writing commands in command prompts.

Let’s look at the RabbitMQ management console first. Navigate to the admin UI we tested above and log in. Click on the Exchanges tab. Below the table of default exchanges click the Add a new exchange link. Insert the following values:

  • Name: newexchange
  • Type: fanout
  • Durability: durable (meaning messages can be recovered)

Keep the rest unchanged and click Add exchange. The new exchange has been added to the table above.

Next go to the Queues link and click on Add a new queue. Add the following values:

  • Name: newqueue
  • Durability: durable

Keep the rest of the options unchanged and press Add queue. The queue has been added to the list of queues on top. Click on its name in the list, scroll down to “Bindings” and click on it. We’ll bind newexchange to newqueue. Insert ‘newexchange’ in the “From exchange” text box. We’ll keep it as a straight binding so we’ll not provide any routing key. Press ‘Bind’. The new binding will show up in the list of bindings for this queue.

Open a new tab in the web browser and log onto the RabbitMQ management console there as well. Go to the Exchanges tab and click on the name of the exchange we’ve just created, i.e. newexchange. Open the ‘Publish message’ section. We have no routing key, we only want to send a first message. Enter some message in the Payload text box and press Publish message. You should see a popup saying Message published:

Message published popup

Go back to the other window where we set up the queue. You should see that there’s 1 message waiting:

One message waiting in queue

Click on the name of the queue in the table and scroll down to the Get messages section. Open it and press Get Message(s). You should see the message payload you entered in the other browser tab.

Creating queues at runtime

You can achieve all this dynamically in code. Go back to the Console app we started working with. Add the following code to create a new queue:

model.QueueDeclare("queueFromVisualStudio", true, false, false, null);		

As you type in the parameters you’ll recognise their names from the form we saw in the management UI.

We create an exchange of type topic:

model.ExchangeDeclare("exchangeFromVisualStudio", ExchangeType.Topic);

…and finally bind them specifying a routing key of “superstars”:

model.QueueBind("queueFromVisualStudio", "exchangeFromVisualStudio", "superstars");

The routing key means that if the message routing key contains the word “superstars” then it will be routed from exchangeFromVisualStudio to queueFromVisualStudio.

Run the Console app. It should run without exceptions. Go back to the admin UI and check if the exchange and queue have been created. I can see them here:

New queue from Visual Studio

New queue from Visual Studio

The binding has also succeeded:

Queue and exchange bound

Let’s test if this setup works. In the UI navigate to the exchange created through VS and publish a message:

Message from exchange created in VS

Then go to the queue we set up through VS to check if the message has arrived. And it has indeed:

Message arrived through Visual Studio queue

You can perform the same test with a different routing key, such as “music”. The message should not be delivered. Indeed, the popup message should say that the message has not been routed. This means that there’s no queue listening to messages with that routing key.

This concludes our discussion on the basics of messaging with RabbitMQ. We’ll continue with some C# code in the next installment of the series.

View the list of posts on Messaging here.

How to cancel parallel LINQ queries in .NET C#

We saw in several posts on TPL on this blog how the CancellationToken object can be used to cancel Tasks. They can be used to cancel parallel queries as well. An instance of the token must be supplied to the WithCancellation extension method.

Define the cancellation token and the data source:

CancellationTokenSource cancellationTokenSource
	= new CancellationTokenSource();

int[] integerArray = new int[10000000];
for (int i = 0; i < integerArray.Length; i++)
{
	integerArray[i] = i;
}

Define the query. Notice how the token is provided to the query:

IEnumerable<double> query = integerArray
	.AsParallel()
	.WithCancellation(cancellationTokenSource.Token)
	.Select(item =>
	{
		return Math.Sqrt(item);
	});

Start a separate task that will cancel the token after 5 seconds:

Task.Factory.StartNew(() =>
{
	Thread.Sleep(5000);
	cancellationTokenSource.Cancel();
	Console.WriteLine("Token source cancelled");
});

Loop through the query results and catch the OperationCancelledException:

try
{
	foreach (double d in query)
	{
		Console.WriteLine("Result: {0}", d);
	}
}
catch (OperationCanceledException)
{
	Console.WriteLine("Caught cancellation exception");
}

Do not assume that cancelling the token will cause the item processing to stop immediately. Items that were already being processed when the token was cancelled will be completed.

View the list of posts on the Task Parallel Library here.

Elliot Balynn's Blog

A directory of wonderful thoughts

Software Engineering

Web development

Disparate Opinions

Various tidbits

chsakell's Blog

WEB APPLICATION DEVELOPMENT TUTORIALS WITH OPEN-SOURCE PROJECTS

Once Upon a Camayoc

ARCHIVED: Bite-size insight on Cyber Security for the not too technical.