Messaging with RabbitMQ and .NET C# part 1: foundations and setup
April 28, 2014 6 Comments
Introduction
Messaging is a technique to solve communication between disparate systems in a reliable and maintainable manner. You can have various platforms that need to communicate with each other: a Windows service, a Java servlet based web service, an MVC web application etc. Messaging aims to integrate these systems so that they can exchange information in a decoupled fashion.
A message bus is probably the most important component in a messaging infrastructure. It is the mechanism that co-ordinates sending and receiving messages in a message queue.
There have been numerous ways to solve messaging in the past: Java Messaging Service, MSMQ, IBM MQ, but they never really became widespread. Messaging systems based on those technologies were complex, expensive, difficult to connect to and in general difficult to work with. Also, they didn’t follow any particular messaging standard; each vendor had their own standards that the customers had to adhere to.
RabbitMQ is a high availability messaging framework which implements the Advanced Message Queue Protocol (AMQP). AMQP is an open standard wire level protocol similar to HTTP. It is also independent of any particular vendor. Here are some key concepts of AMQP:
- Message broker: the messaging server which applications connect to
- Exchange: there will be a number of exchanges on the broker which are message routers. A client submits a message to an exchange which will be routed to one or more queues
- Queue: a store for messages which normally implements the first-in-first-out pattern
- Binding: a rule that connects the exchange to a queue. The rule also determines which queue the message will be routed to
There are 4 different exchange types:
- Direct: a client sends a message to a queue for a particular recipient
- Fan-out: a message is sent to an exchange. The message is then sent to a number of queues which could be bound to that exchange
- Topic: a message is sent to a number of queues based on some rules
- Headers: the message headers are inspected and the message is routed based on those headers
RabbitMQ is not the only product that implements AMQP: Windows Azure Service Bus, Apache ActiveMQ, StormMQ are some of the other examples. RabbitMQ and the Azure Service Bus are probably enough for most .NET developers. Note that there are different versions of the protocol and some of these products support them to a various degree.
Installation
RabbitMQ is based on Erlang. There are client libraries for a number of frameworks such as .NET, Java, Ruby etc. We’ll of course be looking at the .NET variant. I’m going to run the installation on Windows 7. By the time you read this post the exact versions of Erlang and RabbitMQ server may be different. Hopefully there won’t be any breaking changes and you’ll be able to complete this tutorial.
Open a web browser and navigate to the RabbitMQ home page. We’ll need to install Erlang first. Click Installation:
![]()
…then Windows…:
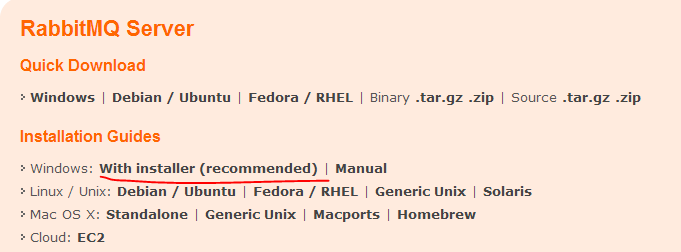
Look for the following link:
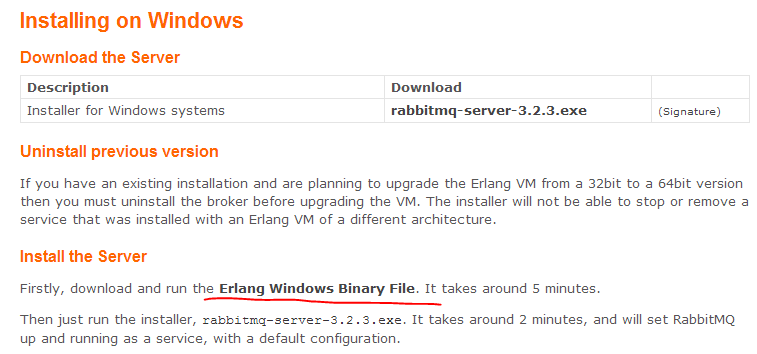
This will get you to the Erlang page. Select either the 32 or 64 bit installation package depending on your system…:

This will download an installation package. Go through the installation process accepting the defaults. Then go back to the Windows installation page on the RabbitMQ page and click the following link:

Again, go through the installation process and accept the defaults.
RabbitMQ is now available among the installed applications:

Run the top item, i.e. the RabbitMQ command prompt. Issue the following command:
rabbitmqctl status
You’ll get a series of status messages in JSON format:

The fact that we received all this text confirms that the RabbitMQ server is up and running and can receive messages.
Next enter the following command:
rabbitmq-plugins enable rabbitmq_management
This command will enable the management UI for RabbitMQ for easy administration. The answer should say that a number of plugins have been enabled:

As the message says we’ll need to restart the server. The following command will stop the server:
rabbitmqctl stop
…and the following will start it:
rabbitmq-service start
In case the command prompt is complaining that the access was denied then you’ll need to run the command prompt as an administrator: right-click, and Run As Administrator from the context menu.
Open a web browser and navigate to the following URL:
This will open the RabbitMQ management login page. The default username and password is ‘guest’. Click around in the menu a bit. You won’t see much happening yet as there are no queues, no messages, no exchanges etc. Under the Exchanges link you’ll find the 4 exchange types we listed in the introduction.
We’re done with the RabbitMQ server setup.
RabbitMQ in .NET
There are two sets of API to interact with RabbitMQ in .NET: the general .NET library and WCF specific bindings. This binding allows the programmer to interact with the RabbitMQ service as if it were a WCF service.
Open Visual Studio 2012/2013 and create a new Console application. Import the following NuGet package:

Add the following using statement to Program.cs:
using RabbitMQ.Client;
Let’s create a connection to the RabbitMQ server in Main. The ConnectionFactory object will help build an IConnection:
ConnectionFactory connectionFactory = new ConnectionFactory();
connectionFactory.HostName = "localhost";
connectionFactory.UserName = "guest";
connectionFactory.Password = "guest";

IConnection connection = connectionFactory.CreateConnection();
An IModel represents a channel to the AMQP server:
IModel model = connection.CreateModel();
From IModel we can access methods to send and receive messages and much more. As we have no channels yet there’s no point in trying to run the available methods on IModel. Let’s return to RabbitMQ and create some queues!
Back in RabbitMQ
There are a couple of ways to create queues and exchanges in RabbitMQ:
- During run-time: directly in code
- After deploy: through the administration UI or PowerShell
We’ll look at creating queues and exchanges in the UI and in code. I’ll skip PowerShell as I’m not a big fan of writing commands in command prompts.
Let’s look at the RabbitMQ management console first. Navigate to the admin UI we tested above and log in. Click on the Exchanges tab. Below the table of default exchanges click the Add a new exchange link. Insert the following values:
- Name: newexchange
- Type: fanout
- Durability: durable (meaning messages can be recovered)
Keep the rest unchanged and click Add exchange. The new exchange has been added to the table above.
Next go to the Queues link and click on Add a new queue. Add the following values:
- Name: newqueue
- Durability: durable
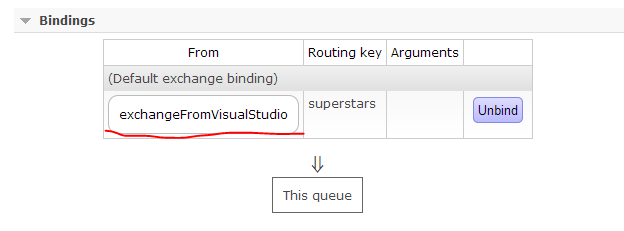
Keep the rest of the options unchanged and press Add queue. The queue has been added to the list of queues on top. Click on its name in the list, scroll down to “Bindings” and click on it. We’ll bind newexchange to newqueue. Insert ‘newexchange’ in the “From exchange” text box. We’ll keep it as a straight binding so we’ll not provide any routing key. Press ‘Bind’. The new binding will show up in the list of bindings for this queue.
Open a new tab in the web browser and log onto the RabbitMQ management console there as well. Go to the Exchanges tab and click on the name of the exchange we’ve just created, i.e. newexchange. Open the ‘Publish message’ section. We have no routing key, we only want to send a first message. Enter some message in the Payload text box and press Publish message. You should see a popup saying Message published:

Go back to the other window where we set up the queue. You should see that there’s 1 message waiting:

Click on the name of the queue in the table and scroll down to the Get messages section. Open it and press Get Message(s). You should see the message payload you entered in the other browser tab.
Creating queues at runtime
You can achieve all this dynamically in code. Go back to the Console app we started working with. Add the following code to create a new queue:
model.QueueDeclare("queueFromVisualStudio", true, false, false, null);
As you type in the parameters you’ll recognise their names from the form we saw in the management UI.
We create an exchange of type topic:
model.ExchangeDeclare("exchangeFromVisualStudio", ExchangeType.Topic);
…and finally bind them specifying a routing key of “superstars”:
model.QueueBind("queueFromVisualStudio", "exchangeFromVisualStudio", "superstars");
The routing key means that if the message routing key contains the word “superstars” then it will be routed from exchangeFromVisualStudio to queueFromVisualStudio.
Run the Console app. It should run without exceptions. Go back to the admin UI and check if the exchange and queue have been created. I can see them here:


The binding has also succeeded:
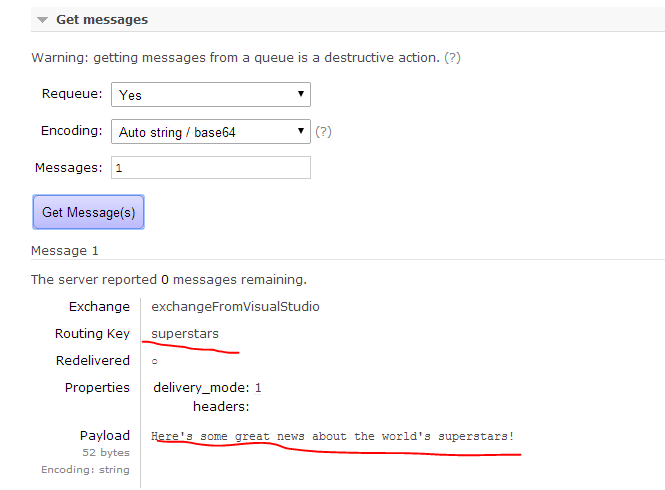
Let’s test if this setup works. In the UI navigate to the exchange created through VS and publish a message:

Then go to the queue we set up through VS to check if the message has arrived. And it has indeed:
You can perform the same test with a different routing key, such as “music”. The message should not be delivered. Indeed, the popup message should say that the message has not been routed. This means that there’s no queue listening to messages with that routing key.
This concludes our discussion on the basics of messaging with RabbitMQ. We’ll continue with some C# code in the next installment of the series.
View the list of posts on Messaging here.


Very nice and usefull article for me, Andras.
Pingback: Domain Driven Design with Web API extensions part 6: domain events with RabbitMQ | Dinesh Ram Kali.
Andras, you do a great and helpfull job. Really nice! Thank you!
Wonderful Article! Thanks a lot ! Kindly let me know where I can find remaining series .
Hello, you can find a link to all posts on this page: https://dotnetcodr.com/messaging/
//Andras
Wonderful job. Very clear, simple and didactic. Thank you very much, your article is very helpful.